Migrate to an availability zone-enabled ExpressRoute virtual network gateway in Azure portal
When you create an ExpressRoute virtual network gateway, you need to choose the gateway SKU. If you choose a higher-level SKU, more CPUs and network bandwidth are allocated to the gateway. As a result, the gateway can support higher network throughput and more dependable network connections to the virtual network.
The following SKUs are available for ExpressRoute virtual network gateways:
- Standard
- HighPerformance
- UltraPerformance
- ErGw1Az
- ErGw2Az
- ErGw3Az
- ErGwScale (Preview)
Prerequisites
- Review the Gateway migration article before you begin.
- You must have an existing ExpressRoute Virtual network gateway in your Azure subscription.
- A second prefix is required for the gateway subnet. If you have only one prefix, you can add a second prefix by following the steps in the Add a second prefix to the gateway subnet section.
Add a second prefix to the gateway subnet
The gateway subnet needs two or more address prefixes for migration. If you have only one prefix, you can add a second prefix by following these steps.
First, update the
Az.Networkmodule to the latest version by running this PowerShell command:Update-Module -Name Az.Network -ForceThen, add a second prefix to the GatewaySubnet by running these PowerShell commands:
$vnet = Get-AzVirtualNetwork -Name $vnetName -ResourceGroupName $resourceGroup
$subnet = Get-AzVirtualNetworkSubnetConfig -Name GatewaySubnet -VirtualNetwork $vnet
$prefix = "Enter new prefix"
$subnet.AddressPrefix.Add($prefix)
Set-AzVirtualNetworkSubnetConfig -Name GatewaySubnet -VirtualNetwork $vnet -AddressPrefix $subnet.AddressPrefix
Set-AzVirtualNetwork -VirtualNetwork $vnet
Migrate to a new gateway in Azure portal
Here are the steps to migrate to a new gateway in Azure portal.
In the Azure portal, navigate to your Virtual Network Gateway resource.
the left-hand menu under Settings, select Gateway SKU Migration.

Select Validate to check if the gateway is ready for migration. You'll first see a list of prerequisites that must be met before migration can begin. If these prerequisites aren't met, validation fails and you can't proceed.

Once validation is successful, you enter the Prepare stage. Here, a new Virtual Network gateway is created. Under Virtual Network Gateway Details, enter the following information.

Setting Value Gateway Name Enter a name for the new gateway. Gateway SKU Select the SKU for the new gateway. Public IP Address Select Add new, then enter a name for the new public IP, select your availability zone, and select OK Note
Be aware that your existing Virtual Network gateway will be locked during this process, preventing any creation or modification of connections to this gateway.
Select Prepare to create the new gateway. This operation could take up to 15 minutes.
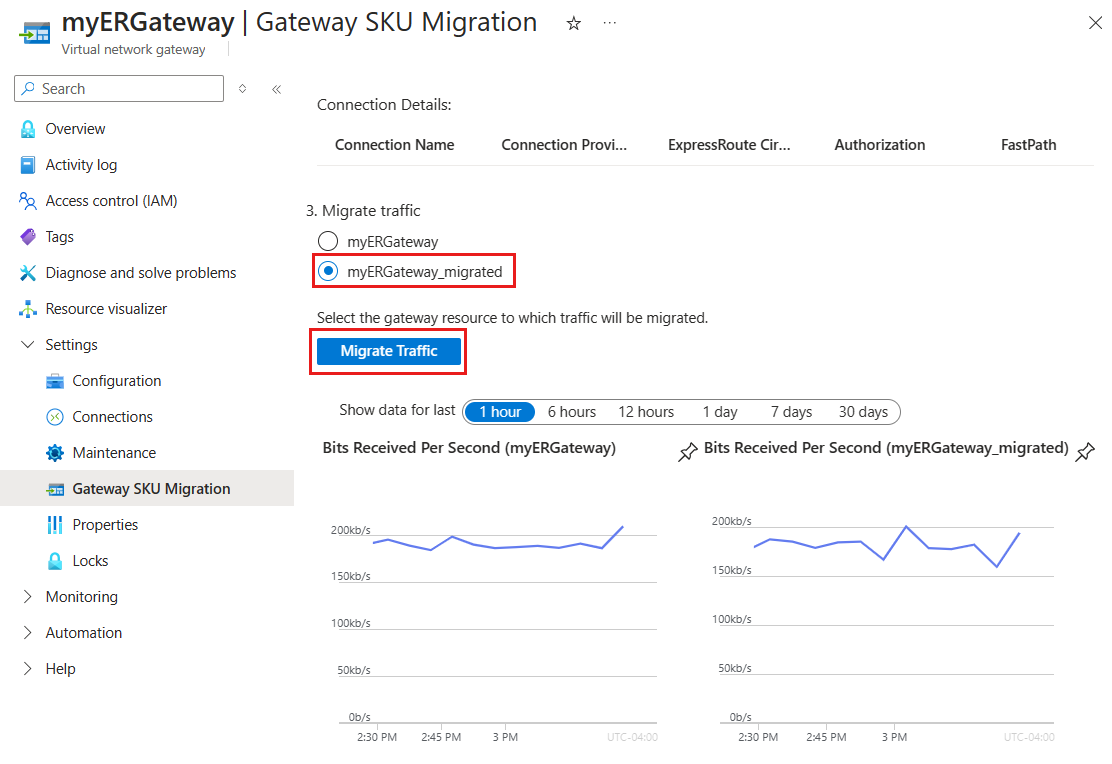
After the new gateway is created, you'll proceed to the Migrate stage. Here, select the new gateway you created. In this example, it's myERGateway_migrated. This transfers the settings from your old gateway to the new one. All network traffic, control plane, and data path connections from your old gateway will transfer without any interruptions. To start this process, select Migrate Traffic. This operation could take up to 5 minutes.
After the traffic migration is finished, you'll proceed to the Commit stage. In this stage, you finalize the migration, which involves deleting the old gateway. To do this, select Commit Migration. This final step is designed to occur without causing any downtime.


Important
- Before running this step, verify that the new virtual network gateway has a working ExpressRoute connection.
- When migrating your gateway, you can expect possible interruption for a maximum of 30 seconds.
Next steps
- Learn more about designing for high availability.
- Plan for disaster recovery and using VPN as a backup.
Pripomienky
Pripravujeme: V priebehu roka 2024 postupne zrušíme službu Problémy v službe GitHub ako mechanizmus pripomienok týkajúcich sa obsahu a nahradíme ju novým systémom pripomienok. Ďalšie informácie nájdete na stránke: https://aka.ms/ContentUserFeedback.
Odoslať a zobraziť pripomienky pre