Deploy an IPv6 dual stack application in Azure virtual network using PowerShell
Článok
This article shows you how to deploy a dual stack (IPv4 + IPv6) application using Standard Load Balancer in Azure that includes a dual stack virtual network and subnet, a Standard Load Balancer with dual (IPv4 + IPv6) frontend configurations, VMs with NICs that have a dual IP configuration, network security group, and public IPs.
Azure Cloud Shell
Azure hosts Azure Cloud Shell, an interactive shell environment that you can use through your browser. You can use either Bash or PowerShell with Cloud Shell to work with Azure services. You can use the Cloud Shell preinstalled commands to run the code in this article, without having to install anything on your local environment.
To start Azure Cloud Shell:
Option
Example/Link
Select Try It in the upper-right corner of a code or command block. Selecting Try It doesn't automatically copy the code or command to Cloud Shell.
Go to https://shell.azure.com, or select the Launch Cloud Shell button to open Cloud Shell in your browser.
Select the Cloud Shell button on the menu bar at the upper right in the Azure portal.
To use Azure Cloud Shell:
Start Cloud Shell.
Select the Copy button on a code block (or command block) to copy the code or command.
Paste the code or command into the Cloud Shell session by selecting Ctrl+Shift+V on Windows and Linux, or by selecting Cmd+Shift+V on macOS.
Select Enter to run the code or command.
If you choose to install and use PowerShell locally, this article requires the Azure PowerShell module version 6.9.0 or later. Run Get-Module -ListAvailable Az to find the installed version. If you need to upgrade, see Install Azure PowerShell module. If you're running PowerShell locally, you also need to run Connect-AzAccount to create a connection with Azure.
Create a resource group
Before you can create your dual-stack virtual network, you must create a resource group with New-AzResourceGroup. The following example creates a resource group named myRGDualStack in the east us location:
To access your virtual machines from the Internet, you need IPv4 and IPv6 public IP addresses for the load balancer. Create public IP addresses with New-AzPublicIpAddress. The following example creates IPv4 and IPv6 public IP address named dsPublicIP_v4 and dsPublicIP_v6 in the dsRG1 resource group:
In this section, you configure dual frontend IP (IPv4 and IPv6) and the backend address pool for the load balancer and then create a Standard Load Balancer.
Create frontend IP
Create a frontend IP with New-AzLoadBalancerFrontendIpConfig. The following example creates IPv4 and IPv6 frontend IP configurations named dsLbFrontEnd_v4 and dsLbFrontEnd_v6:
Create a backend address pool with New-AzLoadBalancerBackendAddressPoolConfig. The VMs attach to this backend pool in the remaining steps. The following example creates backend address pools named dsLbBackEndPool_v4 and dsLbBackEndPool_v6 to include VMs with both IPV4 and IPv6 NIC configurations:
A load balancer rule is used to define how traffic is distributed to the VMs. You define the frontend IP configuration for the incoming traffic and the backend IP pool to receive the traffic, along with the required source and destination port. To make sure only healthy VMs receive traffic, you can optionally define a health probe. Basic load balancer uses an IPv4 probe to assess health for both IPv4 and IPv6 endpoints on the VMs. Standard load balancer includes support for explicitly IPv6 health probes.
Create a load balancer rule with Add-AzLoadBalancerRuleConfig. The following example creates load balancer rules named dsLBrule_v4 and dsLBrule_v6 and balances traffic on TCP port 80 to the IPv4 and IPv6 frontend IP configurations:
Create a Standard Load Balancer with New-AzLoadBalancer. The following example creates a public Standard Load Balancer named myLoadBalancer using the IPv4 and IPv6 frontend IP configurations, backend pools, and load-balancing rules that you created in the preceding steps:
Before you deploy some VMs and can test your balancer, you must create supporting network resources - availability set, network security group, virtual network, and virtual NICs.
Create an availability set
To improve the high availability of your app, place your VMs in an availability set.
Create an availability set with New-AzAvailabilitySet. The following example creates an availability set named myAvailabilitySet:
Create virtual NICs with New-AzNetworkInterface. The following example creates two virtual NICs both with IPv4 and IPv6 configurations. (One virtual NIC for each VM you create for your app in the following steps).
Set an administrator username and password for the VMs with Get-Credential:
Azure PowerShell
$cred = get-credential -Message"DUAL STACK VNET SAMPLE: Please enter the Administrator credential to log into the VMs."
Now you can create the VMs with New-AzVM. The following example creates two VMs and the required virtual network components if they don't already exist.
Determine IP addresses of the IPv4 and IPv6 endpoints
Get all Network Interface Objects in the resource group to summarize the IPs used in this deployment with get-AzNetworkInterface. Also, get the Load Balancer's frontend addresses of the IPv4 and IPv6 endpoints with get-AzpublicIpAddress.
Azure PowerShell
$rgName= "dsRG1"$NICsInRG= get-AzNetworkInterface -resourceGroupName$rgNamewrite-host `nSummary of IPs in this Deployment:
write-host ******************************************
foreach ($NICin$NICsInRG) {
$VMid= $NIC.virtualmachine.id
$VMnamebits= $VMid.split("/")
$VMname= $VMnamebits[($VMnamebits.count-1)]
write-host `nPrivate IP addresses for$VMname$IPconfigsInNIC= $NIC.IPconfigurations
foreach ($IPconfigin$IPconfigsInNIC) {
$IPaddress= $IPconfig.privateipaddress
write-host" "$IPaddressIF ($IPconfig.PublicIpAddress.ID) {
$IDbits= ($IPconfig.PublicIpAddress.ID).split("/")
$PipName= $IDbits[($IDbits.count-1)]
$PipObject= get-azPublicIpAddress -name$PipName -resourceGroup$rgNamewrite-host" "RDP address: $PipObject.IpAddress
}
}
}
write-host `nPublic IP addresses on Load Balancer:
(get-AzpublicIpAddress -resourcegroupname$rgName | where { $_.name -notlike"RdpPublicIP*" }).IpAddress
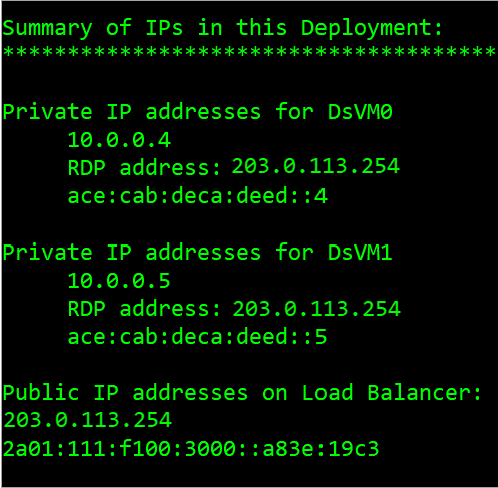
The following figure shows a sample output that lists the private IPv4 and IPv6 addresses of the two VMs, and the frontend IPv4 and IPv6 IP addresses of the Load Balancer.
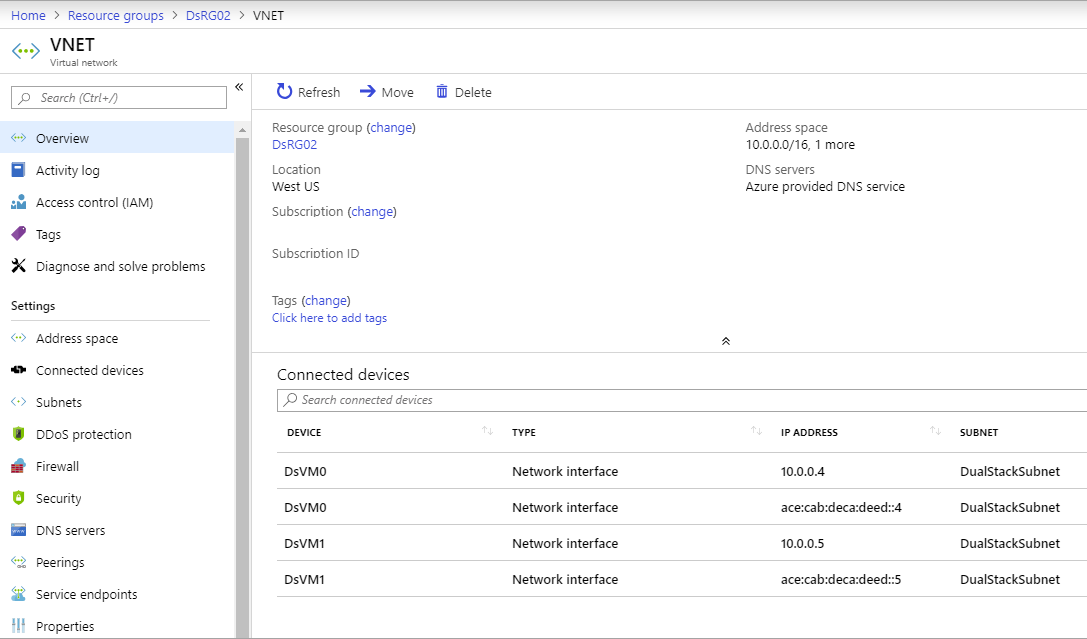
View IPv6 dual stack virtual network in Azure portal
You can view the IPv6 dual stack virtual network in Azure portal as follows:
In the portal's search bar, enter dsVnet.
When dsVnet appears in the search results, select it. This launches the Overview page of the dual stack virtual network named dsVnet. The dual stack virtual network shows the two NICs with both IPv4 and IPv6 configurations located in the dual stack subnet named dsSubnet.
Clean up resources
When no longer needed, you can use the Remove-AzResourceGroup command to remove the resource group, VM, and all related resources.
Azure PowerShell
Remove-AzResourceGroup -Name dsRG1
Next steps
In this article, you created a Standard Load Balancer with a dual frontend IP configuration (IPv4 and IPv6). You also created a two virtual machines that included NICs with dual IP configurations (IPV4 + IPv6) that were added to the backend pool of the load balancer. To learn more about IPv6 support in Azure virtual networks, see What is IPv6 for Azure Virtual Network?