Quickstart: Create a Recovery Services vault using an ARM template
This quickstart describes how to set up a Recovery Services vault by using an Azure Resource Manager template (ARM template). The Azure Site Recovery service contributes to your business continuity and disaster recovery (BCDR) strategy so your business applications stay online during planned and unplanned outages. Site Recovery manages disaster recovery of on-premises machines and Azure virtual machines (VM), including replication, failover, and recovery.
An Azure Resource Manager template is a JavaScript Object Notation (JSON) file that defines the infrastructure and configuration for your project. The template uses declarative syntax. You describe your intended deployment without writing the sequence of programming commands to create the deployment.
To protect VMware or physical server, see Modernized architecture.
If your environment meets the prerequisites and you're familiar with using ARM templates, select the Deploy to Azure button. The template will open in the Azure portal.
Prerequisites
If you don't have an active Azure subscription, you can create a free account before you begin.
Review the template
The template used in this quickstart is from Azure Quickstart Templates.
{
  "$schema": "https://schema.management.azure.com/schemas/2019-04-01/deploymentTemplate.json#",
  "contentVersion": "1.0.0.0",
  "metadata": {
    "_generator": {
      "name": "bicep",
      "version": "0.6.1.6515",
      "templateHash": "1347593202495112636"
    }
  },
  "parameters": {
    "vaultName": {
      "type": "string",
      "metadata": {
        "description": "Name of the Vault"
      }
    },
    "enableCRR": {
      "type": "bool",
      "defaultValue": true,
      "metadata": {
        "description": "Enable CRR (Works if vault has not registered any backup instance)"
      }
    },
    "vaultStorageType": {
      "type": "string",
      "defaultValue": "GeoRedundant",
      "allowedValues": [
        "LocallyRedundant",
        "GeoRedundant"
      ],
      "metadata": {
        "description": "Change Vault Storage Type (Works if vault has not registered any backup instance)"
      }
    },
    "location": {
      "type": "string",
      "defaultValue": "[resourceGroup().location]",
      "metadata": {
        "description": "Location for all resources."
      }
    }
  },
  "variables": {
    "skuName": "RS0",
    "skuTier": "Standard"
  },
  "resources": [
    {
      "type": "Microsoft.RecoveryServices/vaults",
      "apiVersion": "2022-02-01",
      "name": "[parameters('vaultName')]",
      "location": "[parameters('location')]",
      "sku": {
        "name": "[variables('skuName')]",
        "tier": "[variables('skuTier')]"
      },
      "properties": {}
    },
    {
      "type": "Microsoft.RecoveryServices/vaults/backupstorageconfig",
      "apiVersion": "2022-02-01",
      "name": "[format('{0}/{1}', parameters('vaultName'), 'vaultstorageconfig')]",
      "properties": {
        "storageModelType": "[parameters('vaultStorageType')]",
        "crossRegionRestoreFlag": "[parameters('enableCRR')]"
      },
      "dependsOn": [
        "[resourceId('Microsoft.RecoveryServices/vaults', parameters('vaultName'))]"
      ]
    }
  ]
}
Two Azure resources are defined in the template:
- Microsoft.RecoveryServices vaults: creates the vault.
- Microsoft.RecoveryServices/vaults/backupstorageconfig: configures the vault's backup redundancy settings.
The template includes optional parameters for the vault's backup configuration. The storage redundancy settings are locally redundant storage (LRS) or geo-redundant storage (GRS). For more information, see Set storage redundancy.
For more Azure Recovery Services templates, see Azure Quickstart Templates.
Deploy the template
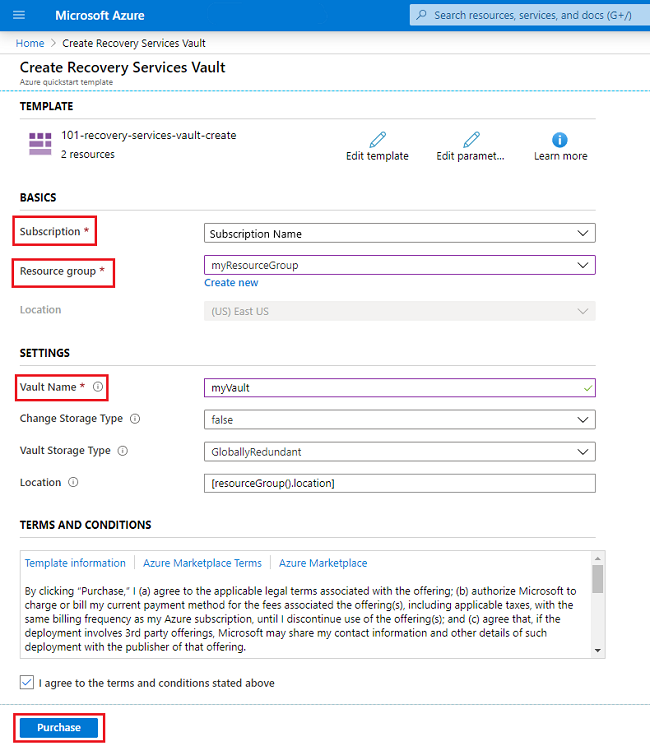
To deploy the template, the Subscription, Resource group, and Vault name are required.
To sign in to Azure and open the template, select the Deploy to Azure image.
Select or enter the following values:

- Subscription: select your Azure subscription.
- Resource group: select an existing group or select Create new to add a group.
- Location: defaults to the resource group's location and becomes unavailable after a resource group is selected.
- Vault Name: Provide a name for the vault.
- Change Storage Type: Default is false. Select true only if you need to change the vault's storage type.
- Vault Storage Type: Default is GloballyRedundant. If the storage type was set to true, select LocallyRedundant.
- Location: the function
[resourceGroup().location]defaults to the resource group's location. To change the location, enter a value such as westus. - Select the check box I agree to the terms and conditions stated above.
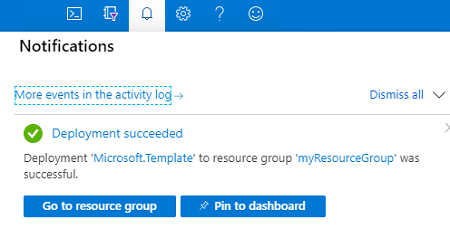
To begin the vault's deployment, select the Purchase button. After a successful deployment, a notification is displayed.

Validate the deployment
To confirm that the vault was created, use Azure CLI or Azure PowerShell.
echo "Enter the resource group name:" &&
read resourceGroupName &&
echo "Enter the vault name:" &&
read vaultName &&
az backup vault show --name $vaultName --resource-group $resourceGroupName &&
az backup vault backup-properties show --name $vaultName --resource-group $resourceGroupName &&
echo "Press [ENTER] to continue ..."
The following output is an excerpt of the vault's information:
"id": "/subscriptions/<Subscription Id>/resourceGroups/myResourceGroup
         /providers/Microsoft.RecoveryServices/vaults/myVault"
"location": "eastus"
"name": "myVault"
"resourceGroup": "myResourceGroup"

"storageModelType": "GeoRedundant"
"storageType": "GeoRedundant"
"type": "Microsoft.RecoveryServices/vaults/backupstorageconfig"
Clean up resources
If you plan to use the new resources, no action is needed. Otherwise, you can remove the resource group and vault that was created in this quickstart. To delete the resource group and its resources use Azure CLI or Azure PowerShell.
echo "Enter the resource group name:" &&
read resourceGroupName &&
az group delete --name $resourceGroupName &&
echo "Press [ENTER] to continue ..."
Next steps
In this quickstart, you created a Recovery Services vault. To learn more about disaster recovery, continue to the next quickstart article - Set up disaster recovery.
