Migrate Microsoft Entra Connect Sync group writeback V2 to Microsoft Entra Cloud Sync
Important
The public preview of Group Writeback v2 in Microsoft Entra Connect Sync will no longer be available after June 30, 2024. This feature will be discontinued on this date, and you will no longer be supported in Connect Sync to provision cloud security groups to Active Directory. The feature will continue to operate beyond the discontinuation date; however, it will no longer receive support after this date and may cease functioning at any time without notice.
We offer similar functionality in Microsoft Entra Cloud Sync called Group Provision to Active Directory that you can use instead of Group Writeback v2 for provisioning cloud security groups to Active Directory. We're working on enhancing this functionality in Cloud Sync along with other new features that we're developing in Cloud Sync.
Customers who use this preview feature in Connect Sync should switch their configuration from Connect Sync to Cloud Sync. You can choose to move all your hybrid sync to Cloud Sync (if it supports your needs). You can also run Cloud Sync side by side and move only cloud security group provisioning to Active Directory onto Cloud Sync.
For customers who provision Microsoft 365 groups to Active Directory, you can keep using Group Writeback v1 for this capability.
You can evaluate moving exclusively to Cloud Sync by using the user synchronization wizard.
The following document describes how to migrate group writeback using Microsoft Entra Connect Sync (formerly Azure AD Connect) to Microsoft Entra Cloud Sync. This scenario is only for customers who are currently using Microsoft Entra Connect group writeback v2. The process outlined in this document pertains only to cloud-created security groups that are written back with a universal scope.
Important
This scenario is only for customers who are currently using Microsoft Entra Connect group writeback v2
Also, this scenario is only supported for:
- cloud created Security groups
- groups written back to AD with scope of universal.
Mail-enabled groups and DLs written back to AD continue to work with Microsoft Entra Connect group writeback but will revert to the behavior of group writeback V1, so in this scenario, after disabling group writeback V2 all M365 groups will be written back to AD independently of the Writeback Enabled setting in Entra admin center. For more information, see the Provisioning to Active Directory with Microsoft Entra Cloud Sync FAQ.
Prerequisites
The following prerequisites are required to implement this scenario.
- Microsoft Entra account with at least a Hybrid Identity Administrator role.
- An on-premises AD account with at least domain administrator permissions - required to access the adminDescription attribute and copy it to the msDS-ExternalDirectoryObjectId attribute
- On-premises Active Directory Domain Services environment with Windows Server 2016 operating system or later.
- Required for AD Schema attribute - msDS-ExternalDirectoryObjectId
- Provisioning agent with build version 1.1.1367.0 or later.
- The provisioning agent must be able to communicate with the domain controller(s) on ports TCP/389 (LDAP) and TCP/3268 (Global Catalog).
- Required for global catalog lookup to filter out invalid membership references
Naming convention for groups written back
By default, Microsoft Entra Connect Sync uses the following format when naming groups that are written back.
Default format: CN=Group_<guid>,OU=<container>,DC=<domain component>,DC=<domain component>
Example: CN=Group_3a5c3221-c465-48c0-95b8-e9305786a271,OU=WritebackContainer,DC=contoso,DC=com
To make it easier to find groups being written back from Microsoft Entra ID to Active Directory, Microsoft Entra Connect Sync added an option to write back the group name by using the cloud display name. This is done by selecting the Writeback Group Distinguished Name with cloud Display Name during initial setup of group writeback v2. If this feature is enabled, Microsoft Entra Connect uses the following new format, instead of the default format:
New format: CN=<display name>_<last 12 digits of object ID>,OU=<container>,DC=<domain component>,DC=<domain component>
Example: CN=Sales_e9305786a271,OU=WritebackContainer,DC=contoso,DC=com
Important
By default, Microsoft Entra cloud sync uses the new format, even if Writeback Group Distinguished Name with cloud Display Name feature is not enabled in Microsoft Entra Connect Sync. If you are using the default Microsoft Entra Connect Sync naming and then migrate the group so that it is managed by Microsoft Entra cloud sync, the group is renamed to the new format. Use the following section to allow Microsoft Entra cloud sync to use the default format from Microsoft Entra Connect.
Using the default format
If you want cloud sync to use the same default format as Microsoft Entra Connect Sync, you need to modify the attribute flow expression for the CN attribute. The two possible mappings are:
| Expression | Syntax | Description |
|---|---|---|
| Cloud sync default expression using DisplayName | Append(Append(Left(Trim([displayName]), 51), "_"), Mid([objectId], 25, 12)) | The default expression used by Microsoft Entra cloud sync (that is, the new format) |
| Cloud sync new expression without using DisplayName | Append("Group_", [objectId]) | The new expression to use the default format from Microsoft Entra Connect Sync. |
For more information, see Add an attribute mapping - Microsoft Entra ID to Active Directory
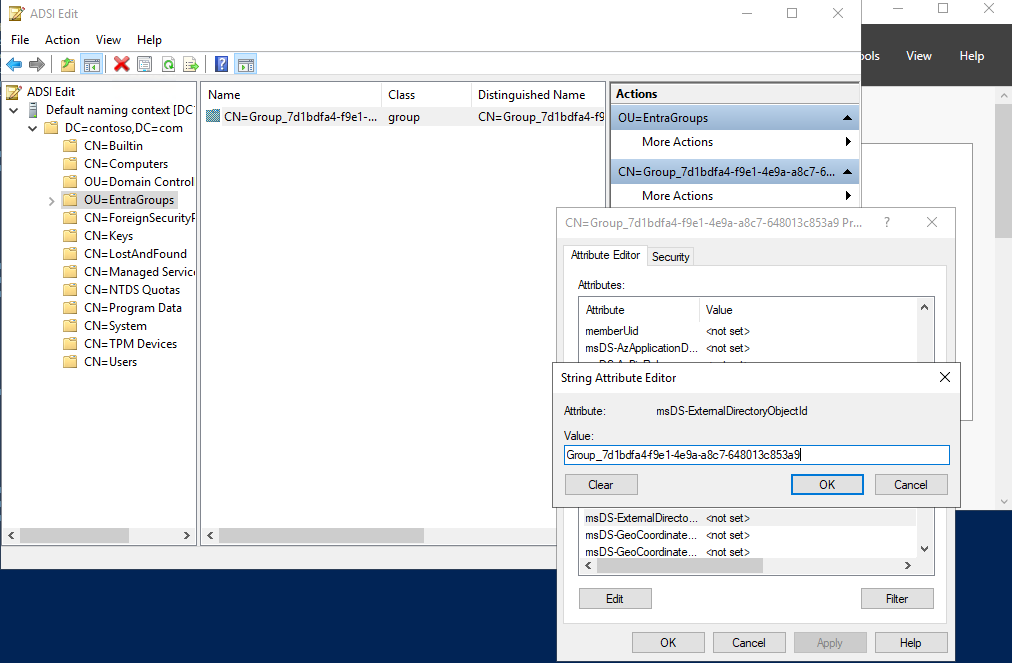
Step 1 - Copy adminDescription to msDS-ExternalDirectoryObjectID
To validate group membership references, Microsoft Entra Cloud Sync must query the Active Directory Global Catalog for msDS-ExternalDirectoryObjectID attribute. This is an indexed attribute which replicates across all Global Catalogs within the Active Directory Forest.
In your on-premises environment, open ADSI Edit.
Copy the value that it in the group's adminDescription attribute
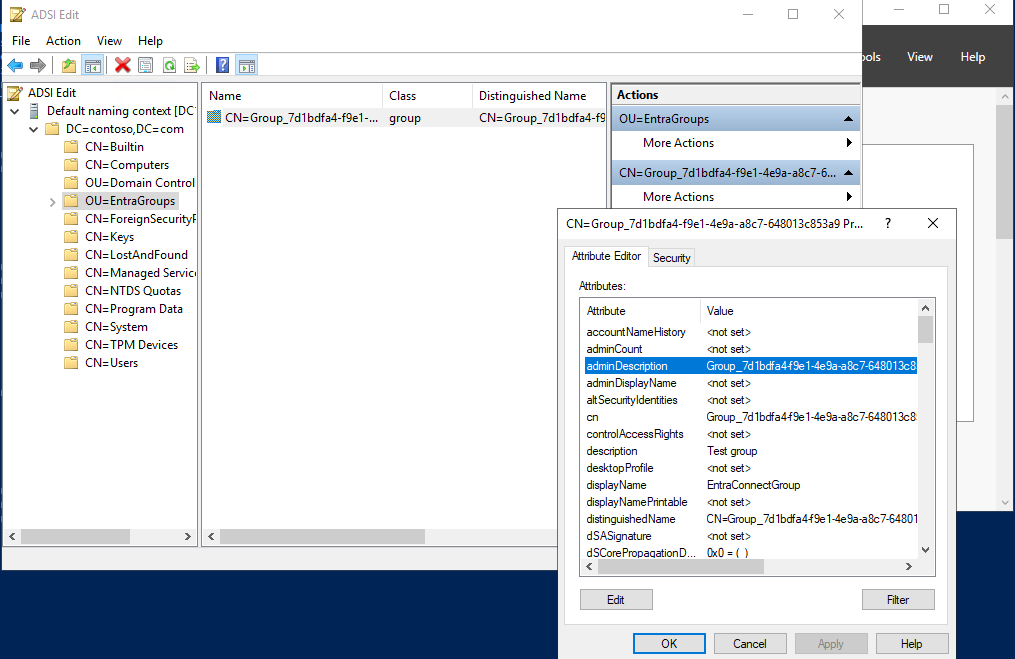
Paste in to the msDS-ExternalDirectoryObjectID attribute


The following PowerShell script can be used to help automate this step. This script takes all of the groups in the OU=Groups,DC=Contoso,DC=com container and copy the adminDescription attribute value to the msDS-ExternalDirectoryObjectID attribute value. Before using this script, update the variable $gwbOU with the DistinguishedName of your group writeback's target organizational unit (OU).
# Provide the DistinguishedName of your Group Writeback target OU
$gwbOU = 'OU=Groups,DC=Contoso,DC=com'

# Get all groups written back to Active Directory
Import-module ActiveDirectory
$properties = @('Samaccountname', 'adminDescription', 'msDS-ExternalDirectoryObjectID')
$groups = Get-ADGroup -Filter * -SearchBase $gwbOU -Properties $properties |
    Where-Object {$_.adminDescription -ne $null} |
        Select-Object $properties

# Set msDS-ExternalDirectoryObjectID for all groups written back to Active Directory
foreach ($group in $groups) {
    Set-ADGroup -Identity $group.Samaccountname -Add @{('msDS-ExternalDirectoryObjectID') = $group.adminDescription}
}
Step 2 - Place the Microsoft Entra Connect Sync server in staging mode and disable the sync scheduler
Start the Microsoft Entra Connect Sync wizard
Click Configure
Select Configure staging mode and click Next
Enter Microsoft Entra credentials
Place a check in the Enable staging mode box and click Next
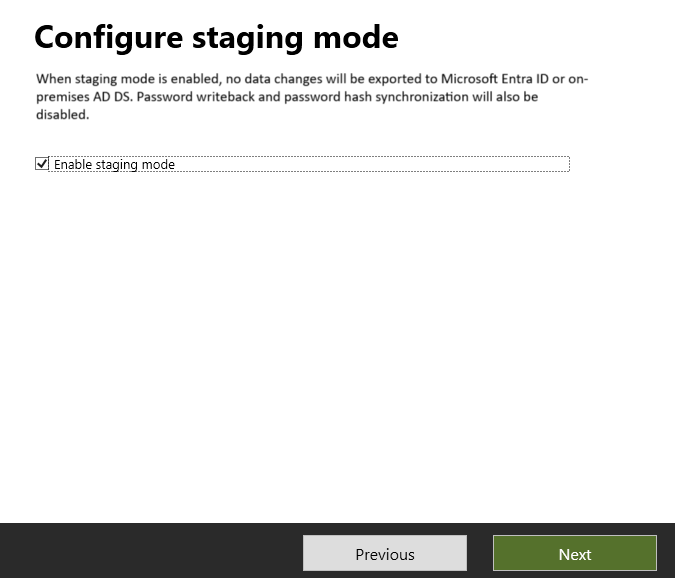
Click Configure
Click Exit

On your Microsoft Entra Connect server, open a PowerShell prompt as an administrator.
Disable the sync scheduler:
Set-ADSyncScheduler -SyncCycleEnabled $false


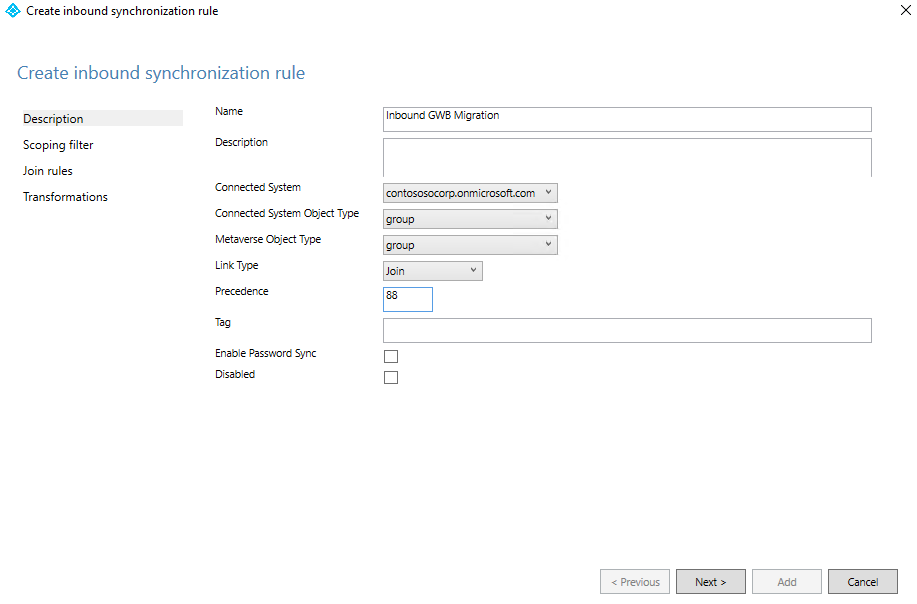
Step 3 - Create a custom group inbound rule
In the Microsoft Entra Connect Synchronization Rules editor, you need to create an inbound sync rule that filters out groups that have NULL for the mail attribute. The inbound sync rule is a join rule with a target attribute of cloudNoFlow. This rule tells Microsoft Entra Connect not to synchronize attributes for these groups.
Launch the Synchronization Rules Editor from the start menu.
Select Inbound from the drop-down list for Direction and select Add new rule.
On the Description page, enter the following and select Next:
Name: Give the rule a meaningful name
Description: Add a meaningful description
Connected System: Choose the Microsoft Entra connector that you're writing the custom sync rule for
Connected System Object Type: Group
Metaverse Object Type: Group
Link Type: Join
Precedence: Provide a value that is unique in the system. Lower than 100 is recommended, so that it takes precedence over the default rules.
Tag: Leave empty
On the Scoping filter page, Add the following and then select Next.
Attribute Operator Value cloudMastered EQUAL true mail ISNULL 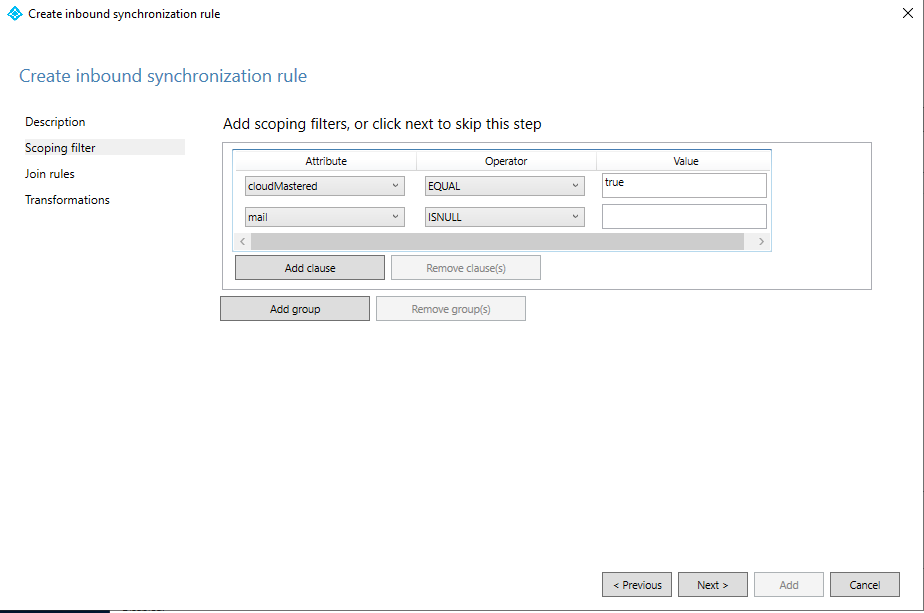
On the Join rules page, select Next.
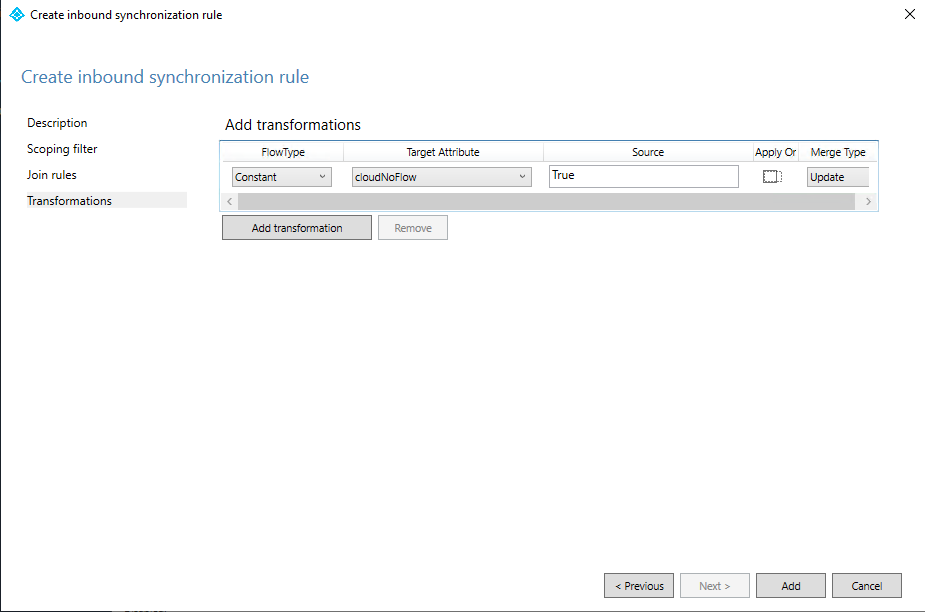
On the Transformations page, add a Constant transformation: flow True to cloudNoFlow attribute. Select Add.


Step 4 - Create a custom group outbound rule
You also need an outbound sync rule with a link type of JoinNoFlow and the scoping filter that has the cloudNoFlow attribute set to True. This rule tells Microsoft Entra Connect not to synchronize attributes for these groups.
Select Outbound from the drop-down list for Direction and select Add rule.
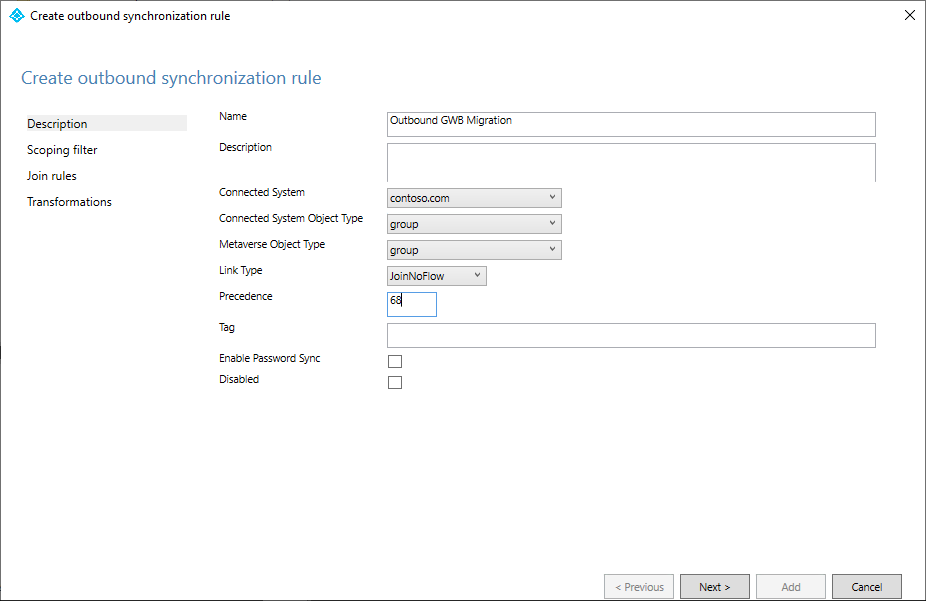
On the Description page, enter the following and select Next:
- Name: Give the rule a meaningful name
- Description: Add a meaningful description
- Connected System: Choose the AD connector that you're writing the custom sync rule for
- Connected System Object Type: Group
- Metaverse Object Type: Group
- Link Type: JoinNoFlow
- Precedence: Provide a value that is unique in the system. Lower than 100 is recommended, so that it takes precedence over the default rules.
- Tag: Leave empty
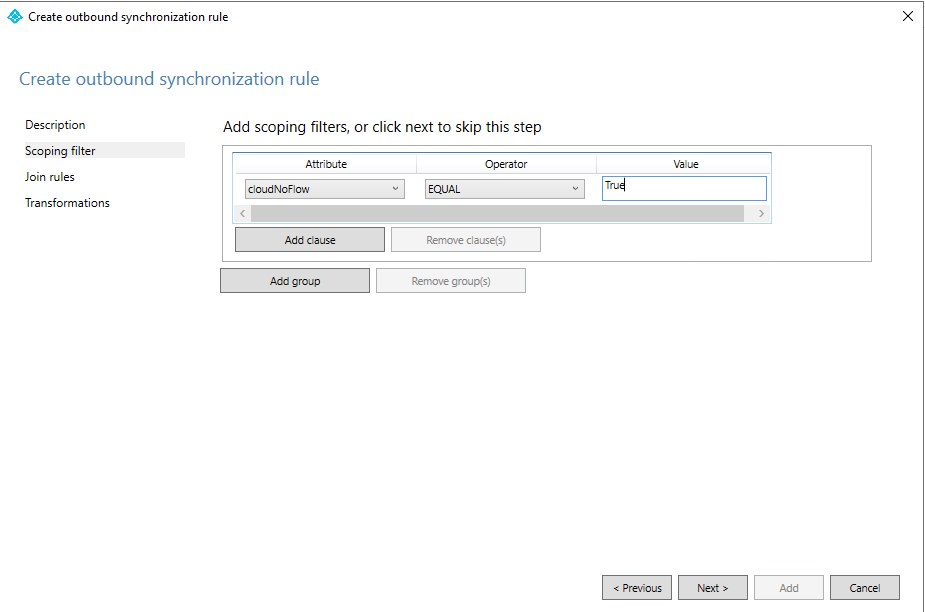
On the Scoping filter page, choose cloudNoFlow equal True. Then select Next.
On the Join rules page, select Next.
On the Transformations page, select Add.


Step 5 - Use PowerShell to finish configuration
On your Microsoft Entra Connect server, open a PowerShell prompt as an administrator.
Import the ADSync module:
Import-Module 'C:\Program Files\Microsoft Azure Active Directory Connect\Tools\ADSyncTools.psm1'Run a full sync cycle:
Start-ADSyncSyncCycle -PolicyType InitialDisable the group writeback feature for the tenant:
Warning
This operation is irreversible. After disabling group writeback V2, all Microsoft 365 groups will be written back to AD, independently of the Writeback Enabled setting in Entra admin center.
Set-ADSyncAADCompanyFeature -GroupWritebackV2 $falseRun a full sync cycle (yes again):
Start-ADSyncSyncCycle -PolicyType InitialRe-enable the sync scheduler:
Set-ADSyncScheduler -SyncCycleEnabled $true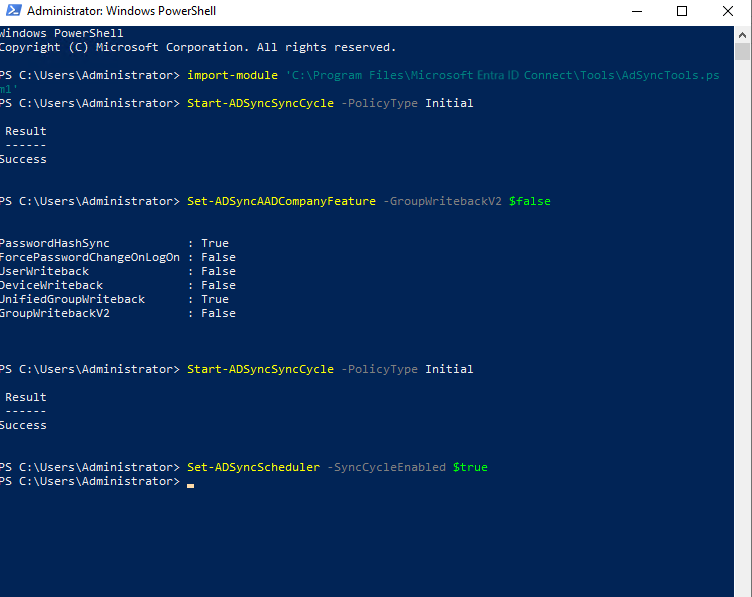

Step 6 - Remove the Microsoft Entra Connect Sync server from staging mode
- Start the Microsoft Entra Connect Sync wizard
- Click Configure
- Select Configure staging mode and click Next
- Enter Microsoft Entra credentials
- Remove the check from the Enable staging mode box and click Next
- Click Configure
- Click Exit
Step 7 - Configure Microsoft Entra Cloud Sync
Now that the groups are removed from the synchronization scope of Microsoft Entra Connect Sync, you can set up and configure Microsoft Entra Cloud Sync to take over synchronization of the security groups. See Provision groups to Active Directory using Microsoft Entra Cloud Sync.
Next Steps
Pripomienky
Pripravujeme: V priebehu roka 2024 postupne zrušíme službu Problémy v službe GitHub ako mechanizmus pripomienok týkajúcich sa obsahu a nahradíme ju novým systémom pripomienok. Ďalšie informácie nájdete na stránke: https://aka.ms/ContentUserFeedback.
Odoslať a zobraziť pripomienky pre