Upgrade SQL Server to the latest version
In this guide, you learn how to upgrade your user databases from previous versions of SQL Server to SQL Server 2022 (16.x) by using the Data Migration Assistant (DMA).
For other migration guides, see Azure Database Migration.
Prerequisites
Before beginning your migration project, it's important to address the associated prerequisites. Learn about the supported versions and considerations for upgrading SQL Server.
To prepare for the migration, download and install the following items:
- Data Migration Assistant v5.3 or later.
- Database Experimentation Assistant.
Premigration
After you confirm the source environment is supported and any prerequisites are addressed, you can start the Premigration stage. The process involves conducting an inventory of the databases that you need to migrate. Next, assess the databases for potential migration issues or blockers, and then resolving any items you might have uncovered. The following two sections cover the premigration steps of discover, assess.
Discover
The Azure Migrate: Discovery and assessment tool discovers and assesses on-premises VMware VMs, Hyper-V VMs, and physical servers for migration to Azure.
You can use this tool for the following steps:
- Azure readiness: Assesses whether on-premises servers, SQL Server instances, and web apps are ready for migration to Azure.
- Azure sizing: Estimates the size of Azure VMs/Azure SQL configuration/number of Azure VMware Solution nodes after migration.
- Azure cost estimation: Estimates costs for running on-premises servers in Azure.
- Dependency analysis: Identifies cross-server dependencies and optimization strategies for moving interdependent servers to Azure. Learn more about Discovery and assessment with dependency analysis.
The Discovery and assessment tool uses a lightweight Azure Migrate appliance that you deploy on-premises.
- The appliance runs on a VM or physical server. You can install it easily using a downloaded template.
- The appliance discovers on-premises servers. It also continually sends server metadata and performance data to Azure Migrate.
- Appliance discovery is agentless. Nothing is installed on discovered servers.
- After appliance discovery, you can gather discovered servers into groups and run assessments for each group.
Assess and convert
After you identify the data sources, the next step is to assess the on-premises SQL Server instances. Use the Data Migration Assistant (DMA) to assess your source database before upgrading your SQL Server instance.
To use DMA to create an assessment, complete the following steps.
Download the DMA tool, and then install it.
Create a New Assessment project.
Select the New (+) icon, select the Assessment project type, specify a project name, select SQL Server as the source and target, and then select Create.

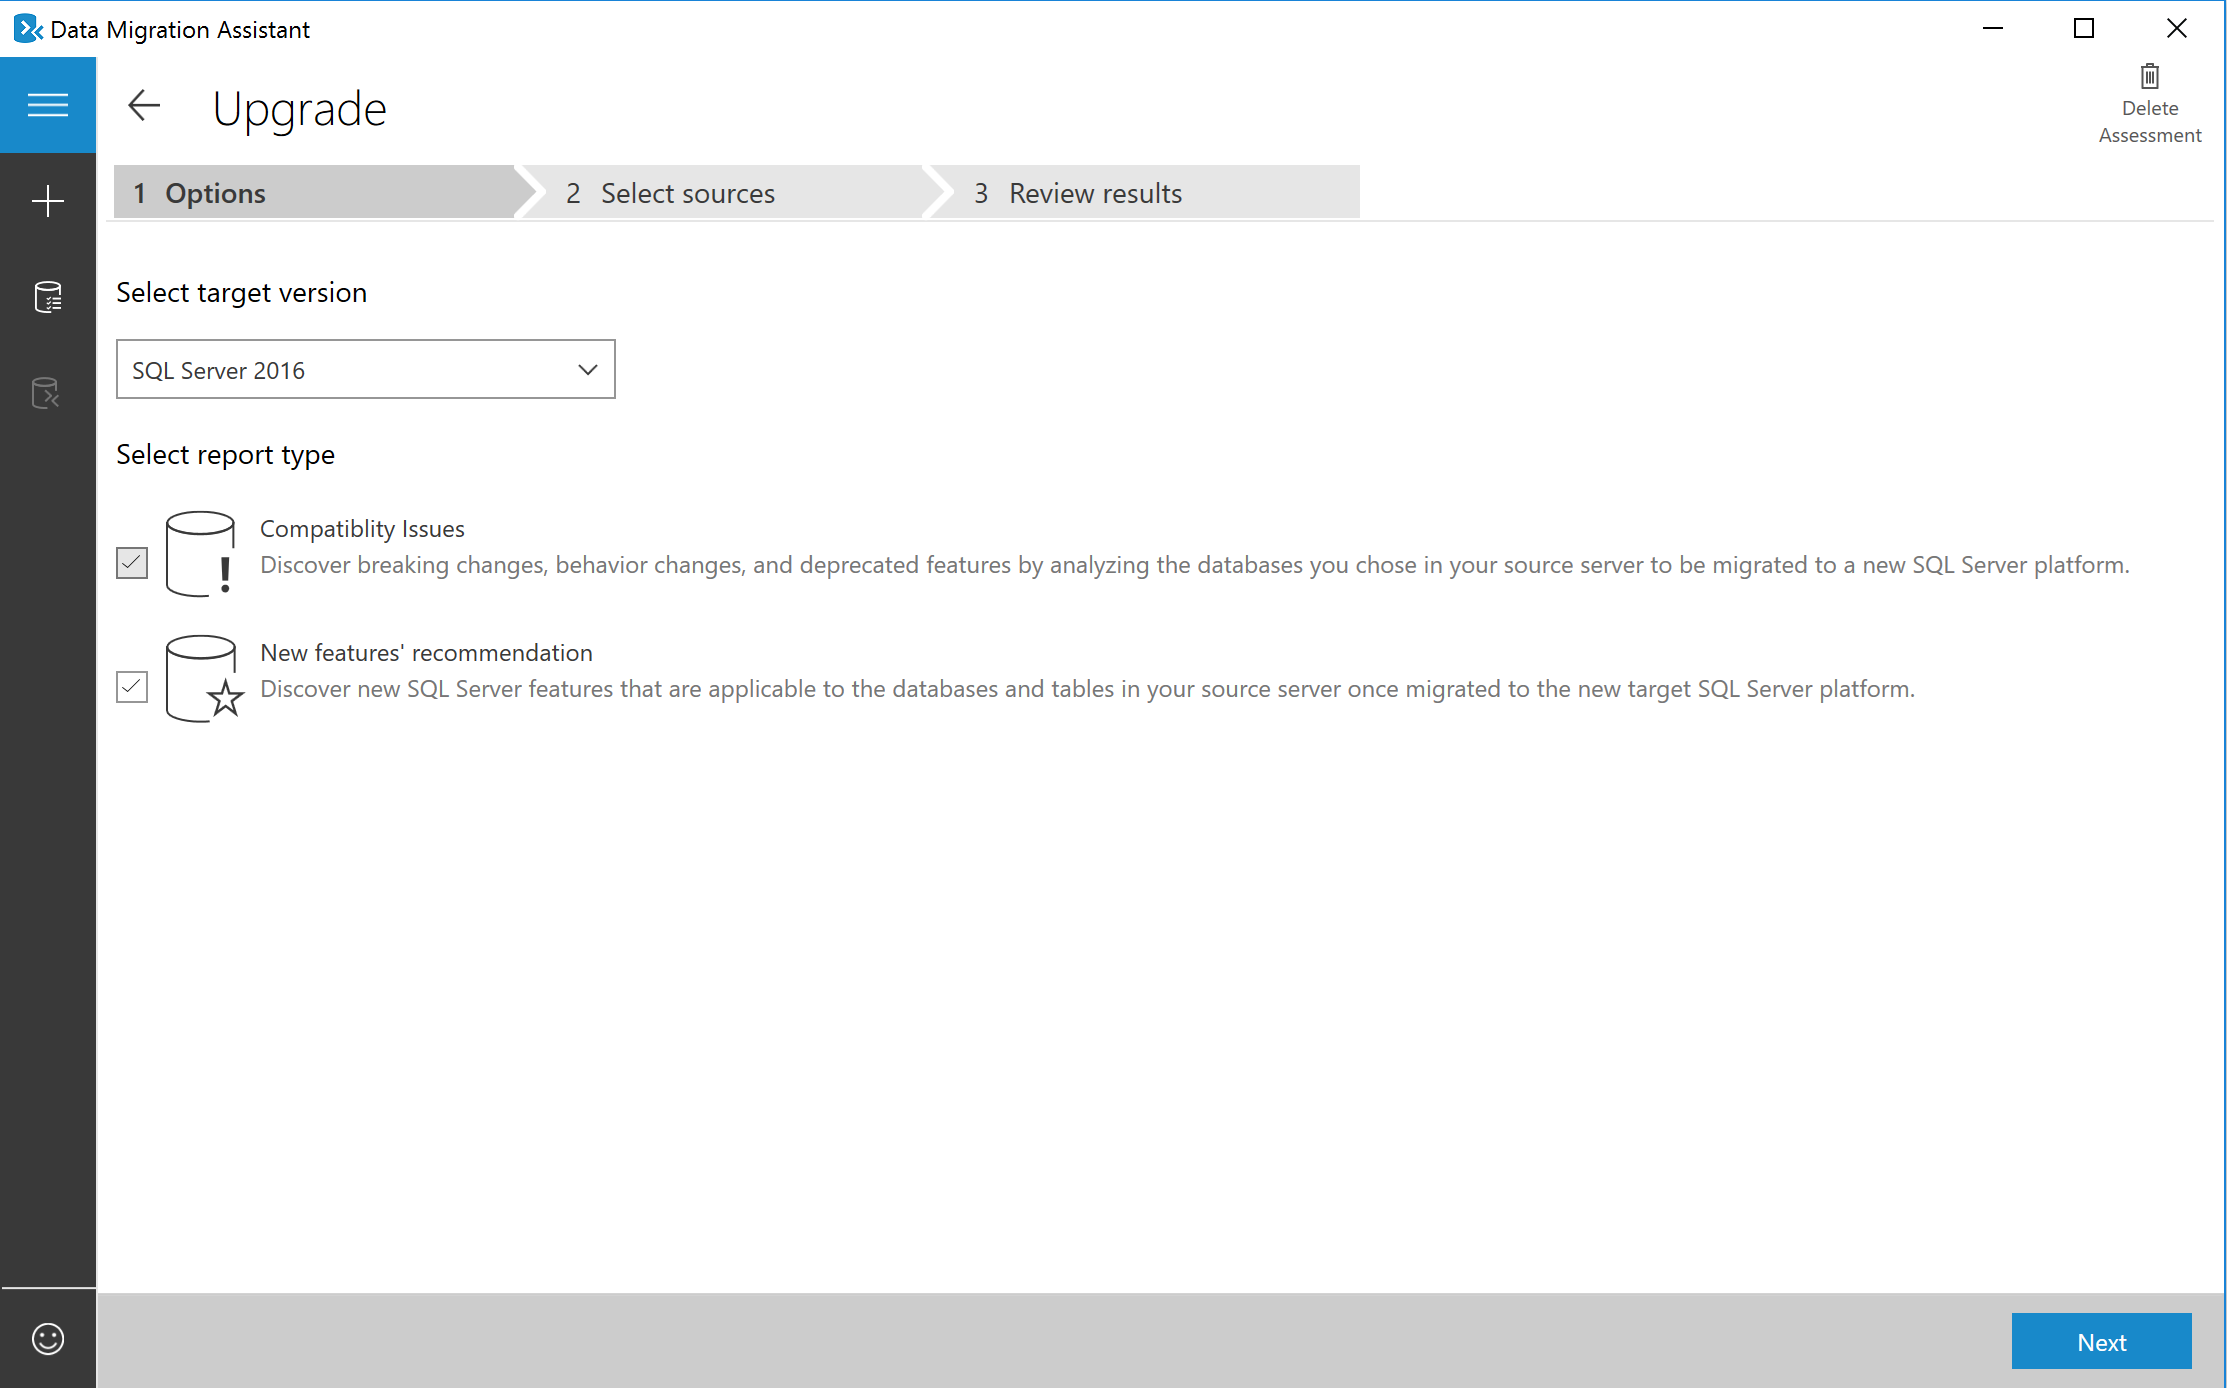
Select the target SQL Server version that you plan to migrate to and against which you need to run an assessment, select one or both of the assessment report types (Compatibility Issues and New features' recommendation), and then select Next.
In Connect to a server, specify the name of the SQL Server instance to connect to, specify the Authentication type and Connection properties, and then select Connect.
In the Add Sources panel, select the databases you that want to assess, and then select Add.

Select Start Assessment.
Now wait for the assessment results; the duration of the assessment depends on the number of databases added and the schema size of each database. Results are displayed per database as soon as they're available.
Select the database that has completed assessment, and then switch between Compatibility issues and Feature recommendations by using the switcher.

Review the compatibility issues by analyzing the affected object and its details for every issue identified under Breaking changes, Behavior changes, and Deprecated features.
Review feature recommendations across the Performance, Storage, and Security areas.
Feature recommendations cover various features such as In-Memory OLTP and Columnstore, Always Encrypted (AE), Dynamic Data Masking (DDM), and Transparent Data Encryption (TDE).
Review assessment results.
- After all database assessments are complete, select Export report to export the results to either a JSON or CSV file for analyzing the data at your own convenience.


Optional A/B testing
This step is considered optional and not necessary to complete migration. To use DEA for database migration testing, complete the following steps.
Download the DEA tool, and then install it.
Run a trace capture
On the left navigation tree, select the camera icon the go to All Captures.
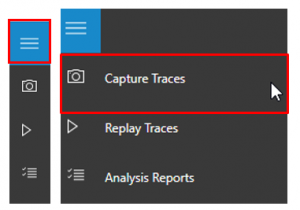
To start a new capture, select New Capture.
To configure the capture, specify the trace name, duration, SQL Server instance name, database name, and the share location for storing the trace file on the computer running SQL Server.
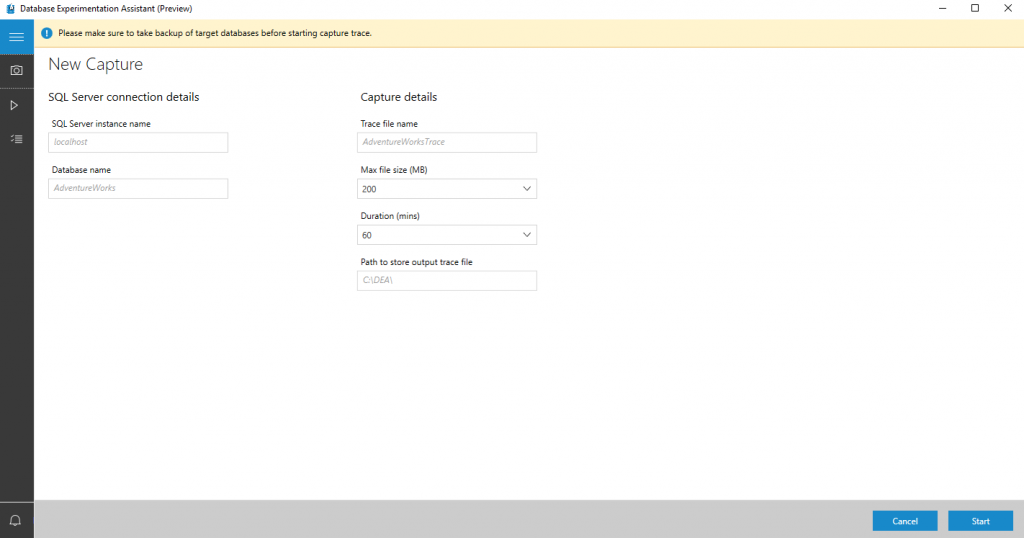
Select Start to begin trace capture.
Run a trace replay
On the left navigation tree, select the play icon the go to All Replays.
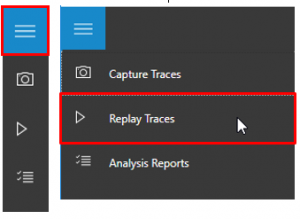
To start a new replay, select New Replay.
To configure the replay, specify the replay name, controller machine name, path to source trace file on controller, SQL Server instance name, and the path for storing the target trace file on the computer running SQL Server.
Select Start to begin replay of your capture.
Create a new Analysis Report
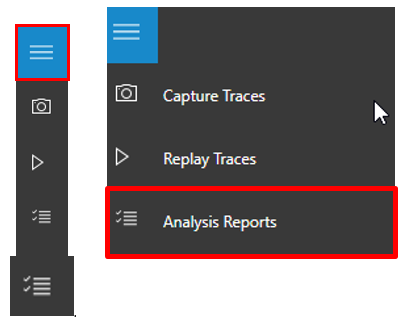
On the left navigation tree, select the checklist icon to go to Analysis Reports.
Connect to the SQL Server on which you'll store your report databases.
You see the list of all reports in the server.
Select New Report.
To configure the report, specify the report name, and specify paths to the traces for the source and target SQL Server instances.

Review an analysis report
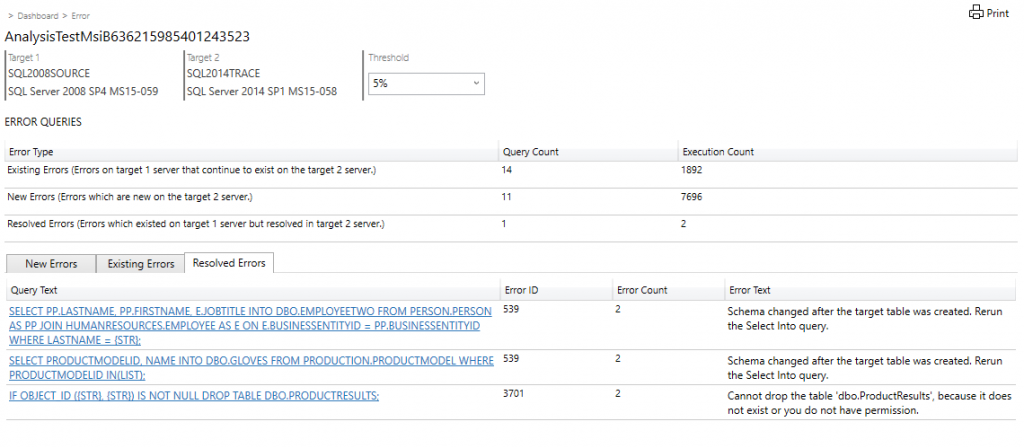
On the first page of the report, the version and build information for the target servers on which the experiment was run displays.
Threshold allows you to adjust the sensitivity or tolerance of your A/B Test analysis.
Note
By default, threshold is set to 5%; any performance improvement that is greater than or equal to 5% is categorized as 'Improved'. The dropdown list selector allows you to evaluate the report using different performance thresholds.
Select the individual slices of the pie chart to view detailed metrics on performance.
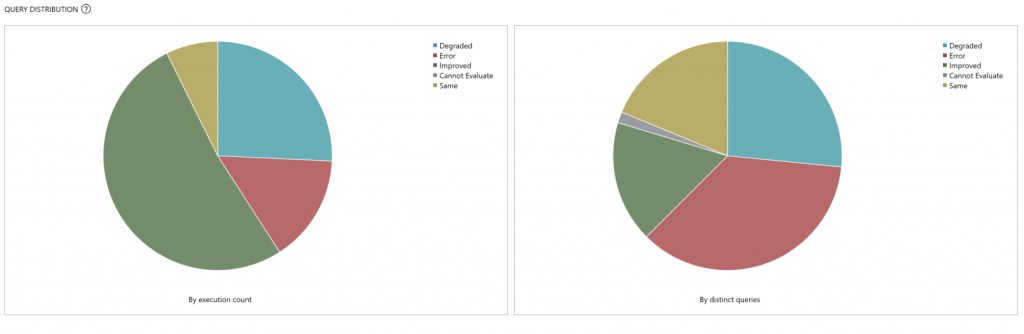
On the detail page for a performance change category, you see a list of queries in that category.
Select an individual query to get performance summary statistics, error information, and query plan information.


Convert
After assessing one or more source database instances you're migrating, for heterogenous migrations, you need to convert the schema to work in the target environment. Since upgrading to a newer version of SQL Server would be considered a homogeneous migration, the Convert step is unnecessary.
Migration overview
After you have the necessary prerequisites in place, and complete the tasks associated with the Pre-migration stage, you're ready to complete the schema and data migration. A successful migration and upgrade means you addressed all the issues discovered from the premigration stage.
Review the compatibility issues discovered with DMA tool.
Preserve backup logs, maintenance plans, and other automated tasks, including jobs by creating a backup of the system database msdb.
View linked servers by using SQL Server Management Studio. In the Object Explorer, right-click server objects to expand list.
Additional considerations might be needed based on the complexity of your data and environment.
- Troubleshoot orphaned users (SQL Server)
- Migrating Triggers
- Generate and Publish Scripts Wizard
- Mirrored Backup Media Sets (SQL Server)
- Backup overview (SQL Server)
- Editions and supported features of SQL Server 2022
Migrate schema and data
After you assess your databases, the next step is to begin the process of migrating the schema and database by using DMA.
Migrate schema and data sync
To use DMA to create a migration project, complete the following steps.
Create a New Migration project
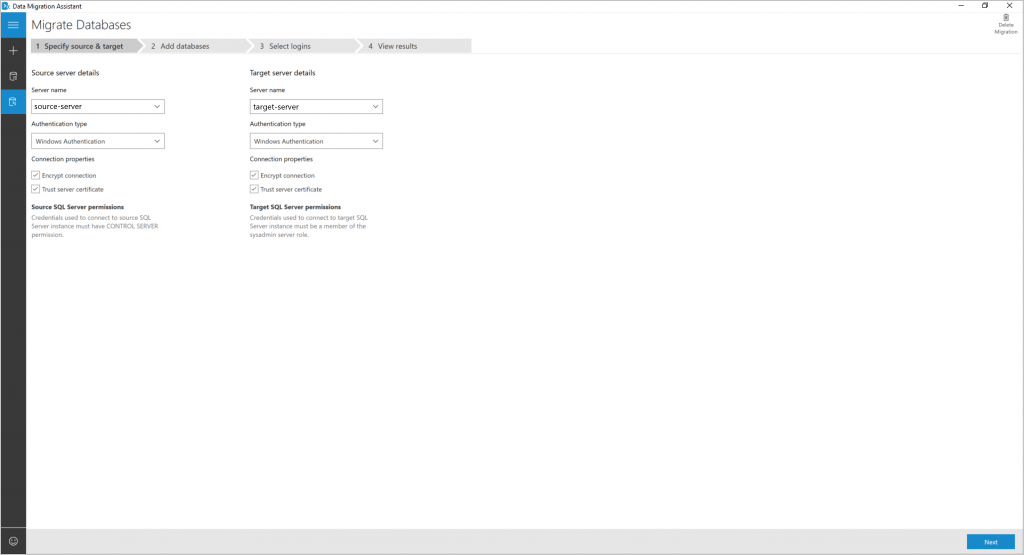
Select the New icon, select the Migration project type, select SQL Server as source and target types, and then select Create.

Provide source and target SQL Server connection details, and then select Next.
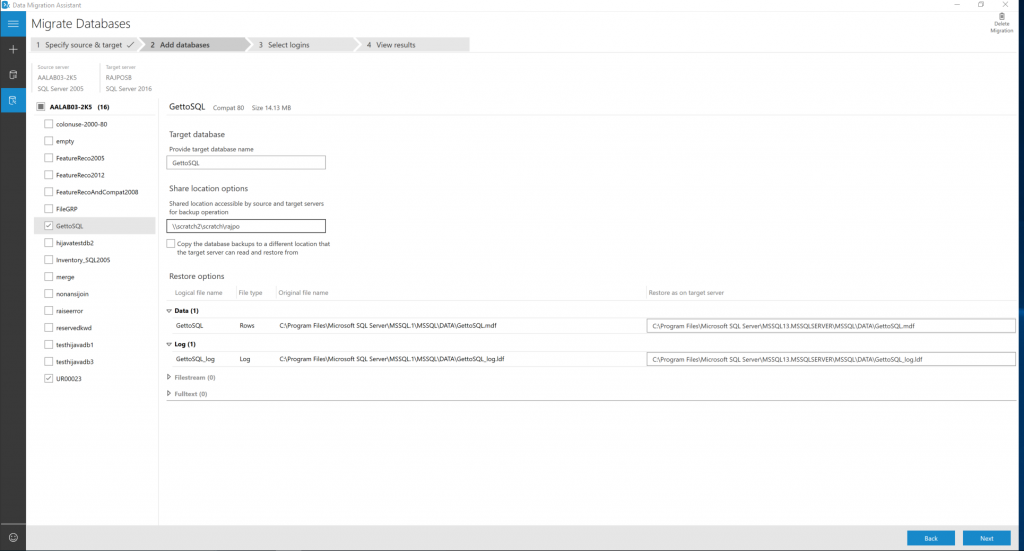
Select databases from the source to migrate, and then specify the Shared location accessible by source and target SQL servers for backup operation.
Note
Be sure that the service account running the source SQL Server instance has write privileges on the shared location and that the target SQL Server service account has read privileges on the shared location.
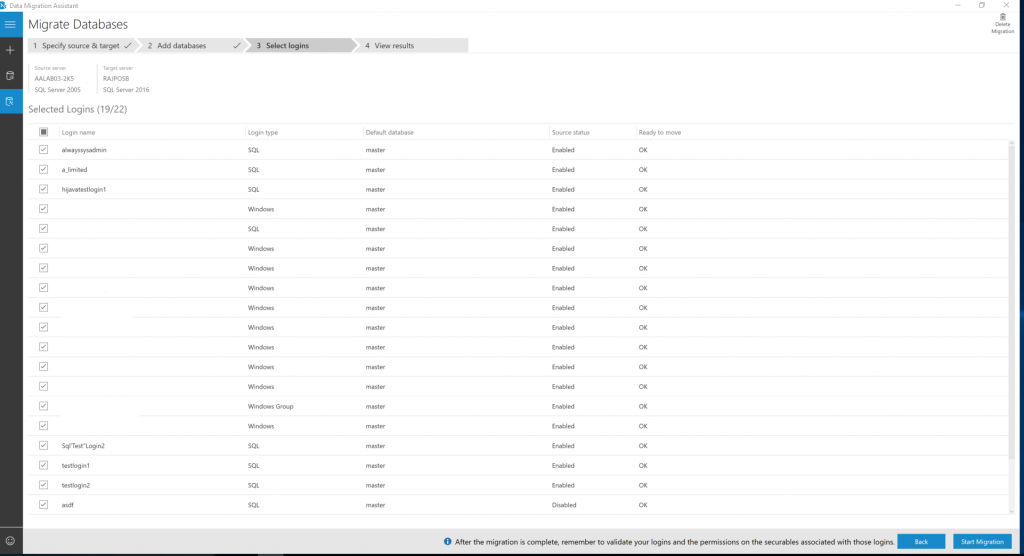
Select Next, select the logins that you want to migrate, and then select Start Migration.
Now, monitor the progress of migration in the View Results screen.
Review Migration Results
Select Export report to save the migration results to a .csv or .json file.
Review the saved file for details about data and logins migration and verify successful completion of the process.


Data sync and cutover
For minimal-downtime migrations, the source you're migrating continues to change after the one-time migration occurs, data and schema might be different from the target. During this process, you need to ensure every change in the source are captured and applied to the target in near real time. After you verify changes in source are applied to the target, cutover from the source to the target environment.
Support for minimal-downtime migrations isn't yet available for this scenario, so the Data sync and Cutover plans aren't currently applicable.
Post migration
After you successfully complete the Migration stage, you need to go through a series of post-migration tasks to ensure that everything is functioning as smoothly and efficiently as possible. The post-migration is crucial for reconciling any data accuracy issues and verifying completeness, and addressing performance issues with the workload.
For more information about these issues, specific steps to mitigate them, and after the migration see the Post-migration Validation and Optimization Guide.
Verify applications
After the data is migrated to the target environment, all the applications that formerly consumed the source need to start consuming the target. Accomplishing this requires changes to the applications in some cases. Test against the databases to verify that the applications work as expected after the migration.
Related content
Pripomienky
Pripravujeme: V priebehu roka 2024 postupne zrušíme službu Problémy v službe GitHub ako mechanizmus pripomienok týkajúcich sa obsahu a nahradíme ju novým systémom pripomienok. Ďalšie informácie nájdete na stránke: https://aka.ms/ContentUserFeedback.
Odoslať a zobraziť pripomienky pre