Real-time alerts in Microsoft Azure CDN
Important
This is a feature of Azure CDN Premium from Edgio only, to configure rules on Azure CDN from Microsoft please use the Standard rules engine. Advanced rules are not available for Azure CDN from Akamai. For a full comparison of CDN features, see Azure CDN product features.
Overview
This document explains real-time alerts in Microsoft Azure CDN. This functionality provides real-time notifications about the performance of the endpoints in your CDN profile. You can set up email or HTTP alerts based on:
- Bandwidth
- Status Codes
- Cache Statuses
- Connections
Creating a real-time alert
In the Azure portal, browse to your CDN profile.
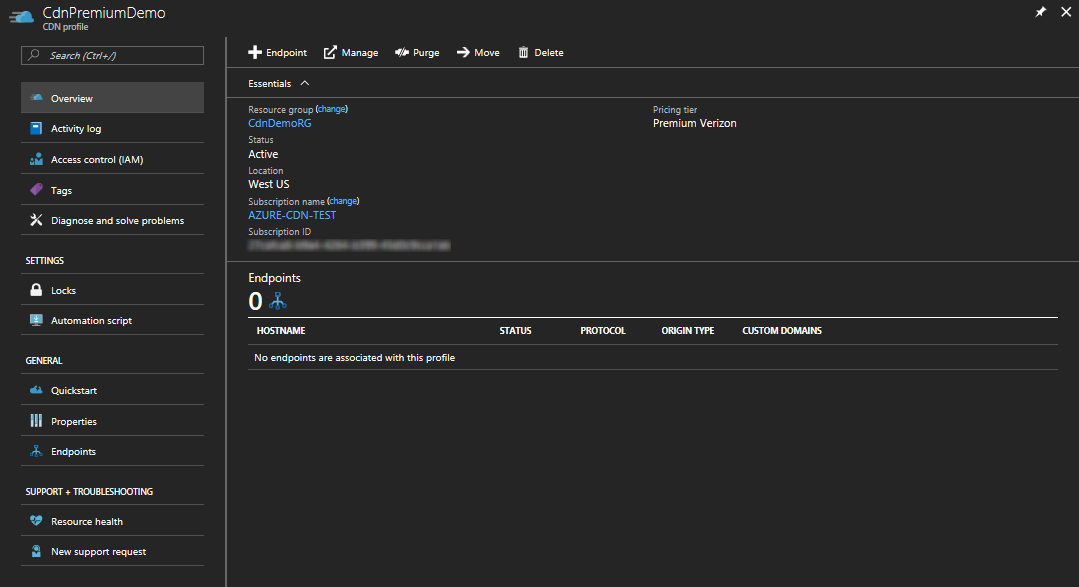
From the CDN profile blade, click the Manage button.

The CDN management portal opens.
Hover over the Analytics tab, then hover over the Real-Time Stats flyout. Click on Real-Time Alerts.
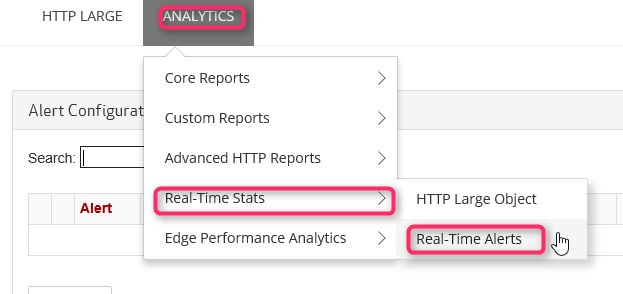
The list of existing alert configurations (if any) is displayed.
Click the Add Alert button.

A form for creating a new alert is displayed.
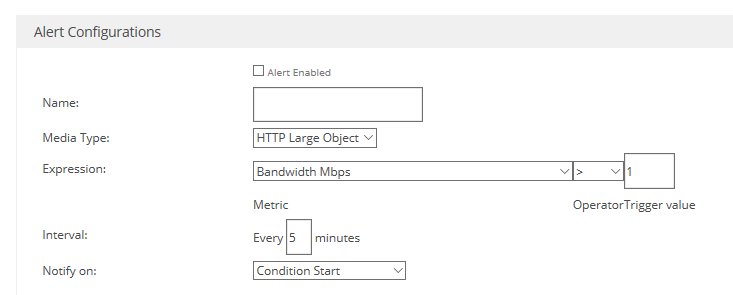
If you want this alert to be active when you click Save, select the Alert Enabled checkbox.
Enter a descriptive name for your alert in the Name field.
In the Media Type dropdown list, select HTTP Large Object.

Important
You must select HTTP Large Object as the Media Type. The other choices are not used by Azure CDN from Edgio. Failure to select HTTP Large Object causes your alert to never be triggered.
Create an Expression to monitor by selecting a Metric, Operator, and Trigger value.
For Metric, select the type of condition you want monitored. Bandwidth Mbps is the amount of bandwidth usage in megabits per second. Total Connections is the number of concurrent HTTP connections to our edge servers. For definitions of the various cache statuses and status codes, see Azure CDN Cache Status Codes and Azure CDN HTTP Status Codes
Operator is the mathematical operator that establishes the relationship between the metric and the trigger value.
Trigger Value is the threshold value that must be met before a notification is sent.
In the following example, the created expression indicates that a notification is sent when the number of 404 status codes is greater than 25.

For Interval, enter how frequently you would like the expression evaluated.
In the Notify on dropdown list, select when you would like to be notified when the expression is true.
- Condition Start indicates that a notification is sent when the specified condition is first detected.
- Condition End indicates that a notification is sent when the specified condition is no longer detected. This notification can only be triggered after our network monitoring system detected that the specified condition occurred.
- Continuous indicates that a notification is sent each time that the network monitoring system detects the specified condition. Keep in mind that the network monitoring system checks only once per interval for the specified condition.
- Condition Start and End indicates that a notification is sent the first time that the specified condition is detected and once again when the condition is no longer detected.
If you want to receive notifications by email, select the Notify by Email checkbox.
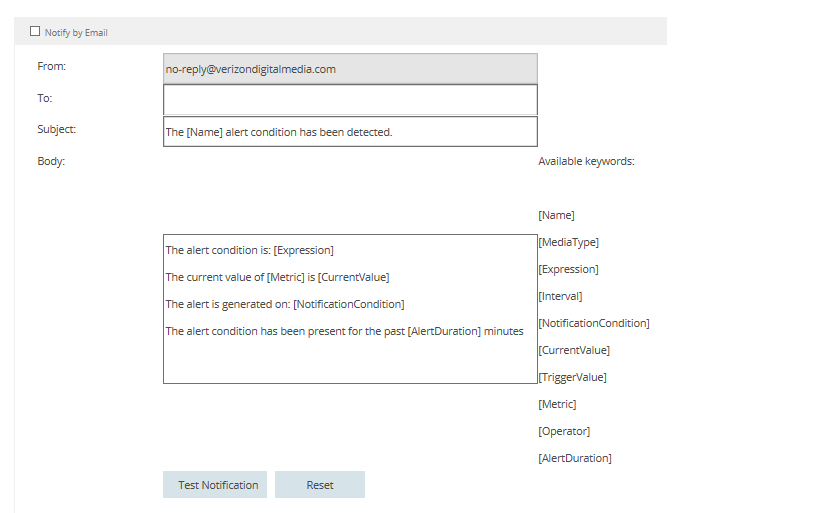
In the To field, enter the email address you where you want notifications sent. For Subject and Body, you might leave the default, or you might customize the message using the Available keywords list to dynamically insert alert data when the message is sent.
Note
You can test the email notification by clicking the Test Notification button, but only after the alert configuration has been saved.
If you want notifications to be posted to a web server, select the Notify by HTTP Post checkbox.
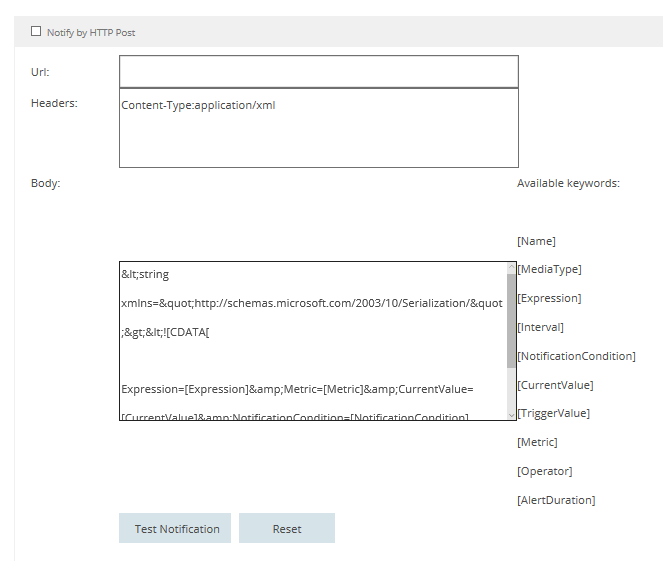
In the Url field, enter the URL you where you want the HTTP message posted. In the Headers textbox, enter the HTTP headers to be sent in the request. For Body, you might customize the message by using the Available keywords list to dynamically insert alert data when the message is sent. Headers and Body default to an XML payload similar to the following example:
<string xmlns="http://schemas.microsoft.com/2003/10/Serialization/">
    <![CDATA[Expression=Status Code : 404 per second > 25&Metric=Status Code : 404 per second&CurrentValue=[CurrentValue]&NotificationCondition=Condition Start]]>
</string>
Note
You can test the HTTP Post notification by clicking the Test Notification button, but only after the alert configuration has been saved.
Click the Save button to save your alert configuration. If you checked Alert Enabled in step 5, your alert is now active.
Next Steps
- Analyze Real-time stats in Azure CDN
- Dig deeper with advanced HTTP reports
- Analyze usage patterns