opomba,
Dostop do te strani zahteva pooblastilo. Poskusite se vpisati alispremeniti imenike.
Dostop do te strani zahteva pooblastilo. Poskusite lahko spremeniti imenike.
This quickstart guides you through the easiest and fastest way to create and deploy a Python web and database solution to Azure. By following the instructions in this quickstart, you:
- Choose an
azdtemplate based on the Python web framework, Azure database platform, and Azure web hosting platform you want to build on. - Use CLI commands to run an
azdtemplate to create a sample web app and database, and create and configure the necessary Azure resources. Then, deploy the sample web app to Azure. - Edit the web app on your local computer and use an
azdcommand to redeploy. - Use an
azdcommand to clean up Azure resources.
It should take less than 15 minutes to complete this tutorial. When you finish, you can start modifying the new project with your custom code.
To learn more about these azd templates for Python web app development, see:
- What are these templates?
- How do the templates work?
- Why would I want to use this?
- What are my other options?
Prerequisites
An Azure subscription - Create one for free
Install the following tools on your local computer:
Choose a template
Choose an azd template based on the Python web framework, Azure web hosting platform, and Azure database platform you want to build on.
Select a template name (first column) from the following list of templates in the following tables. Use the template name during the
azd initstep in the next section.Template Web Framework Database Hosting Platform GitHub Repo azure-django-postgres-flexible-aca Django PostgreSQL Flexible Server Azure Container Apps repo azure-django-postgres-flexible-appservice Django PostgreSQL Flexible Server Azure App Service repo azure-django-cosmos-postgres-aca Django Cosmos DB (PostgreSQL Adapter) Azure Container Apps repo azure-django-cosmos-postgres-appservice Django Cosmos DB (PostgreSQL Adapter) Azure App Service repo azure-django-postgres-addon-aca Django Azure Container Apps PostgreSQL Add-on Azure Container Apps repo
Run the template
Running an azd template is the same across languages and frameworks. The same basic steps apply to all templates. The steps are:
At a terminal, navigate to a folder on your local computer where you typically store your local git repositories. Create a new folder named azdtest. Then, change into that directory by using the
cdcommand.mkdir azdtest cd azdtestDon't use Visual Studio Code's Terminal for this quickstart.
To set up the local development environment, enter the following commands in your terminal and answer any prompts:
azd init --template <template name>Substitute
<template name>with one of the templates from the tables you selected in a previous step, such as azure-django-postgres-aca for example.When prompted for an environment name, use azdtest or any other name. The environment name is used when naming Azure resource groups and resources. For best results, use a short name, lower case letters, no special characters.
To authenticate
azdto your Azure account, enter the following commands in your terminal and follow the prompt:azd auth loginFollow the instructions when prompted to "Pick an account" or sign in to your Azure account. Once you successfully authenticate, the following message is displayed in a web page: "Authentication complete. You can return to the application. Feel free to close this browser tab."
When you close the tab, the shell displays the message:
Logged in to Azure.Ensure that Docker Desktop is open and running in the background before attempting the next step.
To create the necessary Azure resources, enter the following commands in your terminal and answer any prompts:
azd upImportant
Once
azd upcompletes successfully, the sample web app is available on the public internet and your Azure Subscription begins accruing charges for all resources that are created. The creators of theazdtemplates intentionally chose inexpensive tiers but not necessarily free tiers since free tiers often have restricted availability.Follow the instructions when prompted to choose Azure Subscription to use for payment, then select an Azure location to use. Choose a region that is close to you geographically.
Executing
azd upcan take several minutes since it's provisioning and deploying multiple Azure services. As progress is displayed, watch for errors. If you see errors, try the following to fix the problem:- Delete the azd-quickstart folder and the quickstart instructions from the beginning.
- When prompted, choose a simpler name for your environment. Only use lower-case letters and dashes. No numbers, upper-case letters, or special characters.
- Choose a different location.
If you still have problems, see the Troubleshooting section at the bottom of this document.
Important
When you finish working with the sample web app, use
azd downto remove all of the services thatazd upcreated.When
azd upcompletes successfully, the following output is displayed: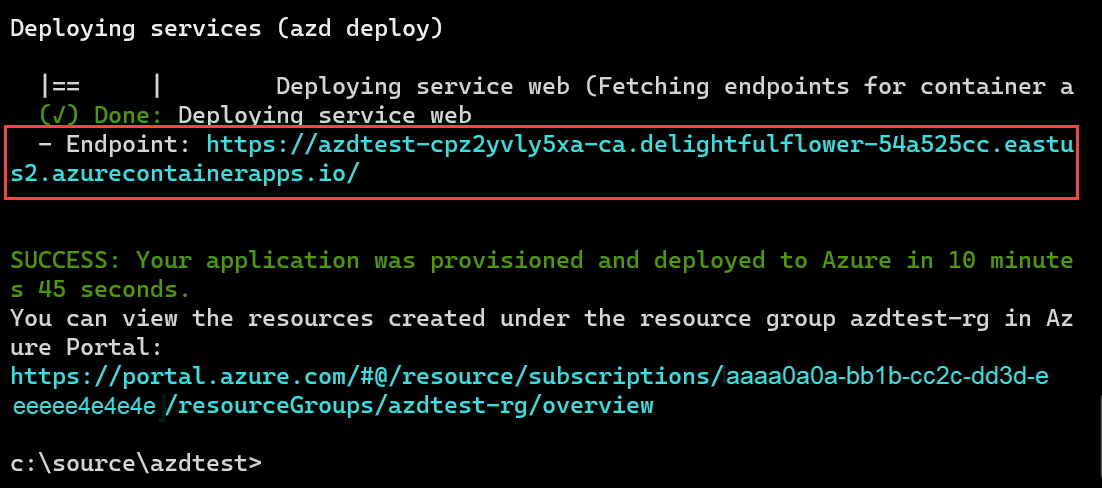
Copy the first URL after the word
- Endpoint:and paste it into the location bar of a web browser to see the sample web app project running live in Azure.Open a new tab in your web browser.
- Copy the second URL from the previous step and paste it into the location bar.
- The Azure portal displays all of the services in your new resource group that are deployed to host the sample web app project.
Edit and redeploy
Next, make a small change to the web app and then redeploy it.
Open Visual Studio Code and open the azdtest folder.
This template is configured to optionally use Dev Containers. When you see the Dev Container notification appear in Visual Studio Code, select the Reopen in Container button.
Use Visual Studio Code's Explorer view to navigate to src/templates folder, and open the index.html file. Locate the following line of code:
<h1 id="pagte-title">Welcome to ReleCloud</h1>Change the text inside of the H1:
<h1 id="pagte-title">Welcome to ReleCloud - UPDATED</h1>Save your changes.
To redeploy the app with your change, run the following command in your terminal:
azd deploySince you're using Dev Containers and are connected remotely into the container's shell, don't use Visual Studio Code's Terminal pane to run
azdcommands.When the command finishes, refresh your web browser to see the update. Depending on the web hosting platform you're using, it might take several minutes before your changes are visible.
You're now ready to edit and delete files in the template. For more information, see What can I edit or delete in the template?
Clean up resources
Clean up the resources created by the template by running the
azd downcommand.azd downThe
azd downcommand deletes the Azure resources and the GitHub Actions workflow. When prompted, agree to deleting all resources associated with the resource group.You can also delete the azdtest folder, or use it as the basis for your own application by modifying the project's files.
Troubleshooting
If you see errors during azd up, try the following steps:
- Run
azd downto remove any resources that the command created. Alternatively, you can delete the resource group that you created in the Azure portal. - Delete the azdtest folder on your local computer.
- In the Azure portal, search for Key Vaults. Select Manage deleted vaults, choose your subscription, select all key vaults that contain the name azdtest or whatever you named your environment, and select Purge.
- Retry the steps in this quickstart. This time when prompted, choose a simpler name for your environment. Try a short name, lowercase letters, no numbers, no uppercase letters, and no special characters.
- When retrying the quickstart steps, choose a different location.
For a more comprehensive list of possible issues and solutions, see the FAQ.
Related content
- Learn more about the Python web
azdtemplates. - Learn more about the
azdcommands. - Learn what each of the folders and files in the project do and what you can edit or delete.
- Learn more about Dev Containers.
- Update the Bicep templates to add or remove Azure services. Don't know Bicep? Try this Learning Path: Fundamentals of Bicep.
- Use
azdto set up a GitHub Actions CI/CD pipeline to redeploy on merge to main branch. - Set up monitoring so that you can Monitor your app using the Azure Developer CLI.