Self-hosted Windows agents
Azure DevOps Services
To build and deploy Windows, Azure, and other Visual Studio solutions you'll need at least one Windows agent. Windows agents can also build Java and Android apps.
This article provides guidance for using the 3.x agent software with Azure DevOps Services and current versions of Azure DevOps Server. For a list of Azure DevOps Server versions that support the 3.x agent, see Does Azure DevOps Server support the 3.x agent.
Note
This article describes how to configure a self-hosted agent. If you're using Azure DevOps Services and a Microsoft-hosted agent meets your needs, you can skip setting up a self-hosted Windows agent.
Learn about agents
If you already know what an agent is and how it works, feel free to jump right in to the following sections. But if you'd like some more background about what they do and how they work, see Azure Pipelines agents.
Check prerequisites
Make sure your machine has these prerequisites:
- Operating system version
- Client OS
- Windows 7 SP1 ESU
- Windows 8.1
- Windows 10
- Windows 11
- Server OS
- Windows Server 2012 or higher
- Client OS
- The agent software installs its own version of .NET so there's no .NET prerequisite.
- PowerShell 3.0 or higher
- Subversion - If you're building from a Subversion repo, you must install the Subversion client on the machine.
- Recommended - Visual Studio build tools (2015 or higher)
You should run agent setup manually the first time. After you get a feel for how agents work, or if you want to automate setting up many agents, consider using unattended config.
Hardware specs
The hardware specs for your agents will vary with your needs, team size, etc. It's not possible to make a general recommendation that will apply to everyone. As a point of reference, the Azure DevOps team builds the hosted agents code using pipelines that utilize hosted agents. On the other hand, the bulk of the Azure DevOps code is built by 24-core server class machines running four self-hosted agents apiece.
Prepare permissions
Information security for self-hosted agents
The user configuring the agent needs pool admin permissions, but the user running the agent does not.
The folders controlled by the agent should be restricted to as few users as possible because they contain secrets that could be decrypted or exfiltrated.
The Azure Pipelines agent is a software product designed to execute code it downloads from external sources. It inherently could be a target for Remote Code Execution (RCE) attacks.
Therefore, it is important to consider the threat model surrounding each individual usage of Pipelines Agents to perform work, and decide what are the minimum permissions that could be granted to the user running the agent, to the machine where the agent runs, to the users who have write access to the Pipeline definition, the git repos where the yaml is stored, or the group of users who control access to the pool for new pipelines.
It is a best practice to have the identity running the agent be different from the identity with permissions to connect the agent to the pool. The user generating the credentials (and other agent-related files) is different than the user that needs to read them. Therefore, it is safer to carefully consider access granted to the agent machine itself, and the agent folders which contain sensitive files, such as logs and artifacts.
It makes sense to grant access to the agent folder only for DevOps administrators and the user identity running the agent process. Administrators may need to investigate the file system to understand build failures or get log files to be able to report Azure DevOps failures.
Decide which user you'll use
As a one-time step, you must register the agent. Someone with permission to administer the agent queue must complete these steps. The agent will not use this person's credentials in everyday operation, but they're required to complete registration. Learn more about how agents communicate.
Confirm the user has permission
Make sure the user account that you're going to use has permission to register the agent.
Is the user an Azure DevOps organization owner or TFS or Azure DevOps Server administrator? Stop here, you have permission.
Otherwise:
Open a browser and navigate to the Agent pools tab for your Azure Pipelines organization or Azure DevOps Server or TFS server:
Sign in to your organization (
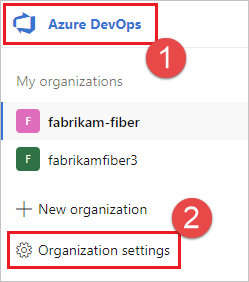
https://dev.azure.com/{yourorganization}).Choose Azure DevOps, Organization settings.
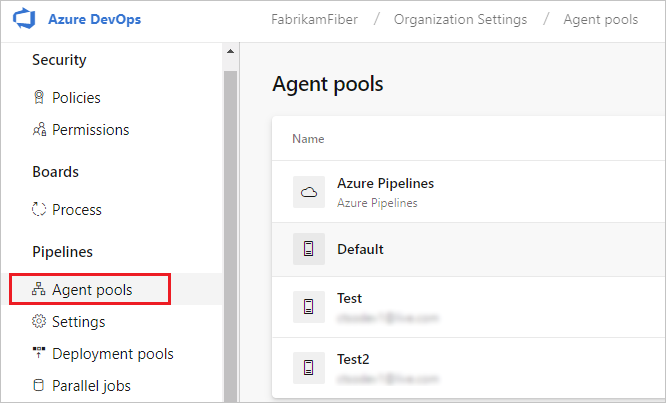
Choose Agent pools.
Sign in to your project collection (
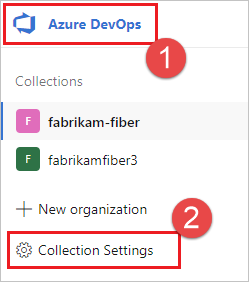
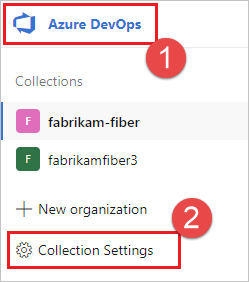
http://your-server/DefaultCollection).Choose Azure DevOps, Collection settings.
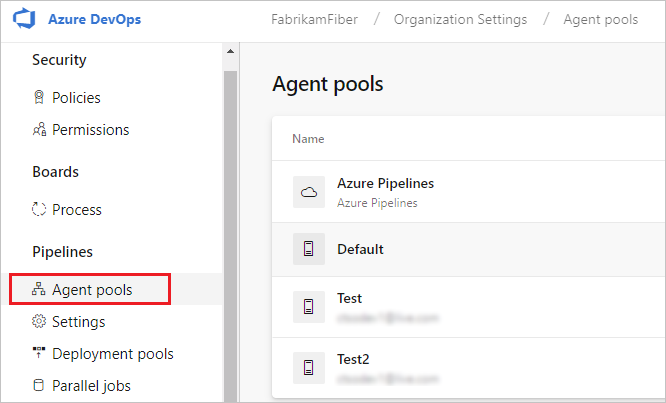
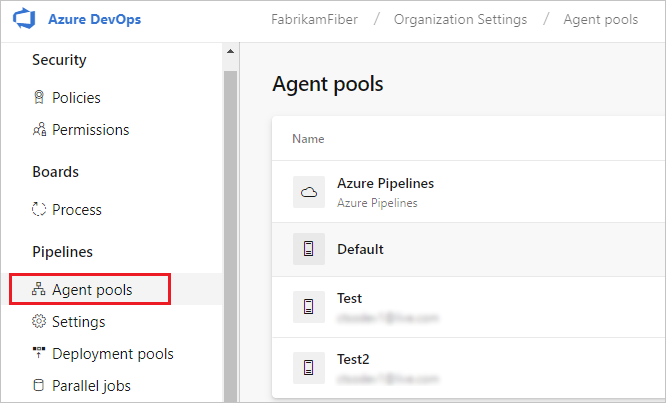
Choose Agent pools.
Choose Azure DevOps, Collection settings.
Choose Agent pools.
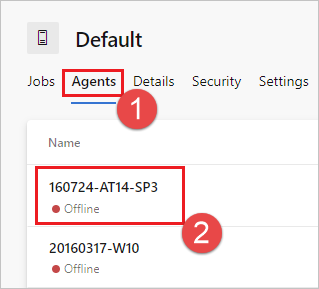
Select the pool on the right side of the page and then click Security.
If the user account you're going to use is not shown, then get an administrator to add it. The administrator can be an agent pool administrator, an Azure DevOps organization owner, or a TFS or Azure DevOps Server administrator.
If it's a deployment group agent, the administrator can be a deployment group administrator, an Azure DevOps organization owner, or a TFS or Azure DevOps Server administrator.
You can add a user to the deployment group administrator role in the Security tab on the Deployment Groups page in Azure Pipelines.
Note
If you see a message like this: Sorry, we couldn't add the identity. Please try a different identity., you probably followed the above steps for an organization owner or TFS or Azure DevOps Server administrator. You don't need to do anything; you already have permission to administer the agent pool.
Download and configure the agent
Azure Pipelines
Log on to the machine using the account for which you've prepared permissions as explained above.
In your web browser, sign in to Azure Pipelines, and navigate to the Agent pools tab:
Sign in to your organization (
https://dev.azure.com/{yourorganization}).Choose Azure DevOps, Organization settings.

Choose Agent pools.

Sign in to your project collection (
http://your-server/DefaultCollection).Choose Azure DevOps, Collection settings.

Choose Agent pools.

Choose Azure DevOps, Collection settings.

Choose Agent pools.

Select the Default pool, select the Agents tab, and choose New agent.
On the Get the agent dialog box, choose Windows.
On the left pane, select the processor architecture of the installed Windows OS version on your machine. The x64 agent version is intended for 64-bit Windows, whereas the x86 version is intended for 32-bit Windows. If you aren't sure which version of Windows is installed, follow these instructions to find out.
On the right pane, click the Download button.
Follow the instructions on the page to download the agent.
Unpack the agent into the directory of your choice. Make sure that the path to the directory contains no spaces because tools and scripts don't always properly escape spaces. A recommended folder is
C:\agents. Extracting in the download folder or other user folders may cause permission issues.
Important
We strongly recommend you configure the agent from an elevated PowerShell window. If you want to configure as a service, this is required.
You must not use Windows PowerShell ISE to configure the agent.
Important
For security reasons we strongly recommend making sure the agents folder (C:\agents) is only editable by admins.
Note
Please avoid using mintty based shells, such as git-bash, for agent configuration. Mintty is not fully compatible with native Input/Output Windows API (here is some info about it) and we can't guarantee the setup script will work correctly in this case.
Install the agent
Start an elevated (PowerShell) window and set the location to where you unpacked the agent.
cd C:\agentsRun
config.cmd. This will ask you a series of questions to configure the agent..\config.cmd
Server URL
When setup asks for your server URL, for Azure DevOps Services, answer https://dev.azure.com/{your-organization}.
When setup asks for your server URL, for Azure DevOps Server, answer https://{my-server}/{my-collection}.
Agent setup authentication type
When you register an agent, choose from the following authentication types, and setup will prompt you for the specific additional information required for each authentication type. For more information, see Self-hosted agent authentication options.
- Personal access token
- Alternate Connect to Azure DevOps Server or TFS using Basic authentication. When you select Alternate you'll be prompted for your credentials.
Windows agents have the following two additional authentication options on Azure DevOps Server and TFS.
- Negotiate Connect to TFS as a user other than the signed-in user via a Windows authentication scheme such as NTLM or Kerberos. After you select Negotiate you'll be prompted for credentials.
- Integrated (Default) Connect a Windows agent to TFS using the credentials of the signed-in user via a Windows authentication scheme such as NTLM or Kerberos. You won't be prompted for credentials after you choose this method.
Important
Your server must be configured to support the authentication method to use Alternate, Negotiate, or Integrated authentication.
The authentication method used for registering the agent is used only during agent registration. To learn more about how agents communicate with Azure Pipelines after registration, see Communication with Azure Pipelines or TFS.
Choose interactive or service mode
For guidance on whether to run the agent in interactive mode or as a service, see Agents: Interactive vs. service.
If you choose to run as a service (which we recommend), the username you run as should be 20 characters or fewer.
Run the agent
Run interactively
If you configured the agent to run interactively, run the following the command to start the agent.
.\run.cmd
To restart the agent, press Ctrl+C to stop the agent, and then run run.cmd to restart it.
Note
If you are running the agent from PowerShell Core to execute Windows PowerShell tasks, your pipeline may fail with an error such as Error in TypeData "System.Security.AccessControl.ObjectSecurity": The member is already present. This is because
Windows PowerShell inherits the PSModulePath environment variable, which includes PowerShell Core module locations, from its parent process.
As a workaround, you can set the agent's knob AZP_AGENT_CLEANUP_PSMODULES_IN_POWERSHELL to true in the pipeline. This will allow the agent to reset PSModulePath
before executing tasks.
variables:
 AZP_AGENT_CLEANUP_PSMODULES_IN_POWERSHELL: "true"
If this workaround does not resolve your issue, or if you need to use custom module locations, you can set the $Env:PSModulePath variable as needed in your PowerShell Core window before running the agent.
Run once
You can also choose to have the agent accept only one job and then exit. To run in this configuration, use the following command.
.\run.cmd --once
Agents in this mode will accept only one job and then spin down gracefully (useful for running in Docker on a service like Azure Container Instances).
Run as a service
If you configured the agent to run as a service, it starts automatically. You can view and control the agent running status from the services snap-in. Run services.msc and look for one of:
- "Azure Pipelines Agent (name of your agent)"
- "VSTS Agent (name of your agent)"
- "vstsagent.(organization name).(name of your agent)"
Note
To allow more flexibility with access control of an agent running as a service it
is possible to set up the agent service SID type as [SERVICE_SID_TYPE_UNRESTRICTED] via
flag or prompt during interactive configuration flow.
By default, the agent service is configured with SERVICE_SID_TYPE_NONE.
For more details about SID types please check this documentation.
To restart the agent, right-click the entry and choose Restart.
Note
If you need to change the agent's logon account, don't do it from the Services snap-in. Instead, see the information below to reconfigure the agent.
To use your agent, run a job using the agent's pool. If you didn't choose a different pool, your agent will be in the Default pool.
Replace an agent
To replace an agent, follow the Download and configure the agent steps again.
When you configure an agent using the same name as an agent that already exists,
you're asked if you want to replace the existing agent. If you answer Y,
then make sure you remove the agent (see below) that you're replacing. Otherwise,
after a few minutes of conflicts, one of the agents will shut down.
Remove and reconfigure an agent
To remove the agent:
.\config remove
After you've removed the agent, you can configure it again.
Unattended config
The agent can be set up from a script with no human intervention.
You must pass --unattended and the answers to all questions.
To configure an agent, it must know the URL to your organization or collection and credentials of someone authorized to set up agents.
All other responses are optional.
Any command-line parameter can be specified using an environment variable instead:
put its name in upper case and prepend VSTS_AGENT_INPUT_.
For example, VSTS_AGENT_INPUT_PASSWORD instead of specifying --password.
Required options
--unattended- agent setup will not prompt for information, and all settings must be provided on the command line--url <url>- URL of the server. For example: https://dev.azure.com/myorganization or http://my-azure-devops-server:8080/tfs--auth <type>- authentication type. Valid values are:pat(Personal access token)SP(Service Principal) (Requires agent version 3.227.1 or newer)negotiate(Kerberos or NTLM)alt(Basic authentication)integrated(Windows default credentials)
Authentication options
- If you chose
--auth pat:--token <token>- specifies your personal access token- You can also pass an OAuth 2.0 token as the
--tokenparameter.
- If you chose
--auth negotiateor--auth alt:--userName <userName>- specifies a Windows username in the formatdomain\userNameoruserName@domain.com--password <password>- specifies a password
- If you chose
--auth SP:--clientID <clientID>- specifies the Client ID of the Service Principal with access to register agents--tenantId <tenantID>- specifies the Tenant ID which the Service Principal is registered in--clientSecret <clientSecret>- specifies the Client Secret of the Service Principal- See Register an agent using a service principal for more information
Pool and agent names
--pool <pool>- pool name for the agent to join--agent <agent>- agent name--replace- replace the agent in a pool. If another agent is listening by the same name, it will start failing with a conflict
Agent setup
--work <workDirectory>- work directory where job data is stored. Defaults to_workunder the root of the agent directory. The work directory is owned by a given agent and should not be shared between multiple agents.--acceptTeeEula- accept the Team Explorer Everywhere End User License Agreement (macOS and Linux only)--disableloguploads- don't stream or send console log output to the server. Instead, you may retrieve them from the agent host's filesystem after the job completes.
Windows-only startup
--runAsService- configure the agent to run as a Windows service (requires administrator permission)--runAsAutoLogon- configure auto-logon and run the agent on startup (requires administrator permission)--windowsLogonAccount <account>- used with--runAsServiceor--runAsAutoLogonto specify the Windows user name in the formatdomain\userNameoruserName@domain.com--windowsLogonPassword <password>- used with--runAsServiceor--runAsAutoLogonto specify Windows logon password (not required for Group Managed Service Accounts and Windows built in accounts such as 'NT AUTHORITY\NETWORK SERVICE')--enableservicesidtypeunrestricted- used with--runAsServiceto configure the agent with service SID type asSERVICE_SID_TYPE_UNRESTRICTED(requires administrator permission)--overwriteAutoLogon- used with--runAsAutoLogonto overwrite the existing auto logon on the machine--noRestart- used with--runAsAutoLogonto stop the host from restarting after agent configuration completes
Troubleshooting configuring the agent with the runAsAutoLogon option
Configuring the agent with the runAsAutoLogon option runs the agent each time after restarting the machine.
Perform next steps if the agent is not run after restarting the machine.
If the agent was already configured on the machine
Before reconfiguring the agent, it is necessary to remove the old agent configuration, so try to run this command from the agent folder:
.\config.cmd remove --auth 'PAT' --token '<token>'
Check if the agent was removed from your agent pool after executing the command:
<Azure DevOps organization> / <Project> / Settings / Agent pools / <Agent Pool> / Agents
Remove the agent from your agent pool manually if it was not removed by running the command.
Then try to reconfigure the agent by running this command from the agent folder:
.\config.cmd --unattended --agent '<agent-name>' --pool '<agent-pool-name>' --url '<azure-dev-ops-organization-url>' --auth 'PAT' --token '<token>' --runAsAutoLogon --windowsLogonAccount '<domain\user-name>' --windowsLogonPassword '<windows-password>'
Specify the agent name (any specific unique name) and check if this agent appeared in your agent pool after reconfiguring.
It will be much better to unpack an agent archive (which can be downloaded here) and run this command from the new unpacked agent folder.
Check if the Windows registry key is recorded and saved correctly
Run the whoami /user command to get the <sid>. Open Registry Editor and follow the path:
Computer\HKEY_USERS\<sid>\SOFTWARE\Microsoft\Windows\CurrentVersion\Run
Check if there is the VSTSAgent key. Delete this key if it exists, then close Registry Editor and configure the agent by running the .\config.cmd command (without args) from the agent folder. Before answering the question Enter Restart the machine at a later time?, open Registry Editor again and check if the VSTSAgent key has appeared. Press Enter to answer the question, and check if the VSTSAgent key remains in its place after restarting the machine.
Check if Windows registry keys work fine on your machine
Create a autorun.cmd file that contains the following line: echo "Hello from AutoRun!".
Open Registry Editor and create in the path above a new key-value pair with the key AutoRun and the value
C:\windows\system32\cmd.exe /D /S /C start "AutoRun" "D:\path\to\autorun.cmd"
Restart your machine. You have an issue with Windows registry keys if you do not see a console window with the Hello from AutoRun! message.
Deployment group only
--deploymentGroup- configure the agent as a deployment group agent--deploymentGroupName <name>- used with--deploymentGroupto specify the deployment group for the agent to join--projectName <name>- used with--deploymentGroupto set the project name--addDeploymentGroupTags- used with--deploymentGroupto indicate that deployment group tags should be added--deploymentGroupTags <tags>- used with--addDeploymentGroupTagsto specify the comma separated list of tags for the deployment group agent - for example "web, db"
Environments only
--addvirtualmachineresourcetags- used to indicate that environment resource tags should be added--virtualmachineresourcetags <tags>- used with--addvirtualmachineresourcetagsto specify the comma separated list of tags for the environment resource agent - for example "web, db"
.\config --help always lists the latest required and optional responses.
Diagnostics
If you're having trouble with your self-hosted agent, you can try running diagnostics. After configuring the agent:
.\run --diagnostics
This will run through a diagnostic suite that may help you troubleshoot the problem. The diagnostics feature is available starting with agent version 2.165.0.
Network diagnostics for self-hosted agents
Set the value of Agent.Diagnostic to true to collect additional logs that can be used for troubleshooting network issues for self-hosted agents. For more information, see Network diagnostics for self-hosted agents
Help on other options
To learn about other options:
.\config --help
The help provides information on authentication alternatives and unattended configuration.
Capabilities
Your agent's capabilities are cataloged and advertised in the pool so that only the builds and releases it can handle are assigned to it. See Build and release agent capabilities.
In many cases, after you deploy an agent, you'll need to install software or utilities. Generally you should install on your agents whatever software and tools you use on your development machine.
For example, if your build includes the npm task, then the build won't run unless there's a build agent in the pool that has npm installed.
Important
Capabilities include all environment variables and the values that are set when the agent runs. If any of these values change while the agent is running, the agent must be restarted to pick up the new values. After you install new software on an agent, you must restart the agent for the new capability to show up in the pool, so that the build can run.
If you want to exclude environment variables as capabilities, you can designate them by setting an environment variable VSO_AGENT_IGNORE with a comma-delimited list of variables to ignore.
FAQ
What version of Git does my agent run?
By default, the Windows agent uses the version of Git that is bundled with the agent software. Microsoft recommends using the version of Git that is bundled with the agent, but you have several options to override this default behavior and use the version of Git that the agent machine has installed in the path.
- Set a pipeline variable named
System.PreferGitFromPathtotruein your pipelines. - On self-hosted agents, you can create a file named .env in the agent root directory and add a
System.PreferGitFromPath=trueline to the file. For more information, see How do I set different environment variables for each individual agent?
To see the version of Git used by a pipeline, you can look at the logs for a checkout step in your pipeline, as shown in the following example.
Syncing repository: PathFilter (Git)
Prepending Path environment variable with directory containing 'git.exe'.
git version
git version 2.26.2.windows.1
How do I make sure I have the latest agent version?
Navigate to the Agent pools tab:
Sign in to your organization (
https://dev.azure.com/{yourorganization}).Choose Azure DevOps, Organization settings.

Choose Agent pools.

Sign in to your project collection (
http://your-server/DefaultCollection).Choose Azure DevOps, Collection settings.

Choose Agent pools.

Choose Azure DevOps, Collection settings.

Choose Agent pools.

Click the pool that contains the agent.
Make sure the agent is enabled.
Navigate to the capabilities tab:
From the Agent pools tab, select the desired agent pool.

Select Agents and choose the desired agent.
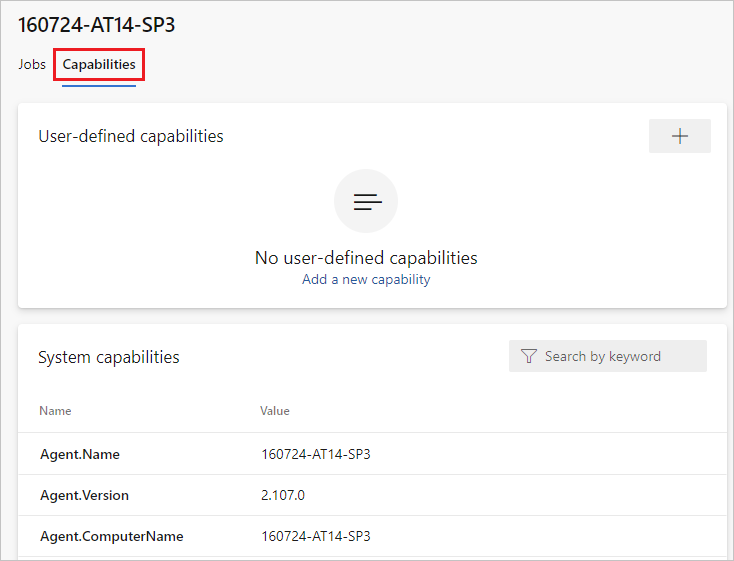
Choose the Capabilities tab.
Note
Microsoft-hosted agents don't display system capabilities. For a list of software installed on Microsoft-hosted agents, see Use a Microsoft-hosted agent.
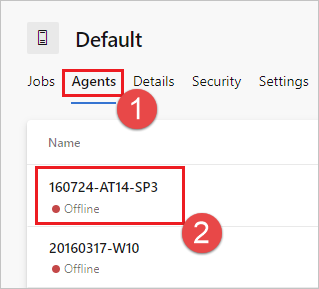
From the Agent pools tab, select the desired pool.

Select Agents and choose the desired agent.
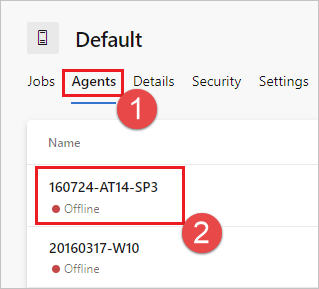
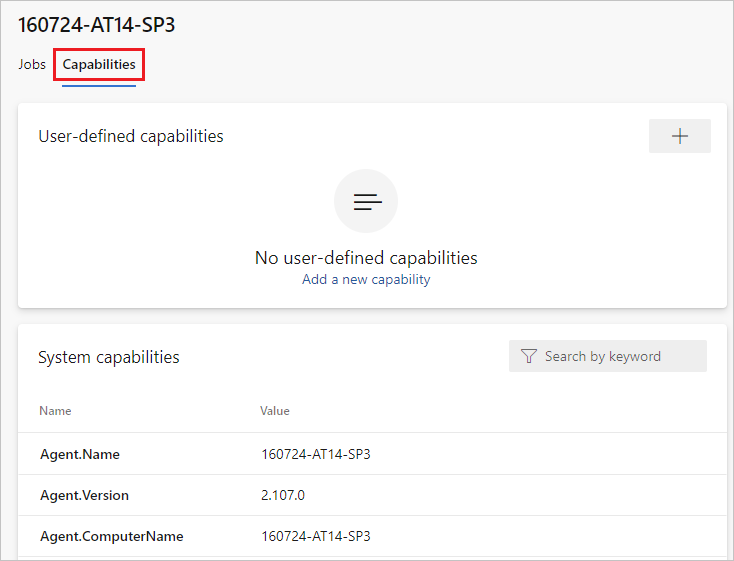
Choose the Capabilities tab.
From the Agent pools tab, select the desired pool.

Select Agents and choose the desired agent.
Choose the Capabilities tab.
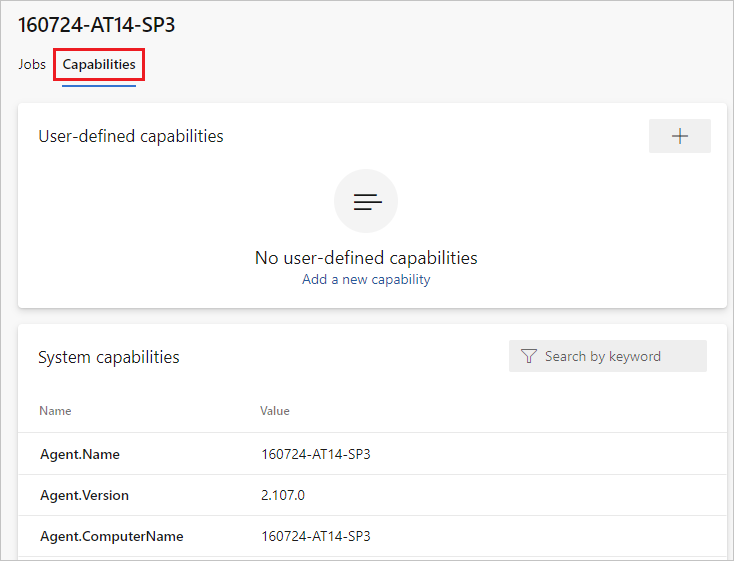
Look for the
Agent.Versioncapability. You can check this value against the latest published agent version. See Azure Pipelines Agent and check the page for the highest version number listed.Each agent automatically updates itself when it runs a task that requires a newer version of the agent. If you want to manually update some agents, right-click the pool, and select Update all agents.
Can I update my agents that are part of an Azure DevOps Server pool?
Yes. Beginning with Azure DevOps Server 2019, you can configure your server to look for the agent package files on a local disk. This configuration will override the default version that came with the server at the time of its release. This scenario also applies when the server doesn't have access to the internet.
From a computer with Internet access, download the latest version of the agent package files (in .zip or .tar.gz form) from the Azure Pipelines Agent GitHub Releases page.
Transfer the downloaded package files to each Azure DevOps Server Application Tier by using a method of your choice (such as USB drive, Network transfer, and so on). Place the agent files under the following folder:
- Windows:
%ProgramData%\Microsoft\Azure DevOps\Agents - Linux:
usr/share/Microsoft/Azure DevOps/Agents - macOS:
usr/share/Microsoft/Azure DevOps/Agents
Create the Agents folder if it is not present.
- You're all set! Your Azure DevOps Server will now use the local files whenever the agents are updated. Each agent automatically updates itself when it runs a task that requires a newer version of the agent. But if you want to manually update some agents, right-click the pool, and then choose Update all agents.
I'm running a firewall and my code is in Azure Repos. What URLs does the agent need to communicate with?
If you're running an agent in a secure network behind a firewall, make sure the agent can initiate communication with the following URLs and IP addresses.
| Domain URL | Description |
|---|---|
https://{organization_name}.pkgs.visualstudio.com |
Azure DevOps Packaging API for organizations using the {organization_name}.visualstudio.com domain |
https://{organization_name}.visualstudio.com |
For organizations using the {organization_name}.visualstudio.com domain |
https://{organization_name}.vsblob.visualstudio.com |
Azure DevOps Telemetry for organizations using the {organization_name}.visualstudio.com domain |
https://{organization_name}.vsrm.visualstudio.com |
Release Management Services for organizations using the {organization_name}.visualstudio.com domain |
https://{organization_name}.vssps.visualstudio.com |
Azure DevOps Platform Services for organizations using the {organization_name}.visualstudio.com domain |
https://{organization_name}.vstmr.visualstudio.com |
Azure DevOps Test Management Services for organizations using the {organization_name}.visualstudio.com domain |
https://*.blob.core.windows.net |
Azure Artifacts |
https://*.dev.azure.com |
For organizations using the dev.azure.com domain |
https://*.vsassets.io |
Azure Artifacts via CDN |
https://*.vsblob.visualstudio.com |
Azure DevOps Telemetry for organizations using the dev.azure.com domain |
https://*.vssps.visualstudio.com |
Azure DevOps Platform Services for organizations using the dev.azure.com domain |
https://*.vstmr.visualstudio.com |
Azure DevOps Test Management Services for organizations using the dev.azure.com domain |
https://app.vssps.visualstudio.com |
For organizations using the {organization_name}.visualstudio.com domain |
https://dev.azure.com |
For organizations using the dev.azure.com domain |
https://login.microsoftonline.com |
Microsoft Entra sign-in |
https://management.core.windows.net |
Azure Management APIs |
https://vstsagentpackage.azureedge.net |
Agent package |
To ensure your organization works with any existing firewall or IP restrictions, ensure that dev.azure.com and *dev.azure.com are open and update your allow-listed IPs to include the following IP addresses, based on your IP version. If you're currently allow-listing the 13.107.6.183 and 13.107.9.183 IP addresses, leave them in place, as you don't need to remove them.
IPv4 ranges
13.107.6.0/2413.107.9.0/2413.107.42.0/2413.107.43.0/24
IPv6 ranges
2620:1ec:4::/482620:1ec:a92::/482620:1ec:21::/482620:1ec:22::/48
Note
For more information about allowed addresses, see Allowed address lists and network connections.
How do I run the agent with self-signed certificate?
Note
Running the agent with a self-signed certificate only applies to Azure DevOps Server.
Run the agent with self-signed certificate
How do I run the agent behind a web proxy?
Run the agent behind a web proxy
How do I restart the agent
If you're running the agent interactively, see the restart instructions in Run interactively. If you're running the agent as a service, restart the agent by following the steps in Run as a service.
How do I set different environment variables for each individual agent?
Create a .env file under agent's root directory and put the environment variables you want to set into the file in the following format, and then restart the agent.
MyEnv0=MyEnvValue0
MyEnv1=MyEnvValue1
MyEnv2=MyEnvValue2
MyEnv3=MyEnvValue3
MyEnv4=MyEnvValue4
How do I configure the agent to bypass a web proxy and connect to Azure Pipelines?
If you want the agent to bypass your proxy and connect to Azure Pipelines directly, then you should configure your web proxy to enable the agent to access the following URLs.
For organizations using the *.visualstudio.com domain:
https://login.microsoftonline.com
https://app.vssps.visualstudio.com
https://{organization_name}.visualstudio.com
https://{organization_name}.vsrm.visualstudio.com
https://{organization_name}.vstmr.visualstudio.com
https://{organization_name}.pkgs.visualstudio.com
https://{organization_name}.vssps.visualstudio.com
For organizations using the dev.azure.com domain:
https://dev.azure.com
https://*.dev.azure.com
https://login.microsoftonline.com
https://management.core.windows.net
https://vstsagentpackage.azureedge.net
https://vssps.dev.azure.com
To ensure your organization works with any existing firewall or IP restrictions, ensure that dev.azure.com and *dev.azure.com are open and update your allow-listed IPs to include the following IP addresses, based on your IP version. If you're currently allow-listing the 13.107.6.183 and 13.107.9.183 IP addresses, leave them in place, as you don't need to remove them.
IPv4 ranges
13.107.6.0/2413.107.9.0/2413.107.42.0/2413.107.43.0/24
IPv6 ranges
2620:1ec:4::/482620:1ec:a92::/482620:1ec:21::/482620:1ec:22::/48
Note
This procedure enables the agent to bypass a web proxy. Your build pipeline and scripts must still handle bypassing your web proxy for each task and tool you run in your build.
For example, if you are using a NuGet task, you must configure your web proxy to support bypassing the URL for the server that hosts the NuGet feed you're using.
I'm using TFS and the URLs in the sections above don't work for me. Where can I get help?
I use TFS on-premises and I don't see some of these features. Why not?
Some of these features are available only on Azure Pipelines and not yet available on-premises. Some features are available on-premises if you have upgraded to the latest version of TFS.
What is enable SERVICE_SID_TYPE_UNRESTRICTED for agent service?
When configuring the agent software on Windows Server, you can specify the service security identifier from the following prompt.
Enter enable SERVICE_SID_TYPE_UNRESTRICTED for agent service (Y/N) (press enter for N)
Previous versions of the agent software set the service security identifier type to SERVICE_SID_TYPE_NONE, which is the default value for the current agent versions. To configure the security service identifier type to SERVICE_SID_TYPE_UNRESTRICTED, press Y.
For more information, see SERVICE_SID_INFO structure and Security identifiers.