Access the FHIR service by using Postman
This article shows the steps to access the FHIR® service in Azure Health Data Services with Postman.
Prerequisites
- FHIR service deployed in Azure. For more information, see Deploy a FHIR service.
- Postman installed locally. For more information, see Get Started with Postman.
- User Access Administrator role for role assignments on FHIR service.
Setup steps
To access FHIR service from Postman application, review the steps:
Register a client application(App Registration) in Microsoft Entra ID.
Assign FHIR Data Contributor role under the FHIR service.
Setup Postman - Create Workspace, collection and environment
Register a client application in Microsoft Entra ID
In the Azure portal, select Microsoft Entra ID tile.

Select + New registrations.
Enter a name for app registration. Under Supported account types, select Accounts in this organization directory only. select Register.
Application ID (client ID)
After registering a new application, you can find the Application (client) ID and Directory (tenant) ID in the Overview section. Make a note of these values for later use, as you will need them when configuring your Postman environment.

Authentication setting: confidential vs. public
Select Authentication to review the settings. The default value for Allow public client flows is "No".
If you keep this default value, the application registration is a confidential client application and a certificate or secret is required.

If you change the default value to "Yes" for the "Allow public client flows" option in the advanced setting, the application registration is a public client application and a certificate or secret isn't required.
The "Yes" value is useful when you want to use the client application in your mobile app or a JavaScript app where you don't want to store any secrets.
For tools that require a redirect URL, select Add a platform to configure the platform.

For Postman, select Mobile and desktop applications. Enter "https://www.getpostman.com/oauth2/callback" in the Custom redirect URIs section. Select the Configure button to save the setting.

Certificates & secrets
- Click on Certificates and secrets. Click +New client secret.
- Under Add a client secret, enter a name for the secret in the Description field. The guidance is to set 6 months for secret expiration. Click Add.
- It is important that you save the secret value, not the secret ID.
Note
Use grant_type of client_credentials when trying to obtain an access token for the FHIR service using tools such as Postman or REST Client.
Assign FHIR Data Contributor role in FHIR service
This section shows the steps to assign FHIR Data Contributor role to a registered application for the FHIR® service in Azure Health Data Services.
In the Azure portal, navigate to your FHIR service.
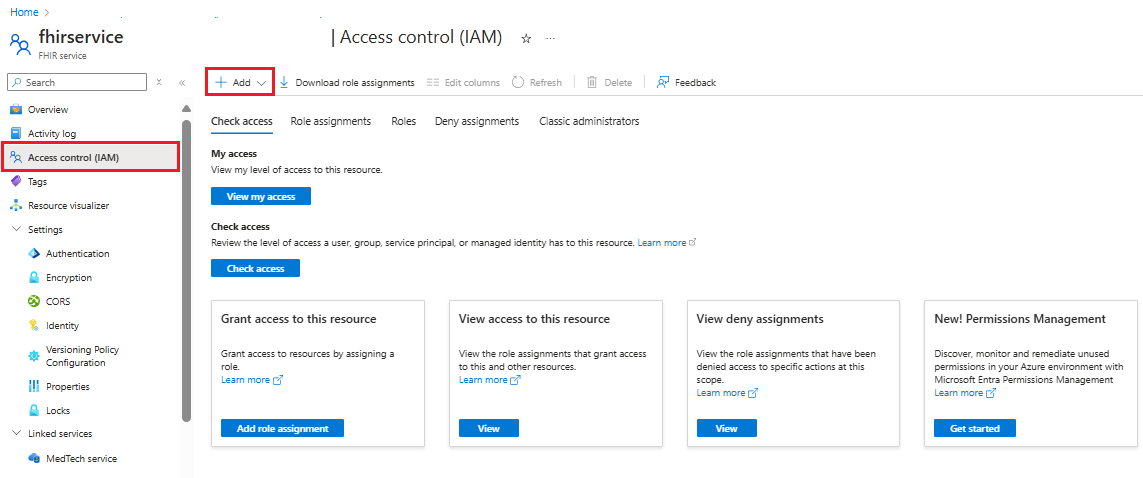
In the left-hand menu, select the Access Control (IAM) blade.Click on + Add and then select Add role assignment. If the option for adding a role assignment is unavailable, ask your Azure administrator to assign you permission to perform this step.

In Add role assignment under the Role tab, scroll down in the list and select FHIR Data Contributor. Then click Next.

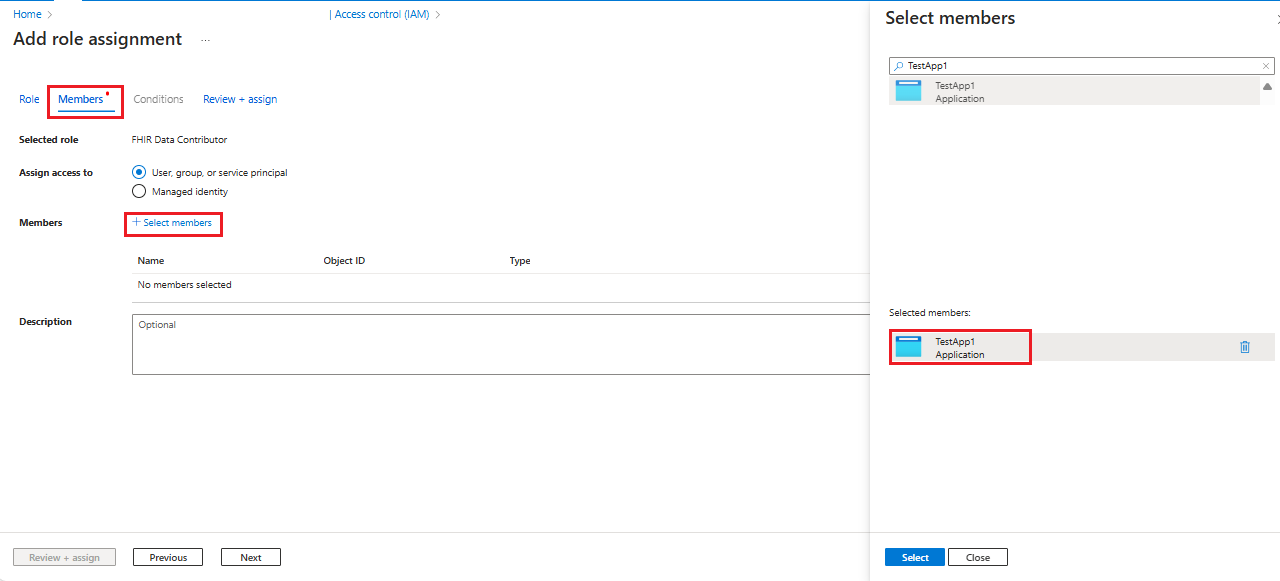
Under the Members tab, click on +Select members. Type in the name of your Postman service client app in the Select field on the right. Select the app.

In same way, Type in the name of your username in the Select. Select your user so it is added to list along with app registration and click Select. Then click Next.

Setup Postman - Create Workspace, collection and environment.
If you're new to Postman, follow these steps to create a workspace, collection, and environment.
Postman introduces the workspace concept to enable you and your team to share APIs, collections, environments, and other components. You can use the default My workspace or Team workspace or create a new workspace for you or your team.

Next, create a new collection where you can group all related REST API requests. In the workspace, select Create Collections. You can keep the default name New collection or rename it. The change is saved automatically.

You can also import and export Postman collections. For more information, see the Postman documentation.
Create or update environment variables
Although you can use the full URL in the request, we recommend that you store the URL and other data in variables.
To access the FHIR service, you need to create or update these variables:
| Variable | Description | Notes |
|---|---|---|
| tenantid | Azure tenant where the FHIR service is deployed | Located on the Application registration overview |
| subid | Azure subscription where the FHIR service is deployed | Located on the FHIR service overview |
| clientid | Application client registration ID | |
| clientsecret | Application client registration secret | |
| fhirurl | The FHIR service full URL (for example, https://xxx.azurehealthcareapis.com) |
Located on the FHIR service overview |
| bearerToken | Stores the Microsoft Entra access token in the script | Leave blank |
Note
Ensure that you configured the redirect URL https://www.getpostman.com/oauth2/callback in the client application registration.
Get the capability statement
Enter {{fhirurl}}/metadata in the GET request, then choose Send. You should see the capability statement of the FHIR service.

Get a Microsoft Entra access token
Get a Microsoft Entra access token by choosing either a service principal, or a Microsoft Entra user account.
Use a service principal with a client credential grant type
The FHIR service is secured by Microsoft Entra ID. The default authentication can't be disabled. To access the FHIR service, you need to get a Microsoft Entra access token first. For more information, see Microsoft identity platform access tokens.
Create a new POST request:
Enter the request header:
https://login.microsoftonline.com/{{tenantid}}/oauth2/tokenSelect the Body tab and select x-www-form-urlencoded. Enter the following values in the key and value section:
- grant_type:
Client_Credentials - client_id:
{{clientid}} - client_secret:
{{clientsecret}} - resource:
{{fhirurl}}
- grant_type:
Note
In scenarios where the FHIR service audience parameter isn't mapped to the FHIR service endpoint URL, the resource parameter value should be mapped to the audience value on the FHIR service Authentication pane.
- Select the Test tab and enter
pm.environment.set("bearerToken", pm.response.json().access_token);in the text section. To make the value available to the collection, use the pm.collectionVariables.set method. For more information on the set method and its scope level, see Using variables in scripts. - Select Save to save the settings.
- Select Send. You should see a response with the Microsoft Entra access token, which is automatically saved to the variable
bearerToken. You can then use it in all FHIR service API requests.
You can examine the access token using online tools such as https://jwt.ms. Select the Claims tab to see detailed descriptions for each claim in the token.
Use a user account with the authorization code grant type
You can get the Microsoft Entra access token by using your Microsoft Entra account credentials and following the listed steps.
Verify that you're a member of Microsoft Entra tenant with the required access permissions.
Ensure that you configured the redirect URL
https://oauth.pstmn.io/v1/callbackfor the web platform in the client application registration.
In the client application registration under API Permissions, add the User_Impersonation delegated permission for Azure Healthcare APIS from APIs my organization uses.

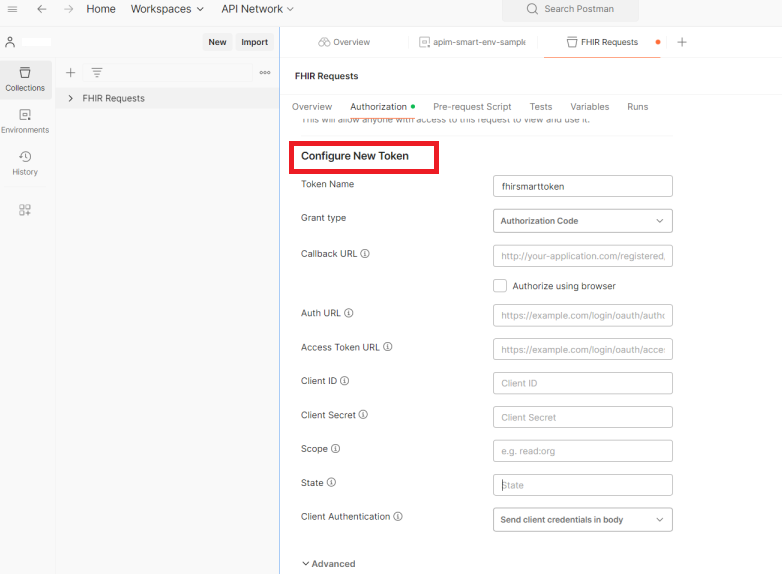
- In Postman, select the Authorization tab of either a collection or a specific REST Call, select Type as OAuth 2.0 and under Configure New Token section, set these values:
Callback URL:
https://oauth.pstmn.io/v1/callbackAuth URL:
https://login.microsoftonline.com/{{tenantid}}/oauth2/v2.0/authorizeAccess Token URL:
https://login.microsoftonline.com/{{tenantid}}/oauth2/v2.0/tokenClient ID: Application client registration ID
Client Secret: Application client registration secret
Scope:
{{fhirurl}}/.defaultClient Authentication: Send client credentials in body
Choose Get New Access Token at the bottom of the page.
Provide User credentials for sign-in.
Once you receive the token, choose Use Token.
Ensure the token is in the Authorization Header of the REST call.
Examine the access token using online tools such as https://jwt.ms. Select the Claims tab to see detailed descriptions for each claim in the token.
Connect to the FHIR server
Open Postman, select the workspace, collection, and environment you want to use. Select the + icon to create a new request.

To perform a health check on the FHIR service, enter {{fhirurl}}/health/check in the GET request, and then choose Send. You should be able to see the Status of FHIR service - HTTP Status code response with 200 and OverallStatus as Healthy in response, which means your health check is successful.
Get the FHIR resource
After you obtain a Microsoft Entra access token, you can access the FHIR data. In a new GET request, enter {{fhirurl}}/Patient.
Select Bearer Token as authorization type. Enter {{bearerToken}} in the Token section. Select Send. As a response, you should see a list of patients in your FHIR resource.

Create or update the FHIR resource
After you obtain a Microsoft Entra access token, you can create or update the FHIR data. For example, you can create a new patient or update an existing patient.
Create a new request, change the method to Post, and enter the value in the request section.
{{fhirurl}}/Patient
Select Bearer Token as the authorization type. Enter {{bearerToken}} in the Token section. Select the Body tab. Select the raw option and JSON as body text format. Copy and paste the following text to the body section.
{
    "resourceType": "Patient",
    "active": true,
    "name": [
        {
            "use": "official",
            "family": "Kirk",
            "given": [
                "James",
                "Tiberious"
            ]
        },
        {
            "use": "usual",
            "given": [
                "Jim"
            ]
        }
    ],
    "gender": "male",
    "birthDate": "1960-12-25"
}
Select Send. You should see a new patient in the JSON response.

Export FHIR data
After you obtain a Microsoft Entra access token, you can export FHIR data to an Azure storage account.
To configure export settings and create a Data Lake Storage Gen2 account, refer to Configure settings for export.
Create a new GET request: {{fhirurl}}/$export?_container=export
Select Bearer Token as authorization type. Enter {{bearerToken}} in the Token section. Select Headers to add two new headers:
Accept:
application/fhir+jsonPrefer:
respond-async
Select Send. You should notice a 202 Accepted response. Select the Headers tab of the response and make a note of the value in the Content-Location. You can use this value to query the export job status.

Next steps
Starter collection of Postman sample queries
Note
FHIR® is a registered trademark of HL7 and is used with the permission of HL7.


