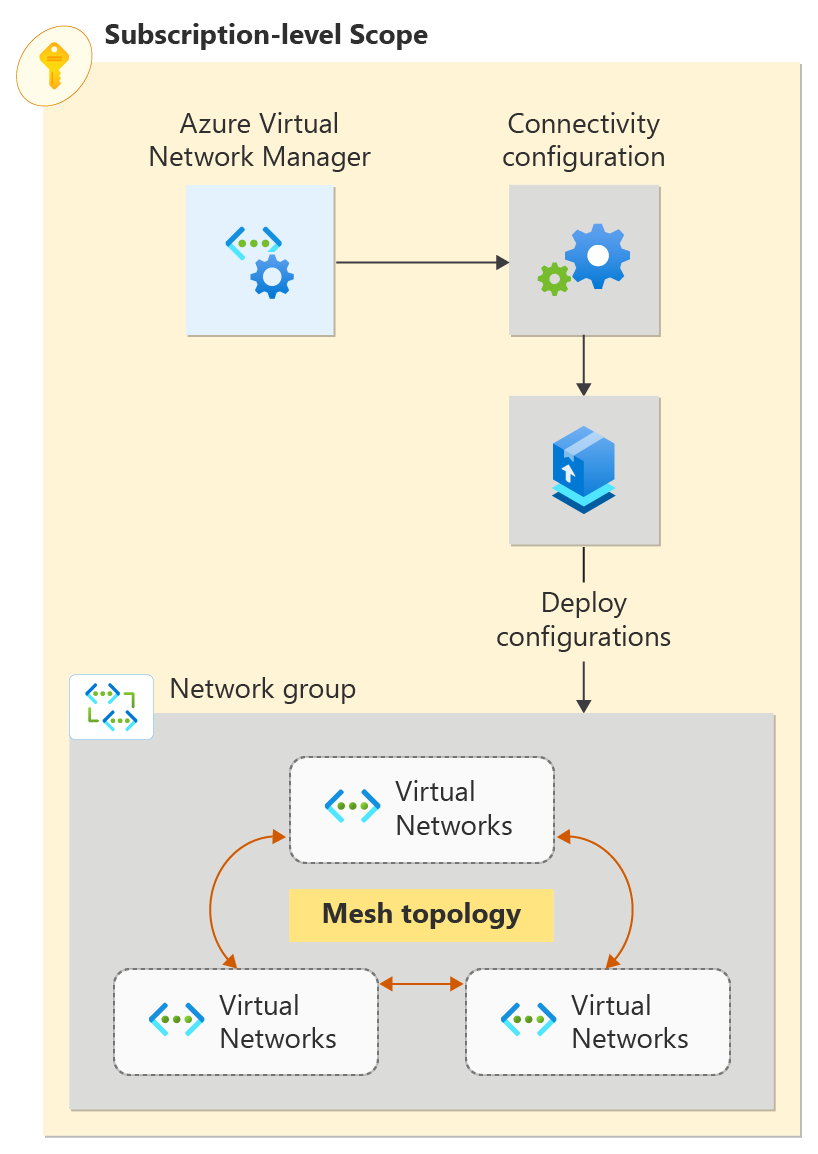
Quickstart: Create a mesh network topology with Azure Virtual Network Manager by using Azure PowerShell
Get started with Azure Virtual Network Manager by using Azure PowerShell to manage connectivity for your virtual networks.
In this quickstart, you deploy three virtual networks and use Azure Virtual Network Manager to create a mesh network topology. Then you verify that the connectivity configuration was applied.
Prerequisites
- An Azure account with an active subscription. Create an account for free.
- Perform this quickstart by using PowerShell locally, not through Azure Cloud Shell. The version of Az.Network in Azure Cloud Shell does not currently support the Azure Virtual Network Manager cmdlets.
- To modify dynamic network groups, you must be granted access via Azure RBAC role assignment only. Classic Admin/legacy authorization is not supported.
Sign in to your Azure account and select your subscription
To begin your configuration, sign in to your Azure account:
Connect-AzAccount
Then, connect to your subscription:
Set-AzContext -Subscription <subscription name or id>
Install the Azure PowerShell module
Install the latest Az.Network Azure PowerShell module by using this command:
Install-Module -Name Az.Network -RequiredVersion 5.3.0
Create a resource group
Before you can create an Azure Virtual Network Manager instance, you have to create a resource group to host it. Create a resource group by using New-AzResourceGroup. This example creates a resource group named resource-group in the West US 2 region:
# Create a resource group
$location = "West US 2"
$rg = @{
    Name = 'resource-group'
    Location = $location
}
New-AzResourceGroup @rg
Define the scope and access type
Define the scope and access type for the Azure Virtual Network Manager instance by using New-AzNetworkManagerScope. This example defines a scope with a single subscription and sets the access type to Connectivity. Replace <subscription_id> with the ID of the subscription that you want to manage through Azure Virtual Network Manager.
$subID= <subscription_id>

[System.Collections.Generic.List[string]]$subGroup = @()
$subGroup.Add("/subscriptions/$subID")

[System.Collections.Generic.List[String]]$access = @()
$access.Add("Connectivity");

$scope = New-AzNetworkManagerScope -Subscription $subGroup
Create a Virtual Network Manager instance
Create a Virtual Network Manager instance by using New-AzNetworkManager. This example creates an instance named network-manager in the West US 2 region:
$avnm = @{
    Name = 'network-manager'
    ResourceGroupName = $rg.ResourceGroupName
    NetworkManagerScope = $scope
    NetworkManagerScopeAccess = $access
    Location = $location
}
$networkmanager = New-AzNetworkManager @avnm
Create three virtual networks
Create three virtual networks by using New-AzVirtualNetwork. This example creates virtual networks named vnet-spoke-001, vnet-spoke-002, and vnet-hub-001 in the West US 2 region. If you already have virtual networks that you want create a mesh network with, you can skip to the next section.
$vnetspoke001 = @{
    Name = 'vnet-spoke-001'
    ResourceGroupName = $rg.ResourceGroupName
    Location = $location
    AddressPrefix = '10.0.0.0/16'
}

$vnet_spoke_001 = New-AzVirtualNetwork @vnetspoke001

$vnetspoke002 = @{
    Name = 'vnet-spoke-002'
    ResourceGroupName = $rg.ResourceGroupName
    Location = $location
    AddressPrefix = '10.1.0.0/16'
}
$vnet_spoke_002 = New-AzVirtualNetwork @vnetspoke002

$vnethub001 = @{
    Name = 'vnet-hub-001'
    ResourceGroupName = $rg.ResourceGroupName
    Location = $location
    AddressPrefix = '10.2.0.0/16'
}
$vnet_hub_001 = New-AzVirtualNetwork @vnethub001
Add a subnet to each virtual network
To complete the configuration of the virtual networks, create a subnet configuration named default with a subnet address prefix of /24 by using Add-AzVirtualNetworkSubnetConfig. Then, use Set-AzVirtualNetwork to apply the subnet configuration to the virtual network.
$subnet_vnetspoke001 = @{
    Name = 'default'
    VirtualNetwork = $vnet_spoke_001
    AddressPrefix = '10.0.0.0/24'
}
$subnetConfig_vnetspoke001 = Add-AzVirtualNetworkSubnetConfig @subnet_vnetspoke001
$vnet_spoke_001 | Set-AzVirtualNetwork

$subnet_vnetspoke002 = @{
    Name = 'default'
    VirtualNetwork = $vnet_spoke_002
    AddressPrefix = '10.1.0.0/24'
}
$subnetConfig_vnetspoke002 = Add-AzVirtualNetworkSubnetConfig @subnet_vnetspoke002
$vnet_spoke_002 | Set-AzVirtualNetwork

$subnet_vnet_hub_001 = @{
    Name = 'default'
    VirtualNetwork = $vnet_hub_001
    AddressPrefix = '10.2.0.0/24'
}
$subnetConfig_vnet_hub_001 = Add-AzVirtualNetworkSubnetConfig @subnet_vnet_hub_001
$vnet_hub_001 | Set-AzVirtualNetwork
Create a network group
Virtual Network Manager applies configurations to groups of virtual networks by placing them in network groups. Create a network group by using New-AzNetworkManagerGroup. This example creates a network group named network-group in the West US 2 region:
$ng = @{
        Name = 'network-group'
        ResourceGroupName = $rg.ResourceGroupName
        NetworkManagerName = $networkManager.Name
    }
    $ng = New-AzNetworkManagerGroup @ng
Define membership for a mesh configuration
In this task, you add the static members vnet-spoke-001 and vnet-spoke-002 to the network group network-group by using New-AzNetworkManagerStaticMember.
Static members must have a unique name that's scoped to the network group. We recommend that you use a consistent hash of the virtual network ID. This approach uses the Azure Resource Manager template's uniqueString() implementation.
    function Get-UniqueString ([string]$id, $length=13)
    {
    $hashArray = (new-object System.Security.Cryptography.SHA512Managed).ComputeHash($id.ToCharArray())
    -join ($hashArray[1..$length] | ForEach-Object { [char]($_ % 26 + [byte][char]'a') })
    }
$sm_vnetspoke001 = @{
        Name = Get-UniqueString $vnet_spoke_001.Id
        ResourceGroupName = $rg.ResourceGroupName
        NetworkGroupName = $ng.Name
        NetworkManagerName = $networkManager.Name
        ResourceId = $vnet_spoke_001.Id
    }
    $sm_vnetspoke001 = New-AzNetworkManagerStaticMember @sm_vnetspoke001
$sm_vnetspoke002 = @{
        Name = Get-UniqueString $vnet_spoke_002.Id
        ResourceGroupName = $rg.ResourceGroupName
        NetworkGroupName = $ng.Name
        NetworkManagerName = $networkManager.Name
        ResourceId = $vnet_spoke_002.Id
    }
    $sm_vnetspoke002 = New-AzNetworkManagerStaticMember @sm_vnetspoke002
Create a connectivity configuration
In this task, you create a connectivity configuration with the network group network-group by using New-AzNetworkManagerConnectivityConfiguration and New-AzNetworkManagerConnectivityGroupItem:
Create a connectivity group item:
$gi = @{
    NetworkGroupId = $ng.Id
}
$groupItem = New-AzNetworkManagerConnectivityGroupItem @gi
Create a configuration group and add a connectivity group item to it:
[System.Collections.Generic.List[Microsoft.Azure.Commands.Network.Models.NetworkManager.PSNetworkManagerConnectivityGroupItem]]$configGroup = @()
$configGroup.Add($groupItem)
Create the connectivity configuration with the configuration group:
$config = @{
    Name = 'connectivity-configuration'
    ResourceGroupName = $rg.ResourceGroupName
    NetworkManagerName = $networkManager.Name
    ConnectivityTopology = 'Mesh'
    AppliesToGroup = $configGroup
}
$connectivityconfig = New-AzNetworkManagerConnectivityConfiguration @config
    ```
Commit deployment
Commit the configuration to the target regions by using Deploy-AzNetworkManagerCommit. This step triggers your configuration to begin taking effect.
[System.Collections.Generic.List[string]]$configIds = @()
$configIds.add($connectivityconfig.id)
[System.Collections.Generic.List[string]]$target = @()
$target.Add("westus2")

$deployment = @{
    Name = $networkManager.Name
    ResourceGroupName = $rg.ResourceGroupName
    ConfigurationId = $configIds
    TargetLocation = $target
    CommitType = 'Connectivity'
}
Deploy-AzNetworkManagerCommit @deployment
Clean up resources
If you no longer need the Azure Virtual Network Manager instance and it's associate resources, delete the resource group that contains them. Deleting the resource group also deletes the resources that you created.
Delete the resource group using Remove-AzResourceGroup:
Remove-AzResourceGroup -Name $rg.ResourceGroupName -Force
Next steps
Now that you've created an Azure Virtual Network Manager instance, learn how to block network traffic by using a security admin configuration:
