Configure bot protection for Web Application Firewall
The Azure Web Application Firewall (WAF) for Front Door provides bot rules to identify good bots and protect from bad bots. For more information on the bot protection rule set, see Bot protection rule set.
This article shows how to enable bot protection rules on the Azure Front Door Premium tier.
Prerequisites
Create a basic WAF policy for Front Door by following the instructions described in Create a WAF policy for Azure Front Door by using the Azure portal.
Enable the bot protection rule set
In the Azure portal, navigate to your WAF policy.
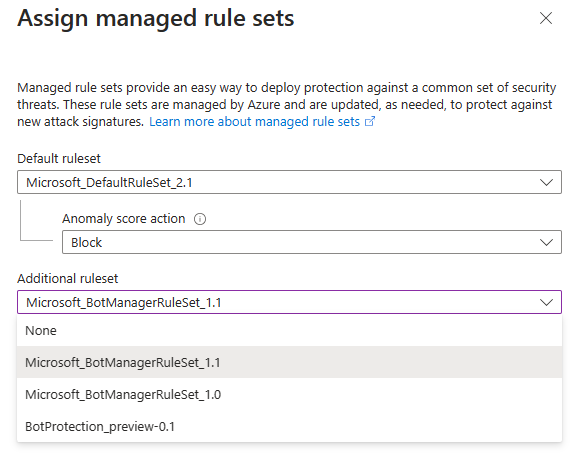
Select Managed rules, then select Assign.

In the Additional rule set drop-down list, select the version of the bot protection rule set that you want to use. It's usually a good practice to use the most recent version of the rule set.

Select Save.
Get your WAF policy's current configuration
Use the Get-AzFrontDoorWafPolicy cmdlet to retrieve the current configuration of your WAF policy. Ensure that you use the correct resource group name and WAF policy name for your own environment.
$frontDoorWafPolicy = Get-AzFrontDoorWafPolicy `
  -ResourceGroupName 'FrontDoorWafPolicy' `
  -Name 'WafPolicy'
Add the bot protection rule set
Use the New-AzFrontDoorWafManagedRuleObject cmdlet to select the bot protection rule set, including the version of the rule set. Then, add the rule set to the WAF's configuration.
The example below adds version 1.0 of the bot protection rule set to the WAF's configuration.
$botProtectionRuleSet = New-AzFrontDoorWafManagedRuleObject `
  -Type 'Microsoft_BotManagerRuleSet' `
  -Version '1.0'

$frontDoorWafPolicy.ManagedRules.Add($botProtectionRuleSet)
Apply the configuration
Use the Update-AzFrontDoorWafPolicy cmdlet to update your WAF policy to include the configuration you created above.
$frontDoorWafPolicy | Update-AzFrontDoorWafPolicy
Enable the bot protection rule set
Use the az network front-door waf-policy managed-rules add command to update your WAF policy to add the bot protection rule set.
The example below adds version 1.0 of the bot protection rule set to the WAF. Ensure that you use the correct resource group name and WAF policy name for your own environment.
az network front-door waf-policy managed-rules add \
  --resource-group FrontDoorWafPolicy \
  --policy-name WafPolicy \
  --type Microsoft_BotManagerRuleSet \
  --version 1.0
The following example Bicep file shows how to do the following steps:
- Create a Front Door WAF policy.
- Enable version 1.0 of the bot protection rule set.
param wafPolicyName string = 'WafPolicy'

@description('The mode that the WAF should be deployed using. In "Prevention" mode, the WAF will block requests it detects as malicious. In "Detection" mode, the WAF will not block requests and will simply log the request.')
@allowed([
  'Detection'
  'Prevention'
])
param wafMode string = 'Prevention'

resource wafPolicy 'Microsoft.Network/frontDoorWebApplicationFirewallPolicies@2022-05-01' = {
  name: wafPolicyName
  location: 'Global'
  sku: {
    name: 'Premium_AzureFrontDoor'
  }
  properties: {
    policySettings: {
      enabledState: 'Enabled'
      mode: wafMode
    }
    managedRules: {
      managedRuleSets: [
        {
          ruleSetType: 'Microsoft_BotManagerRuleSet'
          ruleSetVersion: '1.0'
        }
      ]
    }
  }
}
Next steps
- Learn how to monitor WAF.