opomba,
Dostop do te strani zahteva pooblastilo. Poskusite se vpisati alispremeniti imenike.
Dostop do te strani zahteva pooblastilo. Poskusite lahko spremeniti imenike.
LCD character displays are useful for displaying information without the need for an external monitor. Common LCD character displays can be connected directly to the GPIO pins, but such an approach requires the use of up to 10 GPIO pins. For scenarios that require connecting to a combination of devices, devoting so much of the GPIO header to a character display is often impractical.
Many manufacturers sell 20x4 LCD character displays with an integrated GPIO expander. The character display connects directly to the GPIO expander, which then connects to the Raspberry Pi via the Inter-Integrated Circuit (I2C) serial protocol.
In this topic, you will use .NET to display text on an LCD character display using an I2C GPIO expander.
Prerequisites
- ARM-based (ARMv7 or greater) single-board computer (SBC)
- 20x4 LCD Character Display with I2C interface
- Jumper wires
- Breadboard (optional/recommended)
- Raspberry Pi GPIO breakout board (optional/recommended)
- .NET SDK 8 or later
Note
This tutorial is written assuming the target device is Raspberry Pi. However, this tutorial can be used for any Linux-based SBC that supports .NET, such as Orange Pi, ODROID, and more.
Note
There are many manufacturers of LCD character displays. Most designs are identical, and the manufacturer shouldn't make any difference to the functionality. For reference, this tutorial was developed with the SunFounder LCD2004.
Prepare the SBC
Ensure your SBC is configured to support the following services:
- SSH
- I2C
For many devices, no additional configuration is required. For Raspberry Pi, use the raspi-config command. For more information on raspi-config, refer to the Raspberry Pi documentation.
Prepare the hardware
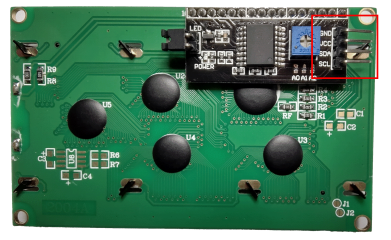
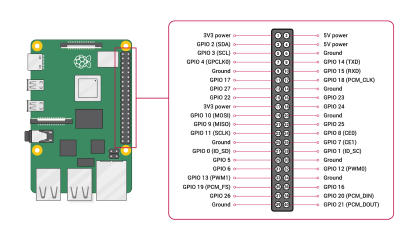
Use jumper wires to connect the four pins on the I2C GPIO expander to the Raspberry Pi as follows:
- GND to ground
- VCC to 5V
- SDA to SDA (GPIO 2)
- SCL to SCL (GPIO 3)
Refer to the following figures as needed:
| I2C interface (back of display) | Raspberry Pi GPIO |
|---|---|

|

Image courtesy Raspberry Pi Foundation. |
Tip
A GPIO breakout board in conjunction with a breadboard is recommended to streamline connections to the GPIO header.
Create the app
Complete the following steps in your preferred development environment:
Create a new .NET Console App using either the .NET CLI or Visual Studio. Name it LcdTutorial.
dotnet new console -o LcdTutorial
cd LcdTutorial
Add the Iot.Device.Bindings package to the project. Use either .NET CLI from the project directory or Visual Studio.
dotnet add package Iot.Device.Bindings --version 3.2.0-*Replace the contents of Program.cs with the following code:
using System;
using System.Device.Gpio;
using System.Device.I2c;
using System.Threading;
using Iot.Device.CharacterLcd;
using Iot.Device.Pcx857x;

Console.WriteLine("Displaying current time. Press Ctrl+C to end.");

using I2cDevice i2c = I2cDevice.Create(new I2cConnectionSettings(1, 0x27));
using var driver = new Pcf8574(i2c);
using var lcd = new Lcd2004(registerSelectPin: 0,
                        enablePin: 2,
                        dataPins: new int[] { 4, 5, 6, 7 },
                        backlightPin: 3,
                        backlightBrightness: 0.1f,
                        readWritePin: 1,
                        controller: new GpioController(PinNumberingScheme.Logical, driver));
int currentLine = 0;

while (true)
{
    lcd.Clear();
    lcd.SetCursorPosition(0,currentLine);
    lcd.Write(DateTime.Now.ToShortTimeString());
    currentLine = (currentLine == 3) ? 0 : currentLine + 1;
    Thread.Sleep(1000);
}
In the preceding code:
A using declaration creates an instance of
I2cDeviceby callingI2cDevice.Createand passing in a newI2cConnectionSettingswith thebusIdanddeviceAddressparameters. ThisI2cDevicerepresents the I2C bus. Theusingdeclaration ensures the object is disposed and hardware resources are released properly.Warning
The device address for the GPIO expander depends on the chip used by the manufacturer. GPIO expanders equipped with a PCF8574 use the address
0x27, while those using PCF8574A chips use0x3F. Consult your LCD's documentation.Another
usingdeclaration creates an instance ofPcf8574and passes theI2cDeviceinto the constructor. This instance represents the GPIO expander.Another
usingdeclaration creates an instance ofLcd2004to represent the display. Several parameters are passed to the constructor describing the settings to use to communicate with the GPIO expander. The GPIO expander is passed as thecontrollerparameter.A
whileloop runs indefinitely. Each iteration:- Clears the display.
- Sets the cursor position to the first position on the current line.
- Writes the current time to the display at the current cursor position.
- Iterates the current line counter.
- Sleeps 1000 ms.
Build the app. If using the .NET CLI, run
dotnet build. To build in Visual Studio, press Ctrl+Shift+B.Deploy the app to the SBC as a self-contained app. For instructions, see Deploy .NET apps to Raspberry Pi. Make sure to give the executable execute permission using
chmod +x.Run the app on the Raspberry Pi by switching to the deployment directory and running the executable.
./LcdTutorialObserve the LCD character display as the current time displays on each line.
Tip
If the display is lit but you don't see any text, try adjusting the contrast dial on the back of the display.
Terminate the program by pressing Ctrl+C.
Congratulations! You've displayed text on an LCD using a I2C and a GPIO expander!
Get the source code
The source for this tutorial is available on GitHub.
