Warehouse set up
This article describes how to set up a warehouse to be used with a new channel in Microsoft Dynamics 365 Commerce.
Each Commerce channel requires a configured warehouse to be associated with it. The following procedures provide the minimum configuration required to set up a warehouse for a Commerce channel. For more information regarding warehouse setup, please see the Warehouse management overview.
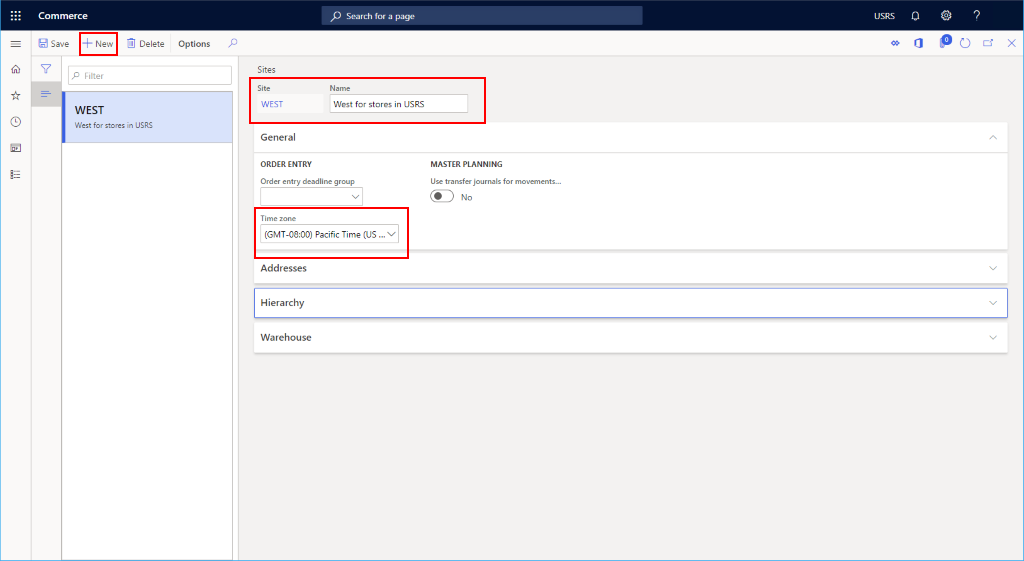
Configure a warehouse site
Before setting up a warehouse, you need to configure a warehouse site.
To configure a warehouse site, follow these steps.
- In the navigation pane, go to Modules > Retail and commerce > Channel setup > Sites.
- On the action pane, select New.
- In the Site field, enter a value.
- In the Name field, enter a value.
- In the General section, set the appropriate Time zone.
- In the Addresses section, enter an address.
- On the action pane, select Save.
The following image shows an example warehouse site.
Set up a warehouse
To set up a warehouse, follow these steps.
- In the navigation pane, go to Modules > Retail and commerce > Channel setup > Warehouses.
- On the action pane, select New.
- In the Warehouse field, enter a value. If this is a 1:1 mapping to a store, consider using the store name or the name of a regional distribution center.
- In the Name field, enter a value.
- In the Site drop-down list, select the warehouse site created previously.
- In the Type field, select Default.
- If you want to set a Quarantine warehouse, first you'll need to follow these steps to create an additional warehouse where the Type is set to Quarantine.
- If you want to set a Transit warehouse, first you'll need to follow these steps to create an additional warehouse where the Type is set to Transit.
- On the action pane, select Save.
Set up inventory aisles
To set up inventory aisles, follow these steps.
- In the navigation pane, go to Modules > Retail and commerce > Channel setup > Location setup > Inventory aisles.
- On the action pane, select New.
- In the Warehouse drop-down list, select the warehouse created previously.
- In the Aisle field, enter a name (for example, "Def").
- In the Name field, enter a name (for example, "Default aisle").
- On the action pane, select Save.
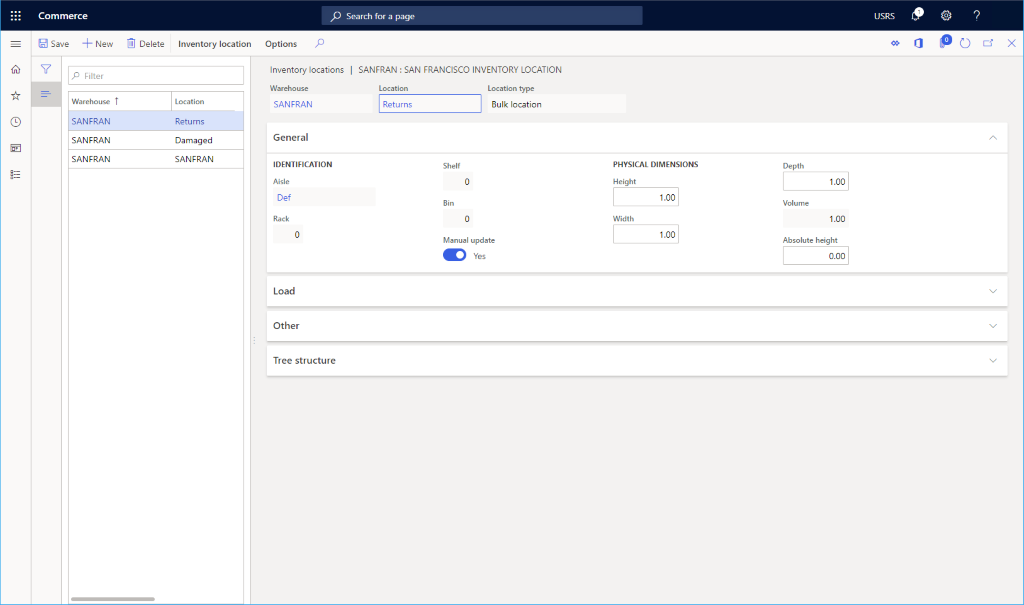
Set up warehouse inventory locations
To set up warehouse inventory locations for standard, damaged, and returned inventory, follow these steps.
- In the navigation pane, go to Modules > Retail and commerce > Channel setup > Warehouses.
- Select the warehouse you created previously.
- On the action pane, select Edit.
- On the action pane, select Warehouse, and then select Inventory location.
- On the action pane, select New. The Warehouse drop-down list should default to your new warehouse.
- In the Aisle box, enter the name of the aisle you specified earlier.
- Set Manual update to Yes
- In the Location box, enter the name of the warehouse.
- On the action pane, select Save.
- On the action pane, select New. The Warehouse drop-down list should default to your new warehouse.
- In the Aisle box, enter the name of the aisle you specified earlier.
- Set Manual update to Yes
- In the Location box, enter "Damaged".
- On the action pane, select Save.
- On the action pane, select New. The Warehouse drop-down list should default to your new warehouse.
- In the Aisle box, enter the name of the aisle you specified earlier.
- Set Manual update to Yes
- In the Location box, enter "Returns".
- On the action pane, select Save.
The following image shows a San Francisco warehouse inventory location setup.
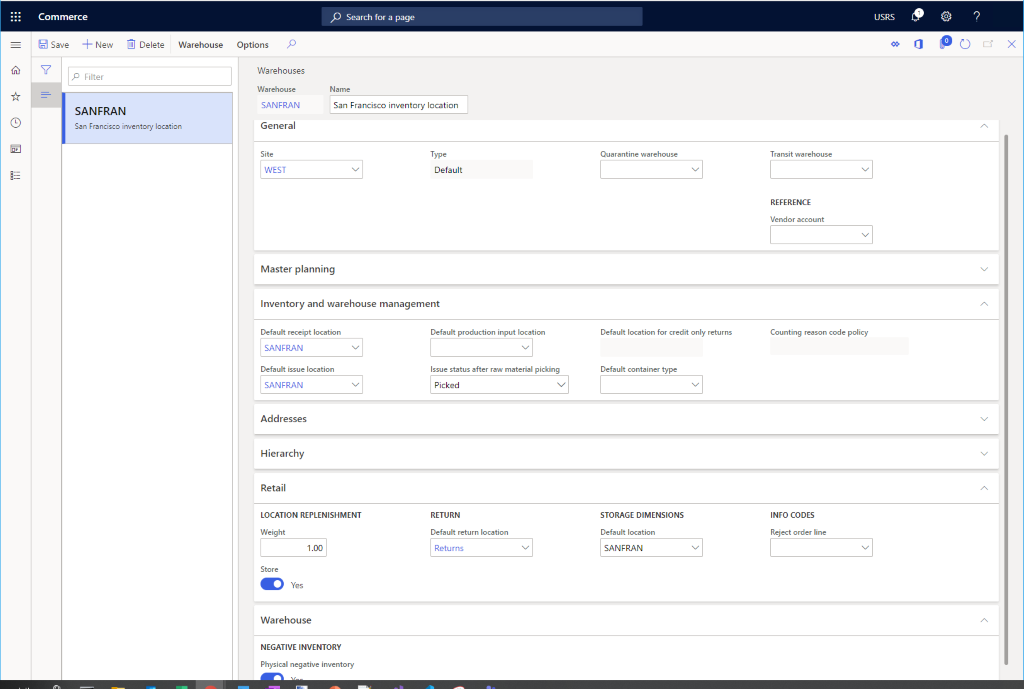
Complete warehouse setup
To complete warehouse setup, follow these steps.
- In the navigation pane, go to Modules > Retail and commerce > Channel setup > Warehouses.
- Select the warehouse you previously created.
- On the action pane, select Edit.
- Under Inventory and warehouse management:
- Set Default receipt location to the default location created above.
- Select Default issue location to the default location created above.
- Under the Addresses section, enter a warehouse address.
- Under the Retail section:
- In the Default return location box, enter the returns location created previously.
- Set Store to Yes.
- Set Weight to 1.00.
- In the Storage Dimensions box, enter the default location created previously.
- Under the Warehouse section, set Physical negative inventory to Yes.
- On the action pane, select Save.
The following image shows details for a configured warehouse.