Create a Retail Server extension API (Retail SDK version 10.0.11 and later)
This article explains how to create a new Retail Server application programming interface (API), and how to expose it so that point of sale (POS) or other clients can consume it. Modification of the existing Retail Server APIs isn't supported.
This article applies to Retail software development kit (SDK) version 10.0.11 and later.
The Retail SDK includes only a few samples of end-to-end Retail Server extensions that include the Commerce runtime (CRT). You can use these samples as templates to start your extensions. You can find the sample extensions in the RetailSDK\SampleExtensions\RetailServer folder.
Note
If you create a new Retail Server extension API that will have high volume and need to read from the channel database, Microsoft recommends that you enable the cache for the database reading. Otherwise, the extension will consume too much Retail Server and channel database resources, which can cause overall Commerce Scale Unit (CSU) performance issues that impact your business.
End-to-end sample repository in the Retail SDK
| Sample extension (RetailSDK\SampleExtensions\RetailServer) |
CRT sample (RetailSDK\SampleExtensions\CommerceRuntime) |
POS sample (RetailSDK\POS\Extensions) |
|---|---|---|
| Extensions.StoreHoursSample | Extensions.StoreHoursSample | StoreHoursSample |
| Extensions.SalesTransactionSignatureSample | Extensions.SalesTransactionSignatureSample | SalesTransactionSignatureSample |
| Extensions.PrintPackingSlipSample | Extensions.PrintPackingSlipSample | |
| Extensions.CrossLoyaltySample | Extensions.CrossLoyaltySample |
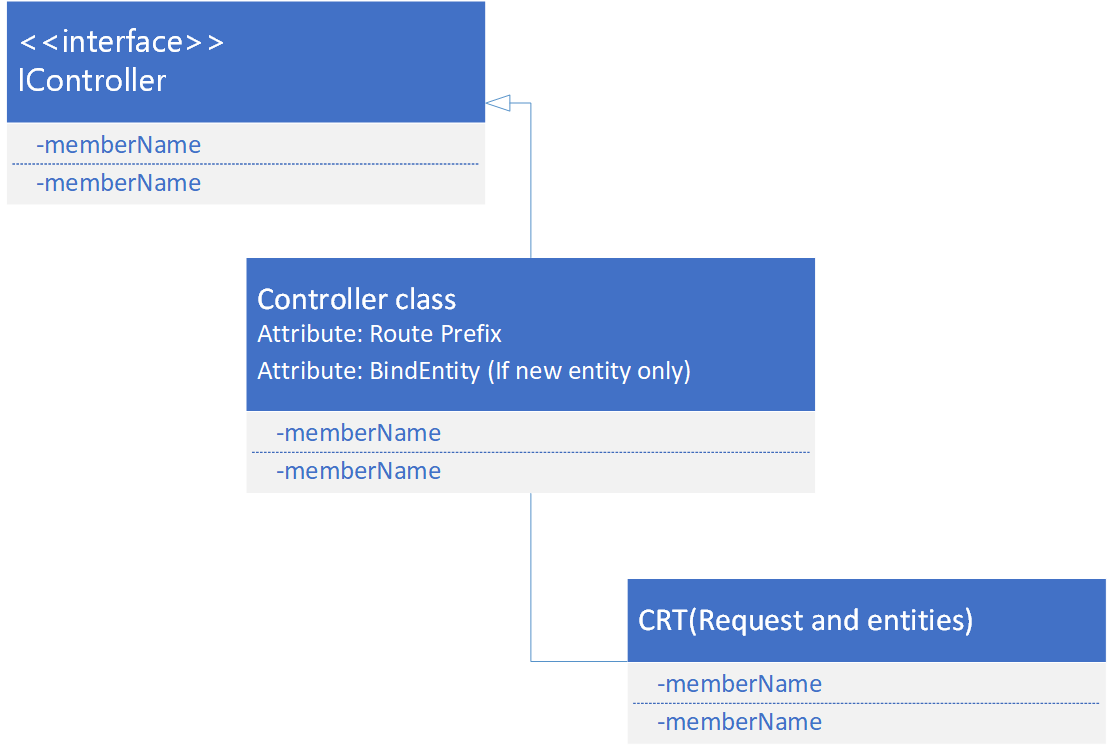
Extension class diagram
The following illustration shows the class structure of the extension.
Note
Retail server does not support loading both IController and CommerceController extensions. If you include both types of extensions, then Retail server load will fail. Extensions should have either IController or CommerceController. If you are migrating to the IController extension, migrate all the Retail server extensions to IController.
Create a new Retail Server API
Create the CRT extension. You must create the CRT extension before you create the Retail Server extension. A Retail Server API should have no logic except logic that calls the CRT with the parameters.
Create a new C# class library project that uses the Microsoft .NET Framework version NET Standard 2.0 as the target framework. Alternatively, you can use one of the Retail Server samples in the Retail software development kit (SDK) as a template.
In the Retail Server extension project, add a reference to your CRT extension library or project. This reference lets you call the CRT request, response, and entities.
In the Retail Server extension project, add the Microsoft.Dynamics.Commerce.Runtime.Hosting.Contracts package using the NuGet package manager. The NuGet packages can be found in the RetailSDK\pkgs folder.
Create a new public controller class and extend it from IController. This controller class will contain the method that the Retail Server API must expose, the controller class must be public.
Inside the controller class, add methods to call the CRT request. Don’t extend the new controller class from existing controller classes such as CustomerController, SalesOrdersController, or ProductController. Extension classes must extend only the IController class.
Add the RoutePrefix attribute on the controller class (Controller class name).
[RoutePrefix("SimpleExtension")]Note
Adding RoutePrefix attribute is optional. If you add the RoutePrefix attribute, you must add the BindEntity attribute with only the custom entity. Adding out of the box RoutePrefix (for example, Customers and Product) and binding out of the box entities (for example, Product, Cart, and Customer) is not supported. You can add only custom RoutePrefix and Custom entity.
Add the BindEntity attribute on the controller class. This step is optional. Add the attribute only if you're adding the RoutePrefix and returning a custom entity.
[BindEntity(typeof(SimpleEntity))]
Note
Steps 7 and 8 are required if the extension class is bound to an entity. These steps are not required for an unbounded controller class returning simple types, not any entity.
The following sample code creates a simple Retail Server API to return an entity, a string, and a bool value. The CRT request and response used in the sample is not included in this sample. For an example of the CRT request and response, see Commerce runtime (CRT) extensibility and triggers.
Sample code for a controller class bounded to a custom entity
Note
Extension code should not bind to the existing entities such as Customer, Cart, or Product. If the API returns a collection, it must return only type IEnumerable<T>, returning any other type like Dictionary <String, String> is not supported. As a result, you may get an error such as System.Collections.Generic.Dictionary2[System.String,System.String] is not supported. To return a collection, Commerce APIs use PageResult<T>, which implements IEnumerable<T>. Follow this pattern to return the collection.
// New extended controller.
[RoutePrefix("SimpleExtension")]
[BindEntity(typeof(SimpleEntity))]
public class SimpleExtensionController : IController
{
    /// <summary>
    /// The action to get the string value.
    /// </summary>
    /// <param name="context">The context parameters.</param>
    /// <param name="stringValue">The string value parameters.</param>
    /// <returns>The string value.</returns>
    [HttpPost]
    [Authorization(CommerceRoles.Customer, CommerceRoles.Employee)]
    public async Task<string> GetStringValue(IEndpointContext context, string stringValue)
    {
        GetStringValueResponse resp = await context.ExecuteAsync<GetStringValueResponse>
                                    (new GetStringValueRequest(stringValue)).ConfigureAwait(false);
        return resp.StringValue;
    }

    /// <summary>
    /// The action to get the bool value.
    /// </summary>
    /// <param name="context">The context parameters.</param>
    /// <param name="boolValue">The string value parameters.</param>
    /// <returns>The bool value.</returns>
    [HttpPost]
    [Authorization(CommerceRoles.Customer, CommerceRoles.Employee)]
    public async Task<bool> GetBoolValue(IEndpointContext context, string boolValue)
    {
        GetBoolValueResponse resp = await context.ExecuteAsync<GetBoolValueResponse>
                                    (new GetBoolValueRequest(boolValue)).ConfigureAwait(false);
        return resp.BoolValue;
    }

    /// <summary>
    /// The action to get the simple entity.
    /// </summary>
    /// <param name="context">The context parameters.</param>
    /// <param name="name">The name parameters.</param>
    /// <returns>The simple entity.</returns>
    [HttpPost]
    [Authorization(CommerceRoles.Customer, CommerceRoles.Employee)]
    public async Task<SimpleEntity> GetSimpleEntity(IEndpointContext context, string name)
    {
        GetSimpleEntityResponse resp = await context.ExecuteAsync<GetSimpleEntityResponse>
                                        (new GetSimpleEntityRequest(name)).ConfigureAwait(false);
        return resp.SimpleEntityObj;
    }
}
Sample code for a controller class not bounded to a custom entity
namespace Contoso.UnboundController.Sample
{
    using System.Threading.Tasks;
    using Microsoft.Dynamics.Commerce.Runtime.DataModel;
    using Microsoft.Dynamics.Commerce.Runtime.Hosting.Contracts;

    /// <summary>
    /// An extension unbounded controller sample.
    /// </summary>
    public class UnboundController : IController
    {
        /// <summary>
        /// A simple GET endpoint to demonstrate GET endpoints on an unbound controller.
        /// </summary>
        /// <returns>A simple true value to indicate the endpoint was reached.</returns>
        [HttpGet]
        [Authorization(CommerceRoles.Anonymous, CommerceRoles.Application, CommerceRoles.Customer, CommerceRoles.Device, CommerceRoles.Employee, CommerceRoles.Storefront)]
        public Task<bool> SampleGet()
        {
            return Task.FromResult(true);
        }

        /// <summary>
        /// A simple POST endpoint to demonstrate POST endpoints on an unbound controller.
        /// </summary>
        /// <returns>A simple true value to indicate the endpoint was reached.</returns>
        [HttpPost]
        [Authorization(CommerceRoles.Customer, CommerceRoles.Device, CommerceRoles.Employee)]
        public Task<bool> SamplePost()
        {
            return Task.FromResult(true);
        }
    }
}
The Retail Server APIs support different authorization roles. Access to the controller method is permitted based on the authorization roles that are specified in the controller method Authorizations attribute. The following example shows the supported authorization roles. Extension code should not use the CommerceAuthorization attribute instead of the Authorizations attribute. The CommerceAuthorization attribute is only supported in SDK versions earlier than 10.0.11.
// Represents the type of logon type.
[DataContract]
public static class CommerceRoles
{
    // Anonymous Role.
    [DataMember]
    public const string Anonymous = "Anonymous";

    // SharePoint Role used by Connector.
    [DataMember]
    public const string Storefront = "Storefront";

    // Employee Role.
    [DataMember]
    public const string Employee = "Employee";

    // Customer Role.
    [DataMember]
    public const string Customer = "Customer";

    // Represents the Device level of authentication.
    [DataMember]
    public const string Device = "Device";

    // Represents Application level of authentication.
    [DataMember]
    public const string Application = "Application";

    // The list of all possible Microsoft.Dynamics.Commerce.Runtime.DataModel.CommerceRoles values.
    public static readonly string[] All;
}
Support paging in Retail Server APIs
Starting in release 10.0.19, if the API requires paging you can add the QueryResultSettings parameter to the API and pass the value from the client. QueryResultSettings contains PagingInfo and other parameters for records to fetch or skip.
The extension can pass QueryResultSettings to the CRT request, which the CRT request can use when there is a database query.
The full sample code is available in the Retail SDK: RetailSDK\SampleExtensions\CommerceRuntime\Extensions.StoreHoursSample\StoreHoursDataService.cs RetailSDK\SampleExtensions\RetailServer\Extensions.StoreHoursSample\StoreHoursController.cs"
    [HttpPost]
        [Authorization(CommerceRoles.Anonymous, CommerceRoles.Customer, CommerceRoles.Device, CommerceRoles.Employee)]
        public async Task<PagedResult<SampleDataModel.StoreDayHours>> GetStoreDaysByStore(IEndpointContext context, string StoreNumber, QueryResultSettings queryResultSettings)
        {
            var request = new GetStoreHoursDataRequest(StoreNumber) { QueryResultSettings = queryResultSettings };
            var hoursResponse = await context.ExecuteAsync<GetStoreHoursDataResponse>(request).ConfigureAwait(false);
            return hoursResponse.DayHours;
        }
private async Task<CommerceEntity> GetStoreDayHoursAsync(GetStoreHoursDataRequest request)
            {
                ThrowIf.Null(request, "request");

                using (DatabaseContext databaseContext = new DatabaseContext(request.RequestContext))
                {
                    var query = new SqlPagedQuery(request.QueryResultSettings)
                    {
                        DatabaseSchema = "ext",
                        Select = new ColumnSet("DAY", "OPENTIME", "CLOSINGTIME", "RECID"),
                        From = "CONTOSORETAILSTOREHOURSVIEW",
                        Where = "STORENUMBER = @storeNumber",
                    };

                    query.Parameters["@storeNumber"] = request.StoreNumber;
                    return new GetStoreHoursDataResponse(await databaseContext.ReadEntityAsync<DataModel.StoreDayHours>(query).ConfigureAwait(false));
                }
            }
Register the extension
Build the extension project, and copy the binary to the \RetailServer\webroot\bin\Ext folder.
Update the Commerce Scale Unit web.config file in the \RetailServer\webroot folder by adding the new extension library name in the extensionComposition section.
<extensionComposition>
    <!-- Use fully qualified assembly names for ALL if you need to support loading from the Global Assembly Cache.
    If you host in an application with a bin folder, this is not required. -->
    <add source="assembly" value="SimpleExtensionSample" >
</extensionComposition>
In Internet Information Services (IIS), restart the Commerce Scale Unit to load the new extension.
Validate the extension
To verify that the extension loaded successfully, you can browse the Retail Server metadata. Confirm that your entities and methods appear in the list. To browse the metadata, open a URL in the following format in a web browser:
https://RS-URL/Commerce/$metadataTo call the Retail Server extension in your client, you must generate the client Typescript proxy. You can then use the proxy to call your new Retail Server APIs from the client.
You don't have to add or include any EdmModelExtender files in the extension with the Retail Server extensions APIs. The files are required only if you're using Retail SDK version 10.0.10 or earlier.
Debugging RS extension
To debug the RS extension project in Visual Studio. Go to Debug > Attach to Process. Select w3wp.exe (the IIS process for Retail Server). If there are multiple w3wp.exe processes, use the correct process based on the process ID. The retail server process ID can be found using IIS > Worker processes or by using the command prompt and the tasklist command.
Generate the Typescript proxy for POS
The POS uses the Typescript proxy to access the Retail Server APIs and CRT entities. The proxy class acts as manger class or wrapper to access the Retail server APIs without the proxy extension manually finding the Retail server API and entities metadata.
Steps to generate the proxy files
In Visual Studio 2017, open the sample proxy template project from \RetailSDK\Code\SampleExtensions\TypeScriptProxy\TypeScriptProxy.Extensions.StoreHoursSample\Proxies.TypeScriptProxy.Extensions.StoreHoursSample.csproj in Visual Studio 2017. Rename the project if a new name is required.
Add the Retail Server extension project to this proxy template project as a project reference project. Remove the existing StoreHoursSample project reference.
Right-click the Proxies.TypeScriptProxy.Extensions.StoreHoursSample.csproj project, and then select Edit Proxies.TypeScriptProxy.Extensions.StoreHoursSample.csproj.
Under the <RetailServerExtensionAssemblies> node, specify your extension Retail Server assembly name. The following example shows how to add the assembly name.
<ItemGroup>
    <RetailServerExtensionAssemblies Include="..\..\RetailServer\Extensions.Sample\bin\$(Configuration)\net461\$(AssemblyNamePrefix).RetailServer.Extension.Sample.dll" />
</ItemGroup>
Under the <Copy> node, update the DestinationFolder path of your POS extension folder, so that generated proxy files are automatically copied to the POS extension folder automatically. The generated proxy files will also be copied to \RetailSDK\Code\SampleExtensions\TypeScriptProxy\TypeScriptProxy.Extensions.StoreHoursSample\DataService. The following example shows how to update the path.
<Copy SourceFiles="@(GeneratedDataServiceContracts)" DestinationFolder="$(SdkRootPath)\POS\Extensions\Sample\DataService" SkipUnchangedFiles="true" />After the changes are completed, build the proxy project to generate the TypeScript proxy files. When the build is completed, the proxy files will be available in the \RetailSDK\Code\SampleExtensions\TypeScriptProxy\TypeScriptProxy.Extensions.StoreHoursSample\DataService folder and the folder that is specified in the Copy command. The path and folder path can vary, depending on the folder structure.
Retail server extension in offline
A Retail Server extension built using the Microsoft.Dynamics.Commerce.Runtime.Hosting.Contracts API can be used in an offline implementation. You don't need to generate a separate C# proxy library. Copy the Retail Server extension library in the \Microsoft Dynamics 365\70\Retail Modern POS\ClientBroker\ext folder and update the RetailProxy.MPOSOffline.ext config file to include this library. This extension must only generate the Typescript proxy. SDK samples can be found in the \RetailSDK\SampleExtensions\TypeScriptProxy) folder.
The following example shows how to update the add element in the RetailProxy.MPOSOffline.ext configuration file.
<?xml version="1.0" encoding="utf-8"?>
<retailProxyExtensions>
    <composition>
        <add source="assembly" value="Contoso.RetailServer.StoreHoursSample" />
    </composition>
</retailProxyExtensions>
Povratne informacije
Kmalu na voljo: V letu 2024 bomo ukinili storitev Težave v storitvi GitHub kot mehanizem za povratne informacije za vsebino in jo zamenjali z novim sistemom za povratne informacije. Za več informacij si oglejte: https://aka.ms/ContentUserFeedback.
Pošlji in prikaži povratne informacije za