opomba,
Dostop do te strani zahteva pooblastilo. Poskusite se vpisati alispremeniti imenike.
Dostop do te strani zahteva pooblastilo. Poskusite lahko spremeniti imenike.
The iCloud storage API in iOS 5 allows applications to save user documents and application-specific data to a central location and access those items from all the user's devices.
There are four types of storage available:
Key-Value storage - to share small amounts of data with your application on a user's other devices.
UIDocument storage - to store documents and other data in the user's iCloud account using a subclass of UIDocument.
CoreData - SQLite database storage.
Individual files and directories - for managing lots of different files directly in the file system.
This document discusses the first two types - Key-Value pairs and UIDocument subclasses - and how to use those features in Xamarin.iOS.
Important
Apple provides tools to help developers properly handle the European Union's General Data Protection Regulation (GDPR).
Requirements
- The latest stable version of Xamarin.iOS
- Xcode 10
- Visual Studio for Mac or Visual Studio 2019.
Preparing for iCloud development
Applications must be configured to use iCloud both in the Apple Provisioning Portal and the project itself. Before developing for iCloud (or trying out the samples) follow the steps below.
To correctly configure an application to access iCloud:
Find your TeamID - login to developer.apple.com and visit the Member Center > Your Account > Developer Account Summary to get your Team ID (or Individual ID for single developers). It will be a 10 character string ( A93A5CM278 for example) - this forms part of the "container identifier".
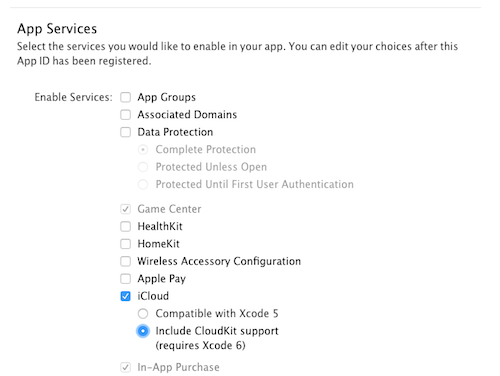
Create a new App ID - To create an App ID, follow the steps outlined in the Provisioning for Store Technologies section of the Device Provisioning guide, and be sure to check iCloud as an allowed service:
Create a new Provisioning Profile - To create a Provisioning Profile, follow the steps outlined in the Device Provisioning guide .
Add the Container Identifier to Entitlements.plist - the container identifier format is
TeamID.BundleID. For more information refer to the Working with Entitlements guide.Configure the project properties - In the Info.plist file ensure the Bundle Identifier matches the Bundle ID set when creating an App ID; The iOS Bundle Signing uses a Provisioning Profile that contain an App ID with the iCloud App Service, and the Custom Entitlements file selected. This can all be done in Visual Studio under the project Properties pane.
Enable iCloud on your device - go to Settings > iCloud and ensure that the device is logged in. Select and turn on the Documents & Data option.
You must use a device to test iCloud - it will not work on the Simulator. In fact, you really need two or more devices all signed in with the same Apple ID to see iCloud in action.
Key-Value Storage
Key-value storage is intended for small amounts of data that a user might like persisted across devices - such as the last page they viewed in a book or magazine. Key-value storage should not be used for backing-up data.
There are some limitations to be aware of when using key-value storage:
Maximum key size - Key names cannot be longer than 64 bytes.
Maximum value size - You cannot store more than 64 kilobytes in a single value.
Maximum key-value store size for an app - Applications can only store up to 64 kilobytes of key-value data in total. Attempts to set keys beyond that limit will fail and the previous value will persist.
Data types - Only basic types like strings, numbers and booleans can be stored.
The iCloudKeyValue example demonstrates how it works. The sample code creates a key named for each device: you can set this key on one device and watch the value get propagated to others. It also creates a key called "Shared" which can be edited on any device - if you edit on many devices at once, iCloud will decide which value "wins" (using a timestamp on the change) and gets propagated.
This screenshot shows the sample in use. When change notifications are received from iCloud they are printed in the scrolling text view at the bottom of the screen and updated in the input fields.
Setting and retrieving data
This code shows how to set a string value.
var store = NSUbiquitousKeyValueStore.DefaultStore;
store.SetString("testkey", "VALUE IN THE CLOUD");  // key and value
store.Synchronize();
Calling Synchronize ensures the value is persisted to local disk storage only. The synchronization to iCloud happens in the background and cannot be "forced" by application code. With good network connectivity the synchronization will often happen within 5 seconds, however if the network is poor (or disconnected) an update may take much longer.
You can retrieve a value with this code:
var store = NSUbiquitousKeyValueStore.DefaultStore;
display.Text = store.GetString("testkey");
The value is retrieved from the local data store - this method does not attempt to contact iCloud servers to get the "latest" value. iCloud will update the local data store according to its own schedule.
Deleting Data
To completely remove a key-value pair, use the Remove method like this:
var store = NSUbiquitousKeyValueStore.DefaultStore;
store.Remove("testkey");
store.Synchronize();
Observing Changes
An application can also receive notifications when values are changed by
iCloud by adding an observer to the NSNotificationCenter.DefaultCenter.
The following code from KeyValueViewController.cs ViewWillAppear method
shows how to listen for those notifications and create a list of which keys have
been changed:
keyValueNotification =
NSNotificationCenter.DefaultCenter.AddObserver (
    NSUbiquitousKeyValueStore.DidChangeExternallyNotification, notification => {
    Console.WriteLine ("Cloud notification received");
    NSDictionary userInfo = notification.UserInfo;

    var reasonNumber = (NSNumber)userInfo.ObjectForKey (NSUbiquitousKeyValueStore.ChangeReasonKey);
    nint reason = reasonNumber.NIntValue;

    var changedKeys = (NSArray)userInfo.ObjectForKey (NSUbiquitousKeyValueStore.ChangedKeysKey);
    var changedKeysList = new List<string> ();
    for (uint i = 0; i < changedKeys.Count; i++) {
        var key = changedKeys.GetItem<NSString> (i); // resolve key to a string
        changedKeysList.Add (key);
    }
    // now do something with the list...
});
Your code can then take some action with the list of changed keys, such as updating a local copy of them or updating the UI with the new values.
Possible change reasons are: ServerChange (0), InitialSyncChange (1), or QuotaViolationChange (2). You can access the reason and perform different processing if required (for example, you might need to remove some keys as a result of a QuotaViolationChange).
Document Storage
iCloud Document Storage is designed to manage data that is important to your app (and to the user). It can be used to manage files and other data that your app needs to run, while at the same time providing iCloud-based backup and sharing functionality across all the user's devices.
This diagram shows how it all fits together. Each device has data saved on
local storage (the UbiquityContainer) and the operating system's iCloud Daemon
takes care of sending and receiving data in the cloud. All file access to the
UbiquityContainer must be done via FilePresenter/FileCoordinator to prevent
concurrent access. The UIDocument class implements those for you; this
example shows how to use UIDocument.
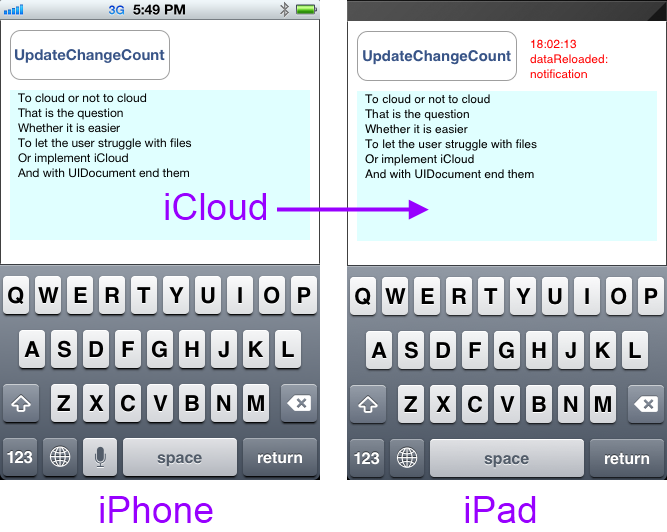
The iCloudUIDoc example implements a simple UIDocument subclass that
contains a single text field. The text is rendered in a UITextView and
edits are propagated by iCloud to other devices with a notification message
shown in red. The sample code does not deal with more advanced iCloud features
like conflict resolution.
This screenshot shows the sample application - after changing the text and pressing UpdateChangeCount the document is synchronized via iCloud to other devices.
There are five parts to the iCloudUIDoc sample:
Accessing the UbiquityContainer - determine if iCloud is enabled, and if so the path to your application's iCloud storage area.
Creating a UIDocument subclass - create a class to intermediate between iCloud storage and your model objects.
Finding and opening iCloud documents - use
NSFileManagerandNSPredicateto find iCloud documents and open them.Displaying iCloud documents - expose properties from your
UIDocumentso that you can interact with UI controls.Saving iCloud documents - ensure that changes made in the UI are persisted to disk and iCloud.
All iCloud operations run (or should run) asynchronously so that they don't block while waiting for something to happen. You will see three different ways of accomplishing this in the sample:
Threads - in AppDelegate.FinishedLaunching the initial call to GetUrlForUbiquityContainer is done on another thread to
prevent blocking the main thread.
NotificationCenter - registering for notifications when
asynchronous operations such as NSMetadataQuery.StartQuery complete.
Completion Handlers - passing in methods to run on
completion of asynchronous operations like UIDocument.Open.
Accessing the UbiquityContainer
The first step in using iCloud Document Storage is to determine whether iCloud is enabled, and if so the location of the "ubiquity container" (the directory where iCloud-enabled files are stored on the device).
This code is in the AppDelegate.FinishedLaunching method of the sample.
// GetUrlForUbiquityContainer is blocking, Apple recommends background thread or your UI will freeze
ThreadPool.QueueUserWorkItem (_ => {
    CheckingForiCloud = true;
    Console.WriteLine ("Checking for iCloud");
    var uburl = NSFileManager.DefaultManager.GetUrlForUbiquityContainer (null);
    // OR instead of null you can specify "TEAMID.com.your-company.ApplicationName"

    if (uburl == null) {
        HasiCloud = false;
        Console.WriteLine ("Can't find iCloud container, check your provisioning profile and entitlements");

        InvokeOnMainThread (() => {
            var alertController = UIAlertController.Create ("No \uE049 available",
            "Check your Entitlements.plist, BundleId, TeamId and Provisioning Profile!", UIAlertControllerStyle.Alert);
            alertController.AddAction (UIAlertAction.Create ("OK", UIAlertActionStyle.Destructive, null));
            viewController.PresentViewController (alertController, false, null);
        });
    } else { // iCloud enabled, store the NSURL for later use
        HasiCloud = true;
        iCloudUrl = uburl;
        Console.WriteLine ("yyy Yes iCloud! {0}", uburl.AbsoluteUrl);
    }
    CheckingForiCloud = false;
});
Although the sample does not do so, Apple recommends calling GetUrlForUbiquityContainer whenever an app comes to the foreground.
Creating a UIDocument Subclass
All iCloud files and directories (ie. anything stored in the UbiquityContainer directory) must be managed using NSFileManager methods, implementing the NSFilePresenter protocol and writing via an NSFileCoordinator. The simplest way to do all of that is not to write it yourself, but subclass UIDocument which does it all for you.
There are only two methods that you must implement in a UIDocument subclass to work with iCloud:
LoadFromContents - passes in the NSData of the file's contents for you to unpack into your model class/es.
ContentsForType - request for you to supply the NSData representation of your model class/es to save to disk (and the Cloud).
This sample code from iCloudUIDoc\MonkeyDocument.cs shows how to implement UIDocument.
public class MonkeyDocument : UIDocument
{
    // the 'model', just a chunk of text in this case; must easily convert to NSData
    NSString dataModel;
    // model is wrapped in a nice .NET-friendly property
    public string DocumentString {
        get {
            return dataModel.ToString ();
        }
        set {
            dataModel = new NSString (value);
        }
    }
    public MonkeyDocument (NSUrl url) : base (url)
    {
        DocumentString = "(default text)";
    }
    // contents supplied by iCloud to display, update local model and display (via notification)
    public override bool LoadFromContents (NSObject contents, string typeName, out NSError outError)
    {
        outError = null;

        Console.WriteLine ("LoadFromContents({0})", typeName);

        if (contents != null)
            dataModel = NSString.FromData ((NSData)contents, NSStringEncoding.UTF8);

        // LoadFromContents called when an update occurs
        NSNotificationCenter.DefaultCenter.PostNotificationName ("monkeyDocumentModified", this);
        return true;
    }
    // return contents for iCloud to save (from the local model)
    public override NSObject ContentsForType (string typeName, out NSError outError)
    {
        outError = null;

        Console.WriteLine ("ContentsForType({0})", typeName);
        Console.WriteLine ("DocumentText:{0}",dataModel);

        NSData docData = dataModel.Encode (NSStringEncoding.UTF8);
        return docData;
    }
}
The data model in this case is very simple - a single text field. Your data model can be as complex as required, such as an Xml document or binary data. The primary role of the UIDocument implementation is to translate between your model classes and an NSData representation that can be saved/loaded on disk.
Finding and Opening iCloud Documents
The sample app only deals with a single file - test.txt - so the code in
AppDelegate.cs creates an NSPredicate and NSMetadataQuery to look specifically
for that filename. The NSMetadataQuery runs asynchronously and sends a
notification when it finishes. DidFinishGathering gets called by the
notification observer, stops the query and calls LoadDocument, which uses the
UIDocument.Open method with a completion handler to attempt to load the file and
display it in a MonkeyDocumentViewController.
string monkeyDocFilename = "test.txt";
void FindDocument ()
{
    Console.WriteLine ("FindDocument");
    query = new NSMetadataQuery {
        SearchScopes = new NSObject [] { NSMetadataQuery.UbiquitousDocumentsScope }
    };

    var pred = NSPredicate.FromFormat ("%K == %@", new NSObject[] {
        NSMetadataQuery.ItemFSNameKey, new NSString (MonkeyDocFilename)
    });

    Console.WriteLine ("Predicate:{0}", pred.PredicateFormat);
    query.Predicate = pred;

    NSNotificationCenter.DefaultCenter.AddObserver (
        this,
        new Selector ("queryDidFinishGathering:"),
        NSMetadataQuery.DidFinishGatheringNotification,
        query
    );

    query.StartQuery ();
}

[Export ("queryDidFinishGathering:")]
void DidFinishGathering (NSNotification notification)
{
    Console.WriteLine ("DidFinishGathering");
    var metadataQuery = (NSMetadataQuery)notification.Object;
    metadataQuery.DisableUpdates ();
    metadataQuery.StopQuery ();

    NSNotificationCenter.DefaultCenter.RemoveObserver (this, NSMetadataQuery.DidFinishGatheringNotification, metadataQuery);
    LoadDocument (metadataQuery);
}

void LoadDocument (NSMetadataQuery metadataQuery)
{
    Console.WriteLine ("LoadDocument");

    if (metadataQuery.ResultCount == 1) {
        var item = (NSMetadataItem)metadataQuery.ResultAtIndex (0);
        var url = (NSUrl)item.ValueForAttribute (NSMetadataQuery.ItemURLKey);
        doc = new MonkeyDocument (url);

        doc.Open (success => {
            if (success) {
                Console.WriteLine ("iCloud document opened");
                Console.WriteLine (" -- {0}", doc.DocumentString);
                viewController.DisplayDocument (doc);
            } else {
                Console.WriteLine ("failed to open iCloud document");
            }
        });
    } // TODO: if no document, we need to create one
}
Displaying iCloud Documents
Displaying a UIDocument shouldn't be any different to any other model class - properties are displayed in UI controls, possibly edited by the user and then written back to the model.
In the example iCloudUIDoc\MonkeyDocumentViewController.cs displays the
MonkeyDocument text in a UITextView. ViewDidLoad listens for the notification
sent in the MonkeyDocument.LoadFromContents method. LoadFromContents is called
when iCloud has new data for the file, so that notification indicates that the
document has been updated.
NSNotificationCenter.DefaultCenter.AddObserver (this,
    new Selector ("dataReloaded:"),
    new NSString ("monkeyDocumentModified"),
    null
);
The sample code notification handler calls a method to update the UI - in this case without any conflict detection or resolution.
[Export ("dataReloaded:")]
void DataReloaded (NSNotification notification)
{
    doc = (MonkeyDocument)notification.Object;
    // we just overwrite whatever was being typed, no conflict resolution for now
    docText.Text = doc.DocumentString;
}
Saving iCloud Documents
To add a UIDocument to iCloud you can call UIDocument.Save directly (for new
documents only) or move an existing file using
NSFileManager.DefaultManager.SetUbiquitious. The example code creates a new
document directly in the ubiquity container with this code (there are two
completion handlers here, one for the Save operation and another for the
Open):
var docsFolder = Path.Combine (iCloudUrl.Path, "Documents"); // NOTE: Documents folder is user-accessible in Settings
var docPath = Path.Combine (docsFolder, MonkeyDocFilename);
var ubiq = new NSUrl (docPath, false);
var monkeyDoc = new MonkeyDocument (ubiq);
monkeyDoc.Save (monkeyDoc.FileUrl, UIDocumentSaveOperation.ForCreating, saveSuccess => {
Console.WriteLine ("Save completion:" + saveSuccess);
if (saveSuccess) {
    monkeyDoc.Open (openSuccess => {
        Console.WriteLine ("Open completion:" + openSuccess);
        if (openSuccess) {
            Console.WriteLine ("new document for iCloud");
            Console.WriteLine (" == " + monkeyDoc.DocumentString);
            viewController.DisplayDocument (monkeyDoc);
        } else {
            Console.WriteLine ("couldn't open");
        }
    });
} else {
    Console.WriteLine ("couldn't save");
}
Subsequent changes to the document are not "saved" directly, instead we
tell the UIDocument that it has changed with UpdateChangeCount, and it will
automatically schedule a save to disk operation:
doc.UpdateChangeCount (UIDocumentChangeKind.Done);
Managing iCloud Documents
Users can manage iCloud documents in the Documents directory of the "ubiquity container" outside of your application via Settings; they can view the file list and swipe to delete. Application code should be able to handle the situation where documents are deleted by the user. Do not store internal application data in the Documents directory.
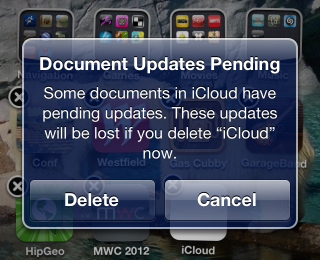
Users will also receive different warnings when they attempt to remove an iCloud-enabled application from their device, to inform them of the status of iCloud documents related to that application.
iCloud Backup
While backing up to iCloud isn't a feature that is directly accessed by developers, the way you design your application can affect the user experience. Apple provides iOS Data Storage Guidelines for developers to follow in their iOS applications.
The most important consideration is whether your app stores large files that are not user-generated (for example, a magazine reader application that stores hundred-plus megabytes of content per issue). Apple prefers that you do not store this sort of data where it will be backed-up to iCloud and unnecessarily fill the user's iCloud quota.
Applications that store large amounts of data like this should either store
it in one of the user directories that is not backed-up (eg. Caches or tmp) or
use NSFileManager.SetSkipBackupAttribute to apply a flag to those files so that
iCloud ignores them during backup operations.
Summary
This article introduced the new iCloud feature included in iOS 5. It examined the steps required to configure your project to use iCloud and then provided examples of how to implement iCloud features.
The key-value storage example demonstrated how iCloud can be used to store a small amount of data similar to the way NSUserPreferences are stored. The UIDocument example showed how more complex data can be stored and synchronized across multiple devices via iCloud.
Finally it included a brief discussion on how the addition of iCloud Backup should influence your application design.


