Configure cross-tenant access settings for B2B direct connect
Use cross-tenant access settings to manage how you collaborate with other Microsoft Entra organizations through B2B direct connect. These settings let you determine the level of outbound access your users have to external organizations. They also let you control the level of inbound access that users in external Microsoft Entra organizations have to your internal resources.
Default settings: The default cross-tenant access settings apply to all external Microsoft Entra organizations, except organizations for which you configure individual settings. You can change these default settings. For B2B direct connect, you typically leave the default settings as-is and enable B2B direct connect access with organization-specific settings. Initially, your default values are as follows:
- B2B direct connect initial default settings - By default, outbound B2B direct connect is blocked for your entire tenant, and inbound B2B direct connect is blocked for all external Microsoft Entra organizations.
- Organizational settings - No organizations are added by default.
Organization-specific settings: You can configure organization-specific settings by adding an organization and modifying the inbound and outbound settings for that organization. Organizational settings take precedence over default settings.
Learn more about using cross-tenant access settings to manage B2B direct connect.
Important
Microsoft is beginning to move customers using cross-tenant access settings to a new storage model on August 30, 2023. You may notice an entry in your audit logs informing you that your cross-tenant access settings were updated as our automated task migrates your settings. For a brief window while the migration processes, you will be unable to make changes to your settings. If you are unable to make a change, you should wait a few moments and try the change again. Once the migration completes, you will no longer be capped with 25kb of storage space and there will be no more limits on the number of partners you can add.
Before you begin
- Review the Important considerations section in the cross-tenant access overview before configuring your cross-tenant access settings.
- Decide on the default level of access you want to apply to all external Microsoft Entra organizations.
- Identify any Microsoft Entra organizations that need customized settings.
- Contact organizations with which you want to set up B2B direct connect. Because B2B direct connect is established through mutual trust, both you and the other organization need to enable B2B direct connect with each other in your cross-tenant access settings.
- Obtain any required information from external organizations. If you want to apply access settings to specific users, groups, or applications within an external organization, you need to obtain these IDs from the organization before you can configure access settings.
- To configure cross-tenant access settings in the Microsoft Entra admin center, you need an account with a Global Administrator or Security Administrator role. Teams administrators can read cross-tenant access settings, but they can't update these settings.
Configure default settings
Tip
Steps in this article might vary slightly based on the portal you start from.
Default cross-tenant access settings apply to all external tenants for which you haven't created organization-specific customized settings. If you want to modify the Microsoft Entra ID-provided default settings, follow these steps.
Sign in to the Microsoft Entra admin center as at least a Security Administrator.
Browse to Identity > External Identities > Cross-tenant access settings.
Select the Default settings tab and review the summary page.
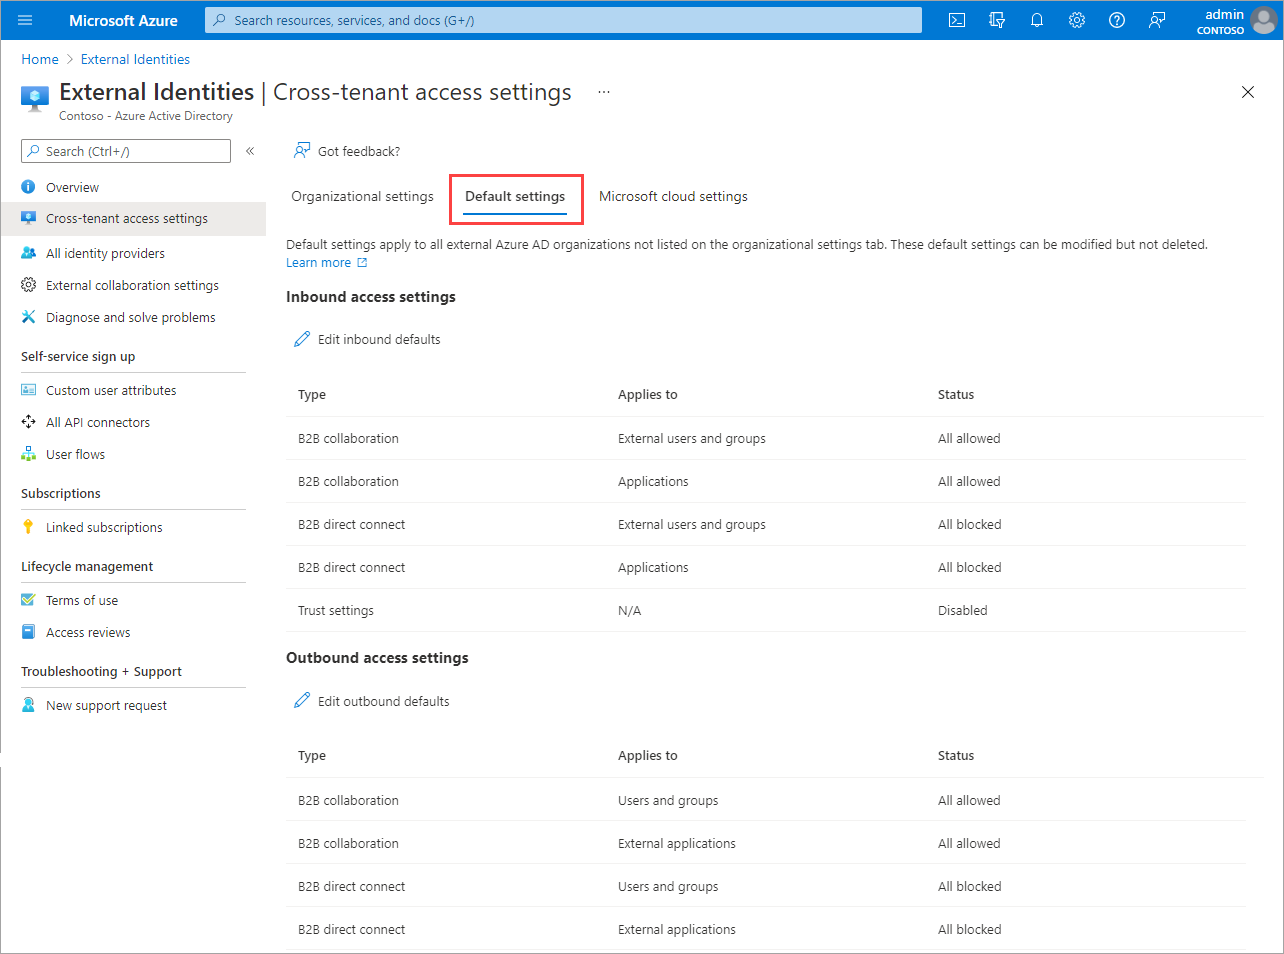
To change the settings, select the Edit inbound defaults link or the Edit outbound defaults link.

Modify the default settings by following the detailed steps in these sections:
Add an organization
Follow these steps to configure customized settings for specific organizations.
Sign in to the Microsoft Entra admin center as at least a Security Administrator.
Browse to Identity > External Identities > Cross-tenant access settings.
Select Organizational settings.
Select Add organization.
On the Add organization pane, type the full domain name (or tenant ID) for the organization.
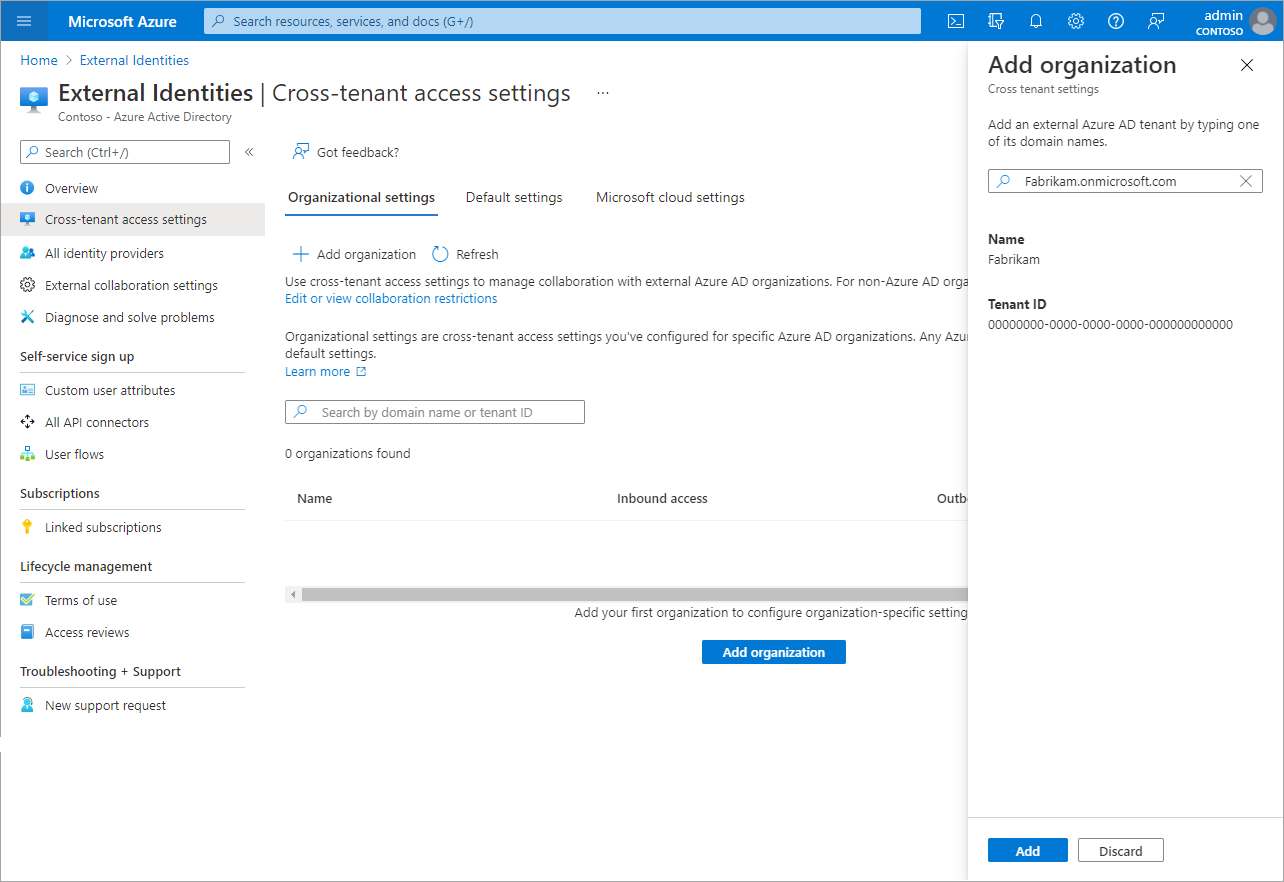
Select the organization in the search results, and then select Add.
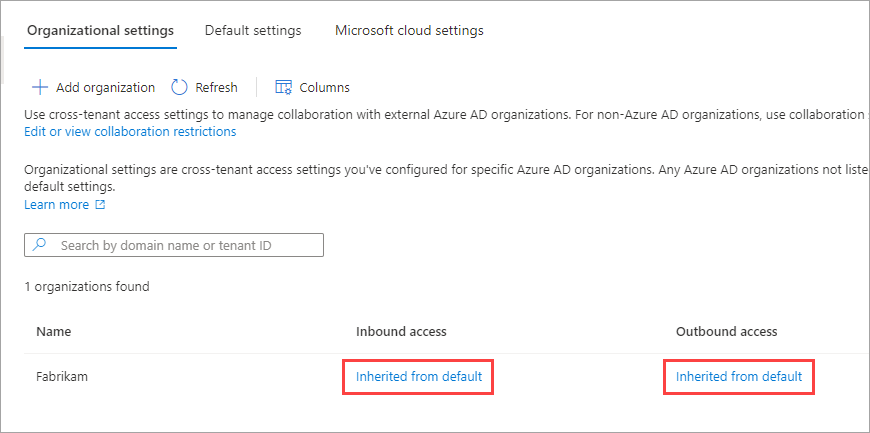
The organization appears in the Organizational settings list. At this point, all access settings for this organization are inherited from your default settings. To change the settings for this organization, select the Inherited from default link under the Inbound access or Outbound access column.
Modify the organization's settings by following the detailed steps in these sections:
Modify inbound access settings
With inbound settings, you select which external users and groups can access the internal applications you choose. Whether you're configuring default settings or organization-specific settings, the steps for changing inbound cross-tenant access settings are the same. As described in this section, you navigate to either the Default tab or an organization on the Organizational settings tab, and then make your changes.
Sign in to the Microsoft Entra admin center as at least a Security Administrator.
Browse to Identity > External Identities > Cross-tenant access settings.
Navigate to the settings you want to modify:
- To modify default inbound settings, select the Default settings tab, and then under Inbound access settings, select Edit inbound defaults.
- To modify settings for a specific organization, select the Organizational settings tab, find the organization in the list (or add one), and then select the link in the Inbound access column.
Follow the detailed steps for the settings you want to change:
To change inbound B2B direct connect settings
Select the B2B direct connect tab
If you're configuring settings for an organization, select one of these options:
Default settings: The organization uses the settings configured on the Default settings tab. If customized settings were already configured for this organization, you need to select Yes to confirm that you want all settings to be replaced by the default settings. Then select Save, and skip the rest of the steps in this procedure.
Customize settings: You can customize the settings to enforce for this organization instead of the default settings. Continue with the rest of the steps in this procedure.
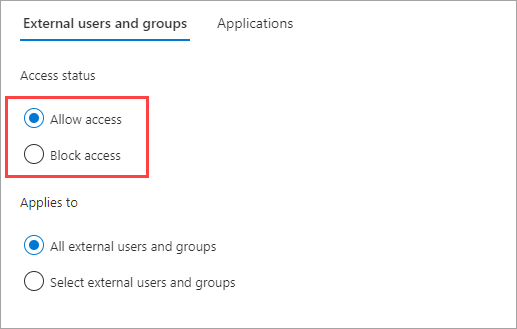
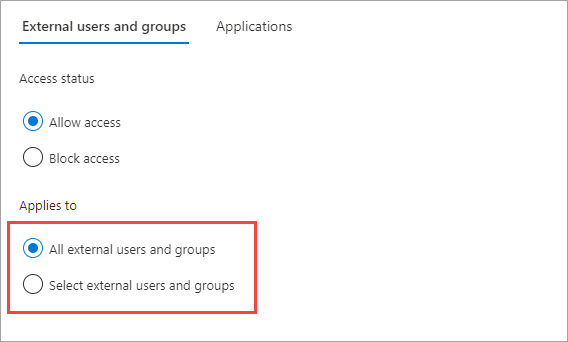
Select External users and groups.
Under Access status, select one of these options:
- Allow access: Allows the users and groups specified under Applies to to access B2B direct connect.
- Block access: Blocks the users and groups specified under Applies to from accessing B2B direct connect. Blocking access for all external users and groups also blocks all your internal applications from being shared via B2B direct connect.
Under Applies to, select one of the following:
- All external users and groups: Applies the action you chose under Access status to all users and groups from external Microsoft Entra organizations.
- Select external users and groups: Lets you apply the action you chose under Access status to specific users and groups within the external organization. A Microsoft Entra ID P1 license is required on the tenant that you configure.
If you chose Select external users and groups, do the following for each user or group you want to add:
- Select Add external users and groups.
- In the Add other users and groups pane, type the user object ID or the group object ID in the search box.
- In the menu next to the search box, choose either user or group.
- Select Add.
Note
You cannot target users or groups in inbound default settings.
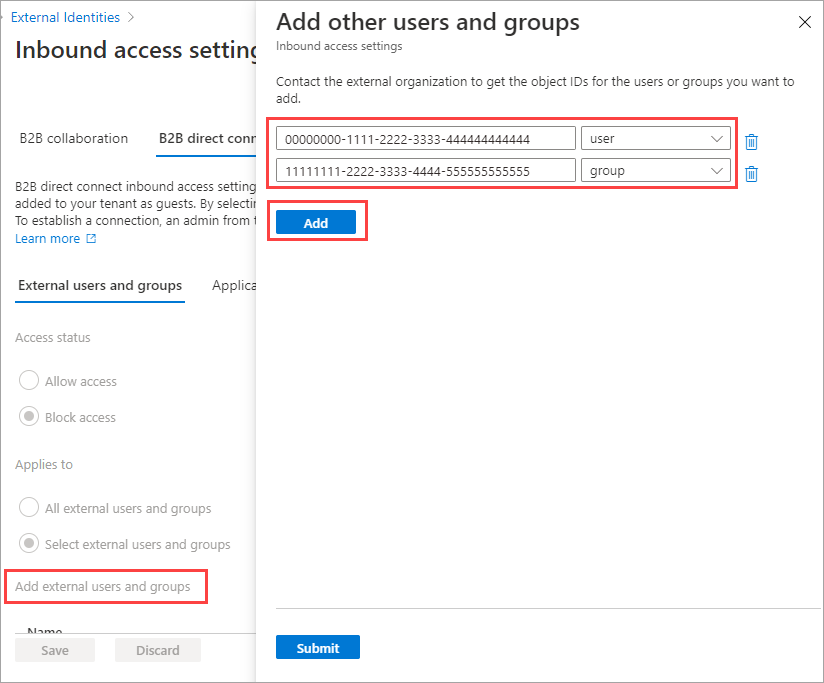
When you're done adding users and groups, select Submit.
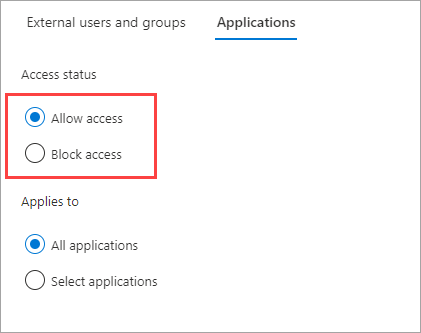
Select the Applications tab.
Under Access status, select one of the following:
- Allow access: Allows the applications specified under Applies to to be accessed by B2B direct connect users.
- Block access: Blocks the applications specified under Applies to from being accessed by B2B direct connect users.
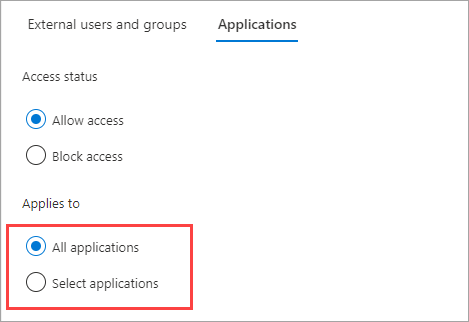
Under Applies to, select one of the following:
- All applications: Applies the action you chose under Access status to all of your applications.
- Select applications (requires a Microsoft Entra ID P1 or P2 subscription): Lets you apply the action you chose under Access status to specific applications in your organization.
If you chose Select applications, do the following for each application you want to add:
- Select Add Microsoft applications.
- In the applications pane, type the application name in the search box and select the application in the search results.
- When you're done selecting applications, choose Select.
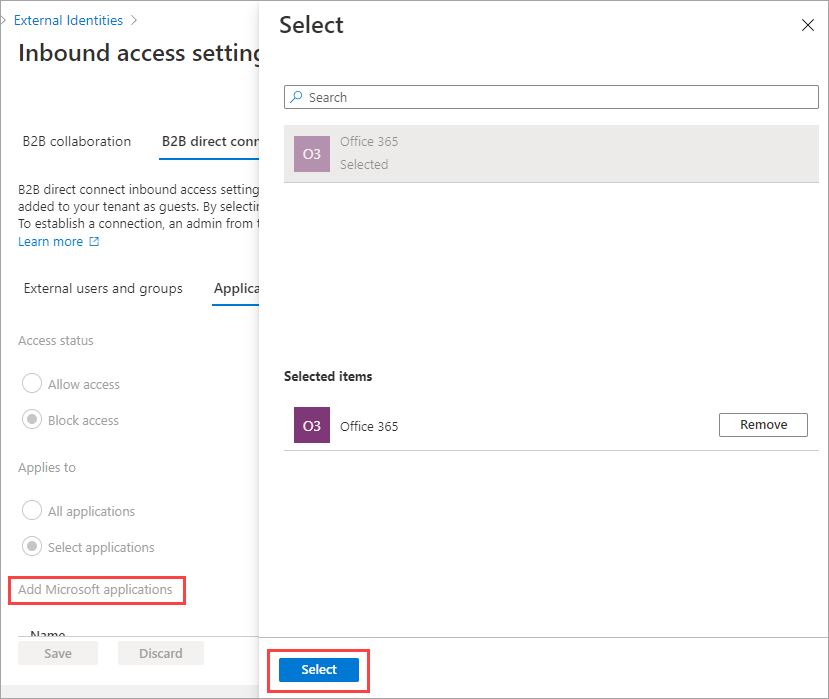
Select Save.
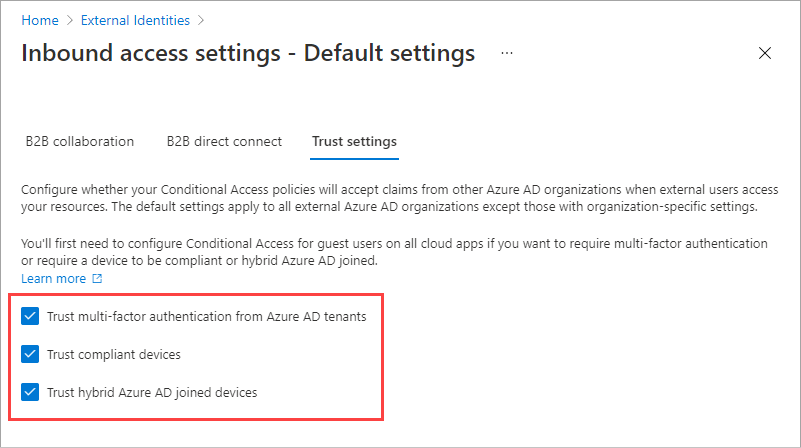
To change inbound trust settings for MFA and device state
Select the Trust settings tab.
If you're configuring settings for an organization, select one of these options:
Default settings: The organization uses the settings configured on the Default settings tab. If customized settings were already configured for this organization, you need to select Yes to confirm that you want all settings to be replaced by the default settings. Then select Save, and skip the rest of the steps in this procedure.
Customize settings: You can customize the settings to enforce for this organization instead of the default settings. Continue with the rest of the steps in this procedure.
Select one or more of the following options:
Trust multi-factor authentication from Microsoft Entra tenants: Select this checkbox if your Conditional Access policies require multifactor authentication (MFA). This setting allows your Conditional Access policies to trust MFA claims from external organizations. During authentication, Microsoft Entra ID checks a user's credentials for a claim that the user completed MFA. If not, an MFA challenge is initiated in the user's home tenant.
Trust compliant devices: Allows your Conditional Access policies to trust compliant device claims from an external organization when their users access your resources.
Trust Microsoft Entra hybrid joined devices: Allows your Conditional Access policies to trust Microsoft Entra hybrid joined device claims from an external organization when their users access your resources.
(This step applies to Organizational settings only.) Review the Automatic redemption option:
- Automatically redeem invitations with the tenant <tenant>: Check this setting if you want to automatically redeem invitations. If so, users from the specified tenant won't have to accept the consent prompt the first time they access this tenant using cross-tenant synchronization, B2B collaboration, or B2B direct connect. This setting only suppresses the consent prompt if the specified tenant checks this setting for outbound access as well.
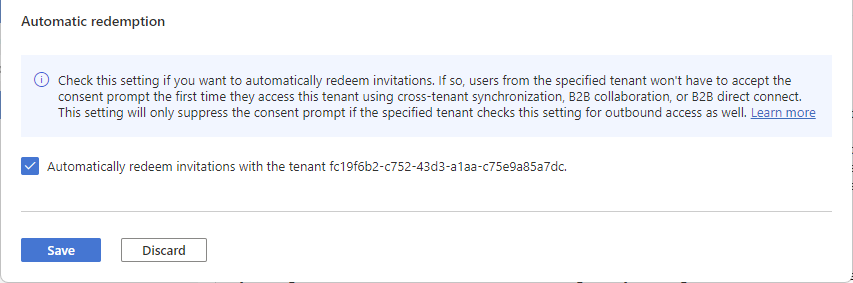
Select Save.
Note
When configuring settings for an organization, you'll notice a Cross-tenant sync tab. This tab doesn't apply to your B2B direct connect configuration. Instead, this feature is used by multi-tenant organizations to enable B2B collaboration across their tenants. For more information, see the multi-tenant organization documentation.
Modify outbound access settings
With outbound settings, you select which of your users and groups are able to access the external applications you choose. The detailed steps for modifying outbound cross-tenant access settings are the same whether you're configuring default or organization-specific settings. As described in this section, navigate to the Default tab or an organization on the Organizational settings tab, and then make your changes.
Sign in to the Microsoft Entra admin center as at least a Security Administrator.
Browse to Identity > External Identities > Cross-tenant access settings.
Navigate to the settings you want to modify:
To modify default outbound settings, select the Default settings tab, and then under Outbound access settings, select Edit outbound defaults.
To modify settings for a specific organization, select the Organizational settings tab, find the organization in the list (or add one) and then select the link in the Outbound access column.
To change the outbound access settings
Select the B2B direct connect tab.
If you're configuring settings for an organization, select one of these options:
Default settings: The organization uses the settings configured on the Default settings tab. If customized settings were already configured for this organization, you need to select Yes to confirm that you want all settings to be replaced by the default settings. Then select Save, and skip the rest of the steps in this procedure.
Customize settings: You can customize the settings for this organization, which will be enforced for this organization instead of the default settings. Continue with the rest of the steps in this procedure.
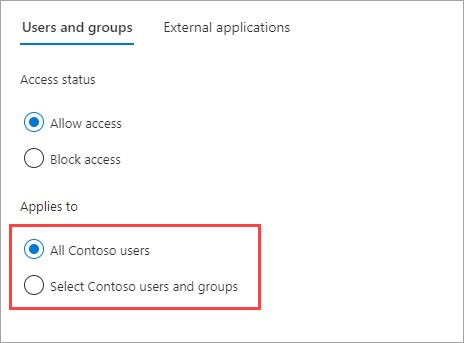
Select Users and groups.
Under Access status, select one of the following:
- Allow access: Allows your users and groups specified under Applies to to access B2B direct connect.
- Block access: Blocks your users and groups specified under Applies to from accessing B2B direct connect. Blocking access for all your users and groups also blocks all external applications from being shared via B2B direct connect.
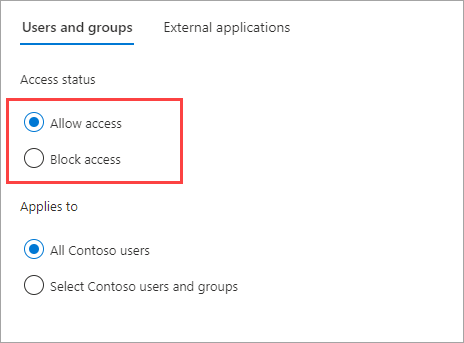
Under Applies to, select one of the following:
- All <your organization> users: Applies the action you chose under Access status to all your users and groups.
- Select <your organization> users and groups (requires a Microsoft Entra ID P1 or P2 subscription): Lets you apply the action you chose under Access status to specific users and groups.
If you chose Select <your organization> users and groups, do the following for each user or group you want to add:
- Select Add <your organization> users and groups.
- In the Select pane, type the user name or the group name in the search box.
- When you're done selecting users and groups, choose Select.
Note
When targeting your users and groups, you won't be able to select users who have configured SMS-based authentication. This is because users who have a "federated credential" on their user object are blocked to prevent external users from being added to outbound access settings. As a workaround, you can use the Microsoft Graph API to add the user's object ID directly or target a group the user belongs to.
Select Save.
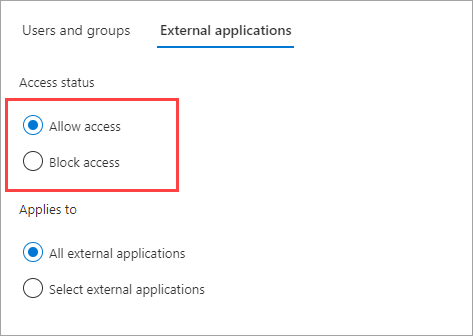
Select the External applications tab.
Under Access status, select one of the following:
- Allow access: Allows the applications specified under Applies to to be accessed by B2B direct connect users.
- Block access: Blocks the applications specified under Applies to from being accessed by B2B direct connect users.
Under Applies to, select one of the following:
- All external applications: Applies the action you chose under Access status to all external applications.
- Select applications (requires a Microsoft Entra ID P1 or P2 subscription): Lets you apply the action you chose under Access status to specific external applications.
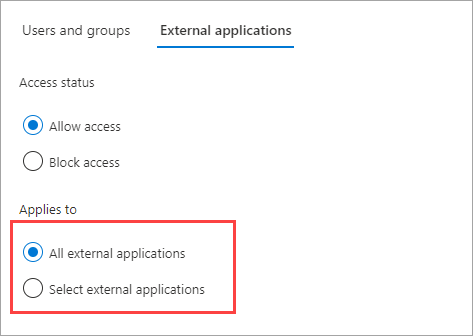
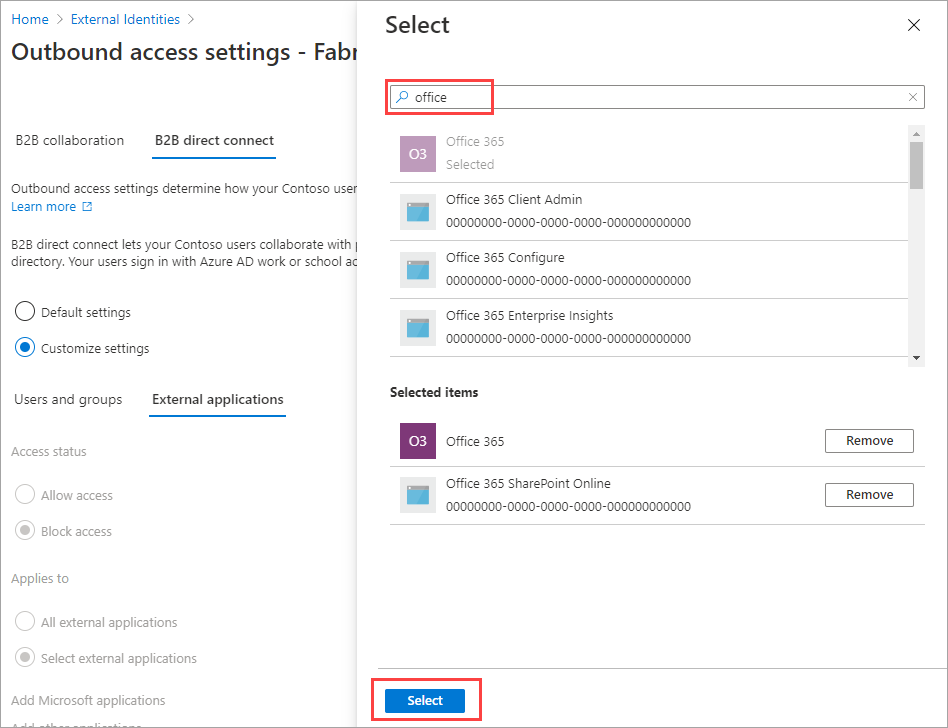
If you chose Select external applications, do the following for each application you want to add:
- Select Add Microsoft applications or Add other applications.
- In the applications pane, type the application name in the search box and select the application in the search results.
- When you're done selecting applications, choose Select.
Select Save.
To change outbound trust settings
(This section applies to Organizational settings only.)
Select the Trust settings tab.
Review the Automatic redemption option:
- Automatically redeem invitations with the tenant <tenant>: Check this setting if you want to automatically redeem invitations. If so, users from this tenant don't have to accept the consent prompt the first time they access the specified tenant using cross-tenant synchronization, B2B collaboration, or B2B direct connect. This setting will only suppress the consent prompt if the specified tenant checks this setting for inbound access as well.
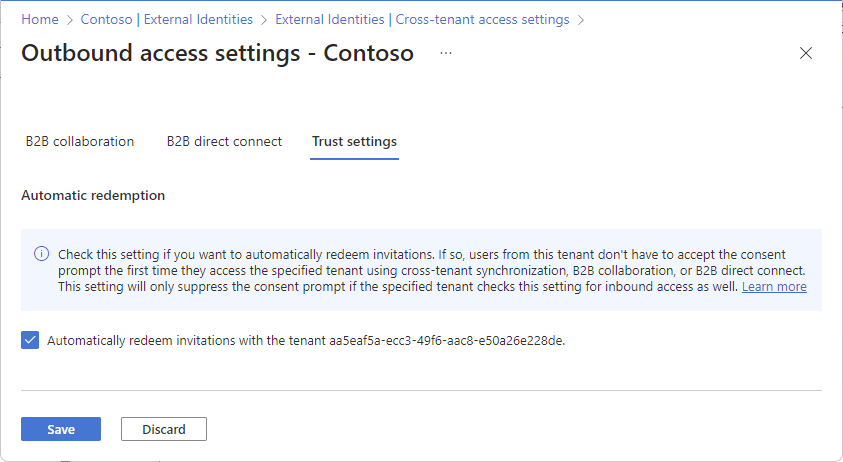
Select Save.
Remove an organization
When you remove an organization from your Organizational settings, the default cross-tenant access settings go into effect for that organization.
Note
If the organization is a cloud service provider for your organization (the isServiceProvider property in the Microsoft Graph partner-specific configuration is true), you won't be able to remove the organization.
Sign in to the Microsoft Entra admin center as at least a Security Administrator.
Browse to Identity > External Identities > Cross-tenant access settings.
Select the Organizational settings tab.
Find the organization in the list, and then select the trash can icon on that row.
Next steps
Configure cross-tenant access settings for B2B collaboration
Povratne informacije
Stiže uskoro: Tokom 2024. godine postepeno ćemo ukidati probleme sa uslugom GitHub kao mehanizam povratnih informacija za sadržaj i zameniti ga novim sistemom povratnih informacija. Dodatne informacije potražite u članku: https://aka.ms/ContentUserFeedback.
Prosledite i prikažite povratne informacije za