Manage quarantined messages and files as an admin
Tip
Did you know you can try the features in Microsoft Defender for Office 365 Plan 2 for free? Use the 90-day Defender for Office 365 trial at the Microsoft Defender portal trials hub. Learn about who can sign up and trial terms on Try Microsoft Defender for Office 365.
In Microsoft 365 organizations with mailboxes in Exchange Online or Microsoft Teams, or in standalone Exchange Online Protection (EOP) organizations without Exchange Online mailboxes or Teams, quarantine holds potentially dangerous or unwanted messages that were detected by EOP and Defender for Office 365.
Admins can view, release, and delete all types of quarantined messages and files for all users.
Admins in organizations with Microsoft Defender for Office 365 can also manage files that were quarantined by Safe Attachments for SharePoint, OneDrive, and Microsoft Teams and Microsoft Teams messages that were quarantined by zero-hour auto purge (ZAP).
Users can manage most quarantined email messages based on the quarantine policy for supported email protection features. For more information about quarantine policies, see Anatomy of a quarantine policy.
Admins and also users (depending on the user reported settings for the organization) can report false positives to Microsoft from quarantine.
You view and manage quarantined messages in the Microsoft Defender portal or in PowerShell (Exchange Online PowerShell for Microsoft 365 organizations with mailboxes in Exchange Online; standalone EOP PowerShell for organizations without Exchange Online mailboxes).
Watch this short video to learn how to manage quarantined messages as an admin.
Tip
As a companion to this article, see our Microsoft Defender for Office 365 setup guide to review best practices and to protect against email, link, and collaboration threats. Features include Safe Links, Safe Attachments, and more. For a customized experience based on your environment, you can access the Microsoft Defender for Office 365 automated setup guide in the Microsoft 365 admin center.
What do you need to know before you begin?
To open the Microsoft Defender portal, go to https://security.microsoft.com. To go directly to the Quarantine page, use https://security.microsoft.com/quarantine.
To connect to Exchange Online PowerShell, see Connect to Exchange Online PowerShell. To connect to standalone EOP PowerShell, see Connect to Exchange Online Protection PowerShell.
You need to be assigned permissions before you can do the procedures in this article. You have the following options:
- Microsoft Defender XDR Unified role based access control (RBAC) (If Email & collaboration > Defender for Office 365 permissions is
 Active. Affects the Defender portal only, not PowerShell):
- Take action on quarantined messages for all users: Security operations / Security data / Email & collaboration quarantine (manage).
- Read-only access to quarantined messages for all users: Security operations / Security data / Security data basics (read).
- Email & collaboration permissions in the Microsoft Defender portal:
- Take action on quarantined messages for all users: Membership in the Quarantine Administrator, Security Administrator, or Organization Management role groups.
- Submit messages from quarantine to Microsoft: Membership in the Security Administrator role groups.
- Use Block sender to add senders to your own Blocked Senders list: Admins see Block sender only if they filter the quarantine results by Recipient > Only me instead of the default value All users. Assigning any permission that gives admin access to quarantine (for example, Security Reader or Global Reader) gives access to Block sender in quarantine if the user filters the quarantine results by Recipient > Only me.
- Read-only access to quarantined messages for all users: Membership in the Security Reader or Global Reader role groups.
- Take action on quarantined messages for all users: Membership in the Quarantine Administrator, Security Administrator, or Organization Management role groups.
- Microsoft Entra permissions: Membership these roles gives users the required permissions and permissions for other features in Microsoft 365:
Take action on quarantined messages for all users: Membership in the Security Administrator or Global Administrator* roles.
Important
* Microsoft recommends that you use roles with the fewest permissions. Using lower permissioned accounts helps improve security for your organization. Global Administrator is a highly privileged role that should be limited to emergency scenarios when you can't use an existing role.
- Submit messages from quarantine to Microsoft: Membership in the Security Administrator role.
- Use Block sender to add senders to your own Blocked Senders list: Admins see Block sender only if they filter the quarantine results by Recipient > Only me instead of the default value All users. Assigning any permission that gives admin access to quarantine (for example, Security Reader or Global Reader) gives access to Block sender in quarantine if the user filters the quarantine results by Recipient > Only me.
Read-only access to quarantined messages for all users: Membership in the Global Reader or Security Reader roles.
Tip
The ability to manage quarantined messages using Exchange Online permissions ended in February 2023 per MC447339.
Guest admins from other organizations can't manage quarantined messages. The admin needs to be in the same organization as the recipients.
- Microsoft Defender XDR Unified role based access control (RBAC) (If Email & collaboration > Defender for Office 365 permissions is
Quarantined messages and files are retained for a default period of time based on why they were quarantined. After the retention period expires, the messages are automatically deleted and aren't recoverable. For more information, see Quarantine retention.
For information about the order of precedence for user allows and blocks and organization allows and blocks, see User and tenant settings conflict.
All actions taken by admins or users on quarantined messages are audited. For more information about audited quarantine events, see Quarantine schema in the Office 365 Management API.
Use the Microsoft Defender portal to manage quarantined email messages
View quarantined email
In the Microsoft Defender portal at https://security.microsoft.com, go to Email & collaboration > Review > Quarantine > Email tab. Or, to go directly to the Email tab on the Quarantine page, use https://security.microsoft.com/quarantine?viewid=Email.
By default, only the first 100 entries are shown until you scroll down to the bottom of the list, which loads more results.
Tip
For answers to frequently asked questions about quarantined messages, select ![]() Resolution to common issues at the top of the page. Or, see the following articles:
Resolution to common issues at the top of the page. Or, see the following articles:
On the Email tab, you can decrease the vertical spacing in the list by clicking ![]() Change list spacing to compact or normal and then selecting
Change list spacing to compact or normal and then selecting ![]() Compact list.
Compact list.
You can sort the entries by clicking on an available column header. Select ![]() Customize columns to change the columns that are shown. The default values are marked with an asterisk (*):
Customize columns to change the columns that are shown. The default values are marked with an asterisk (*):
Time received*
Subject*
Sender*
Quarantine reason* (see the possible values in the
 Filter description.)
Release status* (see the possible values in the
 Filter description.)
Policy type* (see the possible values in the
 Filter description.)
Expires*
Recipient: The recipient email address always resolves to the primary email address, even if the message was sent to a proxy address.
Sender address override reason*: One of the following values:
- None
- Message sender is blocked by recipient settings
- Message sender is blocked by administrator settings
Tip
If a sender is blocked and Don't show blocked senders is selected (default), messages from those senders are shown on the Quarantine page and are included in quarantine notifications when the Sender address override reason value is None. This behavior occurs because the messages were blocked due to reasons other than sender address overrides.
Released by*
Message ID
Policy name
Message size
Mail direction
Recipient tag
To filter the entries, select ![]() Filter. The following filters are available in the Filters flyout that opens:
Filter. The following filters are available in the Filters flyout that opens:
Message ID: The globally unique identifier of the message.
For example, you used message trace to look for a message, and you determine that the message was quarantined instead of delivered. Be sure to include the full message ID value, which might include angle brackets (<>). For example:
<79239079-d95a-483a-aacf-e954f592a0f6@XYZPR00BM0200.contoso.com>.Sender address
Recipient address
Subject
Time received: Select one of the following values:
- Last 24 hours
- Last 7 days (default)
- Last 14 days
- Last 30 days
- Custom: Enter a Start time and End time (date).
Expires: Filter messages by when they expire from quarantine. Select one of the following values:
- Today
- Next 2 days
- Next 7 days
- Custom: Enter a Start time and End time (date).
Recipient tag: Currently, the only selectable user tag is Priority account.
Quarantine reason: Select one or more of the following values:
- Transport rule (mail flow rule)
- Bulk
- Spam
- Data loss prevention
- Malware: Anti-malware policies in EOP or Safe Attachments policies in Defender for Office 365. The Policy Type value indicates which feature was used.
- Admin action - File type block: Messages blocked as malware by the common attachments filter in anti-malware policies. For more information, see Anti-malware policies.
- Phishing: The spam filter verdict was Phishing or anti-phishing protection quarantined the message (spoof settings or impersonation protection).
- High confidence phishing
Recipient: Select one of the following values:
- All users (this is default value, even if it doesn't appear selected)
- Only me: Show only messages where whomever is signed in is a recipient. This value is required for administrators to see the Allow sender and Block sender actions.
Blocked sender: One of the following values:
- Don't show blocked senders (default)
- Show all senders
Tip
If a sender is blocked and Don't show blocked senders is selected, messages from those senders are shown on the Quarantine page and are included in quarantine notifications when the Sender address override reason value is None. This behavior occurs because the messages were blocked due to reasons other than sender address overrides.
Release status: Select one or more of the following values
- Needs review
- Denied
- Release requested
- Released
Policy type: Filter messages by what type of protection policy quarantined the message. Select one or more of the following values:
- Anti-malware policy
- Safe Attachments policy
- Anti-phishing policy
- Anti-spam policy
- Transport rule (mail flow rule)
- Data loss prevention rule
The Policy type and Quarantine reason values are interrelated. For example, Bulk is always associated with an Anti-spam policy, never with an Anti-malware policy.
When you're finished on the Filters flyout, select Apply. To clear the filters, select ![]() Clear filters.
Clear filters.
Tip
Filters are cached. The filters from the last sessions are selected by default the next time you open the Quarantine page. This behavior helps with triage operations.
Use the ![]() Search box and a corresponding value to find specific messages. Wildcards aren't supported. You can search by the following values:
Search box and a corresponding value to find specific messages. Wildcards aren't supported. You can search by the following values:
- Sender email address
- Subject. Use the entire subject of the message. The search isn't case-sensitive.
After you've entered the search criteria, press Enter to filter the results.
Note
The Search box searches for quarantined items in the current view (which is limited to 100 items), not all quarantined items. To search all quarantined items, use ![]() Filter and the resulting Filters flyout.
Filter and the resulting Filters flyout.
After you find a specific quarantined message, select the message to view details about it and to take action on it (for example, view, release, download, or delete the message).
View quarantined email details
In the Microsoft Defender portal at https://security.microsoft.com, go to Email & collaboration > Review > Quarantine > Email tab. Or, to go directly to the Email tab on the Quarantine page, use https://security.microsoft.com/quarantine?viewid=Email.
On the Email tab, select the quarantined message by clicking anywhere in the row other than the check box.
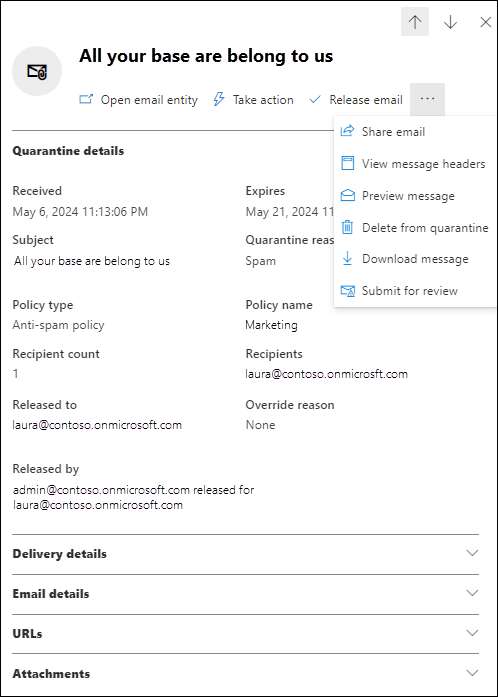
In the details flyout that opens, the following information is available:
Tip
The actions that are available at the top of the flyout are described in Take action on quarantined email.
To see details about other quarantined messages without leaving the details flyout, use  Previous item and Next item at the top of the flyout.
- Quarantine details section:
Received: The date/time when the message was received.
Expires: The date/time when the message is automatically and permanently deleted from quarantine.
Subject
Quarantine reason: Shows if a message has been identified as Spam, Bulk, Phish, matched a mail flow rule (Transport rule), or was identified as containing Malware.
Policy type
Policy name
Recipient count
Recipients: If the message contains many recipients, you can use Preview message or View message header to see the complete list of recipients.
Recipient email addresses always resolve to the primary email address, even if the message was sent to a proxy address.
Not yet released to, Released to, and/or Released by: Depending on the state of the message, one or more of the following values might be available:
- Not yet released to: Email addresses of recipients that the message hasn't been released to.
- Released to: Email addresses of recipients that the message has been released to.
- Released by: The admin that released the message using the format:
<email address of admin who released the message> released for <recipient>. For example,admin@contoso.onmicrosoft.com released to laura@contoso.onmicrosoft.com. If the end user releases the message, it shows the end user's SMTP address. If the release is carried out by the system, it says, "System released". If the release is not carried by an admin, an end user, or the system, it defaults to "Admin."
The rest of the details flyout contains the Delivery details, Email details, URLs, and Attachments sections that are part of the Email summary panel. For more information, see The Email summary panel.
To take action on the message, see the next section.
Tip
To see details about other quarantined messages without leaving the details flyout, use  Previous item and Next item at the top of the flyout.
Take action on quarantined email
In the Microsoft Defender portal at https://security.microsoft.com, go to Email & collaboration > Review > Quarantine > Email tab. Or, to go directly to the Email tab on the Quarantine page, use https://security.microsoft.com/quarantine?viewid=Email.
On the Email tab, select the quarantined email message by using either of the following methods:
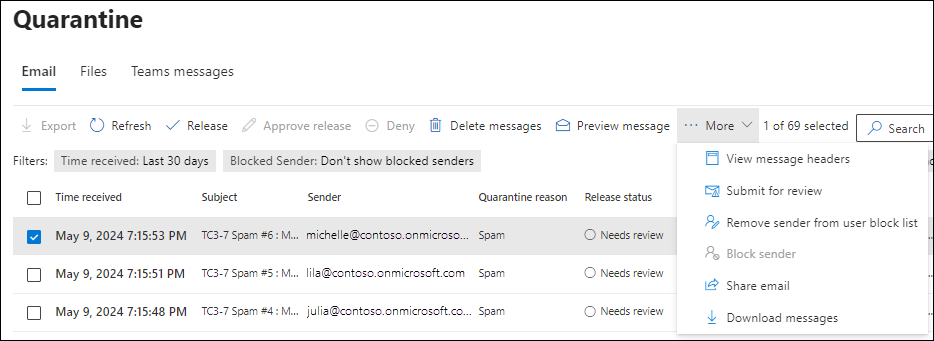
Select the message from the list by selecting the check box next to the first column. The available actions are no longer grayed out.
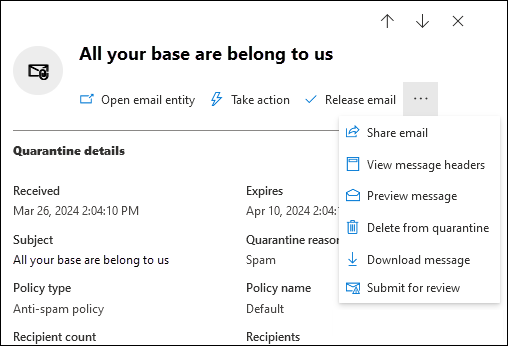
Select the message from the list by clicking anywhere in the row other than the check box. The available actions are in the details flyout that opens.
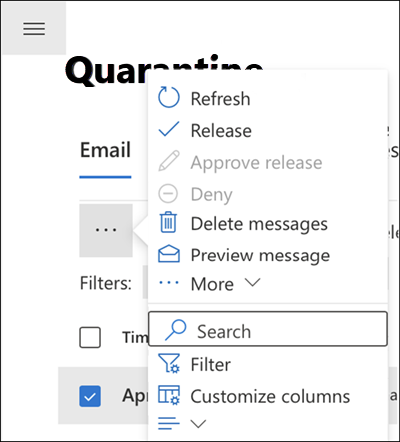
Using either method to select the message, many actions are available under
 More or More options.
After you select the quarantined message, the available actions are described in the following subsections.
Tip
On mobile devices, the action experience is slightly different:
When you select the message by selecting the check box, all actions are under
 More:
More:When you select the message by clicking anywhere in the row other than the check box, description text isn't available on some of the action icons in the details flyout. But, the actions and their order is the same as on a PC:
Release quarantined email
This action isn't available for email messages that have already been released (the Release status value is Released).
If you don't release or remove a message, it's automatically deleted from quarantine after the date shown in the Expires column.
- You can't release a message to the same recipient more than once.
- When you select individual original recipients to receive the released message, you can select only recipients who haven't already received the released message.
- Members of the Security Administrators role group can see and use the Submit the message to Microsoft to improve detection and Allow email with similar attributes options.
- Users can report false positives to Microsoft from quarantine, depending on the value of the Reporting from quarantine setting in user reported settings.
Tip
Third party anti-virus solutions, security services, and outbound connectors can cause the following issues for messages that are released from quarantine:
- The message is quarantined after being released.
- Content is removed from the released message before it reaches the recipient's Inbox.
- The released message never arrives in the recipient's Inbox.
- Actions in quarantine notifications might be randomly selected.
Verify that you aren't using third party filtering before you open a support ticket about these issues.
Inbox rules (created by users in Outlook or by admins by using the *-InboxRule cmdlets in Exchange Online PowerShell) can move or delete messages from the Inbox.
Admins can use message trace to determine if a released message was delivered to the recipient's Inbox.
Selecting Move or delete > Inbox on quarantined messages in
 Take action from other Defender for Office 365 features (for example, Explorer (Threat Explorer) or the Email entity page) also allows you to release messages from quarantine. For more information, see Threat hunting: The Take action wizard.
After you select the message, use either of the following methods to release it:
- On the Email tab: Select
 Release.
 - In the details flyout of the selected message: Select
 Release email.
In the Release email to recipient inboxes flyout that opens, configure the following options:
Select one of the following values:
- Release to all recipients
- Release to one or more of the original recipients of the email: Enter the recipients in the Recipients box that appears.
Send a copy of this message to another recipient: If you select this option, select one or more recipients by clicking in the Recipients box that appears. Select
 to remove an entry.
Submit the message to Microsoft to improve detection: If you select this option, the erroneously quarantined message is reported to Microsoft as a false positive. Depending on the results of their analysis, the service-wide spam filter rules might be adjusted to allow the message through.
Selecting this option reveals the following options:
- Allow this message: If you select this option, allow entries are added to the Tenant Allow/Block List for the sender and any related URLs or attachments in the message. The following options also appear:
- Remove entry after: The default value is 45 days after last used date, but you can also select 1 day, 7 days, 30 days, or a Specific date that's less than 30 days.
- Allow entry note: Enter an optional note that contains additional information.
- Allow this message: If you select this option, allow entries are added to the Tenant Allow/Block List for the sender and any related URLs or attachments in the message. The following options also appear:
When you're finished on the Release email to recipient inboxes flyout, select Release message.
Back on the Email tab, the Release status value of the message is Released.
Approve or deny release requests from users for quarantined email
Users can request the release of email messages if the quarantine policy used Allow recipients to request a message to be released from quarantine (PermissionToRequestRelease permission) instead of Allow recipients to release a message from quarantine (PermissionToRelease permission) when the message was quarantined. For more information, see Create quarantine policies in the Microsoft Defender portal.
After a recipient requests the release of the email message, the Release status value changes to Release requested, and an admin can approve or deny the request.
Tip
One alert to release the message might be created for multiple release requests for that message. Use the quarantine link in the Details section of the alert message to take action on the release request from users in the organization for the past 7 days.
If you don't release or remove a message, it's automatically deleted from quarantine after the date shown in the Expires column.
After you select the message, use either of the following methods to approve or deny the release request:
- On the Email tab: Select
 Release or
  Deny.
Deny. - In the details flyout of the selected message: Select
 Release email or
  More >
  Deny release.
If you select Release or Release email, a Release email to recipient inboxes flyout opens. The options are the same as described in Release quarantined email.
After you release the message, the Release status value of the message changes to Released on the Email tab.
If you select Deny or Deny release, a Deny release flyout opens where you can review information about the message. When you select Deny release, a Release denied flyout opens where you can select the link to learn more about releasing messages. Select Done when you're finished on the Release denied flyout.
Back on the Email tab, the Release status value of the message changes to Denied.
Tip
You can deny release for all recipients only. You can't deny release for specific recipients.
Delete email from quarantine
When you delete an email message from quarantine, the message is removed and isn't sent to the original recipients.
If you don't release or remove a message, it's automatically deleted from quarantine after the date shown in the Expires column.
After you select the message, use either of the following methods to remove it:
- On the Email tab: Select
 Delete from quarantine.
 - In the details flyout of the selected message: Select
 More options >
  Delete from quarantine.
In the Delete (n) messages from quarantine flyout that opens, use one of the following methods to delete the message:
- Select Permanently delete the message from quarantine and then select Delete: The message is permanently deleted and isn't recoverable.
- Select Delete only: The message is deleted, but is potentially recoverable.
After you select Delete on the Delete (n) messages from quarantine flyout, you return to the Email tab where the message is no longer listed.
Preview email from quarantine
After you select the message, use either of the following methods to preview it:
- On the Email tab: Select
 Preview message.
 - In the details flyout of the selected message: Select
 More options >
  Preview message.
In the flyout that opens, choose one of the following tabs:
- Source: Shows the HTML version of the message body with all links disabled.
- Plain text: Shows the message body in plain text.
View email message headers
After you select the message, use either of the following methods to view the message headers:
- On the Email tab: Select
 More >
  View message headers.
 - In the details flyout of the selected message: Select
 More options >
  View message headers.
In the Message header flyout that opens, the message header (all header fields) is shown.
Use ![]() Copy message header to copy the message header to the clipboard.
Copy message header to copy the message header to the clipboard.
Select the Microsoft Message Header Analyzer link to analyze the header fields and values in depth. Paste the message header into the Insert the message header you would like to analyze section (CTRL+V or right-click and choose Paste), and then select Analyze headers.
Submit email to Microsoft for review from quarantine
After you select the message, use either of the following methods to submit the message to Microsoft for analysis:
- On the Email tab: Select
 More >
  Submit for review.
 - In the details flyout of the selected message: Select
 More options >
  Submit for review.
In the Submit to Microsoft for analysis flyout that opens, configure the following options:
Add the network message ID or upload the email file: Select one of the following options:
- Add the email network message ID: This value is selected by default, with the corresponding value in the box.
- Upload the email file (.msg or eml): After you select this option, select the
 Browse files button that appears to find and select the .msg or .eml message file to submit.
Choose a recipient who had an issue: Select one (preferred) or more original recipients of the message to analyze the policies that were applied to them.
Select a reason for submitting to Microsoft: Choose one of the following options:
I've confirmed it's clean (default): Select this option if you're sure that the message is clean, and then select Next. Then the following settings are available:
- Allow this email: If you select this option, allow entries are added to the Tenant Allow/Block List for the sender and any related URLs or attachments in the message. The following options also appear:
- Remove entry after: The default value is 45 days after last used date, but you can also select 1 day, 7 days, 30 days, or a Specific date that's less than 30 days.
- Allow entry note: Enter an optional note that contains additional information.
It appears clean: Select this option if you're unsure and you want a verdict from Microsoft.
When you're finished on the Submit to Microsoft for analysis flyout, select Submit.
Tip
Users can report false positives to Microsoft from quarantine, depending on the value of the Reporting from quarantine setting in user reported settings.
Allow email senders from quarantine
Tip
The Allow sender action is available to admins only if they filter the quarantine results by Recipient > Only me instead of the default value All users.
If the sender is already in the recipient's safelist collection, Allow sender isn't available.
The Allow sender action adds the sender of the selected email message to the Safe Senders list in the mailbox of whomever is signed in. Typically, this action is for end-users if it's available to them by quarantine policies. For more information about users allowing senders, see Add recipients of my email messages to the Safe Senders List.
After you select the message, use either of the following methods to add the message sender to the Safe Senders list in your own mailbox:
- On the Email tab: Select
 More >
  Allow sender.
 - In the details flyout of the selected message: Select
 More options >
  Allow sender.
The flyout that opens indicates when the sender was successfully added to your Safe Senders list. Select Done.
Block email senders from quarantine
Tip
The Block sender action is available to admins only if they filter the quarantine results by Recipient > Only me instead of the default value All users.
If the sender is already in the recipient's safelist collection, Block sender isn't available. Remove sender from user block list is available instead.
The Block sender action adds the sender of the selected email message to the Blocked Senders list in the mailbox of whomever is signed in. Typically, this action is for end-users if it's available to them by quarantine policies. For more information about users blocking senders, see Block a mail sender
After you select the message, use either of the following methods to add the message sender to the Blocked Senders list in your own mailbox:
- On the Email tab: Select
 More >
  Block sender.
 - In the details flyout of the selected message: Select
 More options >
  Block sender.
In the Block sender flyout that opens, review the information about the sender, and then select Block.
Tip
The organization can still receive mail from the blocked sender. Messages from the sender are delivered to user Junk Email folders or to quarantine depending on the policy precedence as described in User allows and blocks. To delete messages from the sender upon arrival, use mail flow rules (also known as transport rules) to Block the message.
Remove senders from user Blocked Senders lists from quarantine
The Remove sender from user block list is available only if the sender of the quarantined message is already in the recipient's Block Senders list.
Admins can remove senders from the Block Senders list of their own mailboxes (if quarantine is filtered by Recipient > Only me) or from the mailboxes of other users (if quarantine is filtered by Recipient > All users).
After you select the message, use either of the following methods to remove the sender from the user's Block Senders list:
- On the Email tab: Select
 More >
  Remove sender from user block list.
 - In the details flyout of the selected message: Select
 More options >
  Remove sender from user block list.
The flyout that opens indicates when the sender was successfully removed from the recipient's Blocked Senders list. Select Done.
Share email from quarantine
You can send a copy of the quarantined email message, including potentially harmful content, to the specified recipients.
After you select the message, use either of the following methods to send a copy of it to others:
- On the Email tab: Select
 More >
  Share email.
 - In the details flyout of the selected message: Select
 More options >
  Share email.
In the Share email with other users flyout that opens, select one or more recipients to receive a copy of the message. When you're finished, select Share.
Download email from quarantine
After you select the email message, use either of the following methods to download it:
- On the Email tab: Select
 More >
  Download messages.
 - In the details flyout of the selected message: Select
 More options >
  Download message.
In the Download file flyout that opens, enter the following information:
- Reason for downloading file: Enter descriptive text.
- Create password and Confirm password: Enter a password that's required to open the downloaded message file.
When you're finished on the Download file flyout, select Download.
When the download is ready, a Save As dialog opens for you to view or change the downloaded filename and location. By default, The .eml message file is saved in a compressed file named Quarantined Messages.zip in your Downloads folder. If the .zip file already exists, a number is appended to the filename (for example, Quarantined Messages(1).zip).
Accept or change the downloaded file details, and then select Save.
Back on the Download file flyout, select Done.
Actions for quarantined email messages in Defender for Office 365
In organizations with Microsoft Defender for Office 365 (add-on licenses or included in subscriptions like Microsoft 365 E5 or Microsoft 365 Business Premium), the following actions are also available in the details flyout of a selected message:
 Open email entity: For more information, see What's on the Email entity page.
 Take actions: This action starts the same Action wizard that's available on the Email entity page. For more information, see Actions on the Email entity page.
Take action on multiple quarantined email messages
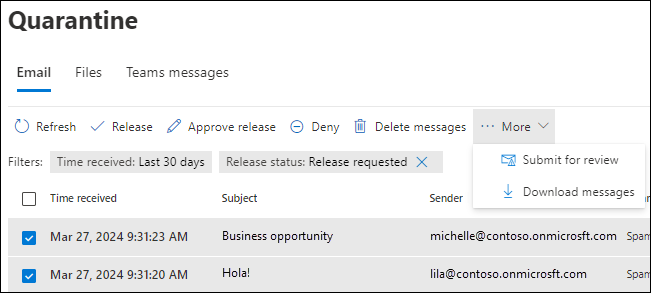
When you select up to 100 quarantined messages on the Email tab by selecting the check boxes next to the first column, the following bulk actions are available on the Email tab (depending on the Release status values of the messages that you selected):
Release quarantined email messages:
- Not available for messages with the Release status value Released.
- Approve user release requests if the Release status value of the messages is Released requested.
The only available options to select for bulk actions are Send a copy of this message to other recipients and Send the message to Microsoft to improve detection (false positive).
Approve or deny release requests from users for quarantined email
Submit email messages to Microsoft for review
The only available options to select for bulk actions are Allow emails with similar attributes and the related Remove allow entry after and Allow entry note options.
Find who deleted a quarantined message
By default, many security policy verdicts allow users to delete their quarantined messages (messages where they're a recipient). For more information, see the table at Manage quarantined messages and files as a user.
Admins can search the audit log to find events for messages that were deleted from quarantine by using the following procedures:
In the Defender portal at https://security.microsoft.com, go to Audit. Or, to go directly to the Audit page, use https://security.microsoft.com/auditlogsearch.
Tip
You can also get to the Audit page in the Microsoft Purview compliance portal at https://compliance.microsoft.com/auditlogsearch
On the Audit page, verify that the New Search tab is selected, and then configure the following settings:
- Date and time range (UTC)
- Activities - friendly names: Click in the box, start typing "quarantine" in the
 Search box that appears, and then select Deleted Quarantine message from the results.
 - Users: If you know who deleted the message from quarantine, you can further filter the results by user.
When you're finished entering the search criteria, select Search to generate the search.
For complete instructions for audit log searches, see Audit New Search.
Use the Microsoft Defender portal to manage quarantined files in Defender for Office 365
Note
The procedures for quarantined files in this section are available only to Microsoft Defender for Office 365 Plan 1 or Plan 2 subscribers.
Files quarantined in SharePoint or OneDrive are removed from quarantine after 30 days, but the blocked files remain in SharePoint or OneDrive in the blocked state.
In organizations with Defender for Office 365, admins can manage files that were quarantined by Safe Attachments for SharePoint, OneDrive, and Microsoft Teams. To enable protection for these files, see Turn on Safe Attachments for SharePoint, OneDrive, and Microsoft Teams.
View quarantined files
In the Microsoft Defender portal at https://security.microsoft.com, go to Email & collaboration > Review > Quarantine > Files tab. Or, to go directly to the Files tab on the Quarantine page, use https://security.microsoft.com/quarantine?viewid=Files.
On the Files tab, you can decrease the vertical spacing in the list by clicking ![]() Change list spacing to compact or normal and then selecting
Change list spacing to compact or normal and then selecting ![]() Compact list.
Compact list.
You can sort the entries by clicking on an available column header. Select ![]() Customize columns to change the columns that are shown. The default values are marked with an asterisk (*):
Customize columns to change the columns that are shown. The default values are marked with an asterisk (*):
- User*
- Location*: The value is SharePoint or OneDrive.
- Attachment filename*
- File URL*
- File Size
- Release status*
- Expires*
- Detected by
- Modified by time
To filter the entries, select ![]() Filter. The following filters are available in the Filters flyout that opens:
Filter. The following filters are available in the Filters flyout that opens:
- Time received:
- Last 24 hours
- Last 7 days
- Last 14 days
- Last 30 days (default)
- Custom: Enter a Start time and End time (date).
- Expires:
- Custom (default): Enter a Start time and End time (date).
- Today
- Next 2 days
- Next 7 days
- Quarantine reason: The only available value is Malware.
- Policy type: The only available value is Unknown.
When you're finished in the Filters flyout, select Apply. To clear the filters, select ![]() Clear filters.
Clear filters.
Use the ![]() Search box and a corresponding value to find specific files by filename. Wildcards aren't supported.
Search box and a corresponding value to find specific files by filename. Wildcards aren't supported.
After you've entered the search criteria, press Enter to filter the results.
After you find a specific quarantined file, select the file to view details about it and to take action on it (for example, view, release, download, or delete the file).
View quarantined file details
In the Microsoft Defender portal at https://security.microsoft.com, go to Email & collaboration > Review > Quarantine > Files tab. Or, to go directly to the Files tab on the Quarantine page, use https://security.microsoft.com/quarantine?viewid=Files.
On the Files tab, select the quarantined file by clicking anywhere in the row other than the check box.
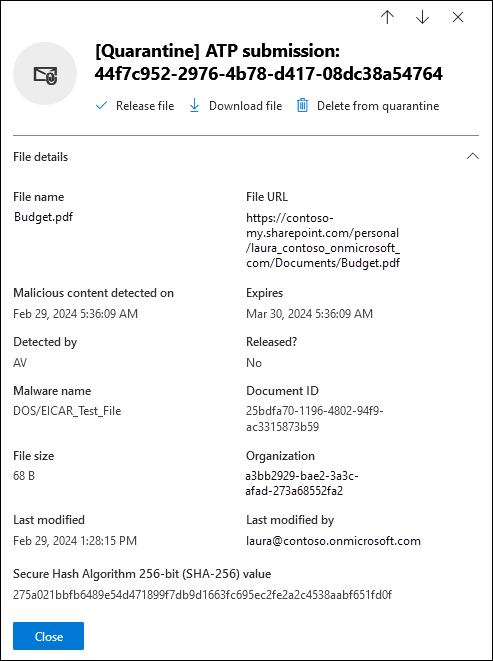
In the details flyout that opens, the following information is available:
- File details section:
- File Name
- File URL: URL that defines the location of the file (for example, in SharePoint Online).
- Malicious content detected on The date/time the file was quarantined.
- Expires: The date when the file will be deleted from quarantine.
- Detected by
- Released?
- Malware Name
- Document ID: A unique identifier for the document.
- File Size
- Organization Your organization's unique ID.
- Last modified
- Last modified By: The user who last modified the file.
- Secure Hash Algorithm 256-bit (SHA-256) value: You can use this hash value to identify the file in other reputation stores or in other locations in your environment.
To take action on the file, see the next section.
Tip
To see details about other quarantined files without leaving the details flyout, use  Previous item and Next item at the top of the flyout.
Take action on quarantined files
In the Microsoft Defender portal at https://security.microsoft.com, go to Email & collaboration > Review > Quarantine > Files tab. Or, to go directly to the Files tab on the Quarantine page, use https://security.microsoft.com/quarantine?viewid=Files.
On the Files tab, select the quarantined file by clicking anywhere in the row other than the check box.
After you select the quarantined file, the available actions in the file details flyout that opens are described in the following subsections.
Release quarantined files from quarantine
This action isn't available for files that have already been released (the Released status value is Released).
If you don't release or delete the file from quarantine, the file is removed from quarantine after the default quarantine retention period expires (as shown in the Expires column), but the blocked file remains in SharePoint or OneDrive in the blocked state.
After you select the file, select ![]() Release file in the file details flyout that opens.
Release file in the file details flyout that opens.
In the Release files and report them to Microsoft flyout that opens, view the file details in the Release the following files section, and then select Release.
Tip
Currently, you can't report quarantined files to Microsoft as you release them.
In the Files have been released flyout that opens, select Done.
Back on the file details flyout, select Close.
Back on the Files tab, the Release status value of the file is Released.
Download quarantined files from quarantine
After you select the file, select ![]() Download file in the details flyout that opens.
Download file in the details flyout that opens.
In the Download file flyout that opens, enter the following information:
- Reason for downloading file: Enter descriptive text.
- Create password and Confirm password: Enter a password that's required to open the downloaded file.
When you're finished on the Download file flyout, select Download.
When the download is ready, a Save As dialog opens for you to view or change the downloaded filename and location. By default, The file is saved in a compressed file named Quarantined Messages.zip in your Downloads folder. If the .zip file already exists, a number is appended to the filename (for example, Quarantined Messages(1).zip).
Accept or change the downloaded file details, and then select Save.
Back on the Download file flyout, select Done.
Delete quarantined files from quarantine
If you don't release or delete the file from quarantine, the file is removed from quarantine after the default quarantine retention period expires (as shown in the Expires column), but the blocked file remains in SharePoint or OneDrive in the blocked state.
After you select the file, select ![]() More >
More > ![]() Delete from quarantine in the details flyout that opens.
Delete from quarantine in the details flyout that opens.
Select Continue in the warning dialog that opens.
Back on the Files tab, the file is no longer listed.
Take action on multiple quarantined files
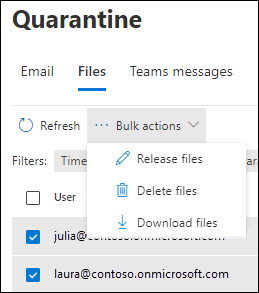
When you select multiple quarantined files on the Files tab by selecting the check boxes next to the first column (up to 100 files), a Bulk actions dropdown list appears where you can take the following actions:
- Release quarantined files from quarantine
- Delete quarantined files from quarantine
- Download quarantined files from quarantine
Use the Microsoft Defender portal to manage Microsoft Teams quarantined messages
Tip
Zero-hour auto purge (ZAP) in Microsoft Teams is currently in Preview, isn't available in all organizations, and is subject to change.
Quarantine in Microsoft Teams is available only in organizations with Microsoft Defender for Office 365 Plan 2 (add-on licenses or included in subscriptions like Microsoft 365 E5).
When a potentially malicious chat message is detected in Microsoft Teams, zero-hour auto purge (ZAP) removes the message and quarantines it. Admins can view and manage these quarantined Teams messages. The message is quarantined for 30 days. After that the Teams message is permanently removed.
This feature is enabled by default.
View quarantined Teams messages
In the Microsoft Defender portal at https://security.microsoft.com, go to Email & collaboration > Review > Quarantine > Teams messages tab. Or, to go directly to the Teams messages tab on the Quarantine page, use https://security.microsoft.com/quarantine?viewid=Teams.
On the Teams messages tab, you can decrease the vertical spacing in the list by clicking ![]() Change list spacing to compact or normal and then selecting
Change list spacing to compact or normal and then selecting ![]() Compact list.
Compact list.
You can sort the entries by clicking on an available column header. Select ![]() Customize columns to change the columns that are shown. The default values are marked with an asterisk (*):
Customize columns to change the columns that are shown. The default values are marked with an asterisk (*):
- Teams message text: Contains the subject for the Teams message.*
- Time received: The time the message was received by the recipient.*
- Release status: Shows whether the message is already reviewed and released or needs review. *
- Participants: The total number of users who received the message.*
- Sender: The person who sent the message that was quarantined.*
- Quarantine reason: Available options are "High confidence phish" and "Malware".*
- Policy type: The organization policy responsible for the quarantined message.*
- Expires: Indicates the time after which the message is removed from quarantine. By default, this value is 30 days.*
- Recipient address: Email address of the recipients.*
- Message ID: Includes the chat message ID.
To filter the entries, select ![]() Filter. The following filters are available in the Filters flyout that opens:
Filter. The following filters are available in the Filters flyout that opens:
- Message ID
- Sender address
- Recipient address
- Subject
- Time received:
- Last 24 hours
- Last 7 days
- Last 14 days
- Last 30 days (default)
- Custom: Enter a Start time and End time (date).
- Expires:
- Custom (default): Enter a Start time and End time (date).
- Today
- Next 2 days
- Next 7 days
- Quarantine reason: Available values are Malware and High confidence phishing.
- Recipient: Select All users or Only me.
- Review status: Select Needs review and Released.
When you're finished in the Filters flyout, select Apply. To clear the filters, select ![]() Clear filters.
Clear filters.
Use the ![]() Search box and a corresponding value to find specific Teams messages. Wildcards aren't supported.
Search box and a corresponding value to find specific Teams messages. Wildcards aren't supported.
After you find a specific quarantined Teams message, select the message to view details about it and to take action on it (for example, view, release, download, or delete the message).
View quarantined Teams message details
On the Teams messages tab of the Quarantine page, select the quarantined message by clicking anywhere in the row other than the check box next to the first column.
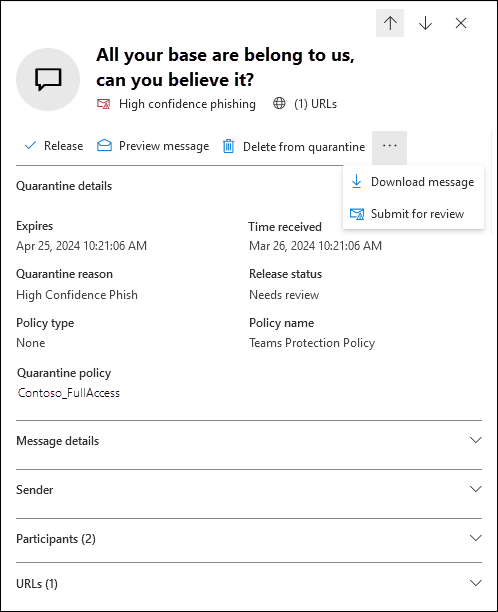
The following message information is available at the top of the details flyout:
- The title of the flyout is the subject or the first 100 characters of the Teams message.
- The Quarantine reason value.
- The number of links in the message.
- The available actions are described in the Take action on quarantined Teams messages section.
Tip
To see details about other quarantined Teams messages without leaving the details flyout, use  Previous item and Next item at the top of the flyout.
The next section in the details flyout is related to quarantined Teams messages:
- Quarantine details section:
- Expires
- Time received
- Quarantine reason
- Release status
- Policy type: The value is None.
- Policy name: The value is Teams Protection Policy.
- Quarantine policy
The rest of the details flyout contains the Message details, Sender, Participants, Channel details, and URLs sections that are part of the Teams message entity panel. For more information, see The Teams mMessage entity panel in Microsoft Defender for Office 365 Plan 2.
When you're finished in the details flyout, select Close.
Take action on quarantined Teams messages
In the Microsoft Defender portal at https://security.microsoft.com, go to Email & collaboration > Review > Quarantine > Teams messages tab. Or, to go directly to the Teams messages tab on the Quarantine page, use https://security.microsoft.com/quarantine?viewid=Teams.
On the Teams messages tab, select the quarantined message by using either of the following methods:
Select the message from the list by selecting the check box next to the first column. The available actions are no longer grayed out.
Select the message from the list by clicking anywhere in the row other than the check box. The available actions are in the details flyout that opens.
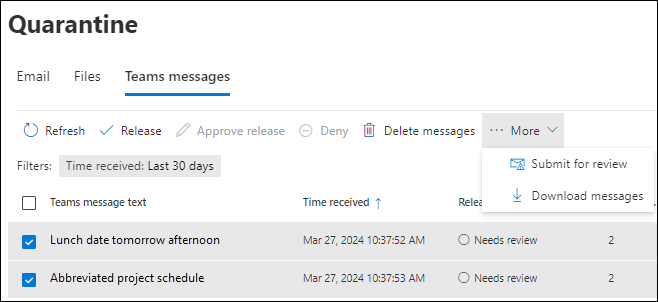
Using either method to select the message, some actions are available under ![]() More.
More.
After you select the quarantined message, the available actions are described in the following subsections.
Release quarantined Teams messages
This action isn't available for Teams messages that have already been released (the Release status value is Released).
If you don't release or remove a message, it's automatically deleted from quarantine after the date shown in the Expires column.
After you select the message, use either of the following methods to release it to all chat participants:
- On the Teams messages tab: Select
 Release.
 - In the details flyout of the selected message: Select
 Release.
In the Release message to your Teams app flyout that opens, decide whether to select Submit the message to Microsoft to improve detection (false positive), and then select Release.
Delete Teams messages from quarantine
If you don't release or remove a Teams message, it's automatically deleted from quarantine after the date shown in the Expires column.
After you select the Teams message, use either of the following methods to remove it:
- On the Teams messages tab: Select
 Delete messages.
 - In the details flyout of the selected message: Select
 More options >
  Delete from quarantine.
In the warning dialog that opens, read the information and then select Continue.
Back on the Teams messages tab, the message is no longer listed.
Preview Teams messages from quarantine
After you select the Teams message, use either of the following methods to preview it:
- On the Teams messages tab: Select
 Preview message.
 - In the details flyout of the selected message: Select

 Preview message.
In the flyout that opens, choose one of the following tabs:
- Source: Shows the HTML version of the message body with all links disabled.
- Plain text: Shows the message body in plain text.
Submit Teams messages to Microsoft for review from quarantine
After you select the message, use either of the following methods to submit the message to Microsoft for analysis:
- On the Teams messages tab: Select
 More >
  Submit for review.
 - In the details flyout of the selected message: Select
 More options >
  Submit for review.
When you select Submit message, the message is sent to Microsoft for analysis. You receive an Item submitted dialog where you select OK.
Download Teams messages from quarantine
After you select the Teams message, use either of the following methods to download it:
- On the Teams messages tab: Select
 More >
  Download messages.
 - In the details flyout of the selected message: Select
 More options >
  Download message.
In the Download messages flyout that opens, enter the following information:
- Reason for downloading file: Enter descriptive text.
- Create password and Confirm password: Enter a password that's required to open the downloaded message file.
When you're finished on the Download file flyout, select Download.
By default, The .html message file is saved in a compressed file named Quarantined Messages.zip in your Downloads folder. If the .zip file already exists, a number is appended to the filename (for example, Quarantined Messages(1).zip).
Back on the Download messages flyout, select Done.
Take action on multiple quarantined Teams messages
When you select multiple quarantined messages on the Teams messages tab by selecting the check boxes next to the first column, the following bulk actions are available on the Teams messages tab:
- Release quarantined Teams messages
- Delete Teams messages from quarantine
- Submit Teams messages to Microsoft for review from quarantine
- Download Teams messages from quarantine
Approve or deny release requests from users for quarantined Teams messages
When a user requests the release of a quarantined Teams message, the Release status value changes to Release requested, and an admin can approve or deny the request.
For more information, see Approve or deny release requests from users.
Use Exchange Online PowerShell or standalone EOP PowerShell to manage quarantined messages
The cmdlets that you use to view and manage messages and files in quarantine are described in this section.
- Delete-QuarantineMessage
- Export-QuarantineMessage
- Get-QuarantineMessage
- Preview-QuarantineMessage: This cmdlet is for messages only, not quarantined files.
- Release-QuarantineMessage
