Relocate Azure Virtual Network to another region
This article shows you how to relocate a virtual network to a new region by redeploying the virtual network. Redeployment supports both independent relocation of multiple workloads and private IP address range change in the target region. It's recommended that you use a Resource Manager template to relocate your virtual network.
However, can also choose to move your virtual network with Azure Resource Mover. However, if you choose to move your virtual network with Azure Resource Mover, make sure that you understand the following considerations:
If you choose to use Resource Mover:
All workloads in a virtual network must be relocated together.
A relocation using Azure Resource Mover doesn't support private IP address range change.
Azure Resource Mover can move resources such as Network Security Group and User Defined Route along with the virtual network. However, it's recommended that you move them separately. Moving them altogether can lead to failure of the Validate dependencies stage.
Resource Mover can't directly move NAT gateway instances from one region to another. To work around this limitation, see Create and configure NAT gateway after moving resources to another region.
Azure Resource Mover doesn’t support any changes to the address space during the relocation process. As a result, when movement completes, both source and target have the same, and thus conflicting, address space. It's recommended that you do manual update of address space as soon as relocation completes.
Virtual Network Peering must be reconfigured after the relocation. It's recommended that you move the peering virtual network either before or with the source virtual network.
While performing the Initiate move steps with Azure Resource Mover, resources may be temporarily unavailable.
To learn how to move your virtual network using Resource Mover, see Move Azure VMs across regions.
Prerequisites
Identify any dependent resources that are also associated with the virtual network, such as:
Confirm that your virtual network is in the source Azure region.
To export a virtual network and deploy a template to create a virtual network in another region, you need to have the Network Contributor role or higher.
Identify the source networking layout and all the resources that you're currently using. This layout includes but isn't limited to load balancers, network security groups (NSGs), and public IPs.
Verify that your Azure subscription allows you to create virtual networks in the target region. To enable the required quota, contact support.
Confirm that your subscription has enough resources to support the addition of virtual networks for this process. For more information, see Azure subscription and service limits, quotas, and constraints.
Understand the following considerations:
- If you enable private IP address range change, multiple workloads in a virtual network can be relocated independently of each other,
- The redeployment method supports the option to enable and disable private IP address range change in the target region.
- If you don't enable private IP address change in the target region, data migration scenarios that require communication between source and target region can only be established using public endpoints (public IP addresses).
Important
Starting July 1, 2021, you won't be able to add new tests in an existing workspace or enable a new workspace with Network performance monitor. You can continue to use the tests created prior to July 1, 2021. To minimize service disruption to your current workloads, migrate your tests from Network performance monitor to the new Connection monitor in Azure Network Watcher before February 29, 2024.
Downtime
To understand the possible downtimes involved, see Cloud Adoption Framework for Azure: Select a relocation method.
Plan
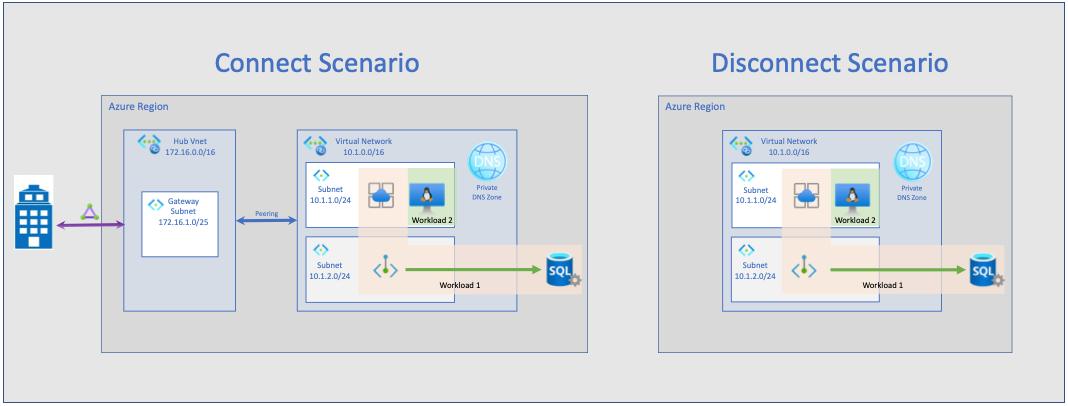
To plan for your relocation of an Azure Virtual Network, you must understand whether you're relocating your virtual network in a connected or disconnected scenario. In a connected scenario, the virtual network has a routed IP connection to an on-premises datacenter using a hub, VPN Gateway, or an ExpressRoute connection. In a disconnected scenario, the virtual network is used by workload components to communicate with each other.

Disconnected scenario
| Relocation with no IP Address Change | Relocation with IP Address Change |
|---|---|
| No other IP address ranges are needed. | Other IP Address ranges are needed. |
| No IP Address change for resources after relocation. | IP Address change of resources after relocation |
| All workloads in a virtual network must be relocated together. | Workload relocation without considering dependencies or partial relocation is possible (Take communication latency into account) |
| Virtual Network in the source region needs to be disconnected or removed before the Virtual Network in the target region can be connected. | Enable communication shortcuts between source and target region using vNetwork peering. |
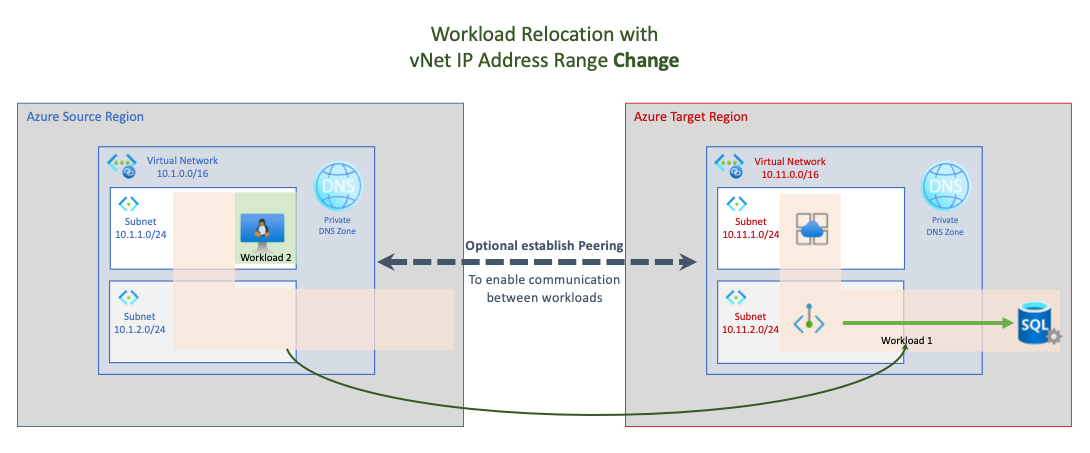
| No support for data migration scenarios where you need communication between source and target region. | If communication between source and target region is required in data migration scenarios, you can establish network peering during relocation. |
Disconnected relocation with the same IP-address range

Disconnected relocation with a new IP-address range

Connected Scenario
| Relocation with no IP Address Change | Relocation with IP Address Change |
|---|---|
| No other IP address ranges are needed. | Other IP Address ranges are needed. |
| No IP Address change for resources after relocation. | IP Address change of resources after relocation. |
| All workloads with dependencies on each other need to be relocated together. | Workload relocation without considering dependencies possible (Take communication latency into account). |
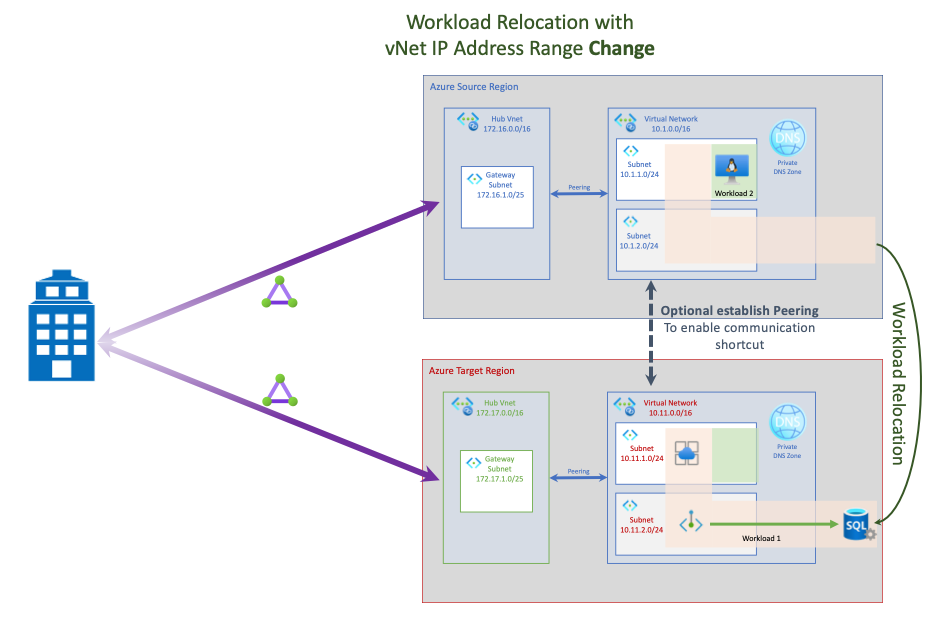
| No communication between the two virtual networks in the source and target regions is possible. | Possible to enable communication between source and target region using vNetwork peering. |
| Data migrations where communication between source and target region isn't possible or can only established through public endpoints. | If communication between source and target region is required in data migration scenarios, you can establish network peering during relocation. |
Connected relocation with the same IP-address range

Connected relocation with a new IP-address range

Prepare
Move the diagnostic storage account that contains Network Watcher NSG logs. To learn how to move a storage account, see Relocate Azure Storage Account to another region.
Disable DDoS Protection Plan.
Export and modify a template
To export the virtual network and deploy the target virtual network by using the Azure portal:
Remove any virtual network peers. Virtual network peerings can't be re-created, and they'll fail if they're still present in the template. In the Redeploy section, you'll reconfigure peerings at the target virtual network.
Sign in to the Azure portal, and then select Resource Groups.
Locate the resource group that contains the source virtual network, and then select it.
Select Automation > Export template.
In the Export template pane, select Deploy.
To open the parameters.json file in your online editor, select Template > Edit parameters.
To edit the parameter of the virtual network name, change the value property under parameters:
{
    "$schema": "https://schema.management.azure.com/schemas/2015-01-01/deploymentParameters.json#",
    "contentVersion": "1.0.0.0",
    "parameters": {
        "virtualNetworks_myVNET1_name": {
            "value": "<target-virtual-network-name>"
        }
    }
}
In the editor, change the source virtual network name value in the editor to a name that you want for the target virtual network. Be sure to enclose the name in quotation marks.
Select Save in the editor.
To open the template.json file in the online editor, select Template > Edit template.
In the online editor, to edit the target region, change the location property under resources:
"resources": [
            {
                "type": "Microsoft.Network/virtualNetworks",
                "apiVersion": "2019-06-01",
                "name": "[parameters('virtualNetworks_myVNET1_name')]",
                "location": "<target-region>",
                "properties": {
                    "provisioningState": "Succeeded",
                    "resourceGuid": "6e2652be-35ac-4e68-8c70-621b9ec87dcb",
                    "addressSpace": {
                        "addressPrefixes": [
                            "10.0.0.0/16"
                        ]
                    },
To obtain region location codes, see Azure Locations. The code for a region is the region name, without spaces (for example, Central US = centralus).
(Optional) You can also change other parameters in the template, depending on your requirements:
Address Space: Before you save the file, you can alter the address space of the virtual network by modifying the resources > addressSpace section and changing the addressPrefixes property:
"resources": [ { "type": "Microsoft.Network/virtualNetworks", "apiVersion": "2019-06-01", "name": "[parameters('virtualNetworks_myVNET1_name')]", "location": "<target-region", "properties": { "provisioningState": "Succeeded", "resourceGuid": "6e2652be-35ac-4e68-8c70-621b9ec87dcb", "addressSpace": { "addressPrefixes": [ "10.0.0.0/16" ] },Subnet: You can change or add to the subnet name and the subnet address space by changing the template's subnets section. You can change the name of the subnet by changing the name property. And you can change the subnet address space by changing the addressPrefix property:
        "subnets": [
            {
            "name": "subnet-1",
            "etag": "W/\"d9f6e6d6-2c15-4f7c-b01f-bed40f748dea\"",
            "properties": {
            "provisioningState": "Succeeded",
            "addressPrefix": "10.0.0.0/24",
            "delegations": [],
            "privateEndpointNetworkPolicies": "Enabled",
            "privateLinkServiceNetworkPolicies": "Enabled"
            }
            },
            {
            "name": "GatewaySubnet",
            "etag": "W/\"d9f6e6d6-2c15-4f7c-b01f-bed40f748dea\"",
            "properties": {
            "provisioningState": "Succeeded",
            "addressPrefix": "10.0.1.0/29",
            "serviceEndpoints": [],
            "delegations": [],
            "privateEndpointNetworkPolicies": "Enabled",
            "privateLinkServiceNetworkPolicies": "Enabled"
            }
            }

        ]
To change the address prefix in the template.json file, edit it in two places: - In the code in the preceding section - In the type section of the following code.
Also, change the addressPrefix property in the following code to match the addressPrefix property in the code in the preceding section.
 "type": "Microsoft.Network/virtualNetworks/subnets",
   "apiVersion": "2019-06-01",
   "name": "[concat(parameters('virtualNetworks_myVNET1_name'), '/GatewaySubnet')]",
      "dependsOn": [
         "[resourceId('Microsoft.Network/virtualNetworks', parameters('virtualNetworks_myVNET1_name'))]"
           ],
      "properties": {
         "provisioningState": "Succeeded",
         "addressPrefix": "10.0.1.0/29",
         "serviceEndpoints": [],
         "delegations": [],
         "privateEndpointNetworkPolicies": "Enabled",
         "privateLinkServiceNetworkPolicies": "Enabled"
          }
         },
          {
          "type": "Microsoft.Network/virtualNetworks/subnets",
          "apiVersion": "2019-06-01",
          "name": "[concat(parameters('virtualNetworks_myVNET1_name'), '/subnet-1')]",
             "dependsOn": [
                "[resourceId('Microsoft.Network/virtualNetworks', parameters('virtualNetworks_myVNET1_name'))]"
                  ],
             "properties": {
                "provisioningState": "Succeeded",
                "addressPrefix": "10.0.0.0/24",
                "delegations": [],
                "privateEndpointNetworkPolicies": "Enabled",
                "privateLinkServiceNetworkPolicies": "Enabled"
                 }
          }
 ]
In the online editor, select Save.
Redeploy
To choose the subscription where the target virtual network will be deployed, select Basics > Subscription.
To choose the resource group where the target virtual network will be deployed, select Basics > Resource group.
If you need to create a new resource group for the target virtual network, select Create new. Make sure that the name isn't the same as the source resource group name in the existing virtual network.
Verify that Basics > Location is set to the target location where you want the virtual network to be deployed.
Under Settings, verify that the name matches the name that you entered previously in the parameters editor.
Select the Terms and Conditions check box.
To deploy the target virtual network, select Purchase.
Enable Connection Monitor by following the guidelines in (Migrate to Connection monitor from Network performance monitor).
Enable the DDoS Protection Plan. After the move, the auto-tuned policy thresholds for all the protected public IP addresses in the virtual network are reset.
- (Optional) Reconfigure the Network security Group (NSG), Application Security Group (ASG) and User Defined Route (UDR) to the target virtual Network subnet which was previously associated to source virtual Network subnet and now moved to target region.
- (Optional) Reconfigure the NAT-Gateway to the target virtual Network subnet which was previously associated to source virtual Network subnet and now moved to target region.
- (Optional) Diagnostic settings: Reconfigure the diagnostic setting for the target virtual network to send the logs to log analytic workspace/storage account/event hub which was relocated as mentioned in prepare.
Discard
To discard the target virtual network, you delete the resource group that contains the target virtual network. To do so:
- On the Azure portal dashboard, select the resource group.
- At the top of the Overview pane, select Delete.
Clean up
To commit the changes and complete the virtual network move, you delete the source virtual network or resource group. To do so:
- On the Azure portal dashboard, select the virtual network or resource group.
- At the top of each pane, select Delete.
Next steps
To learn more about moving resources between regions and disaster recovery in Azure, refer to: