Quickstart: Create an Azure AI services resource
Learn how to create and manage an Azure AI services resource. An Azure AI services resource allows you to access multiple Azure AI services with a single set of credentials.
You can access Azure AI services through two different resources:
- Azure AI services multi-service resource:
- Access multiple Azure AI services with a single set of credentials.
- Consolidates billing from the services you use.
- Single-service resource such as Face and Vision:
- Access a single Azure AI service with a unique set of credentials for each service created.
- Most Azure AI services offer a free tier to try it out.
Azure AI services are Azure resources that you create under your Azure subscription. After you create a resource, you can use the keys and endpoint generated to authenticate your applications.
Supported services with a multi-service resource
The multi-service resource enables access to the following Azure AI services with a single set of credentials. Some services are available via the multi-service resource and single-service resource.
Tip
We recommend whenever possible to use the Azure AI services resource (where the API kind is AIServices) to access multiple Azure AI services with a single set of credentials. For services not available via the multi-service resource (such as Face and Custom Vision), you can create a single-service resource.
| Service | Description | Kind (via API) |
|---|---|---|
 Azure OpenAI Azure OpenAI |
Perform a wide variety of natural language tasks. | AIServicesOpenAI |
 Content Safety Content Safety |
An AI service that detects unwanted contents. | AIServicesContentSafety |
 Custom Vision Custom Vision |
Customize image recognition for your business. | CustomVision.Prediction (Prediction only)CustomVision.Training (Training only) |
 Document Intelligence Document Intelligence |
Turn documents into intelligent data-driven solutions. | AIServicesFormRecognizer |
 Face Face |
Detect and identify people and emotions in images. | Face |
 Language Language |
Build apps with industry-leading natural language understanding capabilities. | AIServicesTextAnalytics |
 Speech Speech |
Speech to text, text to speech, translation, and speaker recognition. | AIServicesSpeech |
 Translator Translator |
Use AI-powered translation technology to translate more than 100 in-use, at-risk, and endangered languages and dialects. | AIServicesTextTranslation |
 Vision Vision |
Analyze content in images and videos. | AIServices (Training and Prediction)ComputerVision |
Prerequisites
- A valid Azure subscription - Create one for free.
Create a new Azure AI services resource
The Azure AI services multi-service resource is listed under Azure AI services > Azure AI services in the portal. Look for the logo as shown here:

Important
Azure provides more than one resource kinds named Azure AI services. Be sure to select the one that is listed under Azure AI services > Azure AI services with the logo as shown previously.
To create an Azure AI services resource follow these instructions:
Select this link to create an Azure AI services resource: https://portal.azure.com/#create/Microsoft.CognitiveServicesAIServices
On the Create page, provide the following information:
Project details Description Subscription Select one of your available Azure subscriptions. Resource group The Azure resource group that will contain your Azure AI services resource. You can create a new group or add it to a pre-existing group. Region The location of your Azure AI service instance. Different locations may introduce latency, but have no impact on the runtime availability of your resource. Name A descriptive name for your Azure AI services resource. For example, MyCognitiveServicesResource. Pricing tier The cost of your Azure AI services account depends on the options you choose and your usage. For more information, see the API pricing details. 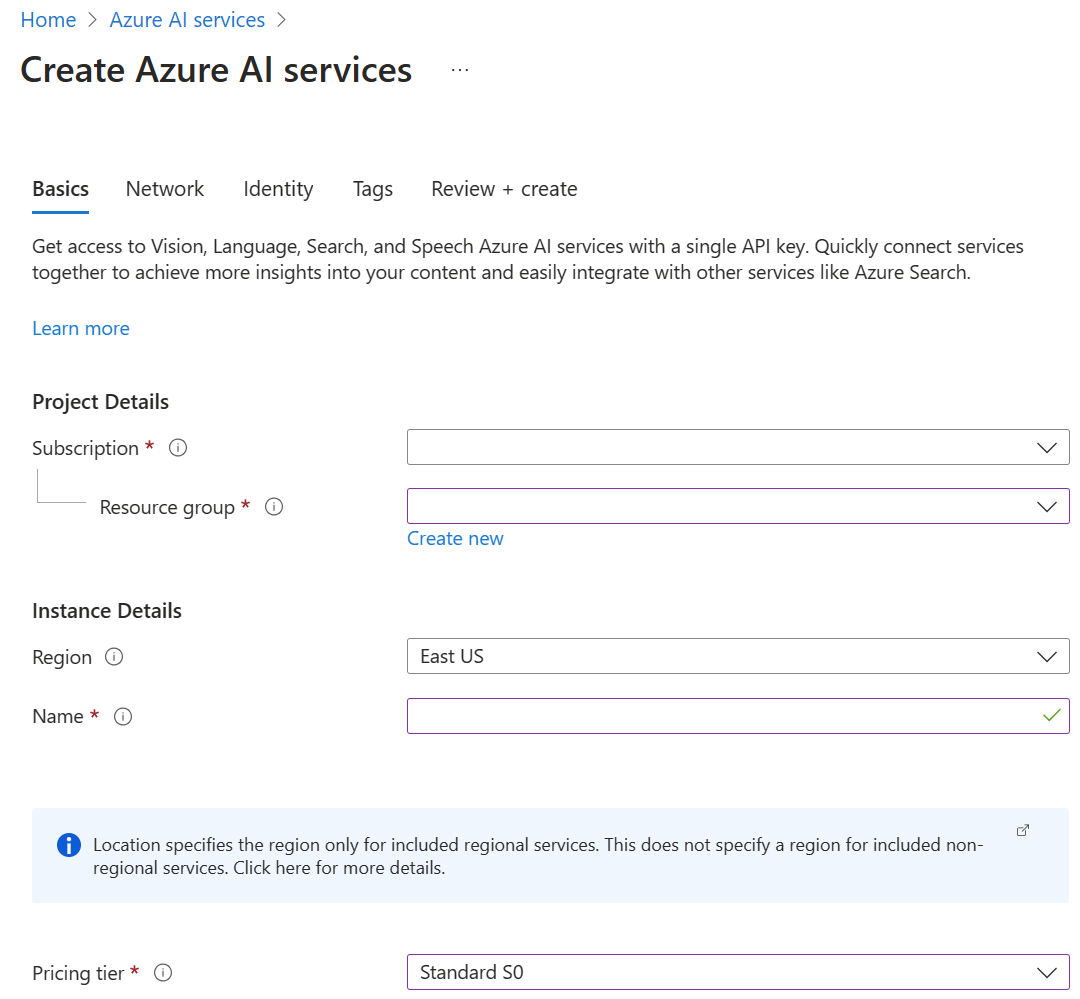
Configure other settings for your resource as needed, read and accept the conditions (as applicable), and then select Review + create.
Tip
If your subscription doesn't allow you to create an Azure AI services resource, you may need to enable the privilege of that Azure resource provider using the Azure portal, PowerShell command or an Azure CLI command. If you are not the subscription owner, ask someone with the role of Owner or Admin to complete the registration for you or ask for the /register/action privileges to be granted to your account.
Clean up resources
If you want to clean up and remove an Azure AI services subscription, you can delete the resource or resource group. Deleting the resource group also deletes any other resources contained in the group.
- In the Azure portal, expand the menu on the left side to open the menu of services, and choose Resource Groups to display the list of your resource groups.
- Locate the resource group containing the resource to be deleted.
- If you want to delete the entire resource group, select the resource group name. On the next page, Select Delete resource group, and confirm.
- If you want to delete only the Azure AI services resource, select the resource group to see all the resources within it. On the next page, select the resource that you want to delete, select the ellipsis menu for that row, and select Delete.
Use this quickstart to create an Azure AI services resource using Azure Command-Line Interface (CLI) commands.
Prerequisites
- A valid Azure subscription - Create one for free.
- The Azure CLI
Install the Azure CLI and sign in
Install the Azure CLI. To sign into your local installation of the CLI, run the az login command:
az login
Create a new resource group
Before you create an Azure AI services resource, you must have an Azure resource group to contain the resource. When you create a new resource, you can either create a new resource group, or use an existing one. This article shows how to create a new resource group.
To create a resource, you'll need one of the Azure locations available for your subscription. You can retrieve a list of available locations with the az account list-locations command. Most Azure AI services can be accessed from several locations. Choose the one closest to you, or see which locations are available for the service.
Important
- Remember your Azure location, as you will need it when calling the Azure AI services resources.
- The availability of some Azure AI services can vary by region. For more information, see Azure products by region.
az account list-locations --query "[].{Region:name}" --out table
After you have your Azure location, create a new resource group in the Azure CLI using the az group create command. In the example below, replace the Azure location westus2 with one of the Azure locations available for your subscription.
az group create --name ai-services-resource-group --location westus2
Create an Azure AI services multi-service resource
To create and subscribe to a new Azure AI services resource, use the az cognitiveservices account create command. This command adds a new billable resource to the resource group you created earlier. When you create your new resource, you'll need to know the kind of service you want to use, along with its pricing tier (or SKU) and an Azure location.
Important
Azure provides more than one resource kinds for Azure AI services. Be sure to create one with the kind of AIServices.
You can create a Standard S0 Azure AI services multi-service resource named multi-service-resource with the command below.
az cognitiveservices account create --name multi-service-resource --resource-group ai-services-resource-group --kind AIServices --sku S0 --location westus2 --yes
Tip
If your subscription doesn't allow you to create an Azure AI services resource, you may need to enable the privilege of that Azure resource provider using the Azure portal, PowerShell command or an Azure CLI command. If you are not the subscription owner, ask someone with the role of Owner or Admin to complete the registration for you or ask for the /register/action privileges to be granted to your account.
Get current quota usage for your resource
Use the az cognitiveservices account list-usage command to get the usage for your resource.
az cognitiveservices account list-usage --name multi-service-resource --resource-group ai-services-resource-group --subscription subscription-name
Clean up resources
If you want to clean up and remove an Azure AI services resource, you can delete it or the resource group. Deleting the resource group also deletes any other resources contained in the group.
To remove the resource group and its associated resources, use the az group delete command.
az group delete --name ai-services-resource-group
Use this quickstart to create an Azure AI services resource using Azure PowerShell commands.
Prerequisites
- A valid Azure subscription - Create one for free.
- Azure PowerShell.
Install Azure PowerShell and sign in
Install Azure PowerShell. To sign in, run the Connect-AzAccount command:
Connect-AzAccount
Create a new Azure AI services resource group
Before you create an Azure AI services resource, you must have an Azure resource group to contain the resource. When you create a new resource, you can either create a new resource group, or use an existing one. This article shows how to create a new resource group.
To create a resource, you'll need one of the Azure locations available for your subscription. You can retrieve a list of available locations with the Get-AzLocation command. Most Azure AI services can be accessed from several locations. Choose the one closest to you, or see which locations are available for the service.
Important
- Remember your Azure location, as you will need it when calling the Azure AI services resources.
- The availability of some Azure AI services can vary by region. For more information, see Azure products by region.
Get-AzLocation | Select-Object -Property Location, DisplayName
After you have your Azure location, create a new resource group in Azure PowerShell using the New-AzResourceGroup command. In the example below, replace the Azure location westus2 with one of the Azure locations available for your subscription.
New-AzResourceGroup -Name ai-services-resource-group -Location westus2
Create an Azure AI services multi-service resource
To create and subscribe to a new Azure AI services resource, use the New-AzCognitiveServicesAccount command. This command adds a new billable resource to the resource group you created earlier. When you create your new resource, you'll need to know the "kind" of service you want to use, along with its pricing tier (or SKU) and an Azure location:
Important
Azure provides more than one resource kinds for Azure AI services. Be sure to create one with the Type (kind) of AIServices.
You can create a Standard S0 Azure AI services multi-service resource named multi-service-resource with the command below.
New-AzCognitiveServicesAccount -ResourceGroupName ai-services-resource-group -Name multi-service-resource -Type AIServices -SkuName S0 -Location westus2
Tip
If your subscription doesn't allow you to create an Azure AI services resource, you may need to enable the privilege of that Azure resource provider using the Azure portal, PowerShell command or an Azure CLI command. If you are not the subscription owner, ask someone with the role of Owner or Admin to complete the registration for you or ask for the /register/action privileges to be granted to your account.
Get current quota usage for your resource
Use the Get-AzCognitiveServicesAccountUsage command to get the usage for your resource.
Get-AzCognitiveServicesAccountUsage -ResourceGroupName ai-services-resource-group -Name multi-service-resource
Clean up resources
If you want to clean up and remove an Azure AI services resource, you can delete it or the resource group. Deleting the resource group also deletes any other resources contained in the group.
To remove the resource group and its associated resources, use the Remove-AzResourceGroup command.
Remove-AzResourceGroup -Name ai-services-resource-group
Pricing
Pricing tiers (and the amount you're billed) are based on the number of transactions that you send by using your authentication information. Each pricing tier specifies the:
- Maximum number of allowed transactions per second (TPS).
- Service features enabled within the pricing tier.
- Cost for a predefined number of transactions. Going above this number will cause an extra charge, as specified in the pricing details for your service.
Related content
- Go to the Azure AI services hub.
- Try AI services in the Azure AI Studio.
Povratne informacije
Stiže uskoro: Tokom 2024. godine postepeno ćemo ukidati probleme sa uslugom GitHub kao mehanizam povratnih informacija za sadržaj i zameniti ga novim sistemom povratnih informacija. Dodatne informacije potražite u članku: https://aka.ms/ContentUserFeedback.
Prosledite i prikažite povratne informacije za