Configure your Bicep environment
Bicep supports an optional configuration file named bicepconfig.json. Within this file, you can add values that customize your Bicep development experience. This file is merged with the default configuration file. For more information, see Understand the merge process. To customize a configuration, create a configuration file in the same directory or a parent directory of your Bicep files. If there are multiple parent directories containing bicepconfig.json files, Bicep uses the configuration from the nearest one. For more information, see Understand the file resolution process.
To configure Bicep extension settings, see Visual Studio Code and Bicep extension.
Create the configuration file in Visual Studio Code
You can use any text editor to create the config file.
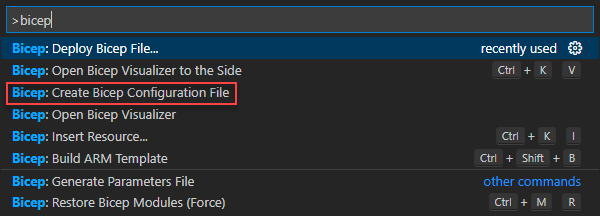
To create a bicepconfig.json file in Visual Studio Code, open the Command Palette ([CTRL/CMD]+[SHIFT]+P), and then select Bicep: Create Bicep Configuration File. For more information, see Create Bicep configuration file.

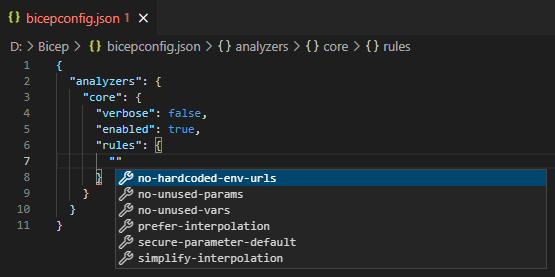
The Bicep extension for Visual Studio Code supports IntelliSense for bicepconfig.json files. Use the IntelliSense to discover available properties and values.

Understand the merge process
The bicepconfig.json file undergoes a recursive bottom-up merging process with the default configuration file. During the merging process, Bicep examines each path in both configurations. If a path isn't present in the default configuration, the path and its associated value are added in the final result. Conversely, if a path exists in the default configuration with a different value, the value from bicepconfig.json takes precedence in the merged result.
Consider a scenario where the default configuration is defined as follows:
{
  "cloud": {
    ...
    "credentialPrecedence": [
      "AzureCLI",
      "AzurePowerShell"
    ]
  },
  "moduleAliases": {
    "ts": {},
    "br": {
      "public": {
        "registry": "mcr.microsoft.com",
        "modulePath": "bicep"
      }
    }
  },
  ...
}
And the bicepconfig.json is defined as follows:
{
  "cloud": {
    "credentialPrecedence": [
      "AzurePowerShell",
      "AzureCLI"
    ]
  },
  "moduleAliases": {
    "br": {
      "ContosoRegistry": {
        "registry": "contosoregistry.azurecr.io"
      },
      "CoreModules": {
        "registry": "contosoregistry.azurecr.io",
        "modulePath": "bicep/modules/core"
      }
    }
  }
}
The resulting merged configuration would be:
{
  "cloud": {
    ...
    "credentialPrecedence": [
      "AzurePowerShell",
      "AzureCLI"
    ]
  },
  "moduleAliases": {
    "ts": {},
    "br": {
      "public": {
        "registry": "mcr.microsoft.com",
        "modulePath": "bicep"
      },
      "ContosoRegistry": {
        "registry": "contosoregistry.azurecr.io"
      },
      "CoreModules": {
        "registry": "contosoregistry.azurecr.io",
        "modulePath": "bicep/modules/core"
      }
    }
  },
  ...
}
In the preceding example, the value of cloud.credentialPrecedence is replaced, while the values of cloud.moduleAliases.ContosoRegistry and cloud.moduleAliases.CoreModules are appended in the merged configuration.
Understand the file resolution process
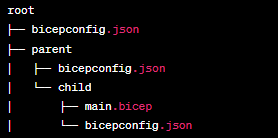
The bicepconfig.json file can be placed in the same directory or a parent directory of your Bicep files. If there are multiple parent directories containing bicepconfig.json files, Bicep uses the configuration file from the nearest one. For instance, in the given folder structure where each folder has a bicepconfig.json file:

If you compile main.bicep in the child folder, the bicepconfig.json file in the child folder is used. The configuration files in the parent folder and the root folder are ignored. If the child folder doesn't contain a configuration file, Bicep searches for a configuration in the parent folder and then the root folder. If a configuration file isn't found in any of the folders, Bicep defaults to using the default values.
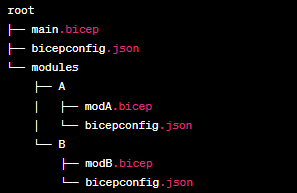
In the context of a Bicep file invoking multiple modules, each module undergoes compilation using the nearest bicepconfig.json. Then, the main Bicep file is compiled with its corresponding bicepconfig.json. In the following scenario, modA.bicep is compiled using the bicepconfig.json located in the A folder, modB.bicep is compiled with the bicepconfig.json in the B folder, and finally, main.bicep is compiled using the bicepconfig.json in the root folder.

In the absence of a bicepconfig.json file in the A and B folders, all three Bicep files are compiled using the bicepconfig.json found in the root folder. If bicepconfig.json isn't present in any of the folders, the compilation defaults to using the default values.
Configure Bicep modules
When working with modules, you can add aliases for module paths. These aliases simplify your Bicep file because you don't have to repeat complicated paths. You can also configure cloud profile and credential precedence for authenticating to Azure from Bicep CLI and Visual Studio Code. The credentials are used to publish modules to registries and to restore external modules to the local cache when using the insert resource function. For more information, see Add module settings to Bicep config.
Configure Linter rules
The Bicep linter checks Bicep files for syntax errors and best practice violations. You can modify a bicepconfig.json file to override the default settings for how a Bicep file is validated. For more information, see Add linter settings to Bicep config.
Enable experimental features
You can enable experimental features by adding the following section to your bicepconfig.json file. Using experimental features automatically enables language version 2.0 code generation.
Here's an example of enabling features 'assertions' and 'testFramework`.
{
  "experimentalFeaturesEnabled": {
    "assertions": true,
    "testFramework": true
  }
}
See Experimental Features for more information about Bicep experimental features.
Next steps
- Learn how to add module settings and linter settings in the Bicep config file.
- Learn about the Bicep linter.