Belešku
Pristup ovoj stranici zahteva autorizaciju. Možete pokušati da se prijavite ili da promenite direktorijume.
Pristup ovoj stranici zahteva autorizaciju. Možete pokušati da promenite direktorijume.
In this quickstart, you configure your IoT Central application to export data Azure Data Explorer. Azure Data Explorer lets you store, query, and process the telemetry from devices such as the IoT Plug and Play smartphone app.
In this quickstart, you:
- Use the data export feature in IoT Central to the telemetry from the smartphone app to an Azure Data Explorer database.
- Use Azure Data Explorer to run queries on the telemetry.
Completing this quickstart incurs a small cost in your Azure account for the Azure Data Explorer instance. The first two devices in your IoT Central application are free.
Prerequisites
- An Azure account with an active subscription. Create an account for free.
- Complete the first quickstart, Quickstart - Use your smartphone as a device to send telemetry to an IoT Central application. The second quickstart, Quickstart: Configure rules and actions for your device in Azure IoT Central, is optional.
- You need the IoT Central application URL prefix that you chose in the first quickstart, Quickstart - Use your smartphone as a device to send telemetry to an IoT Central application.
Use the Bash environment in Azure Cloud Shell. For more information, see Get started with Azure Cloud Shell.

If you prefer to run CLI reference commands locally, install the Azure CLI. If you're running on Windows or macOS, consider running Azure CLI in a Docker container. For more information, see How to run the Azure CLI in a Docker container.
If you're using a local installation, sign in to the Azure CLI by using the az login command. To finish the authentication process, follow the steps displayed in your terminal. For other sign-in options, see Authenticate to Azure using Azure CLI.
When you're prompted, install the Azure CLI extension on first use. For more information about extensions, see Use and manage extensions with the Azure CLI.
Run az version to find the version and dependent libraries that are installed. To upgrade to the latest version, run az upgrade.
Install Azure services
Before you can export data from your IoT Central application, you need an Azure Data Explorer cluster and database. In this quickstart, you run a bash script in the Azure Cloud Shell to create and configure them.
The script completes the following steps:
- Prompts you to sign in to your Azure subscription so that it can generate a bearer token to authenticate the REST API calls.
- Creates an Azure Data Explorer cluster and database.
- Creates a managed identity for your IoT Central application.
- Configures the managed identity with permission to access the Azure Data Explorer database.
- Adds a table to the database to store the incoming telemetry from IoT Central.
Run the following commands to download the script to your Azure Cloud Shell environment:
wget https://raw.githubusercontent.com/Azure-Samples/iot-central-docs-samples/main/quickstart-cde/createADX.sh
chmod u+x createADX.sh
Use the following command to run the script:
- Replace
CLUSTER_NAMEwith a unique name for your Azure Data Explorer cluster. The cluster name can contain only lowercase letters and numbers. The length of the cluster name must be between 4 and 22 characters. - Replace
CENTRAL_URL_PREFIXwith URL prefix you chose in the first quickstart for your IoT Central application. - When prompted, follow the instructions to sign in to your account. It's necessary for the script to sign in because it generates a bearer token to authenticate a REST API call.
./createADX.sh CLUSTER_NAME CENTRAL_URL_PREFIX
Important
This script can take 20 to 30 minutes to run.
Make a note of the Azure Data Explorer URL output by the script. You use this value later in the quickstart.
Configure data export
To configure the data export destination from IoT Central:
- Navigate to the Data export page in your IoT Central application.
- Select the Destinations tab and then Add a destination.
- Enter Azure Data Explorer as the destination name. Select Azure Data Explorer as the destination type.
- In Cluster URL, enter the Azure Data Explorer URL you made a note of previously.
- In Database name, enter phonedata.
- In Table name, enter acceleration.
- In Authorization, select System-assigned managed identity.
- Select Save.
To configure the data export:
On the Data export page, select the Exports tab, and then Add an export.
Enter Phone accelerometer as the export name.
Select Telemetry as the type of data to export.
Use the information in the following table to add two filters:
Name Operator Value Device template Equals IoT Plug and Play mobile Sensors/Acceleration/X Exists N/A Make sure that the option to export the data if all of the conditions are true is set.
Add Azure Data Explorer as a destination.
Add a data transformation to the destination. Add the following query in the 2. Build transformation query field on the Data transformation page:
import "iotc" as iotc;
{
    Device: .device.id,
    EnqueuedTime: .enqueuedTime,
    X: .telemetry | iotc::find(.name == "accelerometer").value.x,
    Y: .telemetry | iotc::find(.name == "accelerometer").value.y,
    Z: .telemetry | iotc::find(.name == "accelerometer").value.z
}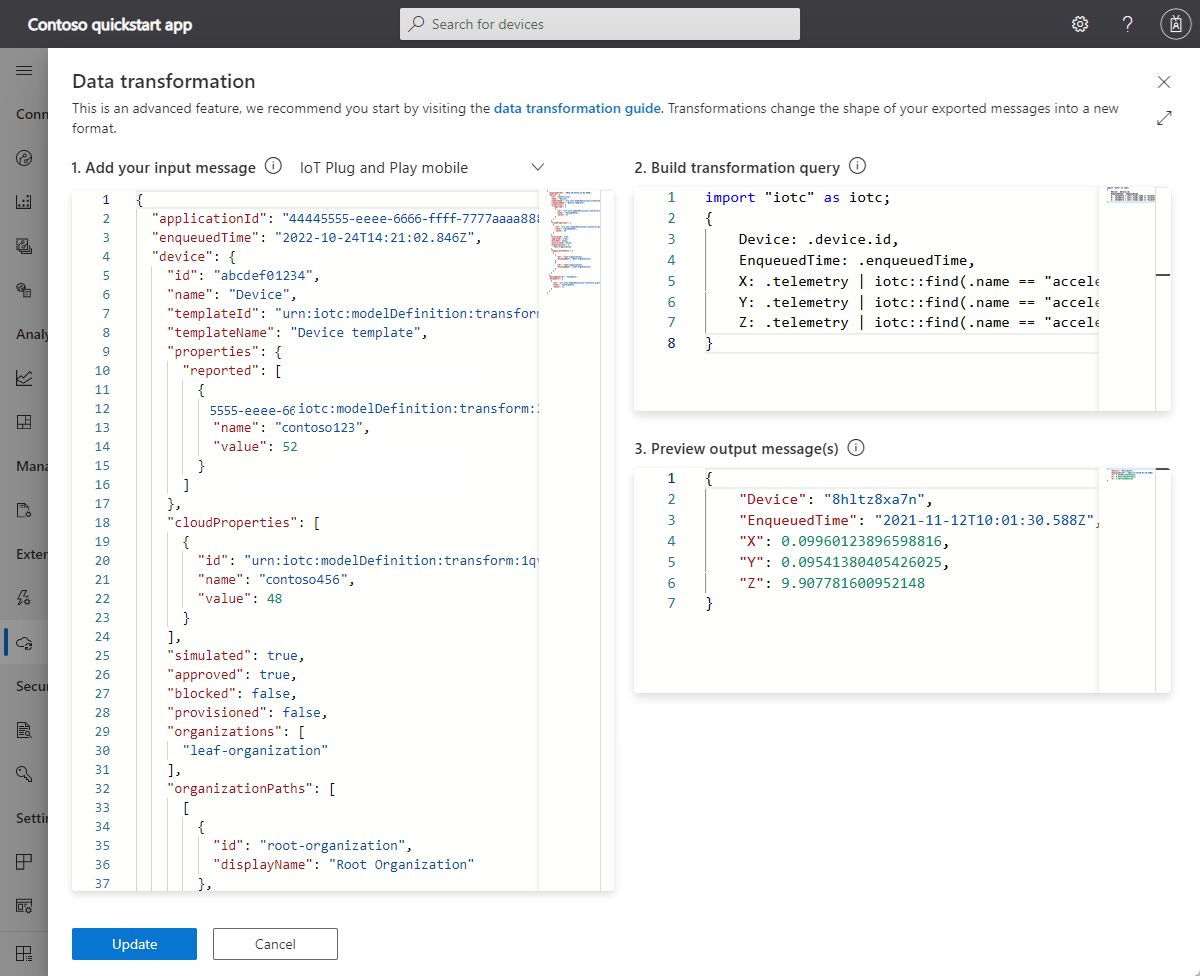
To see how the transformation works and experiment with the query, paste the following sample telemetry message into 1. Add your input message:
{
  "messageProperties": {},
  "device": {
    "id": "8hltz8xa7n",
    "properties": {
      "reported": []
    },
    "approved": true,
    "types": [],
    "name": "8hltz8xa7n",
    "simulated": false,
    "provisioned": true,
    "modules": [],
    "templateId": "urn:modelDefinition:vlcd3zvzdm:y425jkkpqzeu",
    "templateName": "IoT Plug and Play mobile",
    "organizations": [],
    "cloudProperties": [],
    "blocked": false
  },
  "component": "sensors",
  "applicationId": "00001111-aaaa-2222-bbbb-3333cccc4444",
  "messageSource": "telemetry",
  "telemetry": [
    {
      "id": "dtmi:azureiot:PhoneSensors:__accelerometer;1",
      "name": "accelerometer",
      "value": {
        "x": 0.09960123896598816,
        "y": 0.09541380405426025,
        "z": 9.907781600952148
      }
    }
  ],
  "enqueuedTime": "2021-11-12T10:01:30.588Z",
  "enrichments": {}
}
Save the transformation. Then save the data export definition.

Wait until the export status shows Healthy:

Query exported data
To query the exported telemetry:
Use the Azure Data Explorer URL output by the script you ran previously to navigate to your Azure Data Explorer environment.
Expand the cluster node and select the phonedata database. The scope of the query window changes to
Scope:yourclustername.eastus/phonedata.In Azure Data Explorer, open a new tab and paste in the following Kusto query and then select Run to plot the accelerometer telemetry:
['acceleration']
    | project EnqueuedTime, Device, X, Y, Z
    | render timechart
You might need to wait for several minutes to collect enough data. To see the telemetry values change, try holding your phone in different orientations:

Clean up resources
If you don't plan to complete any further IoT Central quickstarts or tutorials, you can delete your IoT Central application:
- In your IoT Central application, navigate to Application > Management.
- Select Delete and then confirm your action.
To remove the Azure Data Explorer instance from your subscription and avoid being billed unnecessarily, delete the IoTCentralExportData-rg resource group from the Azure portal or run the following command in the Azure Cloud Shell:
az group delete --name IoTCentralExportData-rg
Next step
In this quickstart, you learned how to continuously export data from IoT Central to another Azure service.
Now that you know now to export your data, the suggested next step is to: