Set up no-code Automated ML training for tabular data with the studio UI
In this article, you set up automated machine learning training jobs by using Azure Machine Learning Automated ML in Azure Machine Learning studio. This approach lets you set up the job without writing a single line of code. Automated ML is a process where Azure Machine Learning selects the best machine learning algorithm for your specific data. The process enables you to generate machine learning models quickly. For more information, see the Overview of the Automated ML process.
This tutorial provides a high-level overview for working with Automated ML in the studio. The following articles provide detailed instructions for working with specific machine learning models:
- Classification: Tutorial: Train a classification model with Automated ML in the studio
- Time series forecasting: Tutorial: Forecast demand with Automated ML in the studio
- Natural Language Processing (NLP): Set up Automated ML to train an NLP model (Azure CLI or Python SDK)
- Computer vision: Set up AutoML to train computer vision models (Azure CLI or Python SDK)
- Regression: Train a regression model with Automated ML (Python SDK)
Prerequisites
An Azure subscription. You can create a free or paid account for Azure Machine Learning.
An Azure Machine Learning workspace or compute instance. To prepare these resources, see Quickstart: Get started with Azure Machine Learning.
The data asset to use for the Automated ML training job. This tutorial describes how to select an existing data asset or create a data asset from a data source, such as a local file, web url, or datastore. For more information, see Create and manage data assets.
Important
There are two requirements for the training data:
- The data must be in tabular form.
- The value to predict (the target column) must be present in the data.
Create experiment
Create and run an experiment by following these steps:
Sign in to Azure Machine Learning studio, and select your subscription and workspace.
On the left menu, select Automated ML under the Authoring section:
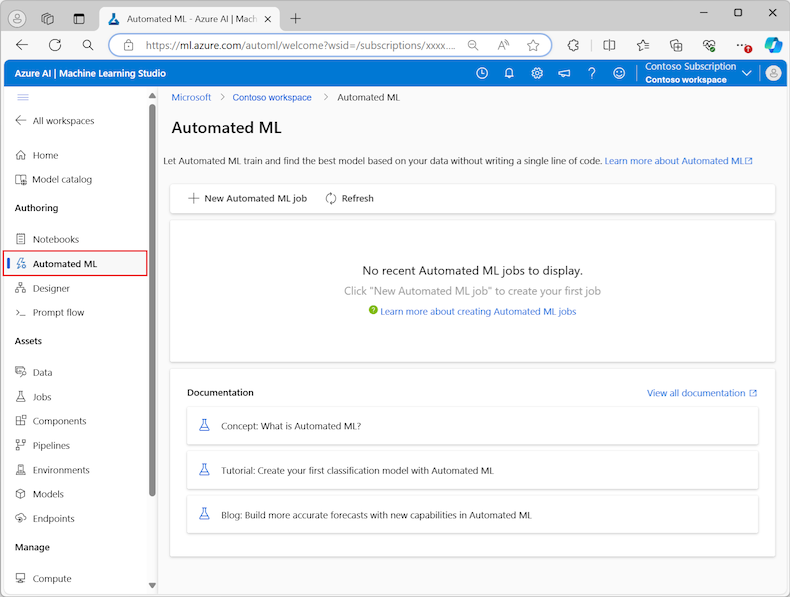
The first time you work with experiments in the studio, you see an empty list and links to documentation. Otherwise, you see a list of your recent Automated ML experiments, including items created with the Azure Machine Learning SDK.
Select New automated ML job to start the Submit an Automated ML job process.
By default, the process selects the Train automatically option on the Training method tab and continues to the configuration settings.
On the Basics settings tab, enter values for the required settings, including the Job name and Experiment name. You can also provide values for the optional settings, as desired.
Select Next to continue.

Identify data asset
On the Task type & data tab, you specify the data asset for the experiment and the machine learning model to use to train the data.
In this tutorial, you can use an existing data asset, or create a new data asset from a file on your local computer. The studio UI pages change based on your selection for the data source and type of training model.
If you choose to use an existing data asset, you can continue to the Configure training model section.
To create a new data asset, follow these steps:
To create a new data asset from a file on your local computer, select Create.
On the Data type page:
- Enter a Data asset name.
- For the Type, select Tabular from the dropdown list.
- Select Next.
On the Data source page, select From local files.
Machine Learning studio adds extra options to the left menu for you to configure the data source.
Select Next to continue to the Destination storage type page, where you specify the Azure Storage location to upload your data asset.
You can specify the default storage container automatically created with your workspace, or choose a Storage container to use for the experiment.
- For the Datastore type, select Azure Blob Storage.
- In the list of datastores, select workspaceblobstore.
- Select Next.
On the File and folder selection page, use the Upload files or folder dropdown menu and select the Upload files or Upload folder option.
- Browse to the location of the data to upload and select Open.
- After the files upload, select Next.
Machine Learning studio validates and uploads your data.
Note
If your data is behind a virtual network, you need to enable the Skip the validation function to ensure the workspace can access your data. For more information, see Use Azure Machine Learning studio in an Azure virtual network.
Check your uploaded data on the Settings page for accuracy. The fields on the page are prepopulated based on the file type of your data:
Field Description File format Defines the layout and type of data stored in a file. Delimiter Identifies one or more characters for specifying the boundary between separate, independent regions in plain text or other data streams. Encoding Identifies what bit to character schema table to use to read your dataset. Column headers Indicates how the headers of the dataset, if any, are treated. Skip rows Indicates how many, if any, rows are skipped in the dataset. Select Next to continue to the Schema page. This page is also prepopulated based on your Settings selections. You can configure the data type for each column, review the column names, and manage columns:
- To change the data type for a column, use the Type dropdown menu to select an option.
- To exclude a column from the data asset, toggle the Include option for the column.
Select Next to continue to the Review page. Review the summary of your configuration settings for the job, and then select Create.
Configure training model
When the data asset is ready, Machine Learning studio returns to the Task type & data tab for the Submit an Automated ML job process. The new data asset is listed on the page.
Follow these steps to complete the job configuration:
Expand the Select task type dropdown menu, and choose the training model to use for the experiment. The options include classification, regression, time series forecasting, natural language processing (NLP), or computer vision. For more information about these options, see the descriptions of the supported task types.
After you specify the training model, select your dataset in the list.
Select Next to continue to the Task settings tab.
In the Target column dropdown list, select the column to use for the model predictions.
Depending on your training model, configure the following required settings:
Classification: Choose whether to Enable deep learning.
Time series forecasting: Choose whether to Enable deep learning, and confirm your preferences for the required settings:
Use the Time column to specify the time data to use in the model.
Choose whether to enable one or more Autodetect options. When you deselect an Autodetect option, such as Autodetect forecast horizon, you can specify a specific value. The Forecast horizon value indicates how many time units (minutes/hours/days/weeks/months/years) the model can predict for the future. The further into the future the model is required to predict, the less accurate the model becomes.
For more information about how to configure these settings, see Use Automated ML to train a time-series forecasting model.
Natural language processing: Confirm your preferences for the required settings:
Use the Select sub type option to configure the sub classification type for the NLP model. You can choose from Multi-class classification, Multi-label classification, and Named entity recognition (NER).
In the Sweep settings section, provide values for the Slack factor and Sampling algorithm.
In the Search space section, configure the set of Model algorithm options.
For more information about how to configure these settings, see Set up Automated ML to train an NLP model (Azure CLI or Python SDK).
Computer vision: Choose whether to enable Manual sweeping, and confirm your preferences for the required settings:
- Use the Select sub type option to configure the sub classification type for the computer vision model. You can choose from Image classification (Multi-class) or (Multi-label), Object detection, and Polygon (instance segmentation).
For more information about how to configure these settings, see Set up AutoML to train computer vision models (Azure CLI or Python SDK).
Specify optional settings
Machine Learning studio provides optional settings that you can configure based on your machine learning model selection. The following sections describe the extra settings.
Configure additional settings
You can select the View additional configuration settings option to see actions to perform on the data in preparation for training.
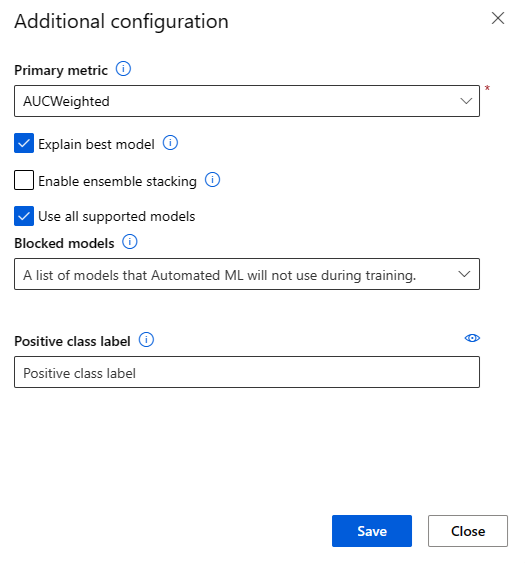
The Additional configuration page shows default values based on your experiment selection and data. You can use the default values or configure the following settings:
| Setting | Description |
|---|---|
| Primary metric | Identify the main metric for scoring your model. For more information, see model metrics. |
| Enable ensemble stacking | Allow ensemble learning and improve machine learning results and predictive performance by combining multiple models as opposed to using single models. For more information, see ensemble models. |
| Use all supported models | Use this option to instruct Automated ML whether to use all supported models in the experiment. For more information, see the supported algorithms for each task type. - Select this option to configure the Blocked models setting. - Deselect this option to configure the Allowed models setting. |
| Blocked models | (Available when Use all supported models is selected) Use the dropdown list and select the models to exclude from the training job. |
| Allowed models | (Available when Use all supported models isn't selected) Use the dropdown list and select the models to use for the training job. Important: Available only for SDK experiments. |
| Explain best model | Choose this option to automatically show explainability on the best model created by Automated ML. |
| Positive class label | Enter the label for Automated ML to use for calculating binary metrics. |
Configure featurization settings
You can select the View featurization settings option to see actions to perform on the data in preparation for training.
The Featurization page shows default featurization techniques for your data columns. You can enable/disable automatic featurization and customize the automatic featurization settings for your experiment.

Select the Enable featurization option to allow configuration.
Important
When your data contains non-numeric columns, featurization is always enabled.
Configure each available column, as desired. The following table summarizes the customizations currently available via the studio.
Column Customization Feature type Change the value type for the selected column. Impute with Select what value to impute missing values with in your data. 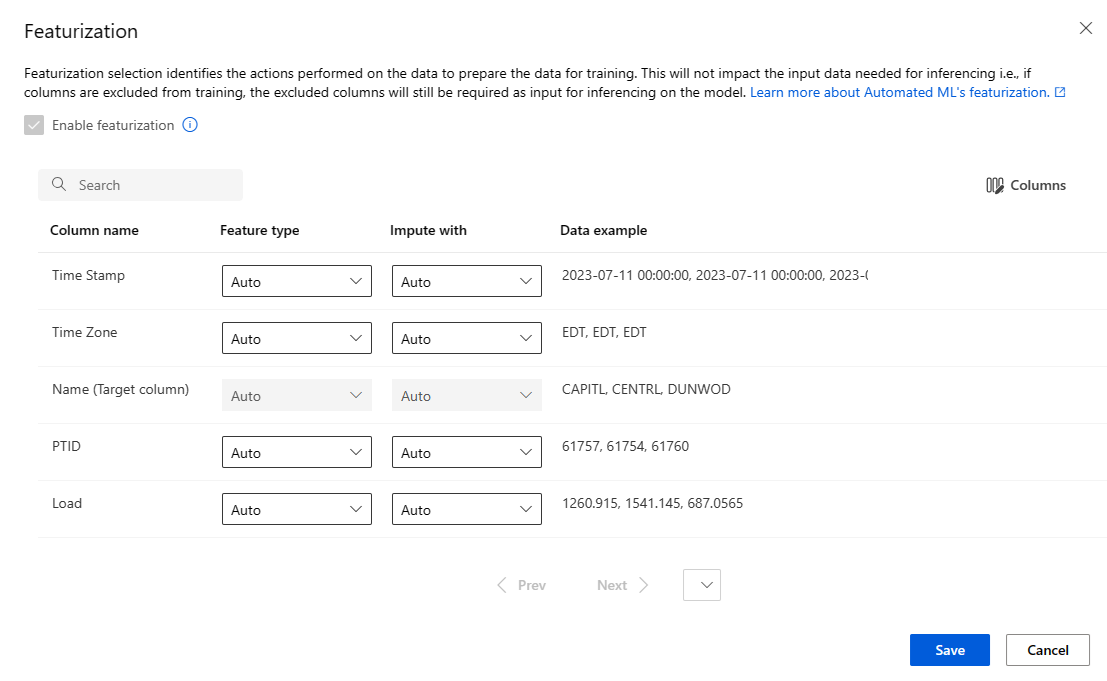

The featurization settings don't affect the input data needed for inferencing. If you exclude columns from training, the excluded columns are still required as input for inferencing on the model.
Configure limits for the job
The Limits section provides configuration options for the following settings:
| Setting | Description | Value |
|---|---|---|
| Max trials | Specify the maximum number of trials to try during the Automated ML job, where each trial has a different combination of algorithm and hyperparameters. | Integer between 1 and 1,000 |
| Max concurrent trials | Specify the maximum number of trial jobs that can be executed in parallel. | Integer between 1 and 1,000 |
| Max nodes | Specify the maximum number of nodes this job can use from the selected compute target. | 1 or more, depending on the compute configuration |
| Metric score threshold | Enter the iteration metric threshold value. When the iteration reaches the threshold, the training job terminates. Keep in mind that meaningful models have a correlation greater than zero. Otherwise, the result is the same as guessing. | Average metric threshold, between bounds [0, 10] |
| Experiment timeout (minutes) | Specify the maximum time the entire experiment can run. After the experiment reaches the limit, the system cancels the Automated ML job, including all its trials (children jobs). | Number of minutes |
| Iteration timeout (minutes) | Specify the maximum time each trial job can run. After the trial job reaches this limit, the system cancels the trial. | Number of minutes |
| Enable early termination | Use this option to end the job when the score isn't improving in the short term. | Select the option to enable early end of job |
Validate and test
The Validate and test section provides the following configuration options:
Specify the Validation type to use for your training job. If you don't explicitly specify either a
validation_dataorn_cross_validationsparameter, Automated ML applies default techniques depending on the number of rows provided in the single datasettraining_data.Training data size Validation technique Larger than 20,000 rows Train/validation data split is applied. The default is to take 10% of the initial training data set as the validation set. In turn, that validation set is used for metrics calculation. Smaller than 20,000& rows Cross-validation approach is applied. The default number of folds depends on the number of rows.
- Dataset with less than 1,000 rows: 10 folds are used
- Dataset with 1,000 to 20,000 rows: Three folds are usedProvide the Test data (preview) to evaluate the recommended model that Automated ML generates at the end of your experiment. When you provide test dataset, a test job is automatically triggered at the end of your experiment. This test job is the only job on the best model recommended by Automated ML. For more information, see View remote test job results (preview).
Important
Providing a test dataset to evaluate generated models is a preview feature. This capability is an experimental preview feature, and can change at any time.
Test data is considered separate from training and validation, and it shouldn't bias the results of the test job of the recommended model. For more information, see Training, validation, and test data.
You can either provide your own test dataset or opt to use a percentage of your training dataset. Test data must be in the form of an Azure Machine Learning table dataset.
The schema of the test dataset should match the training dataset. The target column is optional, but if no target column is indicated, no test metrics are calculated.
The test dataset shouldn't be the same as the training dataset or the validation dataset.
Forecasting jobs don't support train/test split.

Configure the compute
Follow these steps and configure the compute:
Select Next to continue to the Compute tab.
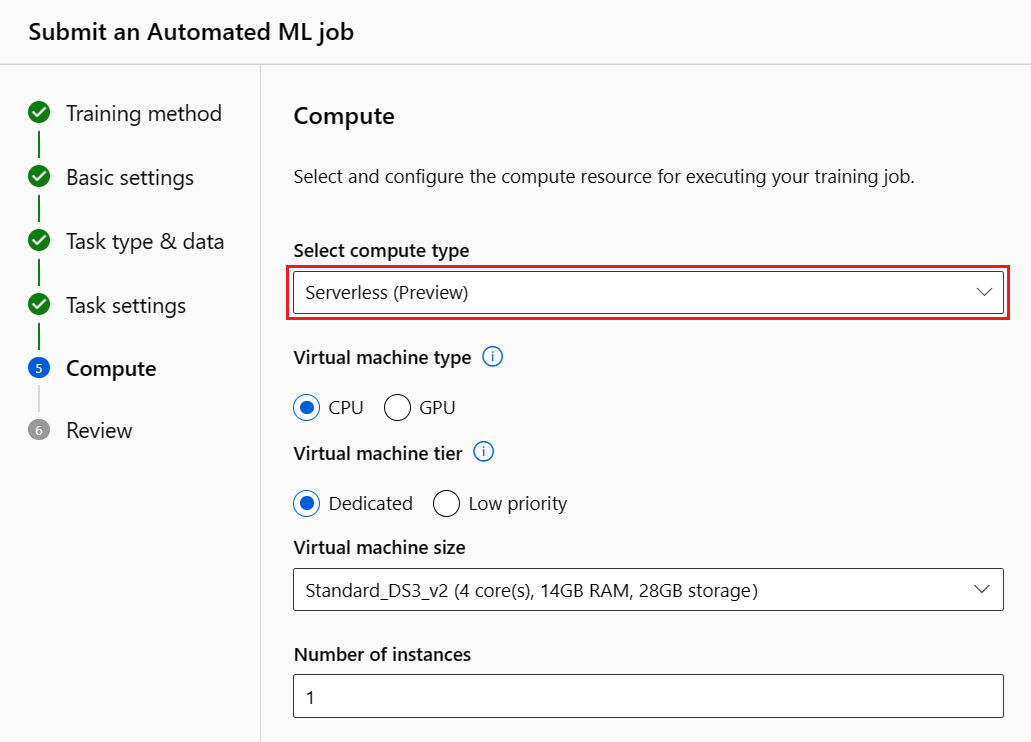
Use the Select compute type dropdown list to choose an option for the data profiling and training job. The options include compute cluster, compute instance or serverless.
After you select the compute type, the other UI on the page changes based on your selection:
Serverless: The configuration settings display on the current page. Continue to the next step for descriptions of the settings to configure.
Compute cluster or Compute instance: Choose from the following options:
Use the Select Automated ML compute dropdown list to select an existing compute for your workspace, and then select Next. Continue to the Run experiment and view results section.
Select New to create a new compute instance or cluster. This option opens the Create compute page. Continue to the next step for descriptions of the settings to configure.
For a serverless compute or a new compute, configure any required (*) settings:
The configuration settings differ depending on your compute type. The following table summarizes the various settings you might need to configure:
Field Description Compute name Enter a unique name that identifies your compute context. Location Specify the region for the machine. Virtual machine priority Low priority virtual machines are cheaper but don't guarantee the compute nodes. Virtual machine type Select CPU or GPU for virtual machine type. Virtual machine tier Select the priority for your experiment. Virtual machine size Select the virtual machine size for your compute. Min / Max nodes To profile data, you must specify one or more nodes. Enter the maximum number of nodes for your compute. The default is six nodes for an Azure Machine Learning Compute. Idle seconds before scale down Specify the idle time before the cluster is automatically scaled down to the minimum node count. Advanced settings These settings allow you to configure a user account and existing virtual network for your experiment. After you configure the required settings, select Next or Create, as appropriate.
Creation of a new compute can take a few minutes. When creation completes, select Next.
Run experiment and view results
Select Finish to run your experiment. The experiment preparing process can take up to 10 minutes. Training jobs can take an additional 2-3 minutes more for each pipeline to finish running. If you specified to generate RAI dashboard for the best recommended model, it can take up to 40 minutes.
Note
The algorithms Automated ML employs have inherent randomness that can cause slight variation in a recommended model's final metrics score, like accuracy. Automated ML also performs operations on data such as train-test split, train-validation split or cross-validation, as necessary. If you run an experiment with the same configuration settings and primary metric multiple times, you likely see variation in each experiment's final metrics score due to these factors.
View experiment details
The Job Detail screen opens to the Details tab. This screen shows you a summary of the experiment job including a status bar at the top next to the job number.
The Models tab contains a list of the models created ordered by the metric score. By default, the model that scores the highest based on the chosen metric is at the top of the list. As the training job tries more models, the exercised models are added to the list. Use this approach to get a quick comparison of the metrics for the models produced so far.
View training job details
Drill down on any of the completed models for the training job details. You can see performance metric charts for specific models on the Metrics tab. For more information, see Evaluate automated machine learning experiment results. On this page, you can also find details on all the properties of the model along with associated code, child jobs, and images.
View remote test job results (preview)
If you specified a test dataset or opted for a train/test split during your experiment setup on the Validate and test form, Automated ML automatically tests the recommended model by default. As a result, Automated ML calculates test metrics to determine the quality of the recommended model and its predictions.
Important
Testing your models with a test dataset to evaluate generated models is a preview feature. This capability is an experimental preview feature, and can change at any time.
This feature isn't available for the following Automated ML scenarios:
Follow these steps to view the test job metrics of the recommended model:
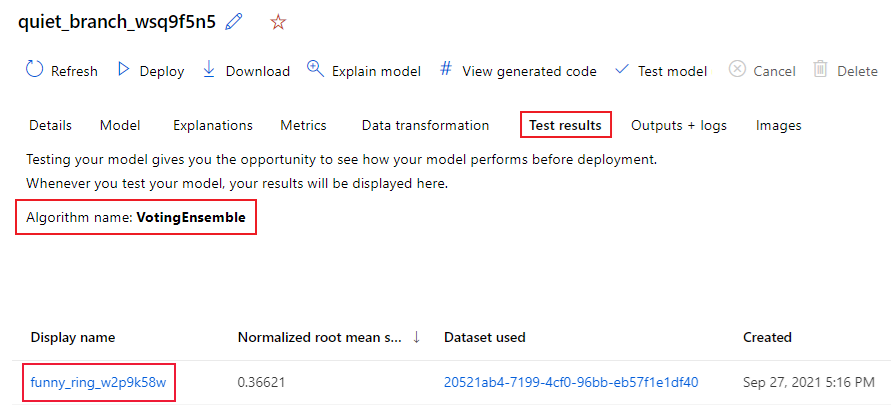
In the studio, browse to the Models page, and select the best model.
Select the Test results (preview) tab.
Select the job you want, and view the Metrics tab:
View the test predictions used to calculate the test metrics by following these steps:
At the bottom of the page, select the link under Outputs dataset to open the dataset.
On the Datasets page, select the Explore tab to view the predictions from the test job.
The prediction file can also be viewed and downloaded from the Outputs + logs tab. Expand the Predictions folder to locate your prediction.csv file.
The model test job generates the predictions.csv file stored in the default datastore created with the workspace. This datastore is visible to all users with the same subscription. Test jobs aren't recommended for scenarios if any of the information used for or created by the test job needs to remain private.
Test existing Automated ML model (preview)
After your experiment completes, you can test the models Automated ML generates for you.
Important
Testing your models with a test dataset to evaluate generated models is a preview feature. This capability is an experimental preview feature, and may change at any time.
This feature isn't available for the following Automated ML scenarios:
If you want to test a different Automated ML generated model, and not the recommended model, follow these steps:
Select an existing Automated ML experiment job.
Browse to the Models tab of the job and select the completed model you want to test.
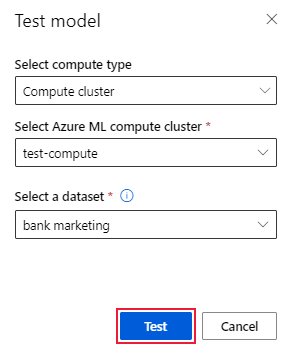
On the model Details page, select the Test model (preview) option to open the Test model pane.
On the Test model pane, select the compute cluster and a test dataset you want to use for your test job.
Select the Test option. The schema of the test dataset should match the training dataset, but the Target column is optional.
Upon successful creation of model test job, the Details page displays a success message. Select the Test results tab to see the progress of the job.
To view the results of the test job, open the Details page and follow the steps in the View remote test job results (preview) section.
Responsible AI dashboard (preview)
To better understand your model, you can see various insights about your model by using the Responsible AI dashboard. This UI allows you to evaluate and debug your best Automated ML model. The Responsible AI dashboard evaluates model errors and fairness issues, diagnoses why the errors are happening by evaluating your train and/or test data, and observing model explanations. Together, these insights could help you build trust with your model and pass the audit processes. Responsible AI dashboards can't be generated for an existing Automated ML model. The dashboard is created only for the best recommended model when a new Automated ML job is created. Users should continue to use Model Explanations (preview) until support is provided for existing models.
Generate a Responsible AI dashboard for a particular model by following these steps:
While you submit an Automated ML job, proceed to the Task settings section on the left menu and select the View additional configuration settings option.
On the Additional configuration page, select the Explain best model option:
Switch to the Compute tab, and select the Serverless option for your compute:
After the operation completes, browse to the Models page of your Automated ML job, which contains a list of your trained models. Select the View Responsible AI dashboard link:

The Responsible AI dashboard appears for the selected model:
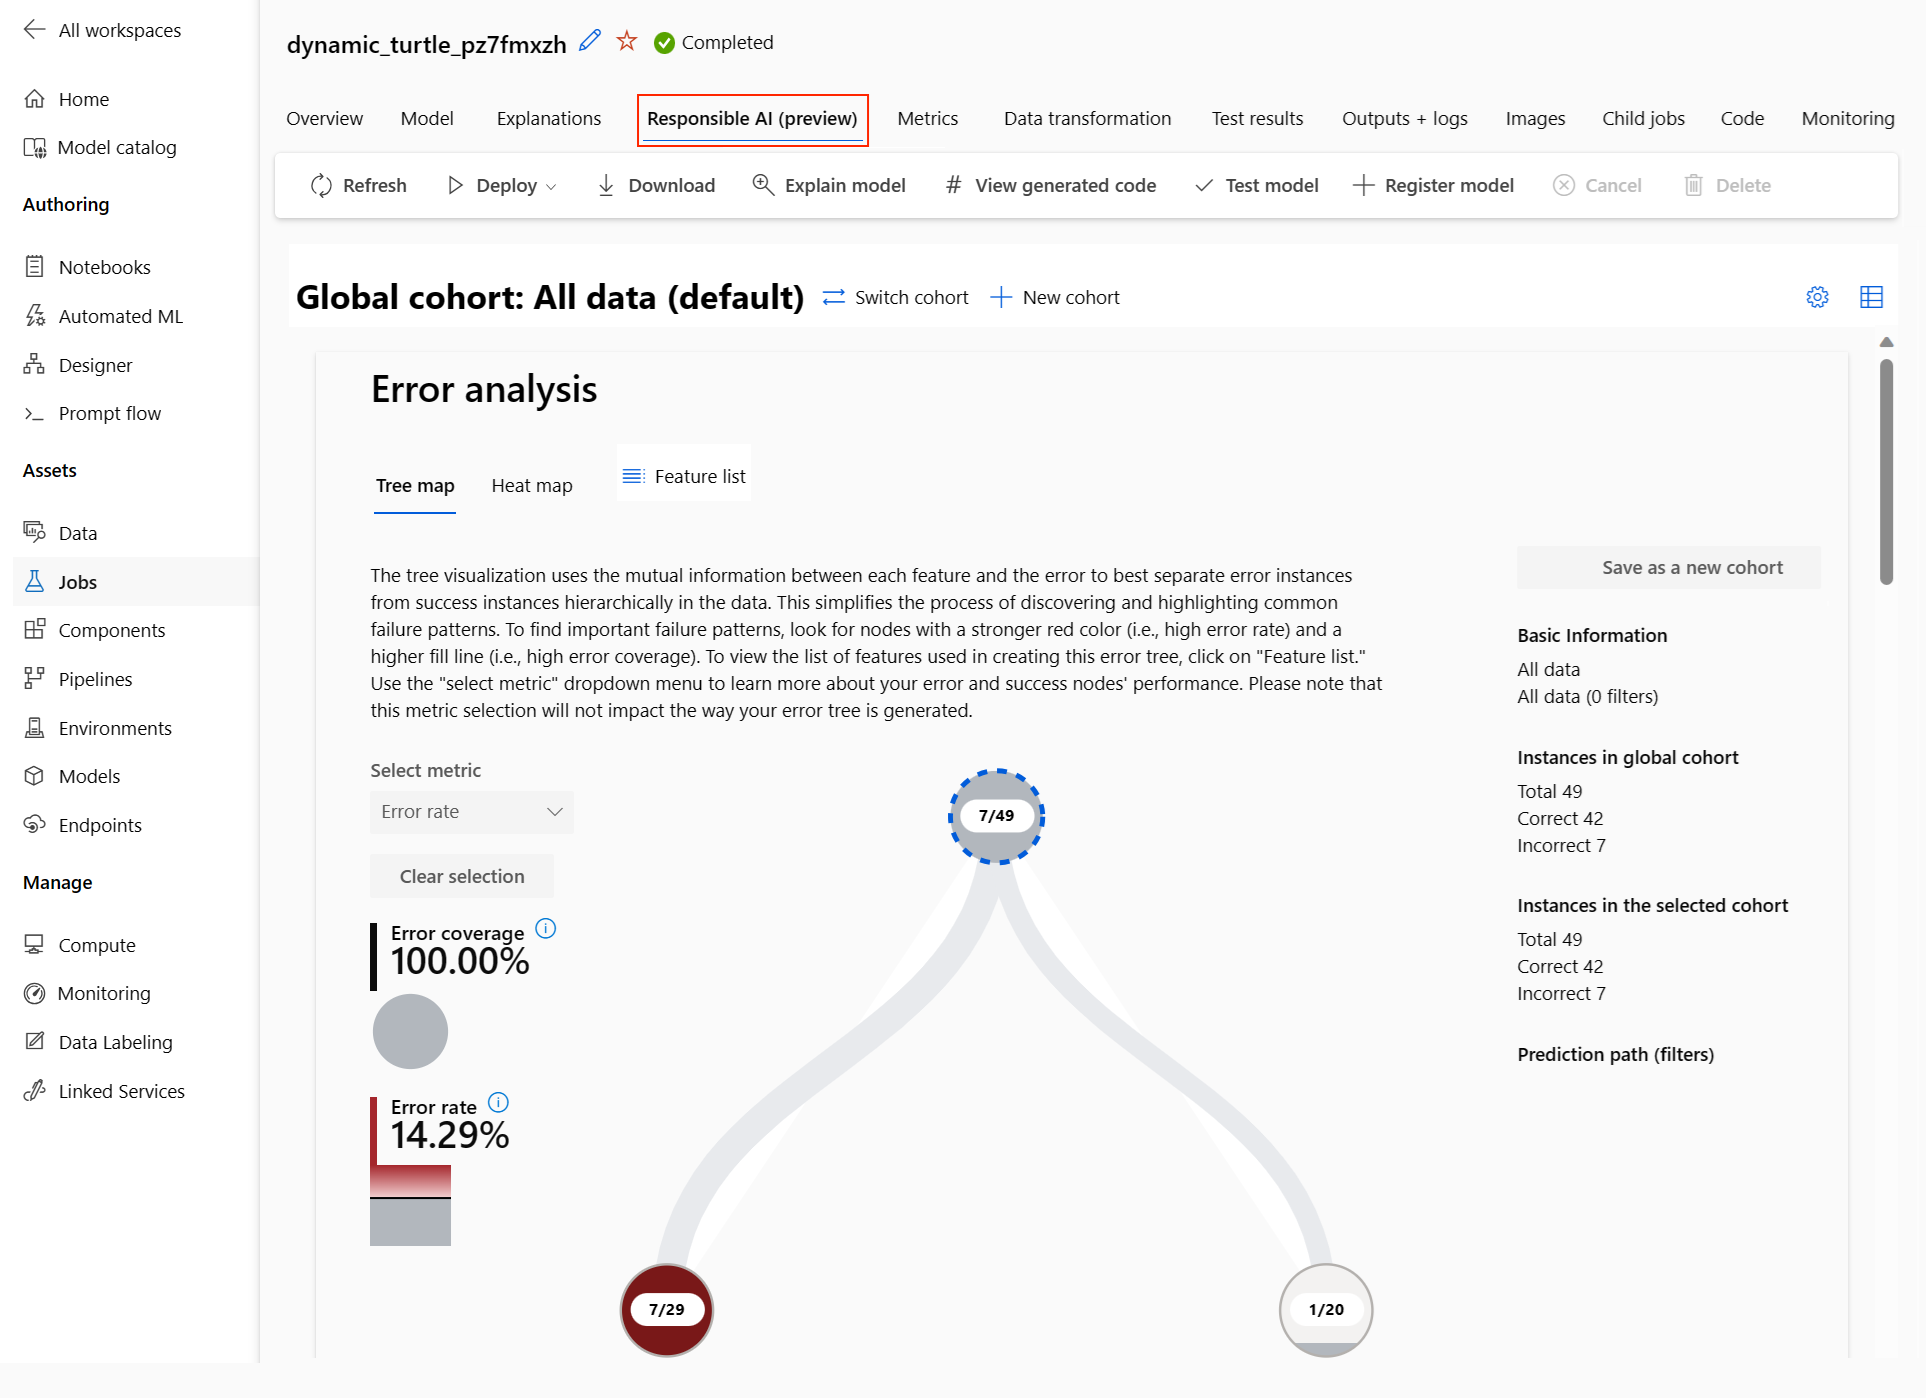
In the dashboard, you see four components activated for your Automated ML best model:
Component What does the component show? How to read the chart? Error Analysis Use error analysis when you need to:
- Gain a deep understanding of how model failures are distributed across a dataset and across several input and feature dimensions.
- Break down the aggregate performance metrics to automatically discover erroneous cohorts in order to inform your targeted mitigation steps.Error Analysis Charts Model Overview and Fairness Use this component to:
- Gain a deep understanding of your model performance across different cohorts of data.
- Understand your model fairness issues by looking at the disparity metrics. These metrics can evaluate and compare model behavior across subgroups identified in terms of sensitive (or nonsensitive) features.Model Overview and Fairness Charts Model Explanations Use the model explanation component to generate human-understandable descriptions of the predictions of a machine learning model by looking at:
- Global explanations: For example, what features affect the overall behavior of a loan allocation model?
- Local explanations: For example, why was a customer's loan application approved or rejected?Model Explainability Charts Data Analysis Use data analysis when you need to:
- Explore your dataset statistics by selecting different filters to slice your data into different dimensions (also known as cohorts).
- Understand the distribution of your dataset across different cohorts and feature groups.
- Determine whether your findings related to fairness, error analysis, and causality (derived from other dashboard components) are a result of your dataset's distribution.
- Decide in which areas to collect more data to mitigate errors that come from representation issues, label noise, feature noise, label bias, and similar factors.Data Explorer Charts You can further create cohorts (subgroups of data points that share specified characteristics) to focus your analysis of each component on different cohorts. The name of the cohort currently applied to the dashboard is always shown at the top left of your dashboard. The default view in your dashboard is your whole dataset, titled All data by default. For more information, see Global controls for your dashboard.


Edit and submit jobs (preview)
In scenarios where you want to create a new experiment based on the settings of an existing experiment, Automated ML provides the Edit and submit option in the studio UI. This functionality is limited to experiments initiated from the studio UI and requires the data schema for the new experiment to match that of the original experiment.
Important
The ability to copy, edit, and submit a new experiment based on an existing experiment is a preview feature. This capability is an experimental preview feature, and can change at any time.
The Edit and submit option opens the Create a new Automated ML job wizard with the data, compute, and experiment settings prepopulated. You can configure the options on each tab in the wizard and edit selections as needed for your new experiment.
Deploy your model
After you have the best model, you can deploy the model as a web service to predict on new data.
Note
To deploy a model generated via the automl package with the Python SDK, you must register your model) to the workspace.
After you register the model, you can locate the model in the studio by selecting Models on the left menu. On the model overview page, you can select the Deploy option and continue to Step 2 in this section.
Automated ML helps you deploy the model without writing code.
Initiate the deployment by using one of the following methods:
Deploy the best model with the metric criteria you defined:
After the experiment completes, select Job 1 and browse to the parent job page.
Select the model listed in the Best model summary section, and then select Deploy.
Deploy a specific model iteration from this experiment:
- Select the desired model from the Models tab, and then select Deploy.
Populate the Deploy model pane:
Field Value Name Enter a unique name for your deployment. Description Enter a description to better identify the deployment purpose. Compute type Select the type of endpoint you want to deploy: Azure Kubernetes Service (AKS) or Azure Container Instance (ACI). Compute name (Applies to AKS only) Select the name of the AKS cluster you wish to deploy to. Enable authentication Select to allow for token-based or key-based authentication. Use custom deployment assets Enable custom assets if you want to upload your own scoring script and environment file. Otherwise, Automated ML provides these assets for you by default. For more information, see Deploy and score a machine learning model by using an online endpoint. Important
File names must be between 1 and 32 characters. The name must begin and end with alphanumerics, and can include dashes, underscores, dots, and alphanumerics between. Spaces aren't allowed.
The Advanced menu offers default deployment features such as data collection and resource utilization settings. You can use the options in this menu to override these defaults. For more information, see Monitor online endpoints.
Select Deploy. Deployment can take about 20 minutes to complete.
After deployment starts, the Model summary tab opens. You can monitor the deployment progress under the Deploy status section.
Now you have an operational web service to generate predictions! You can test the predictions by querying the service from the End-to-end AI samples in Microsoft Fabric.
Related content
Povratne informacije
Stiže uskoro: Tokom 2024. godine postepeno ćemo ukidati probleme sa uslugom GitHub kao mehanizam povratnih informacija za sadržaj i zameniti ga novim sistemom povratnih informacija. Dodatne informacije potražite u članku: https://aka.ms/ContentUserFeedback.
Prosledite i prikažite povratne informacije za