Manage teams in the Microsoft Teams admin center
This article provides an overview of the management tools for Teams in the Microsoft Teams admin center.
As an admin, you may need to view or update the teams in your organization, or you might need to perform remediation actions such as assigning owners for ownerless teams. You can manage teams through both the Teams PowerShell module and the Teams admin center. You can access the admin center at https://admin.teams.microsoft.com. For full administration capabilities using these two toolsets, you should make sure that you're assigned one of the following roles:
- Global administrator
- Teams administrator
You can learn more about admin roles in Teams in Use Microsoft Teams admin roles to manage Teams, and you can read more about how to use the PowerShell cmdlets for managing teams in the Microsoft Teams cmdlet reference.
Teams overview grid
Management tools for teams are under the Teams node in the Microsoft Teams admin center. (In the admin center, select Teams > Manage teams.) This page provides a view of all the teams in your organization.
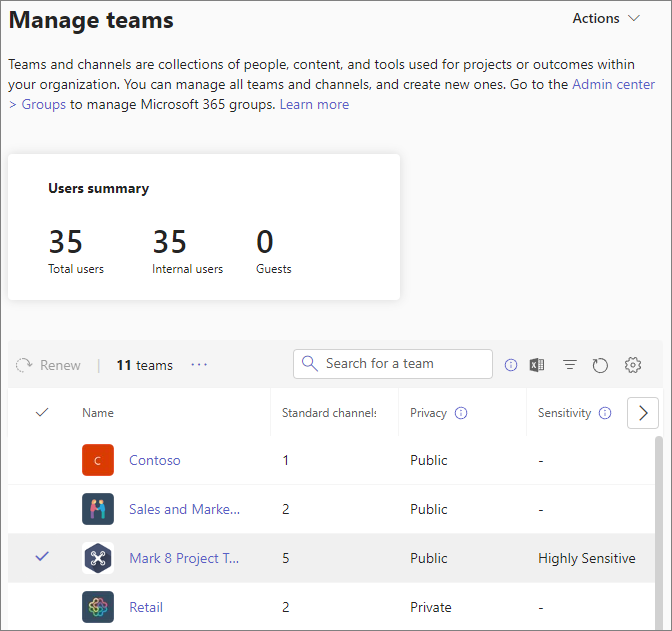
The grid displays the following properties:
- Team name
- Standard channels - a count of the standard channels in the team.
- Private channels - a count of the private channels in the team.
- Shared channels - a count of the shared channels in the team.
- Team members - a count of total users, including owners, members, and guests for the team.
- Owners - a count of owners for this team.
- Guests - a count of Microsoft Entra B2B guests who are members of this team.
- Privacy - whether the team is public or private.
- Status - the Archived or Active status for this team.
- Description - the description of the team.
- Sensitivity - the sensitivity label associated with the team. (This column may be called classification if you haven't set up sensitivity labels.)
- GroupID - the unique ID for the Microsoft 365 group associated with the team.
- Expiration date - the date the team is scheduled to expire if the team has an expiration policy.
If you don't see all these properties in the grid, select the Edit columns icon. In the Edit columns pane, you can use the toggles to turn on or turn off columns in the grid. When you're finished, select Apply.
Add a team
To add a new team, click Add. In the Add a new team pane, give the team a name and description, set whether you want to make it a private or public team, and set the sensitivity if needed.
This video shows the steps to create a new team and a channel for them.
Edit a team
To edit team-specific settings, select the team by clicking to the left of the team name, and then select Edit.
This video shows the steps to view and edit the details of an existing team.
Archive a team
Archiving a team puts the team into read-only mode within Teams. To archive a team, select the team by clicking to the left of the team name, and then select Archive.
Restore deleted teams
To restore a deleted team in the Teams admin center, do the following:
Go to the Teams Admin center > Teams > Manage teams.
Expand Actions menu on the top right corner, click View deleted teams.
Select the team that you want to restore from the list, and then click Restore. You can also select multiple teams and restore them.
Note
It might take some time for the team to appear in the Manage Teams list. Select Refresh to refresh the list.
Renew an expiring team
To renew an expiring team in the Teams admin center, do the following:
Go to the Teams Admin center > Teams > Manage teams.
Select Filter, and in the Filter section, do the following:
Select Match all these conditions.
Choose the Expiration Date and select one of values from the list (for example: in the next 7 days, in the next 14 days, or in the next 30 days).
Click Apply.
Select the expiring team that you want to renew, select Renew, and then select Confirm.
Note
If you do not find the team's detail updated immediately, select Refresh. Note that it might take some time for the team's details and expiration date to get updated.
Team profiles
You can navigate to the team profile page of any team from the main teams overview grid by selecting the team name. The team profile page shows the members, owners, and guests that belong to the team, as well as the team's channels and settings. From the team profile page, you can:
- Add or remove members and owners.
- Add or remove channels (note that you can't remove the General channel).
- Change team and group settings.
On the team's profile page, you can select Edit and change the following elements of a team:
- Team name
- Description
- Privacy - set whether the team is public or private.
- Sensitivity - set the sensitivity label for the team.
- Member permissions - set how members interact with messages, channels, and apps.
- Guest permissions - set whether guests can add or remove channels.
- Fun settings - set whether team members can use giphys, stickers, and memes.
You can also manage members and channels for the team.
The changes that you make to a team are logged. If you're modifying Microsoft 365 group settings (changing the name, description, photo, privacy, sensitivity, or team members), the changes are attributed to you through the audit pipeline. If you're performing actions against Teams-specific settings, your changes are tracked and attributed to you in the General channel of the team.
Related topics
Use Teams administrator roles to manage Teams
Feedback
Kommer snart: Under hela 2024 kommer vi att fasa ut GitHub-problem som feedbackmekanism för innehåll och ersätta det med ett nytt feedbacksystem. Mer information finns i: https://aka.ms/ContentUserFeedback.
Skicka och visa feedback för