Kommentar
Åtkomst till den här sidan kräver auktorisering. Du kan prova att logga in eller ändra kataloger.
Åtkomst till den här sidan kräver auktorisering. Du kan prova att ändra kataloger.
This article outlines how to register Snowflake, and how to authenticate and interact with Snowflake in Microsoft Purview. For more information about Microsoft Purview, read the introductory article.
Important
Snowflake announced that they'll disable basic authentication by August 2026. To align with the change and avoid any service disruptions, Microsoft Purview customers using the Snowflake Data Map connector should transition to Key Pair (SHIR) authentication.
Recommended action (complete by July 2026): To provide customers with more time, Snowflake allows service users of type LEGACY_SERVICE to continue using basic authentication until July 2026. This policy helps ensure there's no disruption to your service while you transition to the new authentication method. You can continue to use basic authentication for a limited period of time, while at the same time setting up and validating the new authentication mechanism Key Pair.
We recommend that Microsoft Purview customers update their users to the LEGACY_SERVICE type. This change ensures continued access and provides more time to complete the transition. This update must be completed before the end of July 2026 by running the following command in Snowflake:
*ALTER USER <purview_user_name> SET TYPE = LEGACY_SERVICE;The creation of new users with the LEGACY_SERVICE type isn't permitted beginning August 2026.
Supported capabilities
Scanning capabilities
| Metadata Extraction | Full Scan | Incremental Scan | Scoped Scan |
|---|---|---|---|
| Yes | Yes | No | Yes |
When scanning a Snowflake source, Microsoft Purview supports:
Extracting technical metadata including:
- Server
- Databases
- Schemas
- Tables including the columns, foreign keys, and unique constraints
- Views including the columns
- Stored procedures including the parameter dataset and result set
- Functions including the parameter dataset
- Pipes
- Stages
- Streams including the columns
- Tasks
- Sequences
Fetching static lineage on assets relationships among tables, views, streams, and stored procedures.
For stored procedures, you can choose the level of detail to extract on scan settings. Stored procedure lineage is supported for Snowflake Scripting (SQL) and JavaScript languages, and generated based on the procedure definition.
When setting up a scan, you can choose to scan one or more Snowflake databases entirely based on the given names or name patterns, or further scope the scan to a subset of schemas matching the given names or name patterns.
Other capabilities
For classifications, sensitivity labels, policies, data lineage, and live view, see the list of supported capabilities.
Known limitations
- When you delete an object from the data source, the subsequent scan doesn't automatically remove the corresponding asset in Microsoft Purview.
- Stored procedure lineage isn't supported for the following patterns:
- Stored procedure defined in Java, Python, and Scala languages.
- Stored procedure using SQL EXECUTE IMMEDIATE with static SQL query as variable.
Prerequisites
An Azure account with an active subscription. Create an account for free.
An active Microsoft Purview account.
You need Data Source Administrator and Data Reader permissions to register a source and manage it in the Microsoft Purview portal. For more information about permissions, see Access control in Microsoft Purview.
Choose the right integration runtime configuration for your scenario.
- To use Managed Virtual Network Integration Runtime to connect to Snowflake via private link, follow the steps in Connect to Snowflake via Managed Private Endpoint to set up the private endpoint.
- To use Self-hosted Integration Runtime for scan, set up the latest self-hosted integration runtime. For more information, see the create and configure a self-hosted integration runtime guide.
- Ensure JDK 11 is installed on the machine where the self-hosted integration runtime is installed. Restart the machine after you newly install the JDK for it to take effect.
- Ensure Visual C++ Redistributable (version Visual Studio 2012 Update 4 or newer) is installed on the self-hosted integration runtime machine. If you don't have this update installed, you can download it here.
Required permissions for scan
Microsoft Purview supports basic authentication (username and password) for scanning Snowflake. The default role of the given user will be used to perform the scan. The Snowflake user must have usage rights on a warehouse and the databases to be scanned, and read access to system tables in order to access advanced metadata.
Here's a sample walkthrough to create a user specifically for Microsoft Purview scan and set up the permissions. If you choose to use an existing user, make sure it has adequate rights to the warehouse and database objects.
Set up a
purview_readerrole. You need ACCOUNTADMIN rights to do this.USE ROLE ACCOUNTADMIN; --create role to allow read only access - this will later be assigned to the Microsoft Purview user CREATE OR REPLACE ROLE purview_reader; --make sysadmin the parent role GRANT ROLE purview_reader TO ROLE sysadmin;Create a warehouse for Microsoft Purview to use and grant rights.
--create warehouse - account admin required
CREATE OR REPLACE WAREHOUSE purview_wh WITH
    WAREHOUSE_SIZE = 'XSMALL'
    WAREHOUSE_TYPE = 'STANDARD'
    AUTO_SUSPEND = 300
    AUTO_RESUME = TRUE
    MIN_CLUSTER_COUNT = 1
    MAX_CLUSTER_COUNT = 2
    SCALING_POLICY = 'STANDARD';

--grant rights to the warehouse
GRANT USAGE ON WAREHOUSE purview_wh TO ROLE purview_reader;
Create a user
purviewfor Microsoft Purview scan.CREATE OR REPLACE USER purview PASSWORD = '<password>'; --note the default role will be used during scan ALTER USER purview SET DEFAULT_ROLE = purview_reader; --add user to purview_reader role GRANT ROLE purview_reader TO USER purview;Grant reader rights to the database objects.
GRANT DATABASE ROLE SNOWFLAKE.OBJECT_VIEWER TO USER purview_reader;
GRANT USAGE ON DATABASE <your_database_name> TO purview_reader;

--grant reader access to all the database structures that purview can currently scan
GRANT USAGE ON ALL SCHEMAS IN DATABASE <your_database_name> TO role purview_reader;
GRANT USAGE ON ALL FUNCTIONS IN DATABASE <your_database_name> TO role purview_reader;
GRANT USAGE ON ALL PROCEDURES IN DATABASE <your_database_name> TO role purview_reader;
GRANT SELECT ON ALL TABLES IN DATABASE <your_database_name> TO role purview_reader;
GRANT SELECT ON ALL VIEWS IN DATABASE <your_database_name> TO role purview_reader;
GRANT USAGE, READ on ALL STAGES IN DATABASE <your_database_name> TO role purview_reader;

--grant reader access to any future objects that could be created
GRANT USAGE ON FUTURE SCHEMAS IN DATABASE <your_database_name> TO role purview_reader;
GRANT USAGE ON FUTURE FUNCTIONS IN DATABASE <your_database_name> TO role purview_reader;
GRANT USAGE ON FUTURE PROCEDURES IN DATABASE <your_database_name> TO role purview_reader;
GRANT SELECT ON FUTURE TABLES IN DATABASE <your_database_name> TO role purview_reader;
GRANT SELECT ON FUTURE VIEWS IN DATABASE <your_database_name> TO role purview_reader;
GRANT USAGE, READ ON FUTURE STAGES IN DATABASE <your_database_name> TO role purview_reader;
Register
This section describes how to register Snowflake in Microsoft Purview using the classic Microsoft Purview governance portal.
Steps to register
To register a new Snowflake source in Microsoft Purview Unified Catalog, follow these steps:
- Navigate to your Microsoft Purview account in the classic Microsoft Purview governance portal.
- Select Data Map on the left navigation.
- Select Register
- On Register sources, select Snowflake. Select Continue.
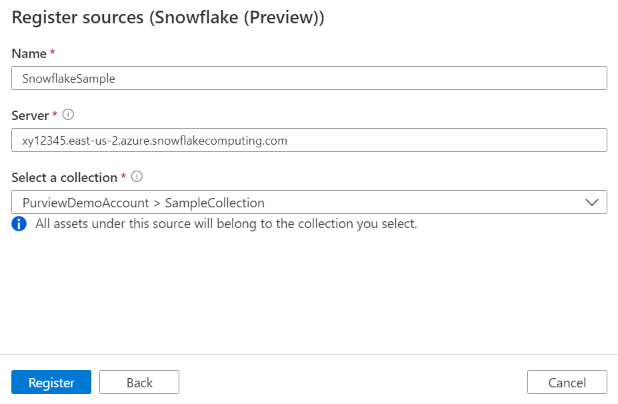
On the Register sources (Snowflake) screen, follow these steps:
Enter a Name that the data source will be listed within the Catalog.
Enter the server URL in the form of
<account_identifier>.snowflakecomputing.com, for example,orgname-accountname.snowflakecomputing.com. Learn more about Snowflake account identifier. Note this URL is used as part of the Snowflake assets' fully qualified name, and is the default endpoint for Microsoft Purview to connect to Snowflake during scan.Add additional hosts if applicable. Specify it when you want the scan operations to connect to a Snowflake endpoint other than the server URL. You can choose the host for connection during scan setup.
Tip
If you already scanned Snowflake but want to switch to use another endpoint, for example, from public endpoint to private endpoint, you can add another host in data source and choose that host for connection in scan to ensure Microsoft Purview generate the assets with the same fully qualified name as previous.
When registering a data source, Microsoft Purview performs uniqueness check that the server URL and other hosts doesn't overlap with any existing sources.
Select a collection from the list.
Finish to register the data source.
Scan
Follow the steps below to scan Snowflake to automatically identify assets. For more information about scanning in general, see our introduction to scans and ingestion.
Authentication for a scan
The supported authentication type for a Snowflake source is Basic authentication and Key Pair
Below process needs to be followed for Key Pair Credential
Prerequisites for Key Pair Authentication
Before starting, ensure you have:
Snowflake Access
Snowflake account with admin privileges
User account for Microsoft Purview scanning (for example, purview_scanner)
Access to execute ALTER USER commands
Tools & Software
OpenSSL installed (for key generation)
Azure CLI or PowerShell (for Key Vault operations)
Access to Microsoft Purview Portal
Ensure you have Microsoft Open JDK 11. Click here to download [Other JDK variants might have issues with advanced encrypted algorithms].
Step by Step Configuration
Part 1: Snowflake Configuration
This step involves creating public and private keys and then assigning the public key to the purview user (‘purview_scanner’ in below example) that connects to Snowflake to perform the scan.
Step 1.1: Generate RSA Key Pair
- Generate Private Key
Open a terminal and generate the private key:
--For Encrypted Private Key (Recommended):

openssl genrsa 2048 | openssl pkcs8 -topk8 -v2 aes-256-cbc -v2prf hmacWithSHA512 - inform PEM -out rsa_key.p8

--Note: You'll be prompted to enter a passphrase. Remember this passphrase!
OR
--For Unencrypted Private Key:

openssl genrsa 2048 | openssl pkcs8 -topk8 -v2 aes-256-cbc -v2prf hmacWithSHA512 - inform PEM -out rsa_key.p8 -nocrypt
Note: Use the above commands to generate the key
- Generate Public Key
openssl rsa -in rsa_key.p8 -pubout -out rsa_key.pub
- Extract Public Key Content
View and copy the public key content (excluding headers):
cat rsa_key.pub
-----BEGIN PUBLIC KEY-----
MIIBIjANBgkqhkiG9w0BAQEFAAOCAQ8AMIIBCgKCAQEA...
... -----END PUBLIC KEY-----
Copy everything between the BEGIN and END lines (don't include the delimiter lines).
Step 1.2: Assign Public Key to Snowflake User
Connect to Snowflake and execute:
-- Create user if it doesn't exist
CREATE USER IF NOT EXISTS purview_scanner
  DEFAULT_ROLE = 'PUVRIEW_READER'
  TYPE = 'SERVICE'  ;
 -- Assign the public key (paste your key without the BEGIN/END lines)
ALTER USER purview_scanner
SET RSA_PUBLIC_KEY='MIIBIjANBgkqhkiG9w0BAQEFAAOCAQ8AMIIBCgKCAQEA...';
 -- Grant necessary privileges
GRANT ROLE purview_reader TO USER purview_scanner;
 -- Verify the fingerprint
DESC USER purview_scanner;
Step 1.3: Verify Key Configuration [optional step to validate]
Verify the public key fingerprint matches:
In Snowflake:
DESC USER purview_scanner ->> SELECT SUBSTR(
(SELECT "value" FROM $1
WHERE "property" = 'RSA_PUBLIC_KEY_FP'),
LEN('SHA256:') + 1) AS key;
In Command Line:
openssl rsa -pubin -in rsa_key.pub -outform DER | openssl dgst -sha256 -binary | openssl
enc -base64
Note that both should produce the same fingerprint hash.
Part 2: Azure Key Vault Setup
Step 2.1: Prepare Private Key Content
View your private key:
cat rsa_key.p8
Copy the entire content including the -----BEGIN ENCRYPTED PRIVATE KEY----- and -----END ENCRYPTED PRIVATE KEY----- lines.
Step 2.2: Store Secrets in Azure Key Vault
You need to store TWO secrets in Azure Key Vault:
Secret 1: Private Key
CRITICAL REQUIREMENT: The private key MUST be stored using Azure CLI or Azure Cloud Shell.
DO NOT use the Azure Portal UI for creating the private key secret because:
The Azure Portal text input doesn't preserve multi-line formatting
It converts line breaks to spaces, corrupting the PEM format
Snowflake connections will FAIL with malformed key errors
The password/passphrase secret CAN be created via Portal (single-line value).
Method 1: Azure CLI (Recommended)
# Replace with your values
KEY_VAULT_NAME="your-keyvault-name"
CREDENTIAL_NAME="snowflake-purview-cred"

# Store the private key from file (preserves multi-line format)
az keyvault secret set \
 --vault-name $KEY_VAULT_NAME \
 --name "${CREDENTIAL_NAME}-privateKey" \
 --file rsa_key.p8
OR
Method 2: Azure Cloud Shell
Open Azure Cloud Shell (https://shell.azure.com)
Upload your rsa_key.p8 file using the upload button (folder icon)
Run the command:
az keyvault secret set \
  --vault-name your-keyvault-name \
  --name "snowflake-purview-cred-privateKey" \
  --file rsa_key.p8
OR
Method 3: PowerShell with Azure CLI
# Read the private key preserving line breaks
$privateKeyContent = Get-Content -Path "rsa_key.p8" -Raw

# Store in Key Vault using Azure CLI
az keyvault secret set `
  --vault-name "your-keyvault-name" `
  --name "snowflake-purview-cred-privateKey" `
  --value $privateKeyContent
OR
Verify the Private Key Format After Upload: [optional step]
# Retrieve and check the secret maintains proper formatting
az keyvault secret show \
  --vault-name $KEY_VAULT_NAME \
  --name "${CREDENTIAL_NAME}-privateKey" \
  --query value -o tsv

# Expected output: Multiple lines like this
# -----BEGIN ENCRYPTED PRIVATE KEY-----
# MIIFHDBOBgkqhkiG9w0BBQ0wQTApBgkqhkiG9w0BBQwwHAQI...
# (multiple lines of base64 encoded content)
# ...
# -----END ENCRYPTED PRIVATE KEY-----
Correct: Multiple lines with line breaks preserved
Incorrect: Single long line or text with spaces instead of newlines
Secret 2: Private Key Passphrase
The passphrase can be created using either Azure Portal or Azure CLI (it's a single-line value).
# Store the passphrase (if your key is encrypted)
az keyvault secret set \
 --vault-name $KEY_VAULT_NAME \
 --name "${CREDENTIAL_NAME}-password" \
 --value "your_passphrase_here"
Important: If you used an unencrypted private key, you still need to create the .password secret, but set it to an empty string or a placeholder value.
Using Azure Portal:
Go to Secrets → Generate/Import
Name: snowflake-purview-cred.password
Value: Your passphrase (or empty string for unencrypted keys)
Select Create
Create and run scan
To create and run a new scan, follow these steps:
In the classic Microsoft Purview governance portal, navigate to Sources.
Select the registered Snowflake source.
Select + New scan.
Provide the below details:
Name: The name of the scan
Connect via integration runtime: Select the Azure autoresolved integration runtime, Managed Virtual Network IR or SHIR according to your scenario. Learn more from Choose the right integration runtime configuration for your scenario. To use Managed Virtual Network IR to connect to Snowflake via private link, follow the steps in Connect to Snowflake via Managed Private Endpoint to set up the private endpoint first.
Host for connection: Choose the endpoint used to establish connection to Snowflake during scan. You can choose from the server URL or the other hosts that you configured in data source.
Credential: Select the credential to connect to your data source.
If using Basic Authentication while creating a credential.
- Provide the user name used to connect to Snowflake in the User name input field.
- Store the user password used to connect to Snowflake in the secret key.
If using Key Pair while creating a credential
Provide User name: purview_scanner (your Snowflake user)
Password Key Vault Reference:
Key Vault Connection: Select your Key Vault
Secret Name: snowflake-purview-cred.password
- Private Key Vault Reference:
Key Vault Connection: Select your Key Vault
Secret Name: snowflake-purview-cred.privateKey
Warehouse: Specify the name of the warehouse instance used to empower scan in uppercase. The default role assigned to the user specified in the credential must have USAGE rights on this warehouse.
Databases: Specify one or more database instance names to import in uppercase. Separate the names in the list with a semi-colon (;). For example,
DB1;DB2. The default role assigned to the user specified in the credential must have adequate rights on the database objects.Note
Classification is not applied to tables when more than one database instance names are specified.
Acceptable database name patterns can be static names or contain wildcard %. For example:
A%;%B;%C%;D:- Start with A or
- End with B or
- Contain C or
- Equal D
Schema: List subset of schemas to import expressed as a semicolon separated list. For example,
schema1;schema2. All user schemas are imported if that list is empty. All system schemas and objects are ignored by default.Acceptable schema name patterns using can be static names or contain wildcard %. For example:
A%;%B;%C%;D:- Start with A or
- End with B or
- Contain C or
- Equal D
Usage of NOT and special characters aren't acceptable.
Stored procedure details: Controls the number of details imported from stored procedures:
- Signature (default): The name and parameters of stored procedures.
- Code, signature: The name, parameters, and code of stored procedures.
- Lineage, code, signature: The name, parameters and code of stored procedures, and the data lineage derived from the code.
- None: Stored procedure details aren't included.
Note
If you use Self-hosted Integration Runtime for scan, customized setting other than the default Signature is supported since version 5.30.8541.1. The earlier versions always extract the name and parameters of stored procedures.
Maximum memory available (applicable when using self-hosted integration runtime): Maximum memory (in GB) available on customer's VM to be used by scanning processes. It's dependent on the size of Snowflake source to be scanned.
Note
As a rule of thumb, provide 1GB memory for every 1000 tables.
Select Test connection to validate the settings (available when using Azure Integration Runtime).
Select Continue.
Select a scan rule set for classification. You can choose between the system default, existing custom rule sets, or create a new rule set inline. Check the Classification article to learn more.
Note
Classification won't be applied to tables or views when the table name, view name, schema name, or database name contain special characters.
Note
If you're using self-hosted runtime, you need to upgrade to version 5.26.404.1 or higher to use Snowflake classification. You can find the latest version of Microsoft Integration runtime here.
Choose your scan trigger. You can set up a schedule or ran the scan once.
Review your scan and select Save and Run.
View your scans and scan runs
To view existing scans:
- Go to the Microsoft Purview portal. On the left pane, select Data map.
- Select the data source. You can view a list of existing scans on that data source under Recent scans, or you can view all scans on the Scans tab.
- Select the scan that has results you want to view. The pane shows you all the previous scan runs, along with the status and metrics for each scan run.
- Select the run ID to check the scan run details.
Manage your scans
To edit, cancel, or delete a scan:
Go to the Microsoft Purview portal. On the left pane, select Data Map.
Select the data source. You can view a list of existing scans on that data source under Recent scans, or you can view all scans on the Scans tab.
Select the scan that you want to manage. You can then:
- Edit the scan by selecting Edit scan.
- Cancel an in-progress scan by selecting Cancel scan run.
- Delete your scan by selecting Delete scan.
Note
- Deleting your scan does not delete catalog assets created from previous scans.
Lineage
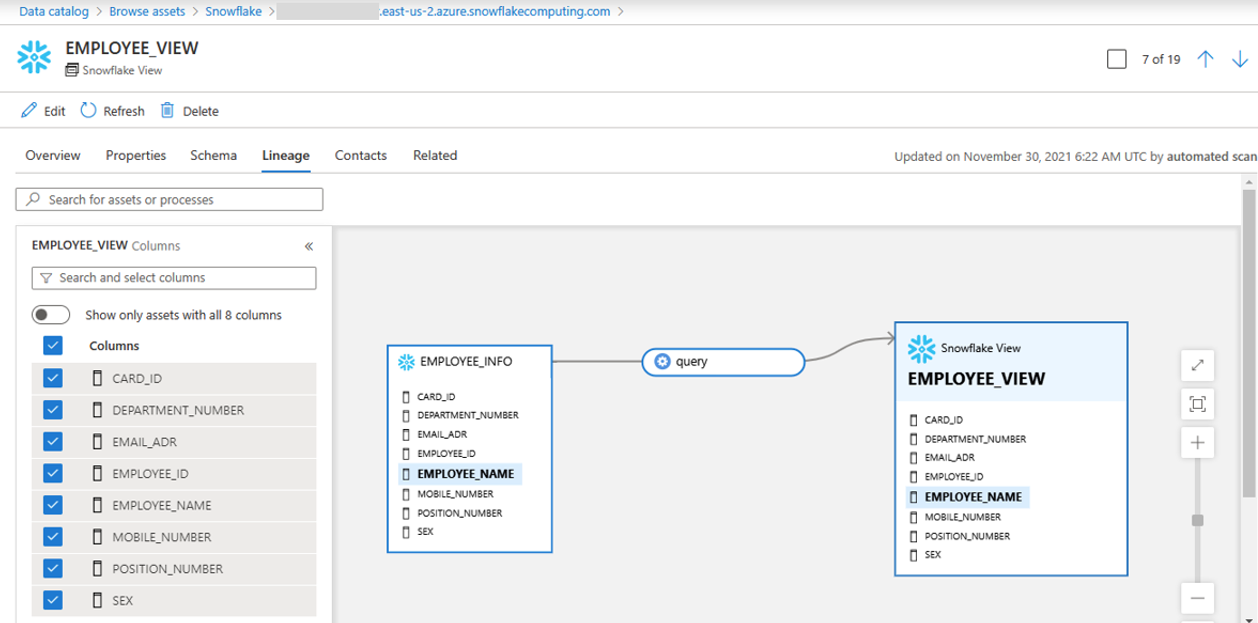
After scanning your Snowflake source, you can browse Unified Catalog or search Unified Catalog to view the asset details.
Go to the asset -> lineage tab, you can see the asset relationship when applicable. Refer to the supported capabilities section on the supported Snowflake lineage scenarios. For more information about lineage in general, see data lineage and lineage user guide.
Note
If a view was created by tables from different databases or different schemas, scan all databases and schemas simultaneously using the names in the semicolon (;) list.
Connect to Snowflake via Managed Private Endpoint
This section describes the required steps to set up a Managed Private Endpoint (PE) from Microsoft Purview to Snowflake on Azure. Learn more about Azure Private Link and Snowflake.
In your Snowflake account, retrieve the target endpoints and resource ID. Run the system function SYSTEM$GET_PRIVATELINK_CONFIG() with Account Admin role, and note down the values of the following properties:
- privatelink-pls-id
- privatelink-account-url
- regionless-privatelink-account-url
- privatelink_ocsp-url
use role accountadmin;
select key, value::varchar from table(flatten(input=>parse_json(SYSTEM$GET_PRIVATELINK_CONFIG())));
In Microsoft Purview, create a managed private endpoint to Snowflake.
- Follow the steps to Create a Managed Virtual Network Integration Runtime. If you already have one, make sure it's in version 2, which supports Snowflake PE.
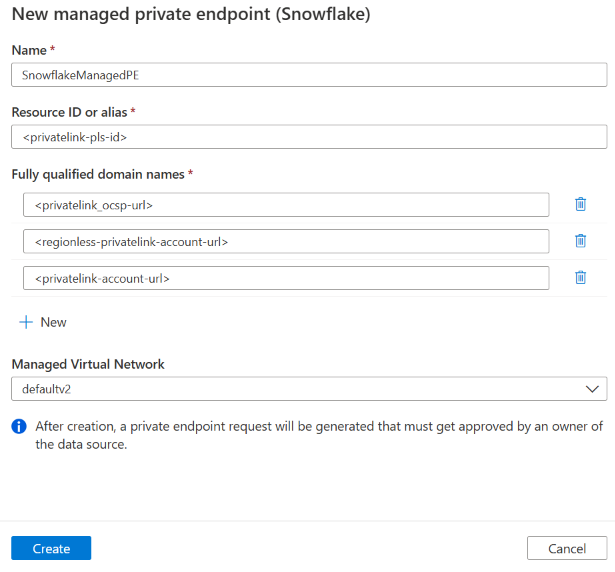
- Create a managed private endpoint for Snowflake. Navigate to Managed private endpoint -> + New -> Snowflake, and fill in the following information.
- Resource ID or alias: Fill in the value of privatelink-pls-id you retrieved.
- Fully qualified domain names: Add the privatelink_ocsp-url, regionless-privatelink-account-url and privatelink-account-url.
After creating the PE, you can see its provisioning state as Succeeded and approval state as Pending. Open the PE and find the Managed private endpoint resource ID in details page.
Contact Snowflake Technical Support and provide the resource ID to let Snowflake approve this PE.
Once Snowflake Support confirms the PE is approved, you should see your managed private endpoint approval state as Approved in Microsoft Purview.
Register the data source and set up a scan. When setting up scan, choose the Managed Virtual Network IR associated with the Snowflake PE.
Troubleshooting tips
- Check your account identifier in the source registration step. Don't include
https://at the beginning. - Make sure the warehouse name and database name are in uppercase on the scan setup page.
- Check your key vault. Make sure there are no typos in the password.
- Check the credential you set up in Microsoft Purview. The user you specify must have a default role with the necessary access rights to both the warehouse and the database you're trying to scan. See Required permissions for scan. USE
DESCRIBE USER;to verify the default role of the user you specified for Microsoft Purview. - Use Query History in Snowflake to see if any activity is coming across.
- If there's a problem with the account identifier or password, you won't see any activity.
- If there's a problem with the default role, you should at least see a
USE WAREHOUSE . . .statement. - You can use the QUERY_HISTORY_BY_USER table function to identify what role is being used by the connection. Setting up a dedicated Microsoft Purview user makes troubleshooting easier.
Troubleshooting for Key Pair authentication
Issue 1: "Test Connection Failed"
Symptoms: Connection test fails in Purview
Possible causes and solutions:
Public Key Not Assigned
Verify in Snowflake: DESC USER purview_scanner;
Check RSA_PUBLIC_KEY_FP is populated
Key Vault Access Issues
Verify Managed Identity has Get and List permissions
Check Key Vault firewall settings
Incorrect Secret Names
Verify: {credentialName}.password exists
Verify: {credentialName}.privateKey exists
Issue 2: "Invalid Private Key Format" or "Connection Failed with Key Error"
Symptoms:
Authentication fails with "invalid private key format" error
Connection test fails immediately
Error messages about malformed PEM or key parsing errors
Common cause: Private key was stored via Azure Portal (corrupted multi-line format)
Solution:
Verify if the key format is corrupted:
# Retrieve the secret and check format
az keyvault secret show \
 --vault-name your-keyvault \
 --name "snowflake-purview-cred-privateKey" \
 --query value -o tsv | head -5

# Should show multiple lines starting with:
# -----BEGIN ENCRYPTED PRIVATE KEY-----
# MIIFHDBOBgkqhkiG9w0BBQ0wQTApBgkqhkiG9w...
# (NOT a single long line)
If corrupted, DELETE and recreate using CLI:
# Delete the corrupted secret az keyvault secret delete \
 --vault-name your-keyvault \
 --name "snowflake-purview-cred-privateKey"

# Wait for soft-delete purge (or purge immediately if needed)
az keyvault secret purge \
 --vault-name your-keyvault \
 --name "snowflake-purview-cred-privateKey"

# Recreate using CLI with
 --file parameter az keyvault secret set \
 --vault-name your-keyvault \
 --name "snowflake-purview-cred-privateKey" \
 --file rsa_key.p8
Additional checks:
Ensure private key is in PKCS#8 PEM format
Include -----BEGIN ENCRYPTED PRIVATE KEY----- and -----END ENCRYPTED PRIVATE KEY----- lines
Verify key locally first:
openssl rsa -in rsa_key.p8 -check
Remember: Always use Azure CLI or Cloud Shell for private key secrets, NEVER the Azure Portal UI.
Issue 3: "Public Key Fingerprint Mismatch"
Symptom: Authentication succeeds but wrong key is being used
Solution:
# Regenerate public key from private key
openssl rsa -in rsa_key.p8 -pubout -out rsa_key_new.pub

# Verify fingerprint
openssl rsa -pubin -in rsa_key_new.pub -outform DER | openssl dgst sha256 -binary | openssl enc -base64

# Update in Snowflake
ALTER USER purview_scanner SET RSA_PUBLIC_KEY='';
Issue 4: "Passphrase Incorrect"
Symptom: Key decryption fails
Solution:
Verify passphrase in Key Vault matches the one used during key generation
Test passphrase locally:
openssl rsa -in rsa_key.p8 -check
# Enter passphrase when prompted
Issue 5: "Missing Snowflake Permissions"
Symptom: Connection succeeds but scan fails
Solution:
Grant required privileges to the Snowflake user:
-- Create role for Purview
CREATE ROLE IF NOT EXISTS purview_reader;

-- Grant usage on warehouse
GRANT USAGE ON WAREHOUSE COMPUTE_WH TO ROLE purview_reader;

-- Grant usage on database
GRANT USAGE ON DATABASE my_database TO ROLE purview_reader;

-- Grant usage on all schemas
GRANT USAGE ON ALL SCHEMAS IN DATABASE my_database TO ROLE  purview_reader;

-- Grant select on all tables
GRANT SELECT ON ALL TABLES IN DATABASE my_database TO ROLE  purview_reader;
GRANT SELECT ON FUTURE TABLES IN DATABASE my_database TO ROLE  purview_reader;

-- Grant select on all views
GRANT SELECT ON ALL VIEWS IN DATABASE my_database TO ROLE  purview_reader;
GRANT SELECT ON FUTURE VIEWS IN DATABASE my_database TO ROLE  purview_reader;

-- Assign role to user
GRANT ROLE purview_reader TO USER purview_scanner;

-- Set as default role
ALTER USER purview_scanner SET DEFAULT_ROLE = purview_reader;
Next steps
Now that you've registered your source, follow the below guides to learn more about Microsoft Purview and your data.