Kommentar
Åtkomst till den här sidan kräver auktorisering. Du kan prova att logga in eller ändra kataloger.
Åtkomst till den här sidan kräver auktorisering. Du kan prova att ändra kataloger.
Qualifying Microsoft 365 Developer Program members can set up a Microsoft 365 E5 developer subscription for use in building solutions independent of your production environment. The Microsoft 365 E5 developer sandbox subscription includes 25 user licenses and lasts for up to 90 days, depending on your activity. If you use your subscription for valid development activity, it will renew automatically.
Note
Instant sandboxes issued to eligible customers with enterprise accounts starting July 2026 include add-on commerce capability, so you can purchase additional paid licenses and services including Microsoft 365 Copilot directly from within the sandbox. See [Purchase add-on services] below.
Important
Before you request a developer subscription, you must first join the Microsoft 365 Developer Program directly or through Visual Studio Professional or Enterprise (if you're a subscriber).
If you qualify for a Microsoft 365 E5 subscription through the developer program, the subscription set up flow will start automatically after you join the program. If you choose not to set up your subscription right away, the option to set up a subscription will be available on your Microsoft 365 Developer Program dashboard.
Important
Your Microsoft 365 E5 developer subscription is for development purposes only and can be revoked if you use it for purposes other than development. For details, see the Microsoft 365 Developer Program Terms and Conditions.
Instant sandbox
Your Microsoft 365 developer subscription is provisioned as an instant sandbox, a fully pre-configured E5 developer environment that's ready in minutes. It comes pre-loaded with:
- 16 fictitious sample users (plus your admin account)
- Microsoft Teams sample data packs
- Microsoft Graph user, mail, and calendar data, and Office Add-ins/SharePoint Framework sample data
- Pre-configured custom apps
- Add-on commerce capability — the ability to purchase additional services, including Microsoft 365 Copilot, directly from your sandbox
For details on the sample data, see Developer sandbox sample data.
Note
Your domain name is pre-configured (for example, yourtenant.onmicrosoft.com) and can't be customized after sign-up.
Set up your Microsoft 365 E5 sandbox subscription
Prerequisites
Before you begin, make sure you have:
- A Microsoft account to sign in with.
- A valid billing account (you can create one during setup if you don't already have one).
- A business phone number and address, for billing account creation.
Important
You will not be charged for the free E5 developer sandbox. Billing details are required only for account verification and to enable future add-on purchases.
Step 1: Choose your sandbox type
On your profile page, choose Set up E5 subscription.
In the setup dialog box, select Instant sandbox (Add-on purchases enabled) — this is the default, top option.
Choose Next to continue to the billing setup screen.
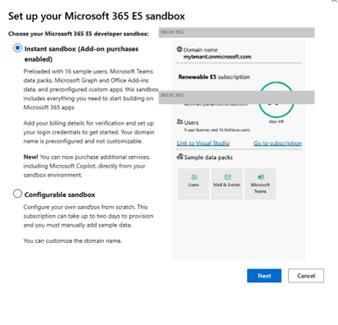
What you get: Your domain name will be pre-configured (e.g., yourtenant.onmicrosoft.com) and cannot be customized after sign-up. The preview panel on the right shows the 90-day renewable subscription details.
Step 2: Configure billing details
On the Set up your Microsoft 365 E5 instant sandbox screen, provide your data center region and link a billing account.
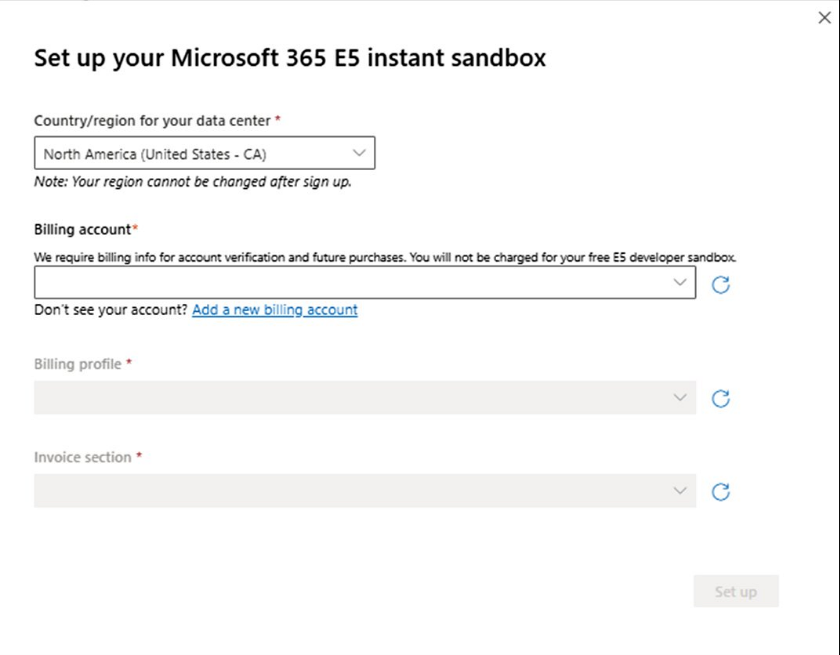
Select country/region. Choose the data center region closest to you from the Country/region for your data center dropdown.
Note
Your region can't be changed after sign-up, so choose carefully.
Select a billing account. Click the Billing account dropdown.
- If you have an existing eligible billing account associated with your Microsoft account, select it and skip to step 4.
- If the dropdown is empty or your account isn't listed, continue to step 3 to create one.
Create a new billing account (if required). Choose Add a new billing account to open the Microsoft billing account creation flow in a new window, and complete the three-step wizard:
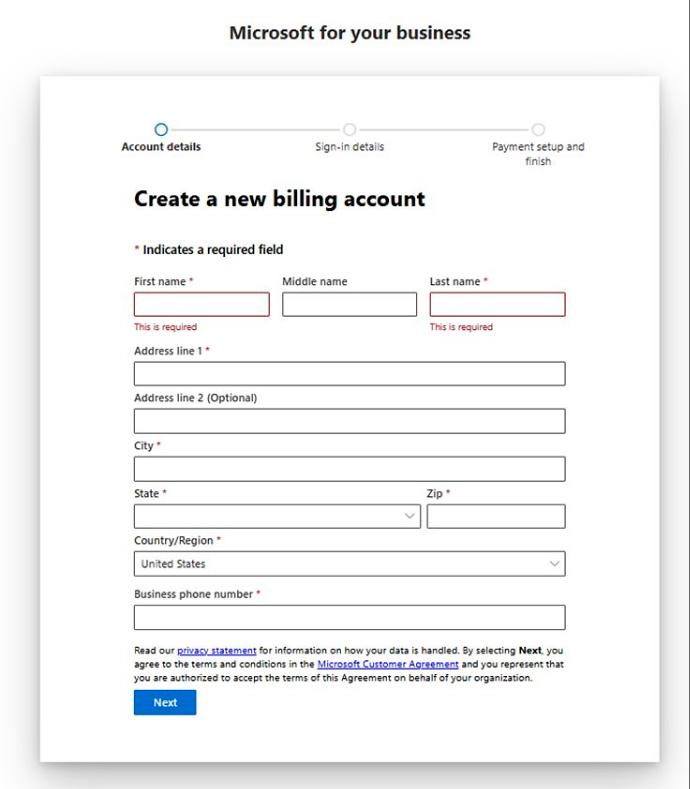
- Account details — your name, business address, country/region, and business phone number.
- Sign-in details — confirm or set up sign-in credentials for the billing account.
- Payment setup and finish — review and accept the Microsoft Customer Agreement.
Note
By selecting Next, you agree to the Microsoft Customer Agreement and confirm that you are authorized to accept its terms on behalf of your organization.
Once billing account creation is complete, close that window and return to the sandbox setup screen.
Refresh and select your billing account. After returning to the setup screen, click the small Refresh (↺) icon next to the Billing account dropdown. Your newly created billing account will now appear in the list. The Billing profile and Invoice section fields populate automatically — verify they're correct.
Tip
If your account still does not appear after refreshing, wait a few seconds and try the refresh button again.
Choose Set up.
Step 3: Set up admin credentials
After billing configuration is saved, set the sign-in credentials for your sandbox:
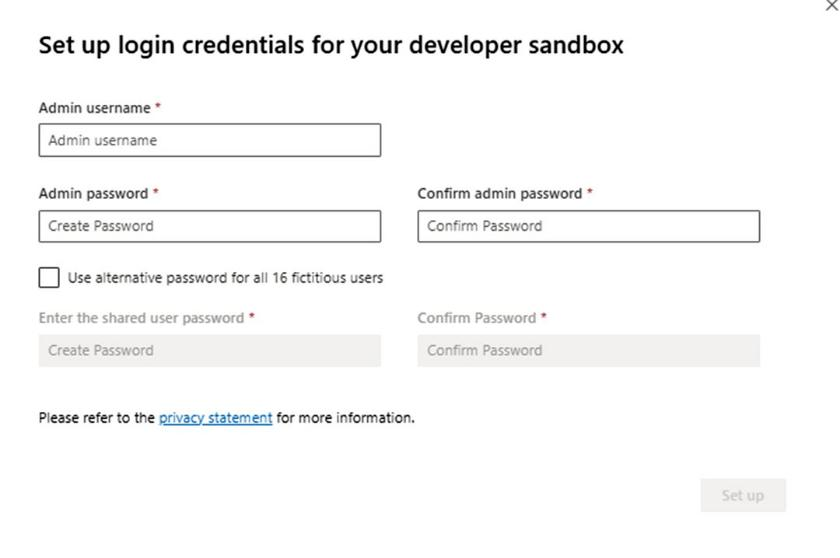
Provide an Admin username.
Create and confirm an Admin password.
Optionally, select Use alternative password for all 16 fictitious users to set one shared password for the sample user accounts — useful for testing scenarios where you need to sign in as different users.
Important
Make a note of your username and password because you'll need them to access your developer subscription.
Choose Set up to begin provisioning your sandbox.
Note
Please refer to the Microsoft privacy statement for information on how your data is handled.
Step 4: Access your sandbox dashboard
Once provisioning is complete, you'll be redirected to the Microsoft 365 Developer Program dashboard, where your new subscription appears with an Active status.
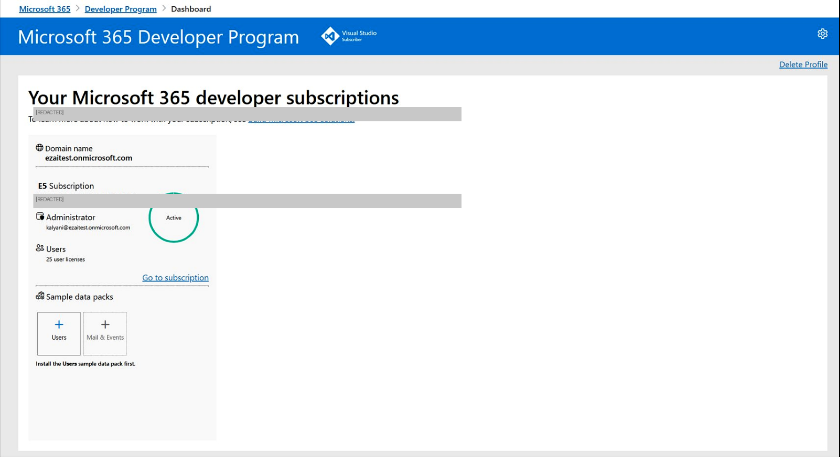
From here, you can:
- View your sandbox domain name and subscription status.
- Choose Go to subscription to access your sandbox.
- Install sample data packs (Users, Mail & events) — the Users pack must be installed first. For details, see Developer sandbox sample data.
- Monitor your 90-day renewable subscription timer.
Tip
If you're a Visual Studio subscriber, link your subscription to Visual Studio for automatic renewal. See Join the Microsoft 365 Developer Program as a Visual Studio subscriber.
Configure the subscription
On your profile page, choose Go to subscription and sign in with your user ID (for example, username@domain.onmicrosoft.com) and the password that you specified for your developer subscription.
Note
Do not sign in to your subscription with your Developer Program account ID.
Use the app launcher to go to the Admin center.
On the Admin center home page, choose Go to guided setup. This takes you to the Microsoft 365 E5 Developer Setup page.
Install your Office apps. You have the option of installing Office apps to your computer. When ready, choose Continue.
Personalize your sign-in and email. You can connect your subscription to a domain, or just use the existing subdomain that you created. When ready, choose Use this domain, or choose Do this later.
Add new users. You can add fictitious or real users to help you with development. When ready, choose Add users and assign licenses.
Assign licenses to unlicensed users. For any users that you want to be able to work with the subscription, grant them a license. When ready, choose Add users and assign licenses or Do this later.
Share sign-in credentials. For any real users that will access the subscription, you must share their sign-in credentials with them. You can choose a method, such as email, download, or print. When ready, choose Continue.
Tip
On subsequent visits to your dashboard, sign in with your username@domain.onmicrosoft.com account before you go to the Dashboard.
Choose whether you want to send an email to users about Microsoft Teams, and then choose Continue.
You've reached the end of setup. You've completed the setup for your subscription. You can optionally rate the experience. When ready, choose Go to the Admin center.
Set up multifactor authentication
Set up multifactor authentication to safeguard your access to your sandbox. To set up multifactor authentication, sign in to your new sandbox with your admin account. In the left pane, choose Admin, choose Setup, and then choose Configure multifactor authentication (MFA). Link the MFA to the email and phone number you used when you set up your sandbox. You will be able to use them to recover your sandbox if you forget your password.
Install sample data packs
Sample data packs come pre-installed with your instant sandbox and save you time by automatically providing data and content you need to build and test your solutions. This includes fictitious users, metadata, and photos to simulate a small corporate environment. For details about the sample data packs available, see Developer sandbox sample data.
Set up a development environment and deployment pipeline
For resources to help you set up your development environment and deployment pipeline, engage with the Microsoft 365 and Power Platform Community.
Troubleshooting
Billing account not appearing in the dropdown
Choose the refresh icon next to the Billing account dropdown. Allow a few seconds after completing billing account creation before refreshing.
If the billing account still does not appear, try creating a new billing account. If the system shows BillingAccountAlreadyExists or displays "Your billing account is ready" but it still doesn't show up in the dropdown, check for the following:
No Azure plan enabled on the account
If there is currently no Azure plan enabled on that account, follow the guidance below to create an invoice section. This action may provision the required Azure plan. Once that is complete, retry the setup process.
Reference: Organize your invoice based on your needs - Microsoft Learn
After the invoice section has been created and the Azure plan is available, attempt the setup again.
Agreement not signed
If you see an error related to the agreement not being signed, please sign the agreement through the Microsoft Admin Center portal. During this process, the required billing profile and invoice section will also need to be created.
You can access the portal here: admin.microsoft.com
Once you have completed the agreement-signing flow and the billing profile with invoice section has been created, retry the operation. If you continue to experience issues, please share a screenshot of the billing account page and the error message with the correlation ID so we can investigate further.
Set up button remains unavailable
Make sure all required fields — Billing account, Billing profile, and Invoice section — have a value selected. All three must be set before Set up becomes active.
Provisioning takes longer than expected
The instant sandbox typically provisions within minutes. If it takes longer, refresh the Developer Program dashboard page. If the issue persists, contact Microsoft 365 Developer Program support.