Managing roles in Azure Cloud Services with Visual Studio
Note
This article applies to Azure Cloud Services (classic), which is now deprecated for new customers and will be retired on August 31, 2024. Existing services built with this technology are still supported through Azure Cloud Services (extended support). For new development, we recommend that you use a newer service type designed for your specific purpose, such as Azure App Service, Azure Functions, or Azure Container Apps. For the latest list of available services, see Directory of Azure products.
After you have created your Azure cloud service, you can add new roles to it or remove existing roles from it. You can also import an existing project and convert it to a role. For example, you can import an ASP.NET web application and designate it as a web role.
Prerequisites
- An Azure account. If you don't have an Azure account, activate your Azure benefits for Visual Studio subscribers or sign up for a free trial.
Adding a role to an Azure cloud service
The following steps guide you through adding a web or worker role to an Azure cloud service project in Visual Studio.
Create or open an Azure cloud service project in Visual Studio.
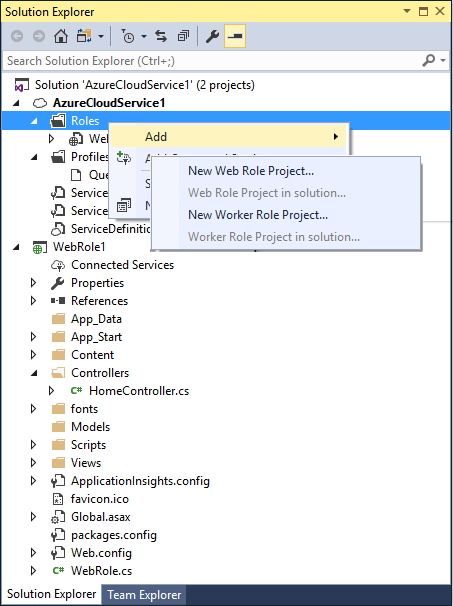
In Solution Explorer, expand the project node
Right-click the Roles node to display the context menu. From the context menu, select Add, then select an existing web role or worker role from the current solution, or create a web or worker role project. You can also select an appropriate project, such as an ASP.NET web application project, and associate it with a role project.
Removing a role from an Azure cloud service
The following steps guide you through removing a web or worker role from an Azure cloud service project in Visual Studio.
Create or open an Azure cloud service project in Visual Studio.
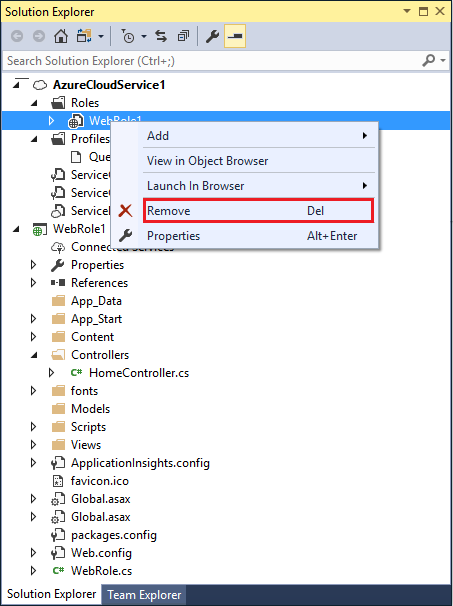
In Solution Explorer, expand the project node
Expand the Roles node.
Right-click the node you want to remove, and, from the context menu, select Remove.
Reading a role to an Azure cloud service project
If you remove a role from your cloud service project but later decide to add the role back to the project, only the role declaration and basic attributes, such as endpoints and diagnostics information, are added. No additional resources or references are added to the ServiceDefinition.csdef file or to the ServiceConfiguration.cscfg file. If you want to add this information, you need to manually add it back into these files.
For example, you might remove a web service role and later you decide to add this role back into your solution. If you do this, an error occurs. To prevent this error, you have to add the <LocalResources> element shown in the following XML back into the ServiceDefinition.csdef file. Use the name of the web service role that you added back into the project as part of the name attribute for the <LocalStorage> element. In this example, the name of the web service role is WCFServiceWebRole1.
<WebRole name="WCFServiceWebRole1">
    <Sites>
      <Site name="Web">
        <Bindings>
          <Binding name="Endpoint1" endpointName="Endpoint1" />
        </Bindings>
      </Site>
    </Sites>
    <Endpoints>
      <InputEndpoint name="Endpoint1" protocol="http" port="80" />
    </Endpoints>
    <Imports>
      <Import moduleName="Diagnostics" />
    </Imports>
    <LocalResources>
      <LocalStorage name="WCFServiceWebRole1.svclog" sizeInMB="1000" cleanOnRoleRecycle="false" />
    </LocalResources>
</WebRole>
Related content
Feedback
Kommer snart: Under hela 2024 kommer vi att fasa ut GitHub-problem som feedbackmekanism för innehåll och ersätta det med ett nytt feedbacksystem. Mer information finns i: https://aka.ms/ContentUserFeedback.
Skicka och visa feedback för