Not
Åtkomst till den här sidan kräver auktorisering. Du kan prova att logga in eller ändra kataloger.
Åtkomst till den här sidan kräver auktorisering. Du kan prova att ändra kataloger.
I den här artikeln får du lära dig hur du publicerar din första ASP.NET webbapp på olika platser, inklusive en lokal webbserver, till exempel IIS och en fjärrmolnmiljö, till exempel Azure App Service.
Den här artikeln stöder ASP.NET och ASP.NET Core.
Observera
Den här artikeln beskriver manuell distribution, vilket är bra för att snabbt få igång något, men för större projekt och produktionsscenarier kanske du vill konfigurera en distributionspipeline. Du kan använda GitHub Actions eller Azure DevOps Pipelines för att konfigurera automatiska distributioner med kontinuerlig integrering för sådana scenarier.
Förutsättningar
Du behöver Visual Studio installerat med arbetsbelastningen för ASP.NET och webbutveckling.
Om du redan har installerat Visual Studio:
- Installera de senaste uppdateringarna i Visual Studio genom att välja Hjälp>Sök efter uppdateringar.
- Lägg till arbetsbelastningen genom att välja Verktyg>Hämta verktyg och funktioner.
Sätta igång
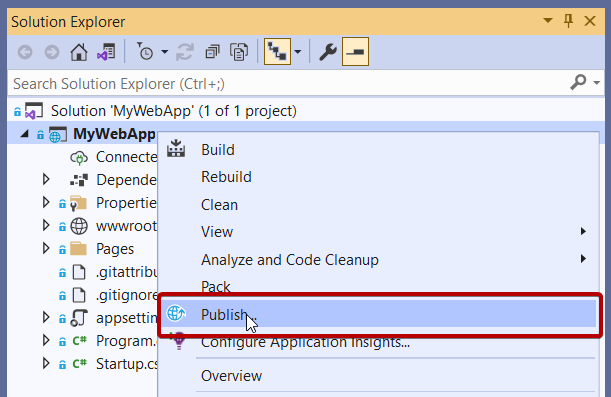
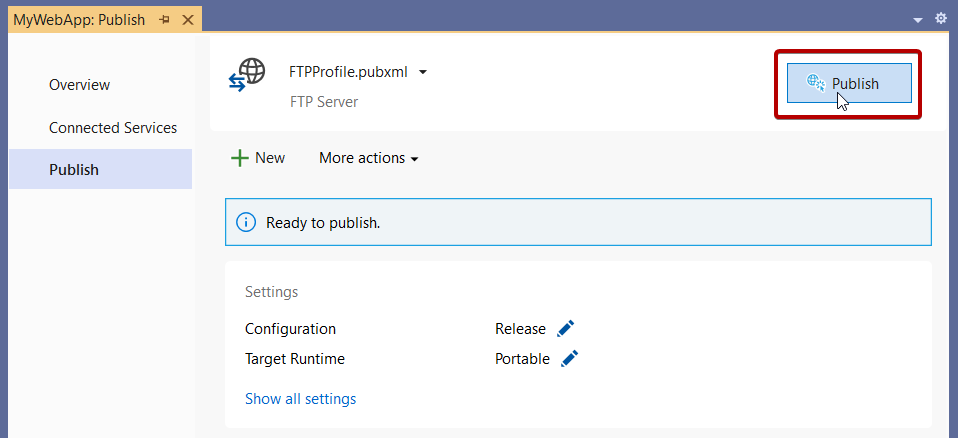
Högerklicka på projektet i Solution Explorer och välj Publicera.
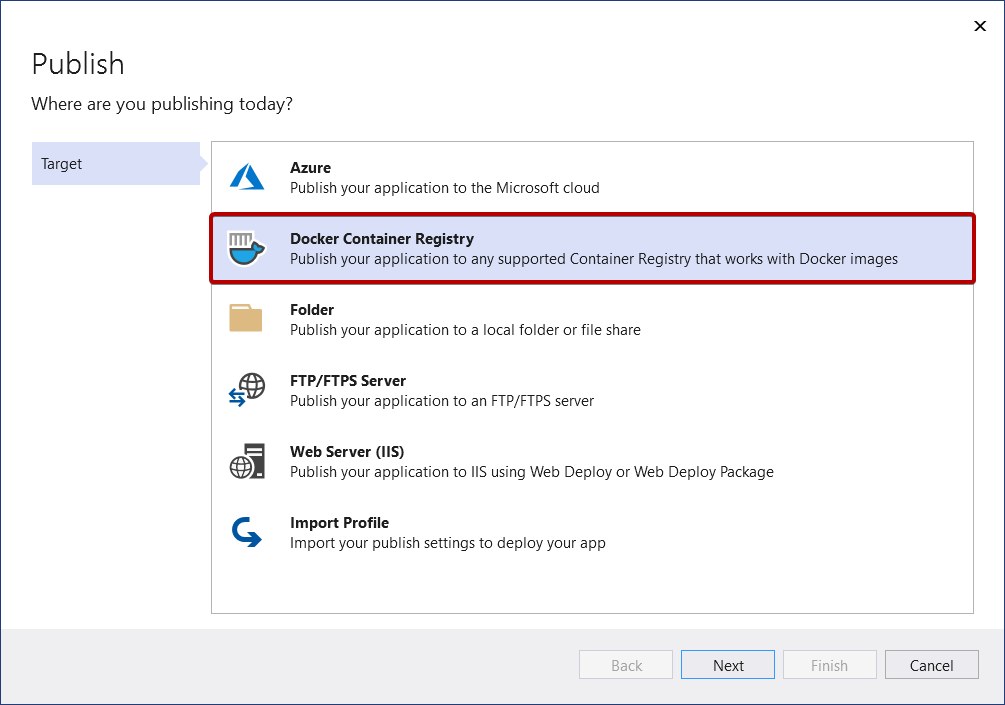
Om du publicerar den här webbappen för första gången visas nästa gång guiden Publicera.

Observera
Visual Studio filtrerar listan över mål beroende på typen av webbapp.
Blått
Detaljerade anvisningar om hur du publicerar webbappen finns i Snabbstart: Distribuera en ASP.NET webbapp.
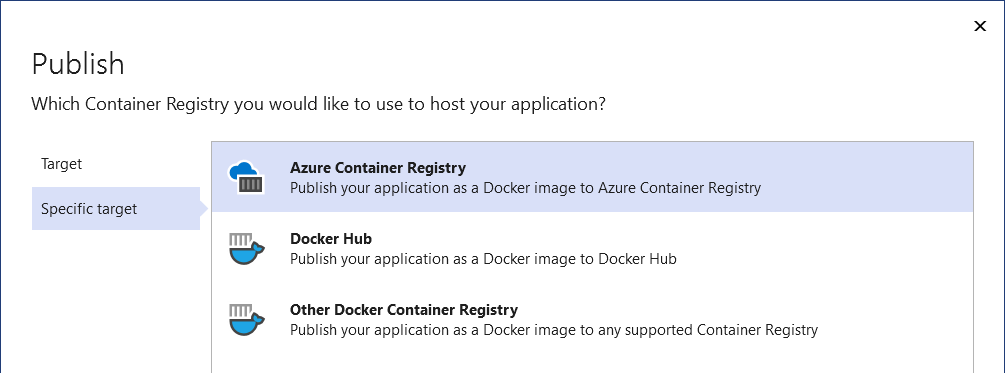
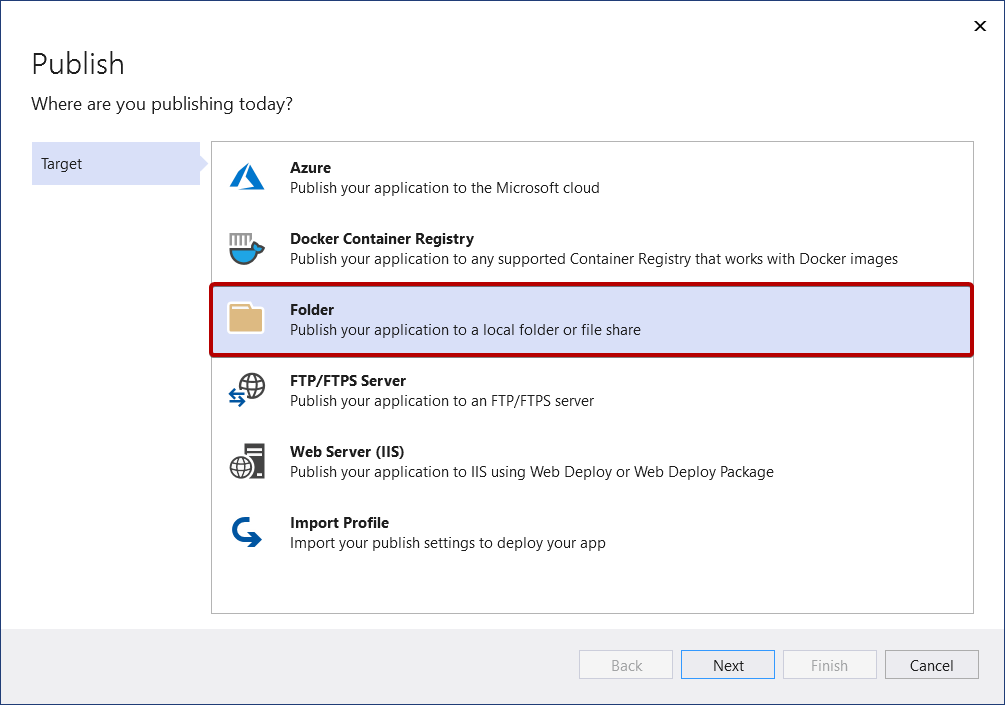
Container-registertjänst
I det här avsnittet beskrivs publicering till ett containerregister. Du kan publicera din webbapp som en Docker-container till alla kompatibla Docker Container Registry.
Klicka på Nästa och välj bland de tillgängliga alternativen, till exempel Azure Container Registry eller Docker Hub.
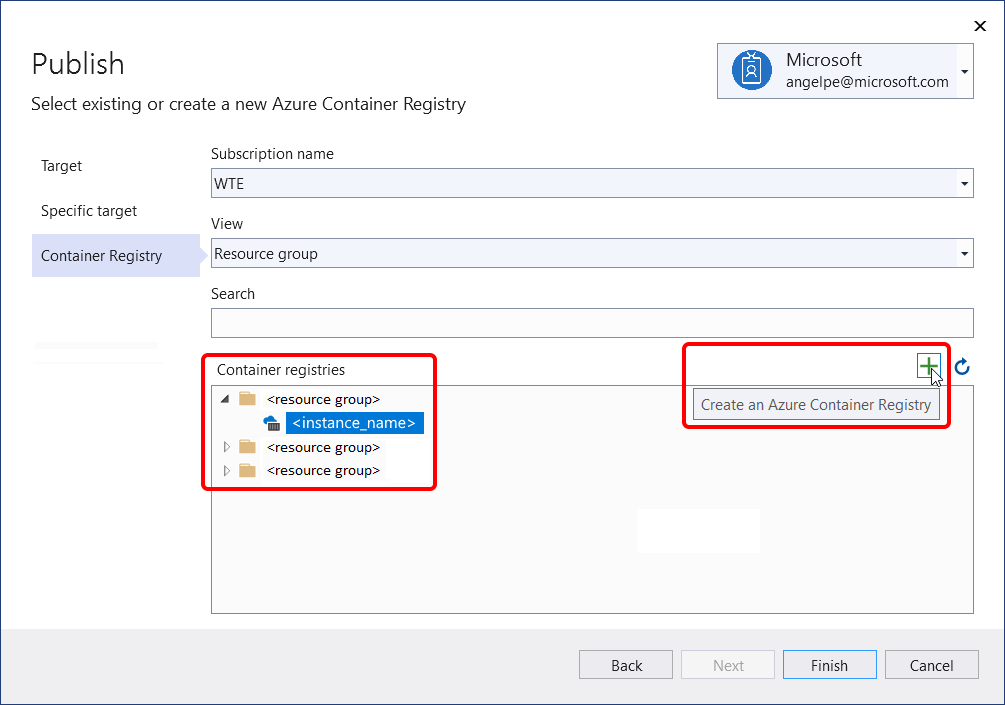
Azure Container Registry (containerregistertjänst från Azure)
För Azure Container Registry väljer du antingen en befintlig instans eller skapar en ny.
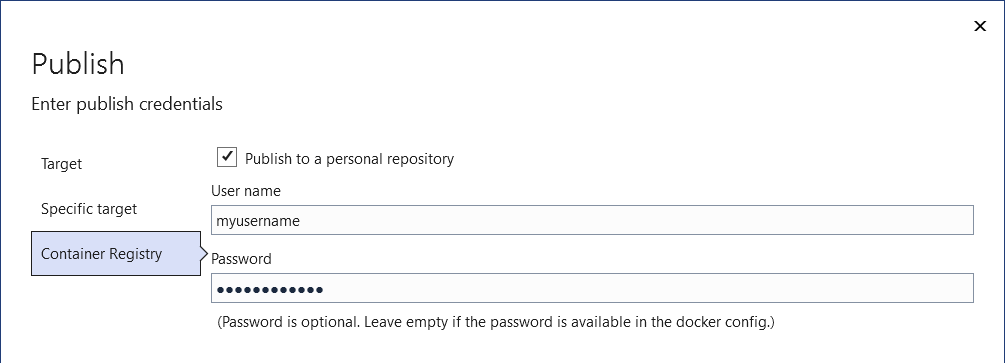
Docker Hub
För Docker Hub anger du sedan autentiseringsuppgifterna för publicering.
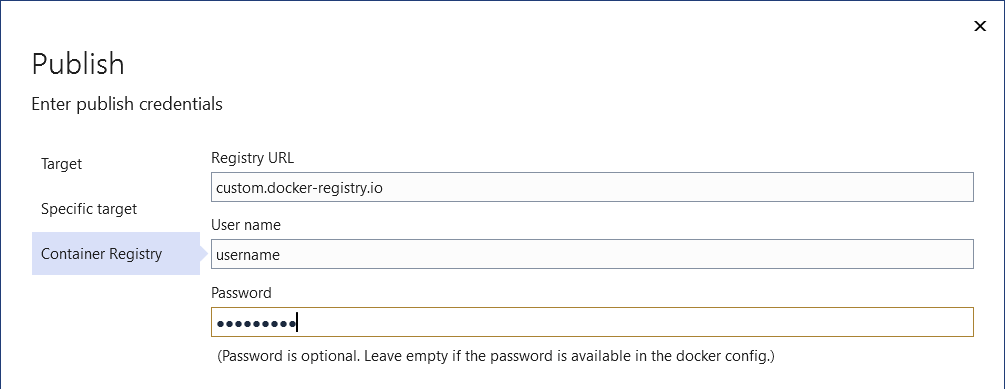
Annat Docker-containerregister
För andra Docker-containerregister anger du sedan URI:n och publicerar autentiseringsuppgifterna.
Publicera containeravbildning
Därefter visas sammanfattningssidan för den nya publiceringsprofilen som du just skapade med hjälp av Publiceringsguiden. Klicka på Publicera och Visual Studio distribuerar webbappen till det angivna Docker Container Registry.
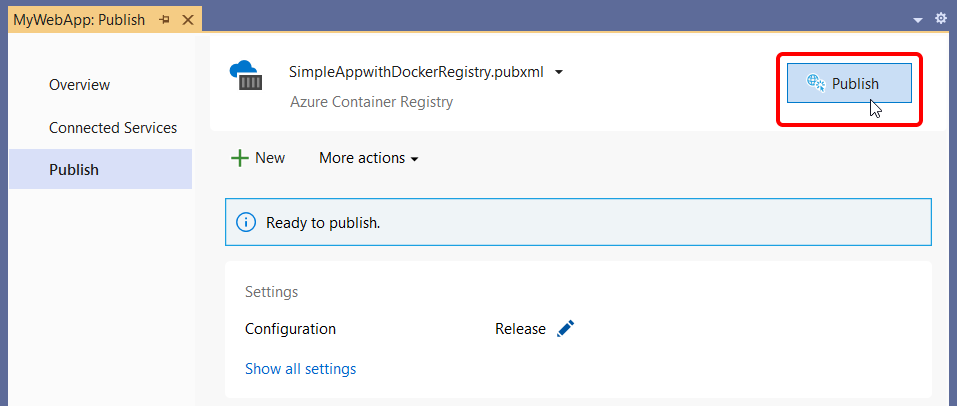
Observera
Skärmbilden ovan visar en publiceringsprofil för Azure Docker Registry, men samma publiceringsknapp är tillgänglig för alla tre Docker Container Registry-alternativ.
Filsystemmapp
Du kan publicera webbappen till både lokala mappar och nätverksmappar.
Först ange sökvägen och klicka sedan på Slutför för att slutföra publiceringsguiden.
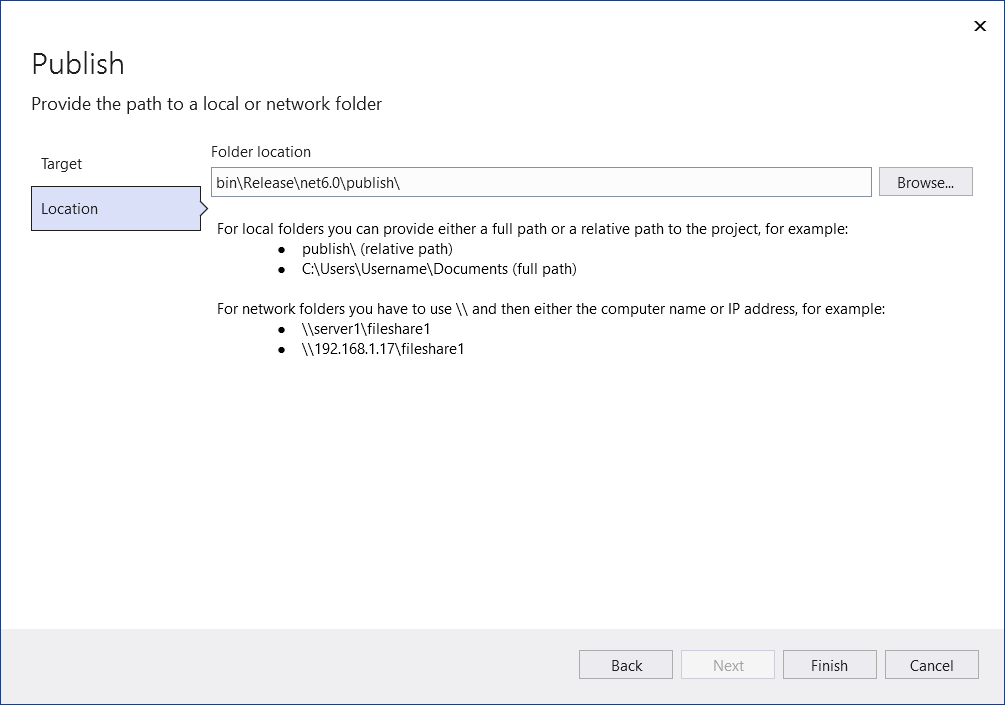
Därefter visas sammanfattningssidan för den nya publiceringsprofilen som du just skapade med hjälp av Publiceringsguiden. Klicka på Publicera och Visual Studio distribuerar webbappen till den angivna sökvägen.
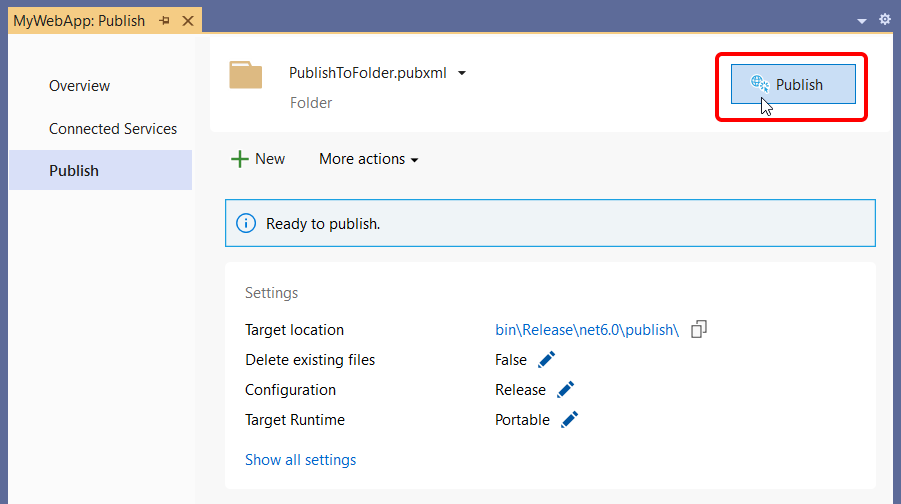
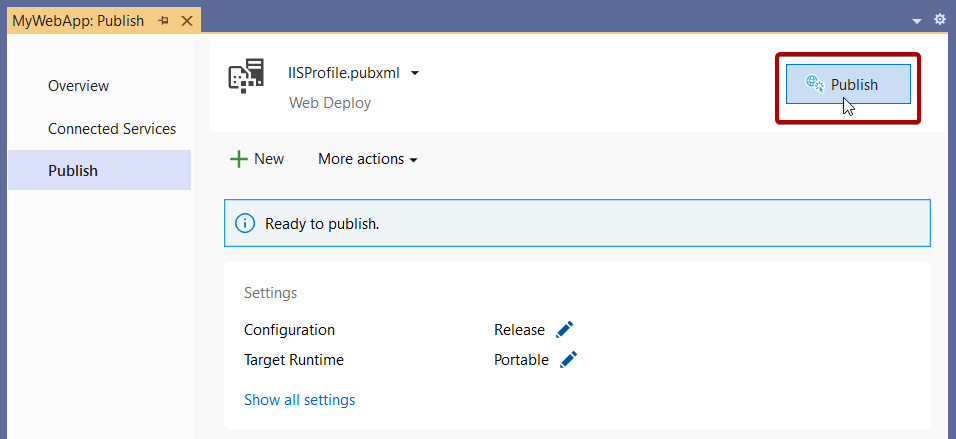
Du kan komma tillbaka till den här sammanfattningssidan när du har stängt den. Nästa gång du högerklickar och väljer Publiceraöppnar Visual Studio den här sammanfattningssidan. (Om du vill gå tillbaka till guiden Publicera klickar du bara på Ny på sammanfattningssidan.)
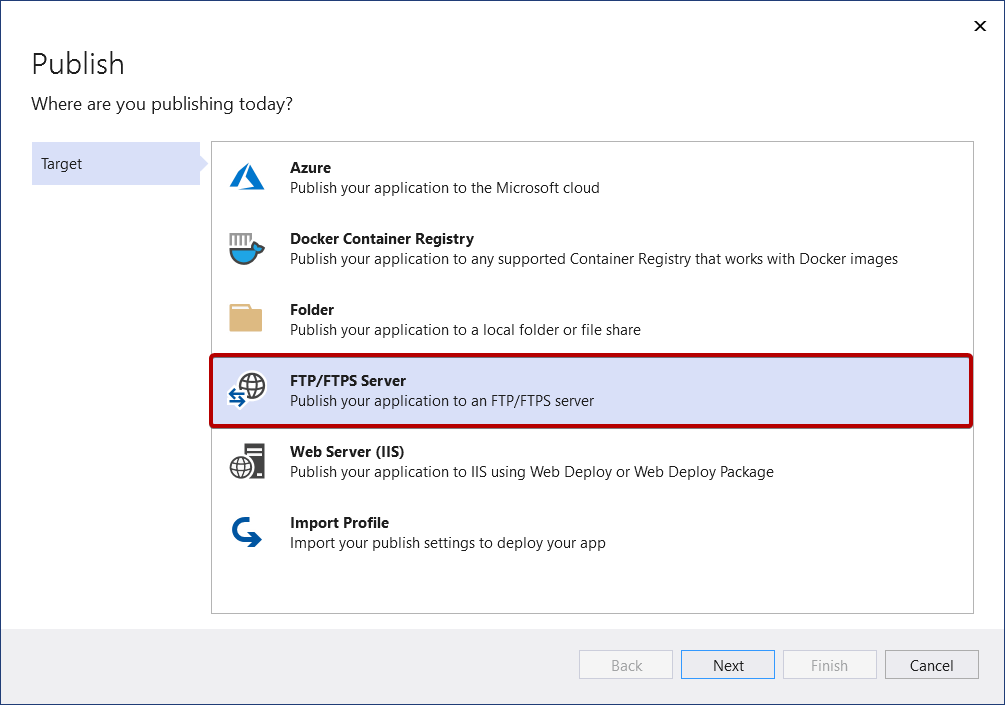
FTP/FTPS-server
Du kan publicera din webbapp med FTP eller FTPS.
Ange nödvändig anslutningsinformation och välj Slutför.
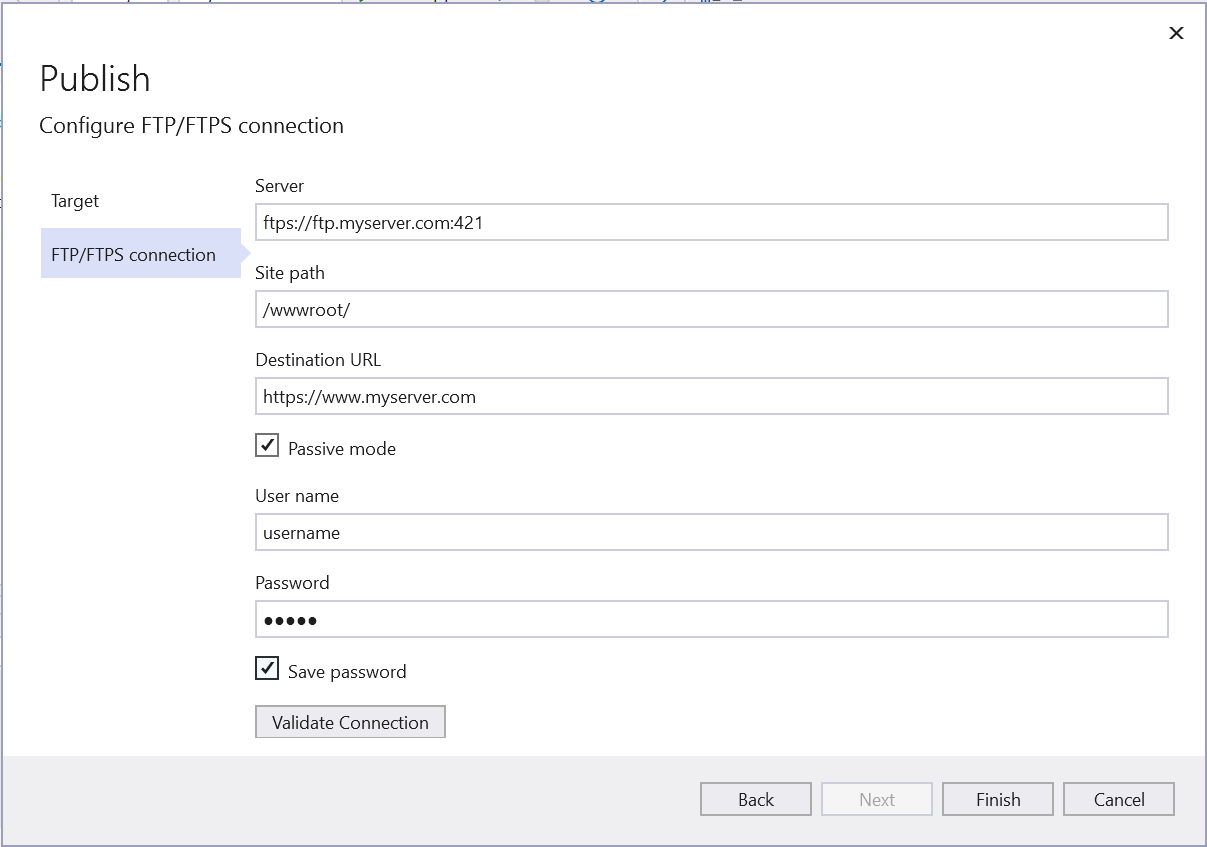
Därefter visas sammanfattningssidan för den nya publiceringsprofilen som du just skapade med hjälp av Publiceringsguiden. Klicka på Publicera och Visual Studio distribuerar din webbapp till den angivna FTP- eller FTPS-servern.
Du kan komma tillbaka till den här sammanfattningssidan när du har stängt den. Nästa gång du högerklickar och publicerar öppnar Visual Studio den här sammanfattningssidan. (Om du vill gå tillbaka till guiden Publicera klickar du bara på Ny på sammanfattningssidan.)
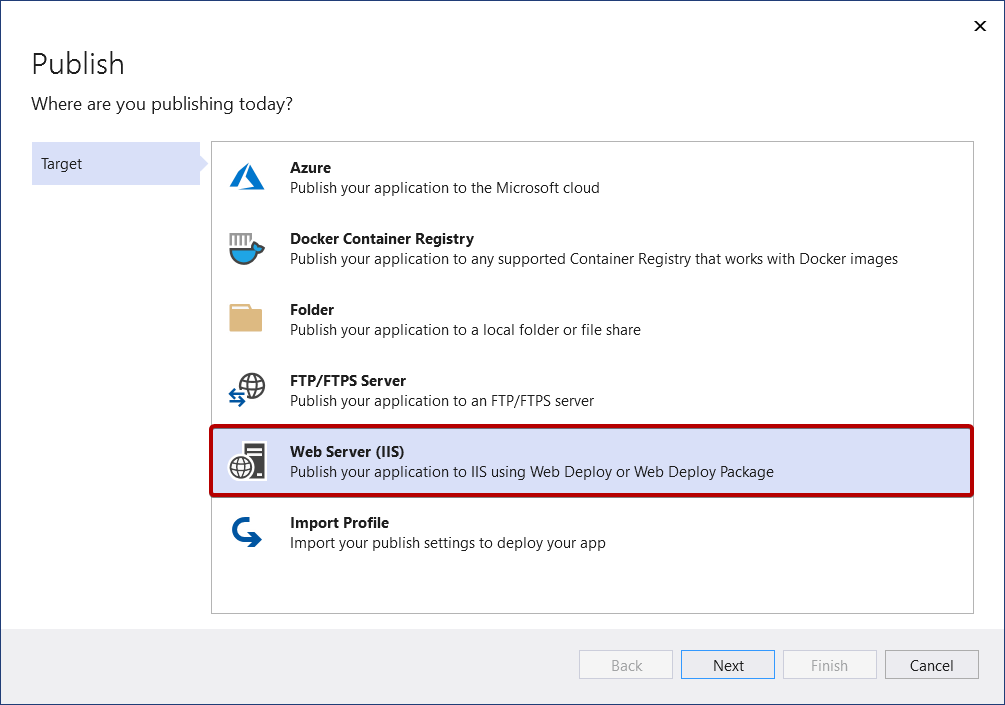
Webbserver (IIS)
Du kan publicera din webbapp till IIS om IIS har konfigurerats. Som standard är IIS Express installerat, men du bör installera IIS-hanteringsverktygen om du distribuerar till IIS från Visual Studio. Observera att du inte behöver köra Visual Studio som administratör för att distribuera till IIS Express, bara till fullständig IIS.
Konfigurera webbservern
Installera Web Management Servicepå fjärrwebbservern. Se till att följa anvisningarna där för att aktivera fjärranslutningar och se till att tjänsten startas, konfigurera dina autentiseringsuppgifter för fjärradministratör av webbservern och verifiera dem innan du försöker distribuera. Webbhanteringstjänsten krävs inte för en lokal IIS-distribution.
Installera IIS 6 Metabase Compatibilitypå webbservern. I Windows-inställningar går du till Program och funktionerväljer du Aktivera eller inaktivera Windows-funktioner. Under Internet Information Services>Web Management Toolsinstallerar du sedan IIS 6 Management Compatibility. Kontrollera att IIS-metabasen och IIS 6-konfigurationskompatibilitet är markerade.
Om du vill konfigurera IIS för ASP.NET Core-program installerar du installationsprogrammet .NET Core Hosting Bundle (direktnedladdning). För mer information, se .NET Core hosting-bundle.
Om du arbetar med ASP.NET 4.8 eller tidigare, eller om du behöver konfigurera IIS på Windows Server för publicering, hittar du detaljerade steg i Fjärrfelsökning ASP.NET på en IIS-dator och för ASP.NET Core Fjärrfelsökning ASP.NET Core på en IIS-dator.
Varning
En webbserver måste konfigureras med metodtips för säkerhet i åtanke. Mer information om rekommenderade säkerhetsmetoder finns i IIS-dokumentationen. Information om IIS 8 finns i Bästa praxis för säkerhet för IIS 8.
Publicera till IIS-webbserver
Välj Publiceraoch sedan Webbserver (IIS).
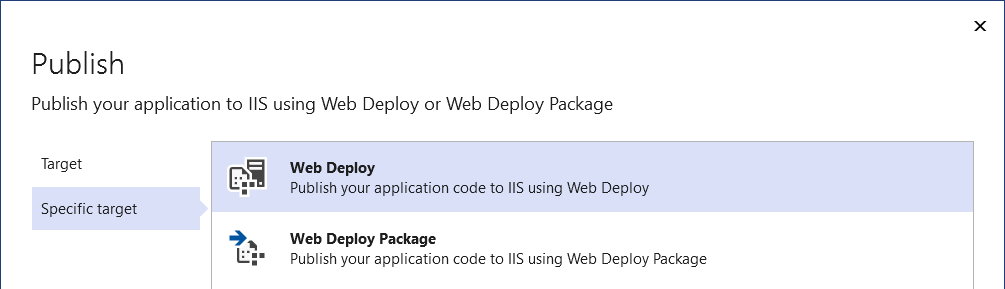
Välj önskat distributionsläge. Välj Webbdistribution för att omedelbart distribuera programmet till den angivna servern. Välj Webbdistributionspaket för att skapa en paketerad zip-fil som innehåller distributionsartefakterna för senare användning av dig eller någon annan.
Webbutforskande
Ange nödvändig anslutningsinformation och välj Slutför. Följande skärmbild visar ett webbprogram som publicerats till standardwebbplatsen för IIS (standardwebbplats) som är installerad på den lokala utvecklingsdatorn med en portbindning på port 5187. Mål-URL:en är valfri. Om den inte tillhandahålls startas inte webbplatsen automatiskt vid publicering och det finns ingen länk på skärmen Publicera för att få åtkomst till den publicerade webbplatsen.
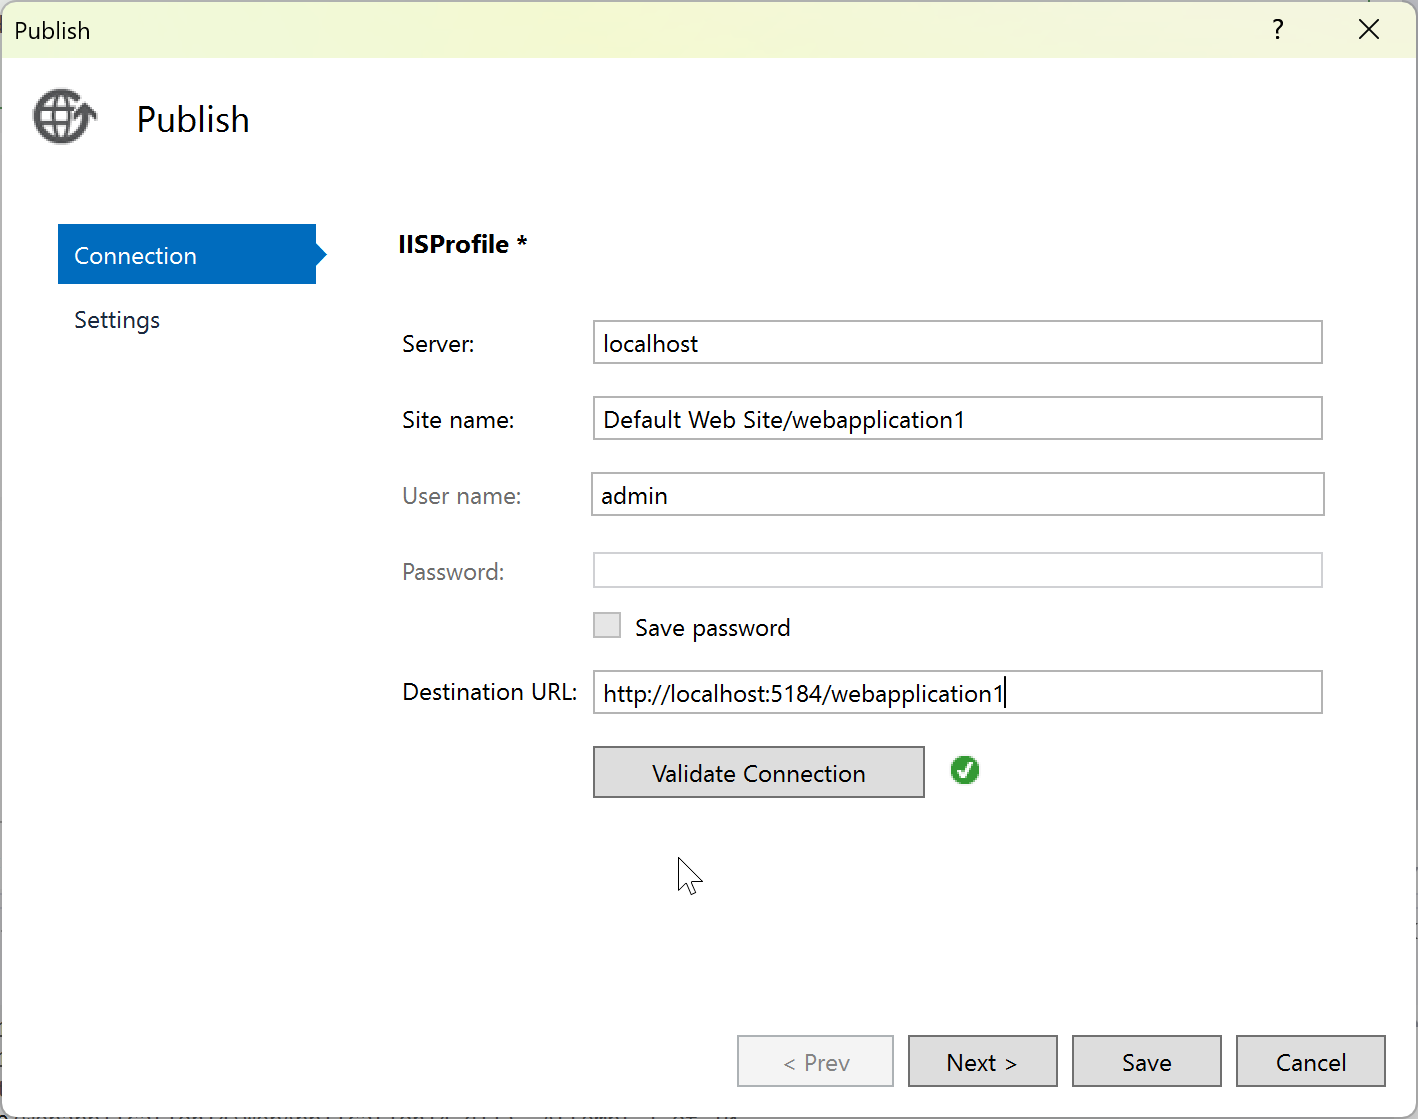
Första gången du publicerar skapar du ett användarnamn och lösenord. Dessa autentiseringsuppgifter är specifika för WebDeploy-distribution. När de har skapats kan du inte ändra dem i Visual Studio, men du kan återställa dem i IIS. Se dialogrutan Webbplatser – Ange autentiseringsuppgifter. Om du inte har lösenordet kan du ladda ned en .publishsettings fil och läsa den därifrån. Se Importera publiceringsinställningar från IIS.
Varning
Att använda autentiseringsuppgifter för användarnamn och lösenord (grundläggande autentisering) är inte den säkraste autentiseringsmetoden. Använd alternativa metoder när det är möjligt. Överväg till exempel att publicera till ett paket från Visual Studio och sedan använda WebDeploy.exe från en kommandorad för att distribuera paketet. Med den metoden kan du använda IIS Manager för att konfigurera behöriga Windows-användare som kan publicera till webbservern och köra WebDeploy.exe under det Windows-användarkontot. Se Installera och konfigurera webbdistribution på IIS 8.0 eller senare. Om du använder autentiseringsuppgifter för lösenord måste du använda ett starkt lösenord och skydda lösenordet från att läcka ut eller delas.
För felsökning, se Felkoder för webbdistribution.
Webbdistributionspaket
Klicka på Bläddra... för att öppna dialogrutan Välj paketplats och ange sökvägen till den plats där du vill att paketet ska skapas, inklusive .zip filnamn.

Avsluta publiceringsguiden
Därefter visas sammanfattningssidan för den nya publiceringsprofilen som du just skapade med hjälp av Publiceringsguiden. Klicka på Publicera och Visual Studio distribuerar webbappen till den angivna IIS-servern.
Importera publiceringsinställningar
Du kan importera publiceringsinställningar från IIS och Azure App Service
Nästa steg
Hantera inställningar för distributionen av webbprogram. Genom att hantera inställningar kan du styra distributionsalternativen för .NET samt beteenden som hur du hanterar befintliga filer som inte ingår i distributionsprocessen på distributionsmålet. Se Hantera inställningar för webbdistribution.