Connect to Bluetooth and USB-C devices
Pair Bluetooth devices
HoloLens 2 supports the following classes of Bluetooth devices:
- HID:
- Mouse
- Keyboard
- Audio output (A2DP) devices
HoloLens 2 supports the following Bluetooth APIs:
Important
You may have to install corresponding companion apps from Microsoft Store to actually use the HID and GATT devices.
HoloLens (1st gen) supports the following classes of Bluetooth devices:
- Mouse
- Keyboard
- HoloLens (1st gen) clicker
Note
Other types of Bluetooth devices, such as speakers, headsets, smartphones, and game pads, may be listed as available in HoloLens settings. However, these devices aren't supported on HoloLens (1st gen). For more information, see HoloLens Settings lists devices as available, but the devices don't work.
Pair a Bluetooth keyboard or mouse
Turn on your keyboard or mouse, and make it discoverable. To learn how to make the device discoverable, look for information on the device (or its documentation) or visit the manufacturer's website.
Use the bloom gesture (HoloLens (1st gen)) or the start gesture (HoloLens 2) to go to Start, and then select Settings.
Select Devices, and make sure that Bluetooth is on.
When you see the device name, select Pair, and then follow the instructions.
Disable Bluetooth
This procedure turns off the RF components of the Bluetooth radio and disables all Bluetooth functionality on Microsoft HoloLens.
Use the bloom gesture (HoloLens (1st gen)) or the start gesture (HoloLens 2) to go to Start, and then select Settings > Devices.
Move the slider switch for Bluetooth to the Off position.
HoloLens 2: Connect USB-C devices
HoloLens 2 supports the following classes of USB-C devices:
- Mass storage devices (such as thumb drives)
- Ethernet adapters (including ethernet plus charging)
- USB-C-to-3.5mm digital audio adapters
- USB-C digital audio headsets (including headset adapters plus charging)
- USB-C External Microphones (Windows Holographic, version 21H1 and higher)
- Wired mouse
- Wired keyboard
- Combination PD hubs (USB A plus PD charging)
Note
In response to customer feedback, we have enabled limited support for cellular connectivity tethered directly to the HoloLens via USB-C. See Connect to Cellular and 5G for more information.
USB-C External Microphone Support
Important
Plugging in a USB mic will not automatically set it as the input device. When plugging in a set of USB-C headphones, users will observe that the headphone's audio will automatically be redirected to the headphones, but the HoloLens OS prioritizes the internal microphone array above any other input device. In order to use a USB-C microphone follow the steps below.
Note
External microphones cannot be used in builds prior to Windows Holographic, version 21H1, to use an external microphone ensure you are on build 20346.1002 or newer.
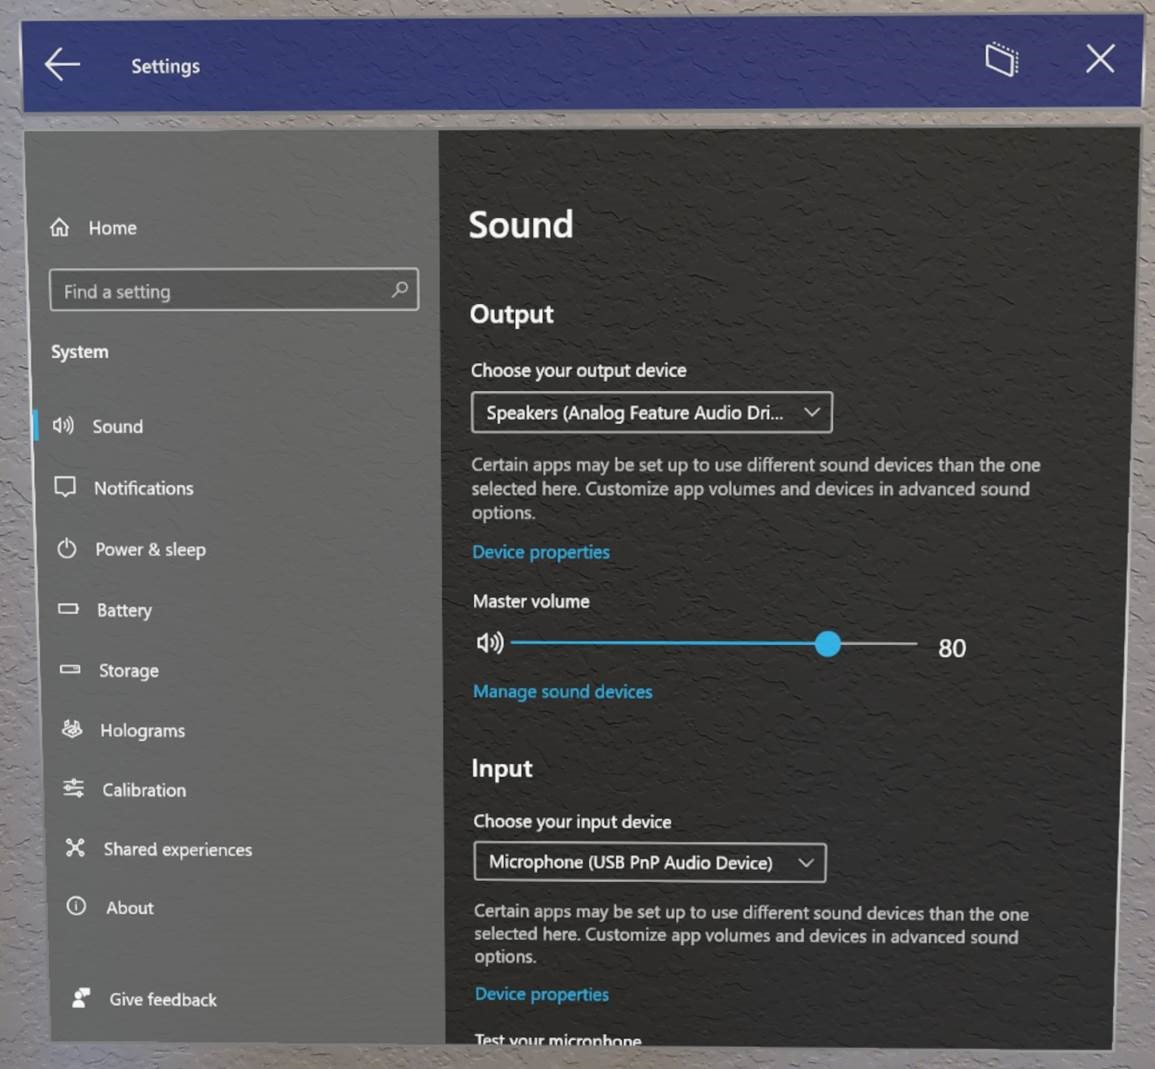
Users can select USB-C connected external microphones using the Sound settings panel. USB-C microphones can be used for calling, recording, etc.
Open the Settings app and select System > Sound.

Important
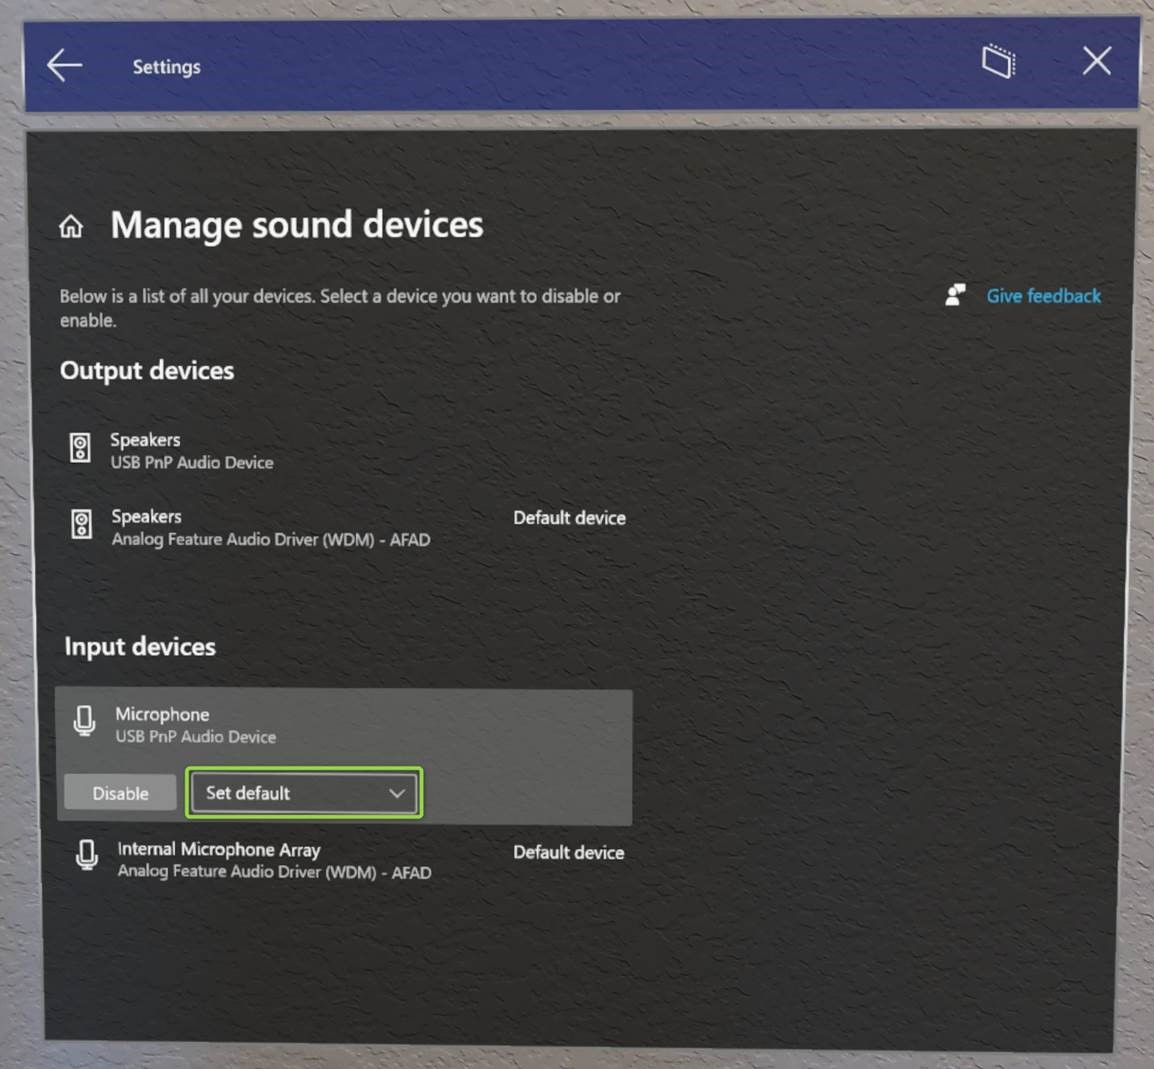
To use external microphones with Remote Assist, users will need to click the “Manage sound devices” hyperlink.
Then use the drop-down to set the external microphone as either Default or Communications Default. Choosing Default means that the external microphone will be used everywhere.
Choosing Communications Default means that the external microphone will be used in Remote Assist and other communications apps, but the HoloLens mic array may still be used for other tasks.


What about Bluetooth microphone support?
Unfortunately, Bluetooth microphones are still not currently supported on HoloLens 2.
USB-C Hubs
Some users may need to connect multiple devices at once. For users who would like to use a USB-C microphone along with another connected device, USB-C hubs may fit the customer's need. Microsoft has not tested these devices, nor can we recommend any specific brands.
Requirements for USB-C hub and connected devices:
- Connected devices must not require a driver to be installed.
- The total power draw of all connected devices must be below 4.5 Watts.
Connect to Miracast
To use Miracast, follow these steps:
Do one of the following:
- Open the Start menu, and select the Display icon.
- Say "Connect" while you gaze at the Start menu.
On the list of devices that appears, select an available device.
Complete the pairing to begin projecting.