หมายเหตุ
การเข้าถึงหน้านี้ต้องได้รับการอนุญาต คุณสามารถลอง ลงชื่อเข้าใช้หรือเปลี่ยนไดเรกทอรีได้
การเข้าถึงหน้านี้ต้องได้รับการอนุญาต คุณสามารถลองเปลี่ยนไดเรกทอรีได้
This page describes how to use Databricks Data Classification in Unity Catalog to automatically classify and tag sensitive data in your catalog.
Data catalogs can have a vast amount of data, often containing known and unknown sensitive data. It is critical for data teams to understand what kind of sensitive data exists in each table so that they can both govern and democratize access to this data.
To address this problem, Databricks Data Classification uses an AI agent to automatically classify and tag tables in your catalog. This allows you to discover sensitive data and to apply governance controls over the results, using tools such as Attribute-based access control in Unity Catalog. For a list of supported tags, see Supported classification tags.
Using this feature, you can:
- Classify data: The engine uses an agentic AI system to automatically classify and tag any tables in Unity Catalog.
- Optimize cost through intelligent scanning: The system intelligently determines when to scan your data by leveraging Unity Catalog and the Data Intelligence Engine. This means that scanning is incremental and optimized to ensure all new data is classified without manual configuration.
- Review and protect sensitive data: The results display assists you in viewing classification results and protecting sensitive data by tagging and creating access control policies for each class.
Important
Databricks Data Classification uses default storage to store classification results. You are not billed for the storage.
Databricks Data Classification uses a large language model (LLM) to assist with classification.
Requirements
Note
Data classification is a workspace-level preview feature, and it can only be managed by a workspace or account admin. For instructions, see Manage Azure Databricks previews.
- Your workspace must have serverless compute available (enabled by default in workspaces with Unity Catalog).
- To enable data classification, you must own the catalog or have
USE CATALOGandMANAGEprivileges on it. - To enable automatic tagging for a catalog, you must have
USE CATALOGon the catalog,APPLY TAGon the catalog, andASSIGNon the tag being applied. - To view classification results in the UI, you must have
USE CATALOGand eitherMANAGEor (SELECT+USE SCHEMA) on the catalog. To see sample values associated with detections, you must haveSELECTon the The results system table.
Note
By default, only account admins have MANAGE and ASSIGN permissions on data classification system governed tags. Account admins can grant MANAGE and ASSIGN for individual governed tags to other users, service principals, or groups. See Manage permissions on governed tags.
Use data classification
You can enable data classification for multiple catalogs at once from the results page, or configure individual catalogs with more granular schema-level control.
Enable multiple catalogs
- On the Data Classification results page, click Configure.
- Select the catalogs you want to enable, or select all available catalogs in the workspace.
- Click Enable.
Enabling all available catalogs does not automatically enable future catalogs. To classify a new catalog, return to the Configure dialog and enable it.
Enable a single catalog with schema selection
To choose specific schemas within a catalog:
Navigate to the catalog and click the Details tab.
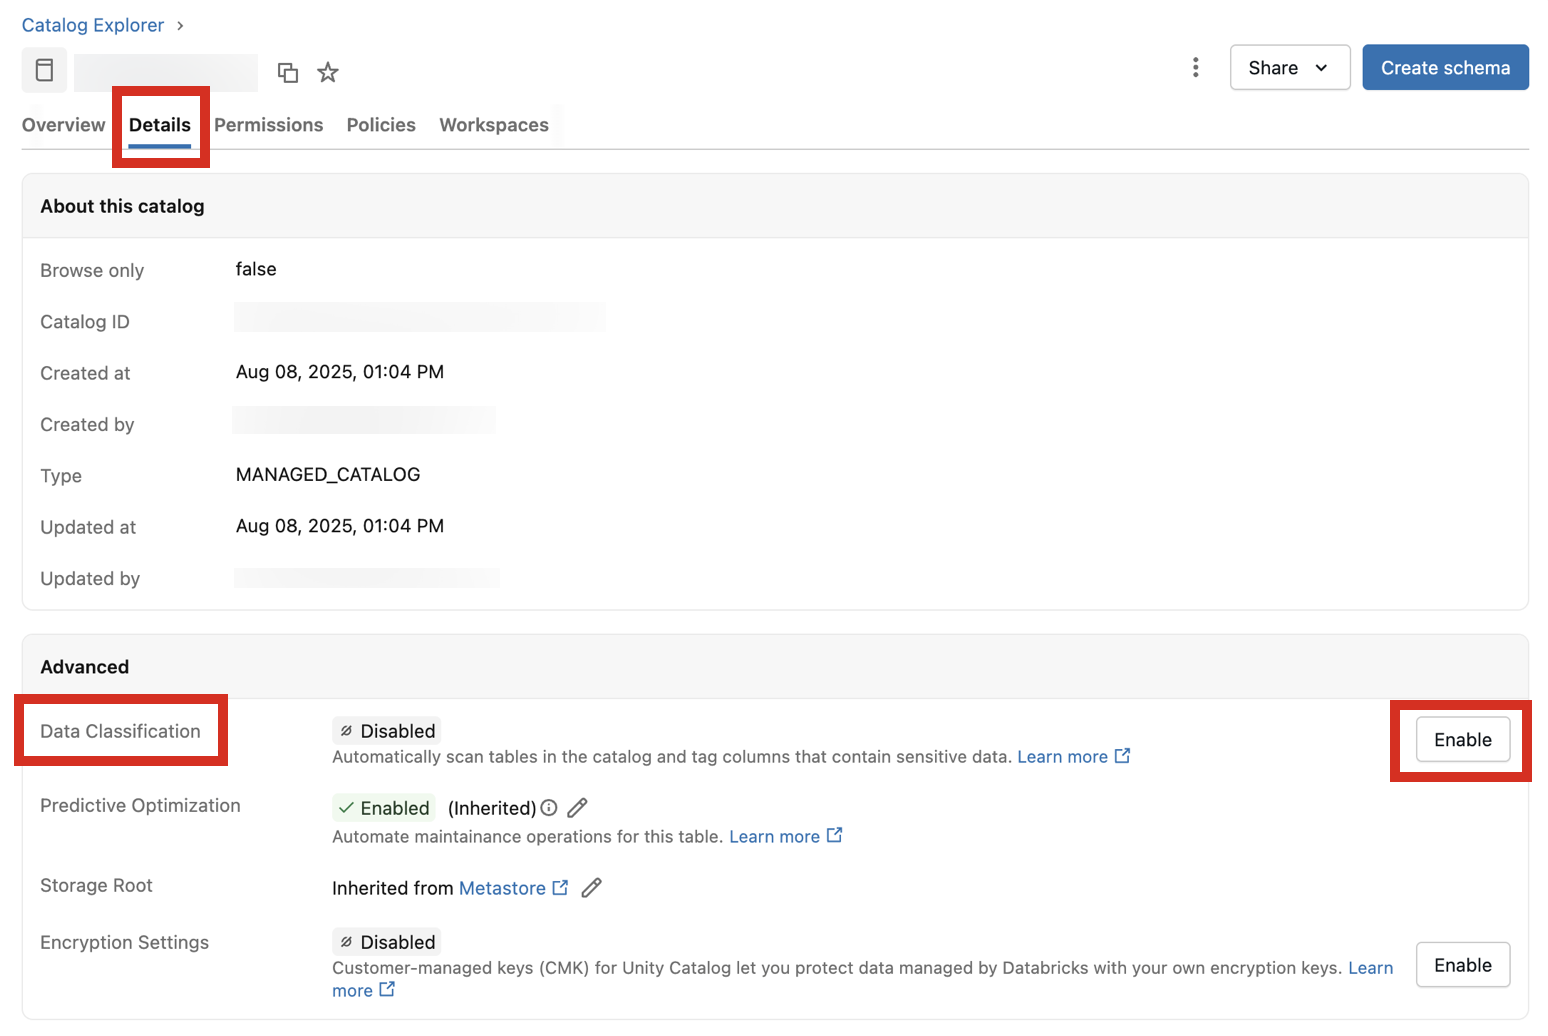
Next to Data Classification, click the Enable button.
The Data Classification dialog appears. By default, all schemas are included. To include only some schemas, select them in the Schemas to include dropdown menu. You can also select a Usage policy
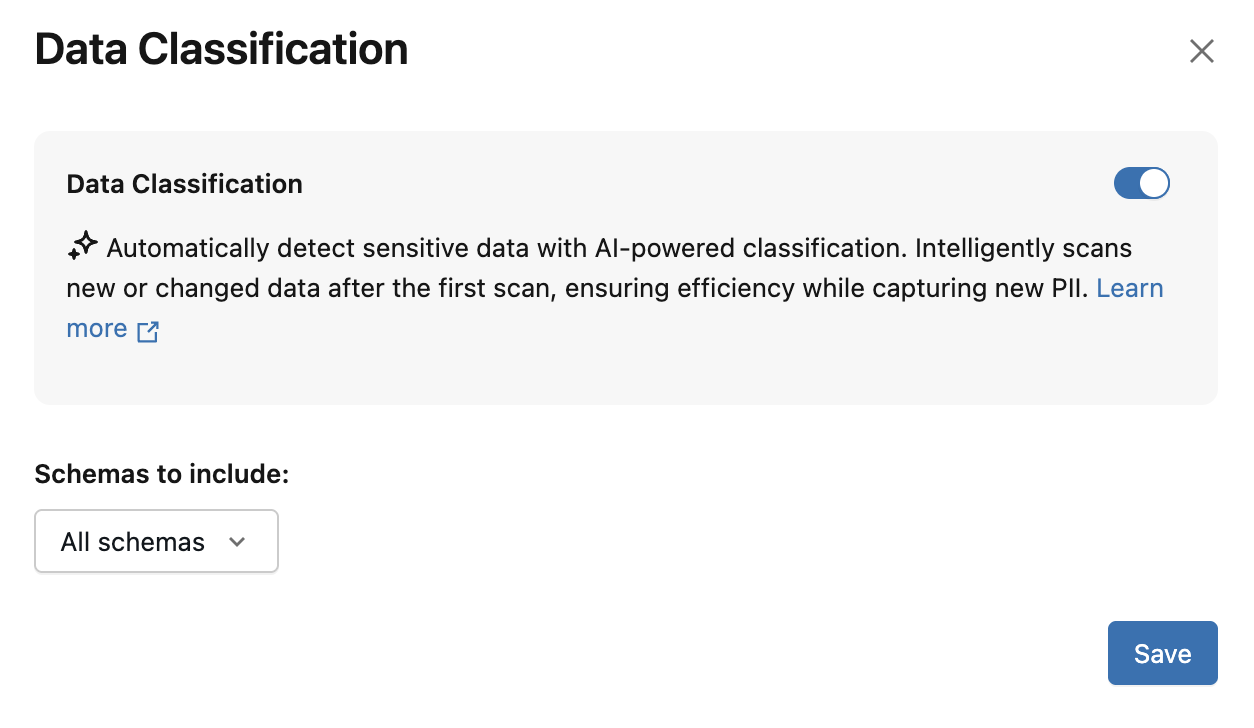
Click Save.
This creates a background job that incrementally scans all tables in the catalog or selected schemas.
The classification engine relies on intelligent scanning to determine when to scan a table. New tables and columns in a catalog are typically scanned within 24 hours of being created.
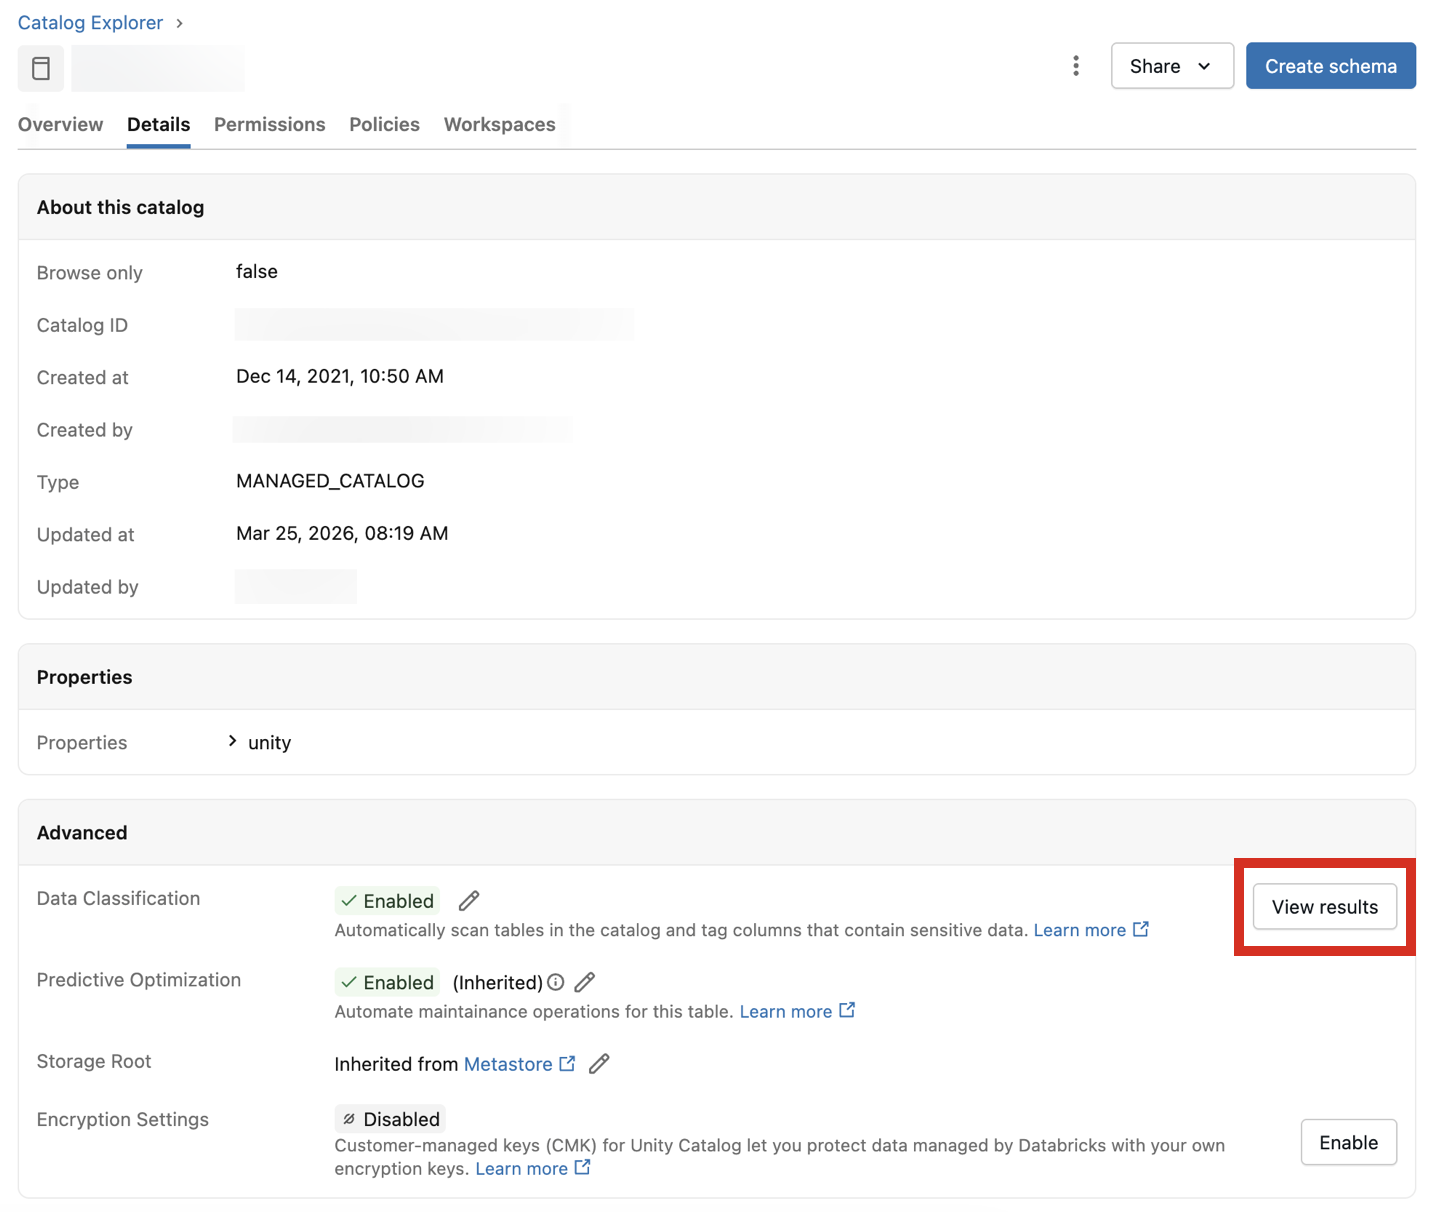
View classification results
To view classification results, click View results next to the Data Classification setting.
This opens the Data Classification UI for the catalog. To view classification results, a serverless SQL warehouse is required.
You can also view aggregated results across all classified catalogs in the metastore by using the catalog selector at the upper left. Choose All catalogs from the drop-down menu.
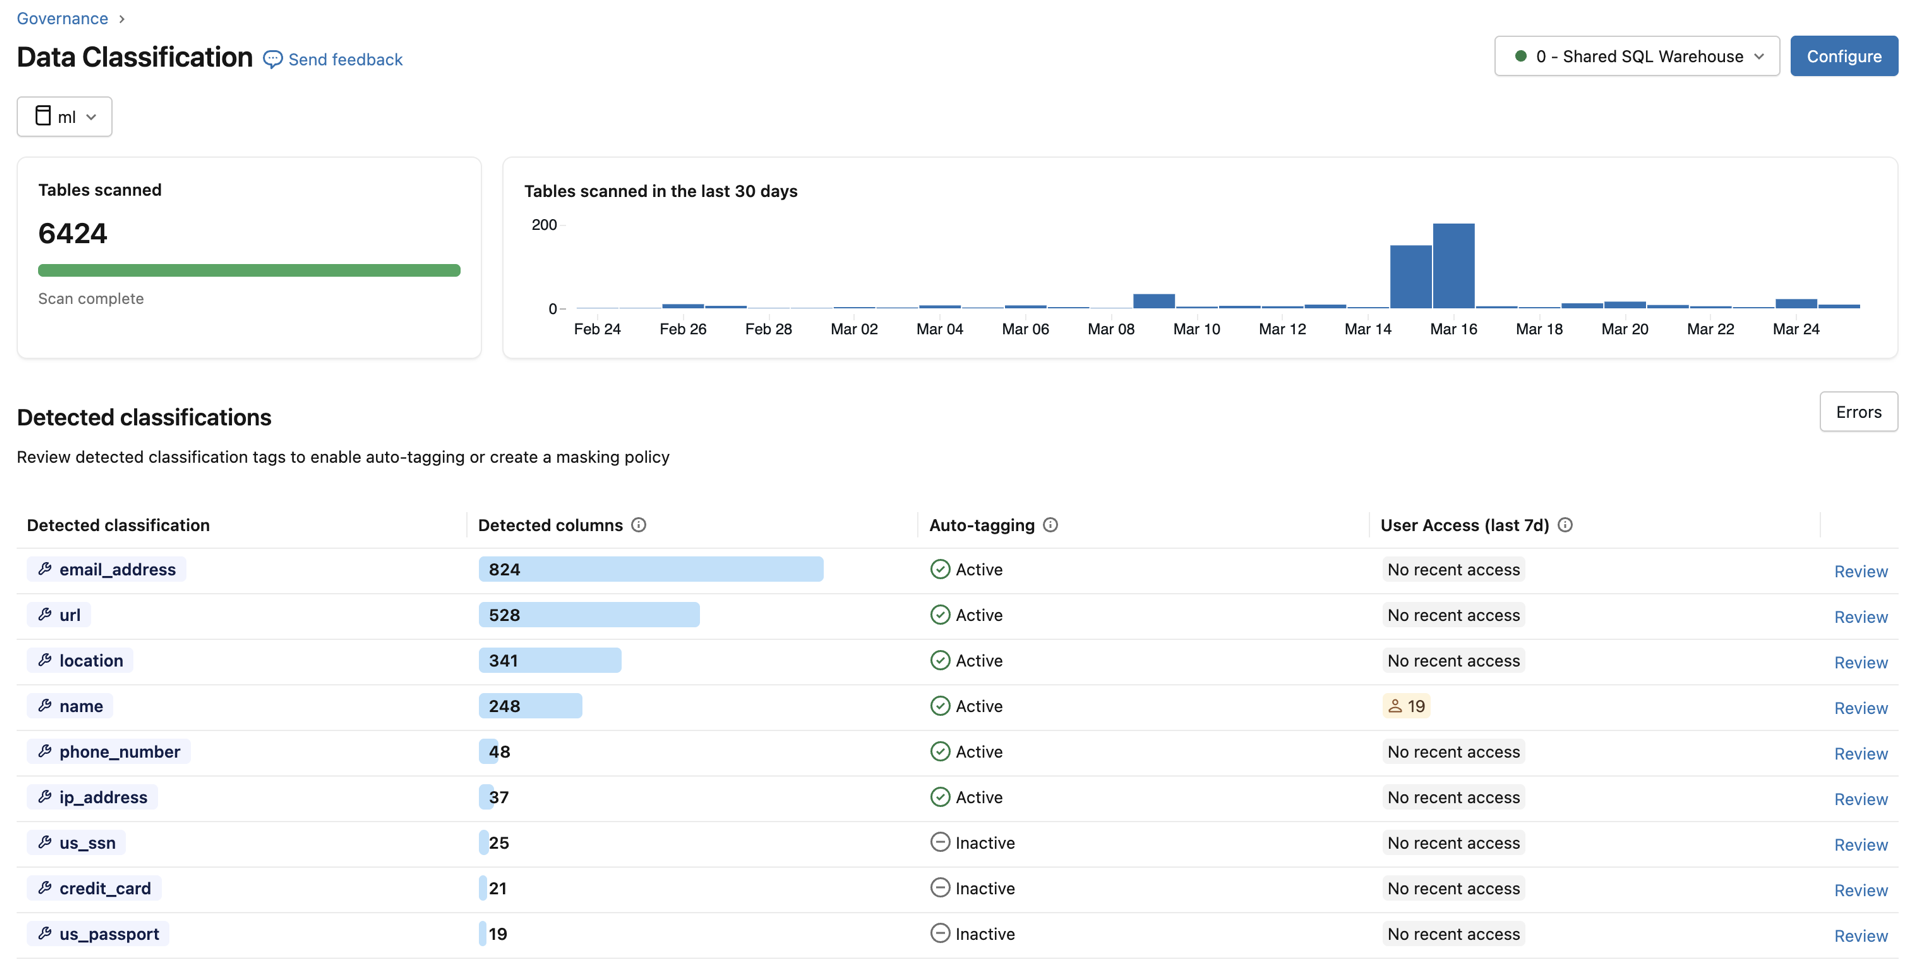
For each classification type, the table shows:
- Detected columns: The number of columns where the classification was detected.
- Auto-tagging: The tagging status for that classification — Active or Inactive. In the metastore view, a status of Partially Active indicates that tagging is enabled in some but not all catalogs.
- User Access (last 7d): The number of distinct users who accessed unmasked vs. masked data of that classification over the last 7 days. Use this to assess the exposure of sensitive data across your organization.
Review detections
To review the results for a specific classification type, click Review in the rightmost column. A panel appears with two tabs:
- Detected Columns: Displays the columns where the classification tag was detected with high confidence, ordered by most recent detection first. Also includes a Detections over time chart and a list of detected columns with sample values. Click any bar in the chart to see the specific detections for that date. Sample values appear only if you have the required permissions to view classification results.
- User Access: Lists all users who accessed columns with this classification tag, showing their email and username along with whether they have masked or unmasked access. Also shows any attribute-based access control (ABAC) policies assigned to this classification tag. When viewing results for a single catalog, you can create a new ABAC policy directly from the panel.
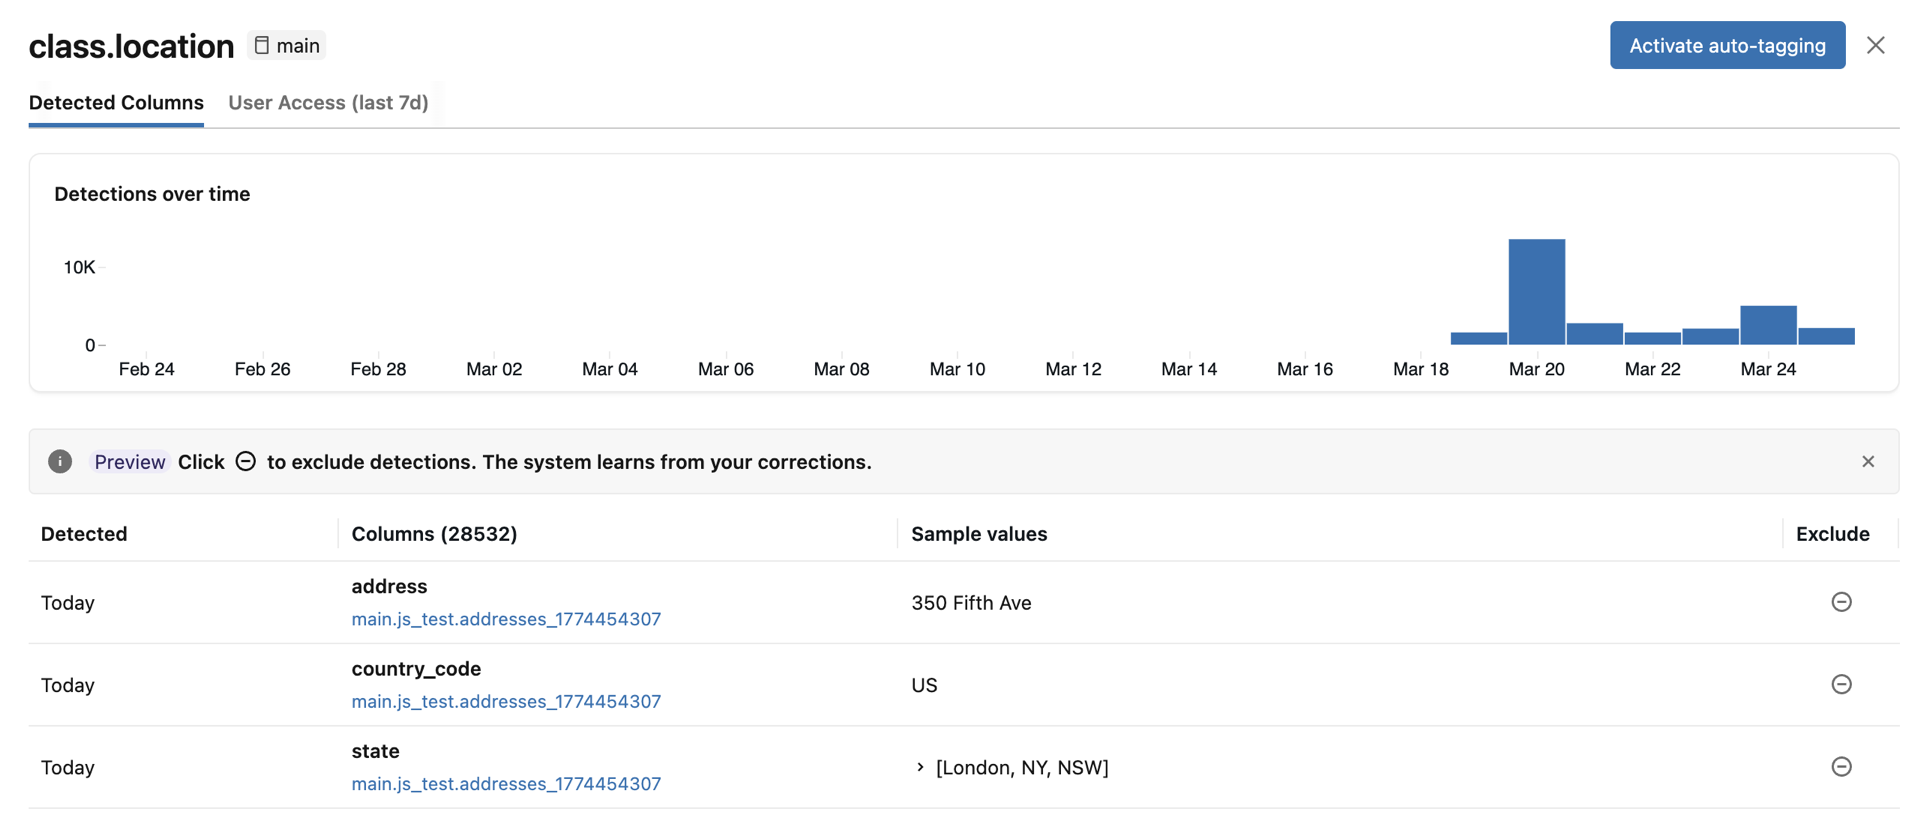
If any detected columns are incorrect, you can click the Exclude icon to the right of the entry. See Exclude detections.
Enable automatic tagging
If the identified columns match your expectations, you can enable automatic tagging for the classification tag. When automatic tagging is enabled, all existing and future detections of this classification are tagged.
You can configure automatic tagging at two levels:
- Metastore level: Enable or disable across all catalogs at once. You must be a metastore admin and have
ASSIGNon the tag being applied. - Catalog level: Enable or disable for the current catalog only. Catalog-level settings take precedence over the metastore-level setting. You must have
USE CATALOGandAPPLY TAGon the catalog, andASSIGNon the tag being applied.
At the catalog level, automatic tagging has three states:
- Default (inherited): The catalog inherits the tagging setting from the metastore level.
- Active: Tagging is explicitly enabled for this catalog, regardless of the metastore-level setting.
- Inactive: Tagging is explicitly disabled for this catalog, regardless of the metastore-level setting.
When you disable tagging, no future tags are applied, but existing tags are not removed.
Note
When you enable automatic tagging, tags are not backfilled immediately. They will be populated in the next scan, which should take effect within 24 hours. Subsequent classifications will be tagged immediately.
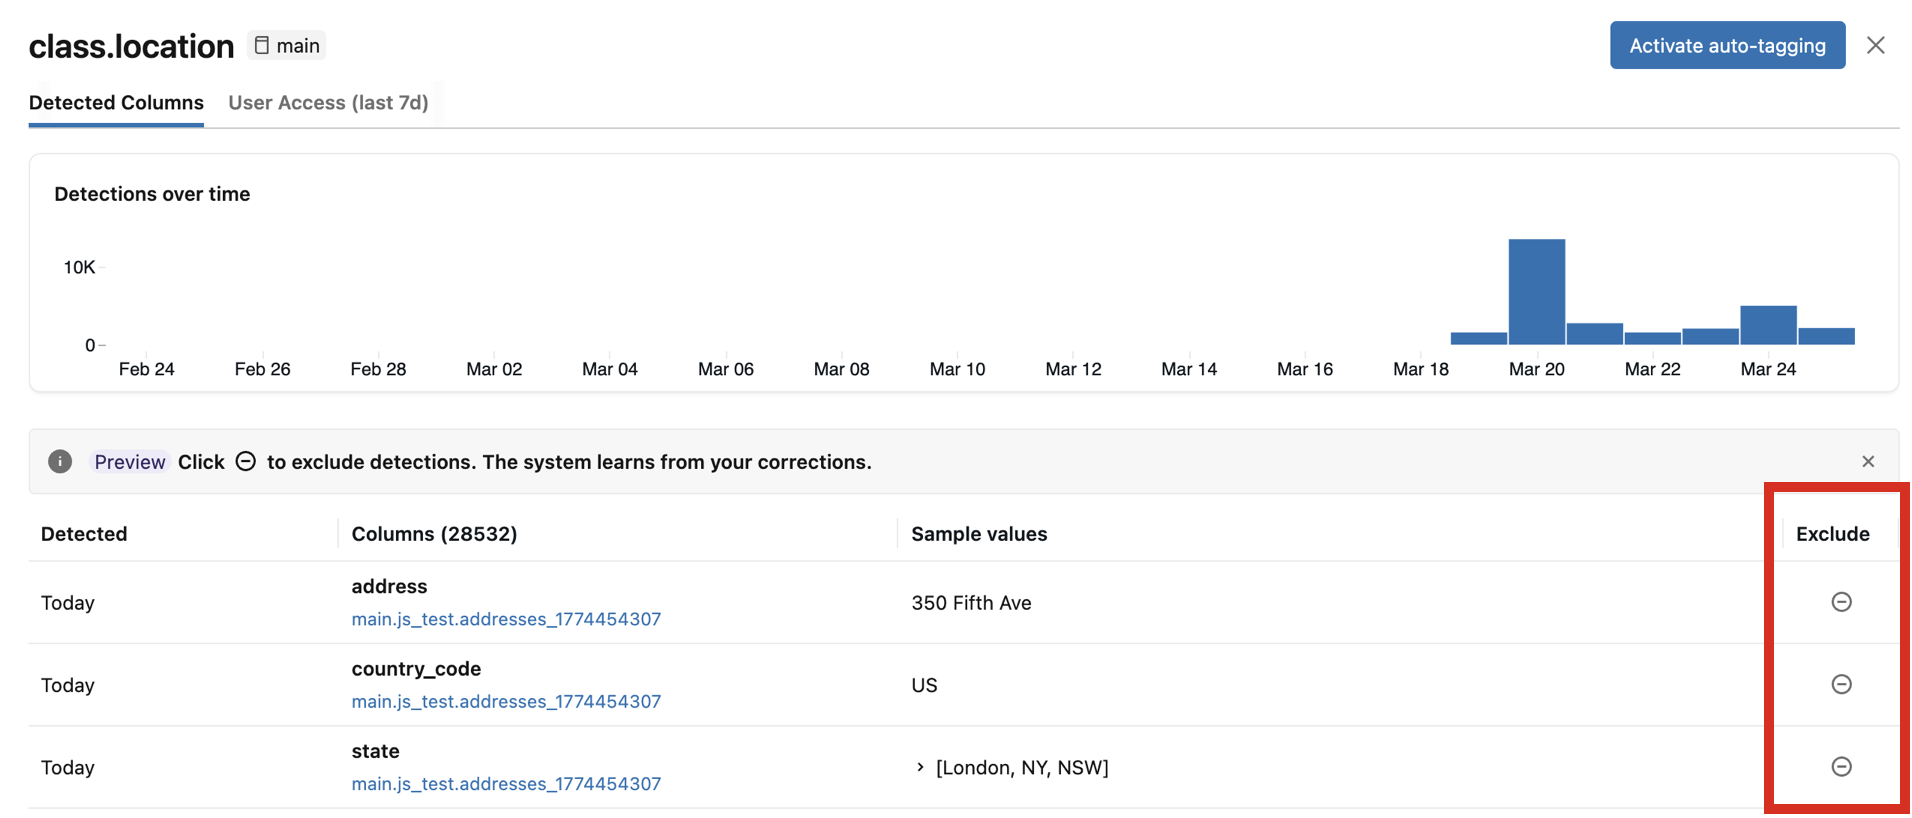
Exclude detections
Important
Detection exclusions and their use to improve future classification accuracy are in Beta.
In the review panel, you can exclude individual column detections. Excluding a detection:
- Removes any existing classification tag from that column.
- Prevents future scans from reapplying the tag to that column.
- Provides feedback that improves the accuracy of future classification results.
To exclude a detection, click the Exclude icon for the corresponding column in the review panel. To re-include the detection, click the icon again.
The results system table
Data classification creates a system table named system.data_classification.results to store results that by default are accessible only to the account admin. The account admin can share this table. The table is only accessible when you use serverless compute. For details about this table, see Data classification system table reference.
Important
The results table system.data_classification.results contains all classification results across the entire metastore and includes sample values from tables in each catalog. You should only share this table with users who are privileged to see metastore-wide classification results, including sample values.
Users with SELECT access to this table can also see sample values associated with detections on the Data Classification results page.
Set up governance controls based on data classification results
Mask sensitive data using an ABAC policy
Databricks recommends using Attribute-based access control in Unity Catalog to create governance controls based on data classification results.
To create a policy from the Data Classification results page, click Review for a classification tag, open the User Access tab, and click New policy. The policy form is pre-filled to mask columns with the classification tag being reviewed. To mask the data, specify any masking function registered in Unity Catalog and click Save.
You can also create a policy that covers multiple classification tags, by changing When column to meets condition and providing multiple tags.
For example, to create a policy called "Confidential" which masks any name, email, or phone number, set the meets condition to has_tag("class.name") OR has_tag("class.email_address") OR has_tag("class.phone_number").
GDPR discovery and deletion
This example notebook shows how you can use data classification to assist with data discovery and deletion for GDPR compliance.
GDPR discovery and deletion using data classification notebook
How to handle incorrect tags
If a classification is incorrect, exclude the detection from the review panel. Excluding a detection removes the tag, prevents it from being reapplied, and improves the accuracy of future scans. See Exclude detections.
Scan errors
If any errors occur during the scan, an Errors button appears at the upper right of the results table.
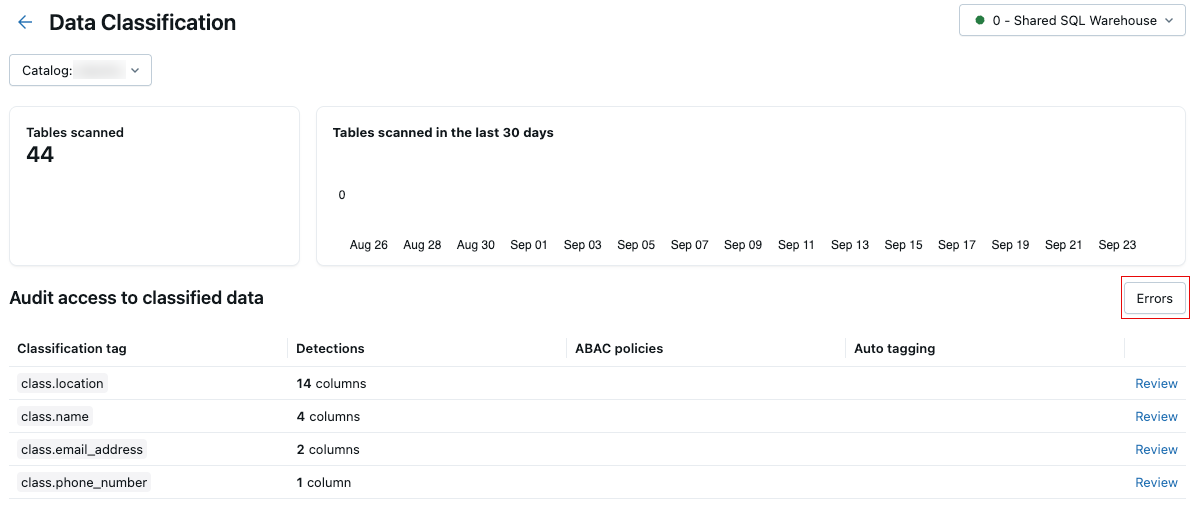
Click the button to display the tables that failed the scan and associated error messages.

By default, failures that occurred for individual tables are skipped and retried the following day.
View Data Classification expenses
To understand how Data Classification is billed, see the pricing page. You can view expenses related to Data Classification either by running a query or viewing the usage dashboard.
Note
The initial scan is more costly than subsequent scans on the same catalog, as those scans are incremental and typically incur lower costs.
View usage from the system table system.billing.usage
You can query Data Classification expenses from system.billing.usage. The fields created_by and catalog_id can be used optionally to break down costs:
created_by: Include to see costs by the user who triggered the usage.catalog_id: Include to see costs by catalog. The catalog ID is shown in thesystem.data_classification.resultstable.
Example query for the last 30 days:
SELECT
   usage_date,
   identity_metadata.created_by,
   usage_metadata.catalog_id,
   SUM(usage_quantity) AS dbus
FROM
   system.billing.usage
WHERE
   usage_date >= DATE_SUB(CURRENT_DATE(), 30)
  AND billing_origin_product = 'DATA_CLASSIFICATION'
GROUP BY
   usage_date,
   created_by,
   catalog_id
ORDER BY
   usage_date DESC,
   created_by;
To calculate the total dollar cost, join with system.billing.list_prices. The following example query uses a named parameter :add_on_rate as a multiplier on the list price. Set it to 1 to use the list price directly, or to a value less than 1 to reflect a negotiated discount (for example, 0.9 for a 10% discount).
Example query for total dollar cost over the last 30 days:
SELECT
  u.usage_date,
  SUM(u.usage_quantity * lp.pricing.effective_list.default) * :add_on_rate
    AS `Data Classification Dollar Cost`
FROM system.billing.usage AS u
JOIN system.billing.list_prices AS lp
  ON lp.sku_name = u.sku_name
WHERE
  u.billing_origin_product = 'DATA_CLASSIFICATION'
  AND u.usage_end_time >= lp.price_start_time
  AND (lp.price_end_time IS NULL OR u.usage_end_time < lp.price_end_time)
  AND u.usage_date >= DATE_ADD(CURRENT_DATE(), -30)
GROUP BY
  u.usage_date
ORDER BY
  u.usage_date DESC;
View usage from the usage dashboard
If you already have a usage dashboard configured in your workspace, you can use it to filter the usage by selecting the Billing Origin Project labeled 'Data Classification.' If you do not have a usage dashboard configured, you can import one and apply the same filtering. For details, see Usage dashboards.
Supported classification tags
For a full list of supported tags organized by global tags, regional tags, and compliance frameworks (PII, GDPR, HIPAA, DPDPA), see Supported classification tags.
Limitations
- Views and metric views are not supported. If the view is based on existing tables, Databricks recommends classifying the underlying tables to see if they contain sensitive data.