หมายเหตุ
การเข้าถึงหน้านี้ต้องได้รับการอนุญาต คุณสามารถลอง ลงชื่อเข้าใช้หรือเปลี่ยนไดเรกทอรีได้
การเข้าถึงหน้านี้ต้องได้รับการอนุญาต คุณสามารถลองเปลี่ยนไดเรกทอรีได้
Applies to: Azure Logic Apps (Consumption + Standard)
To run the same actions on every item in an array or collection, or repeat actions until something finishes in your logic app workflow, add the Control action named For each or Until to your workflow respectively:
| Action | Task |
|---|---|
| For each | Repeat one or more actions on array or collection items. Applies only to arrays and collections. Tip: If you have a trigger that handles arrays and want to run a workflow instance for each array item, set the trigger's Split on property to debatch the array. For information, see Concurrency, looping, and debatching limits. |
| Until | Repeat one or more actions until a condition is met or a specific state changes. Your workflow first runs all the actions in the loop, and then checks the condition or state. If the condition is met, the loop stops. Otherwise, the loop repeats. For information, see Concurrency, looping, and debatching limits. |
This guide shows how to add a loop to your workflow, run iterations sequentially, and prevent endless loops. Jump to the task you want:
- Add a For each loop to your workflow
- Run For each iterations sequentially
- Add an Until loop to your workflow
- Prevent endless loops
Note
For Power Automate documentation, see Use loops.
Prerequisites
An Azure account and subscription. Get a free Azure account.
The logic app workflow where you want to run the loop, including a trigger that starts the workflow.
Before you can add a loop action, your workflow must start with a trigger as the first step.
This guide uses the Azure portal, but you can use Visual Studio Code and the corresponding Azure Logic Apps extension to build logic app workflows:
For each loop considerations
The For each action repeats one or more actions on each array or collection item.
The For each action works only on arrays and collections.
The For each action processes a limited number of array items.
By default, For each action iterations run in parallel. Key behaviors to know:
Behavior What it means Parallel by default Unlike Power Automate's Apply to each loop, iterations don't run one at a time.
If your scenario needs sequential processing, see Run For each iterations sequentially. For example, to pause the next iteration in a For each action by using the Delay action, set up each iteration to run sequentially.Nested loops A nested For each action always runs sequentially. To run in parallel, create and call a child workflow. Variables Increment variable, Decrement variable, and Append to variable might return unpredictable results in parallel loops. To make sure variables in a loop produce predictable results from operations on those variables during each iteration, run the loop sequentially. Actions in a For each loop use the
item()function to reference and process each item in the array. If you specify data that's not in an array, the workflow fails.
Add a For each loop to your workflow
The following example workflow sends a daily summary for a website RSS feed. The workflow uses a For each action that sends an email for each new item.
In the Azure portal, create a logic app workflow with the following steps in the specified order:
The RSS trigger named When a feed item is published
Follow these general steps to add a trigger to a Consumption or Standard logic app workflow.
The Outlook.com or Office 365 Outlook action named Send an email
Follow these general steps to add an action to a Consumption or Standard logic app workflow.
In the designer, between the trigger and Send an email action, add the action named For each by following the general steps based on your workflow type:
Now build the loop:
In the For each action, select inside the Select An Output From Previous Steps box to view the input options, and then select the lightning icon.
From the dynamic content list that opens, under When a feed item is published, select Feed links, which is an array output from the RSS trigger.
Note
If the Feed links output doesn't appear, next to the trigger section label, select See more. From the dynamic content list, you can select only outputs from previous steps.
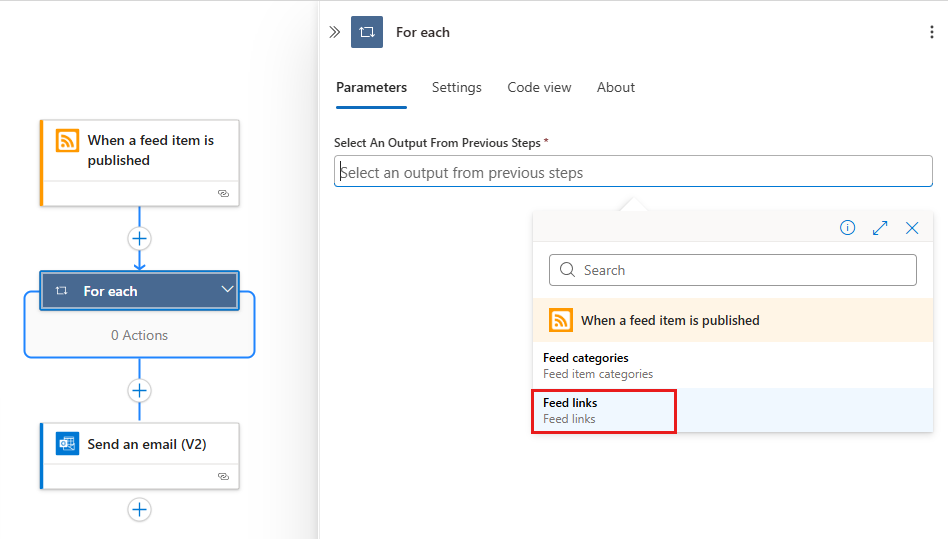
The following example shows the selected array output:
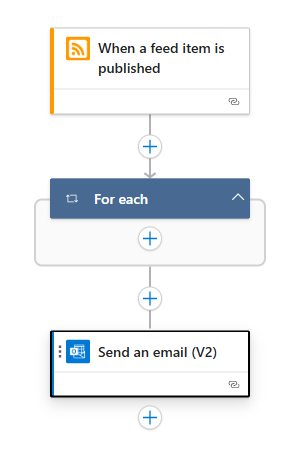
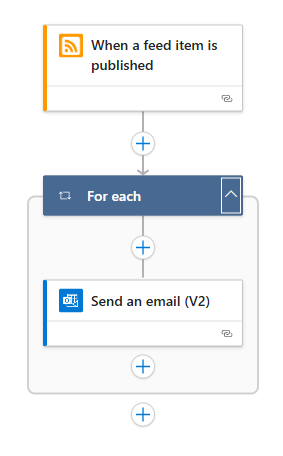
To run an existing action on each array item, drag the Send an email action into the For each loop.
Your workflow looks like the following example:
Save your workflow.
To manually test your workflow, on the designer toolbar, select Run > Run.
For each action definition (JSON)
If you're working in code view, you can define the For_each action in your workflow's JSON definition, for example:
"actions": {
   "For_each": {
      "actions": {
         "Send_an_email_(V2)": {
            "type": "ApiConnection",
            "inputs": {
               "body": {
                  "Body": "@{item()}",
                  "Subject": "New CNN post @{triggerBody()?['publishDate']}",
                  "To": "me@contoso.com"
               },
               "host": {
                  "connection": {
                     "name": "@parameters('$connections')['office365']['connectionId']"
                  }
               },
               "method": "post",
               "path": "/v2/Mail"
            },
            "runAfter": {}
         }
      },
      "foreach": "@triggerBody()?['links']",
      "runAfter": {},
      "type": "Foreach"
   }
},
For each: Run loop iterations sequentially
By default, the iterations in a For each action run at the same time in parallel. However, if you have nested loops or have variables inside loops where you expect predictable results, you must run those loops one at a time sequentially.
On the designer, select the For each action to open the information pane, and then select Settings.
Under Concurrency control, change the setting from Off to On.
Move the Degree of parallelism slider to 1.
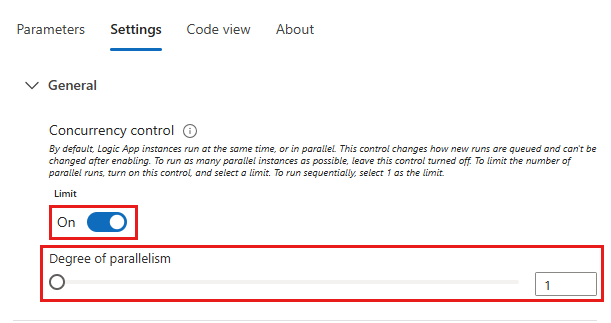
For each action definition (JSON): Run sequentially
If you're working in code view with the For_each action in your workflow's JSON definition, add the operationOptions parameter and set the parameter value to Sequential:
"actions": {
   "For_each": {
      "actions": {
         "Send_an_email_(V2)": { }
      },
      "foreach": "@triggerBody()?['links']",
      "runAfter": {},
      "type": "Foreach",
      "operationOptions": "Sequential"
   }
}
Until loop considerations
The Until action runs and repeats one or more actions until the required specified condition is met. If the condition is met, the loop stops. Otherwise, the loop repeats. For more information, see Concurrency, looping, and debatching limits.
The following list contains some common scenarios where you can use an Until action:
Call an endpoint until you get the response you want.
Create a record in a database. Wait until a specific field in that record gets approved. Continue processing.
By default, the Until action succeeds or fails in the following ways:
The Until loop succeeds if all the actions inside the loop succeed, and if the loop limit is reached, based on the run after behavior.
If all actions in last iteration of the Until loop succeed, the entire Until loop is marked as Succeeded.
If any action fails in the last iteration of the Until loop, the entire Until loop is marked as Failed.
If any action fails in an iteration other than the last iteration, the next iteration continues to run, and the entire Until action isn't marked as Failed.
To make the action fail instead, change the default behavior in the loop's JSON definition by adding the parameter named
operationOptions, and setting the value toFailWhenLimitsReached, for example:"Until": { "actions": { "Execute_stored_procedure": { <...> } }, "expression": "@equals(variables('myUntilStop'), true)", "limit": { "count": 5, "timeout": "PT1H" }, "operationOptions": "FailWhenLimitsReached", "runAfter": { "Initialize_variable": [ "Succeeded" ] }, "type": "Until" }
Add an Until loop to your workflow
The following example workflow starts at 8:00 AM each day. The workflow uses the Until action to increment a variable until the value equals 10. The workflow then sends an email that confirms the current value. The example uses Office 365 Outlook, but you can use any email provider that Azure Logic Apps supports. If you use another email account, the general steps stay the same, but look slightly different.
In the Azure portal, create a logic app resource with a blank workflow.
In the designer, add the Schedule built-in trigger named Recurrence by following the general steps based on your workflow type:
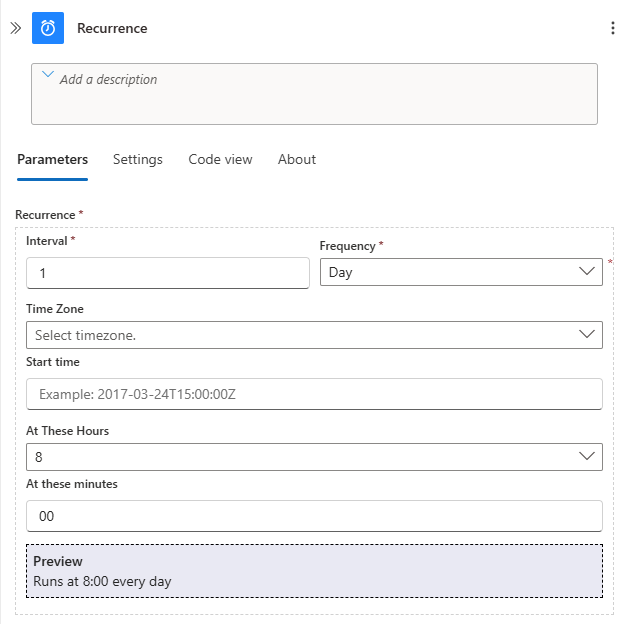
In the Recurrence trigger, provide the following information:
Parameter Value Interval 1 Frequency Day At these hours 8 At these minutes 00 At these hours and At these minutes appear after you set Frequency to Day.
The following example shows how the Recurrence trigger appears:
In the designer, add the Variables built-in action named Initialize variable by following the general steps based on your workflow type:
In the Initialize variable action, provide the following information:
Parameter Value Description Name Limit Your variable's name. Type Integer Your variable's data type. Value 0 Your variable's starting value. 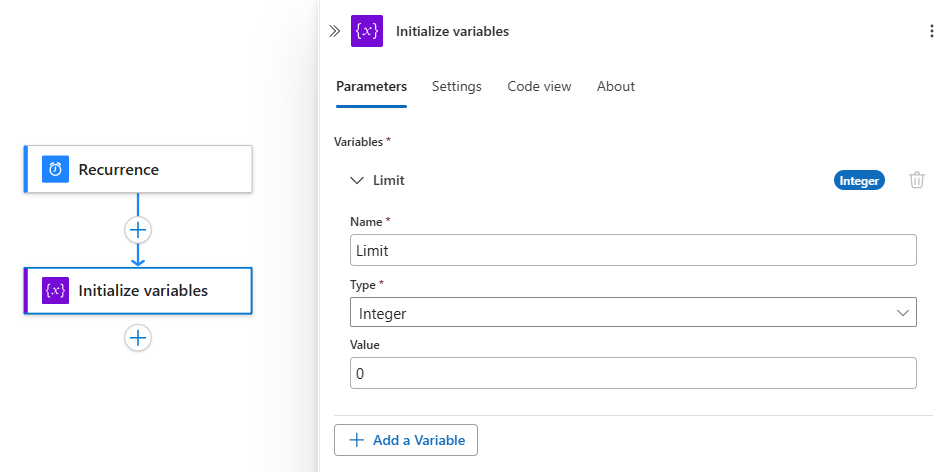
Under the Initialize variable action, add the Control built-in action named Until by following the general steps based on your workflow type:
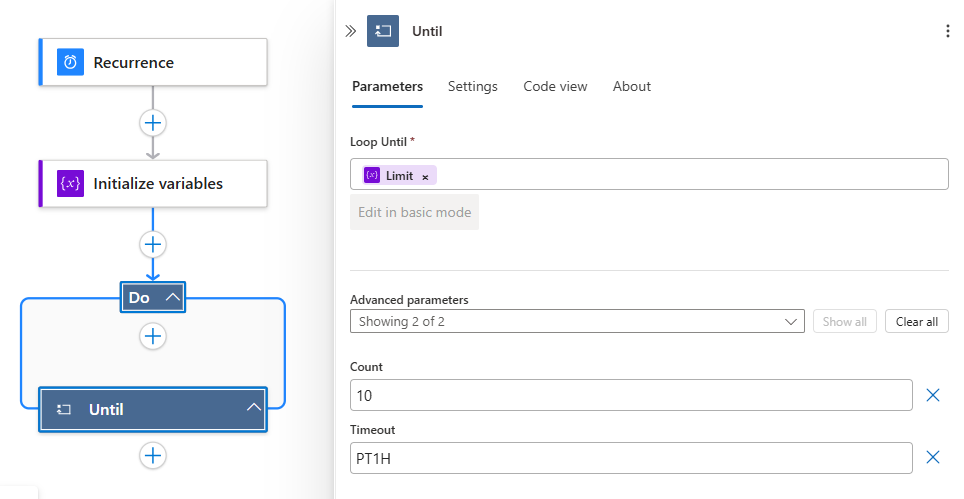
In the Until action, set up the stop condition for the loop:
Select inside the Loop Until box, and then select the lightning icon to open the dynamic content list.
From the list, under Variables, select the variable named Limit.
Under Count, enter 10 as the comparison value.
Inside the Until action, select + > Add an action.
Add the Variables built-in action named Increment variable to the Until action by following the general steps based on your workflow type:
In the Increment variable action, provide the following values to increment the Limit variable's value by 1:
Parameter Value Limit Select the Limit variable. Value 1 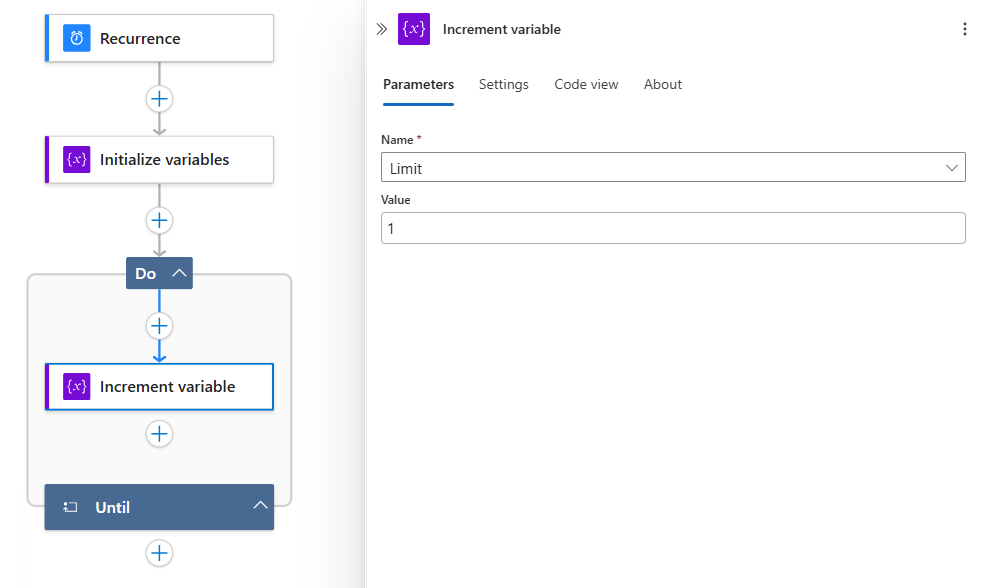
Outside and under the Until action, add an action that sends an email by following the general steps based on your workflow type:
This example continues with the Office 365 Outlook action named Send an email.
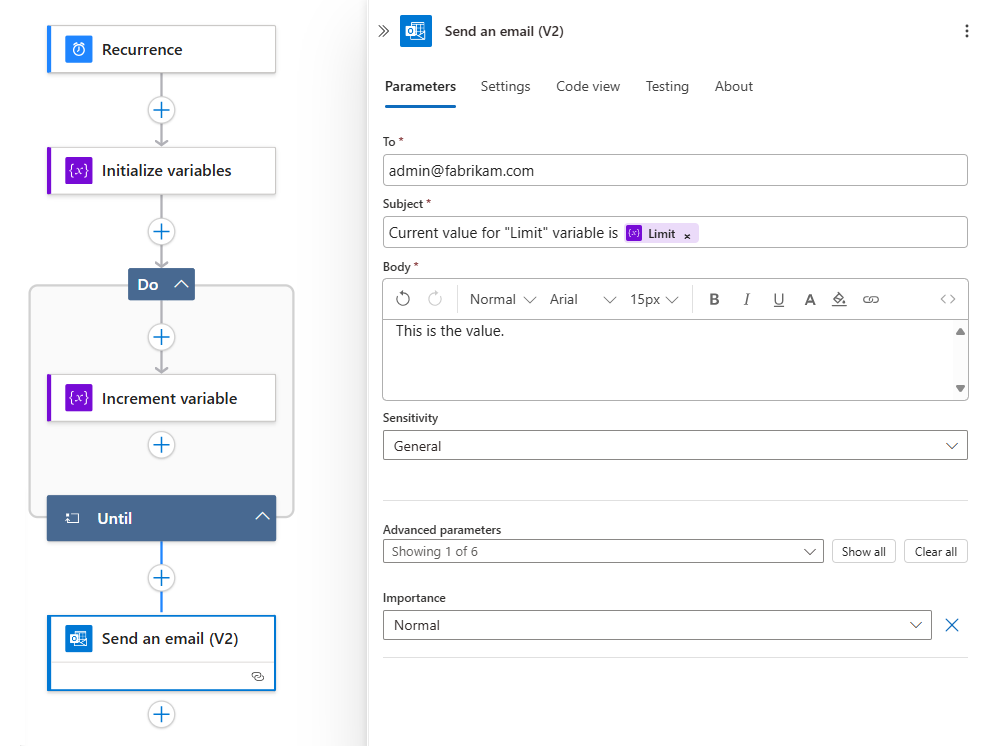
In the email action, provide the following values:
Parameter Value Description To <email-address@domain> The recipient's email address. For testing, use your own email address. Subject Current value for "Limit" variable is: Limit The email subject. For this example, make sure that you include the Limit variable to confirm that the current value meets your specified condition:
1. Select inside the Subject box, and then select the lightning icon.
2. From the dynamic content list that opens, next to the Variables section header, select See more.
3. Select Limit.Body <email-content> The email message content that you want to send. For this example, enter whatever text you want. The following example shows how your email action appears:
Save your workflow.
Test your workflow
To manually test your logic app workflow:
- On the designer toolbar, from the Run option, select Run.
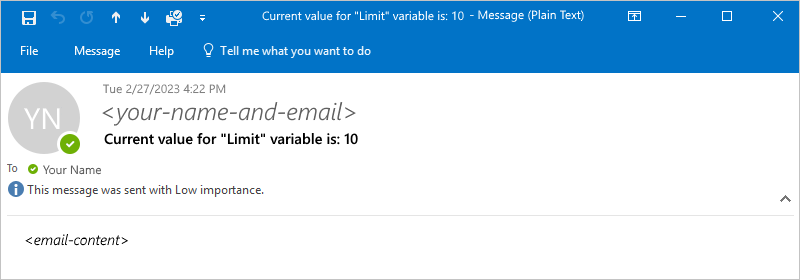
After your workflow starts running, you get an email with the content that you specified:
Prevent endless loops
The Until action stops execution based on the optional Count and Timeout parameters. Make sure that you set these parameter values accordingly:
| Parameter | Description |
|---|---|
| Count | The maximum number of iterations that run before the loop exits. For the default and maximum limits on the number of Until actions that a workflow can have, see Concurrency, looping, and debatching limits. |
| Timeout | The maximum amount of time that the Until action, including all iterations, runs before the loop exits. This value is specified in ISO 8601 format and is evaluated for each iteration. If any action in the loop takes longer than the timeout limit, the current iteration doesn't stop. However, the next iteration doesn't start because the timeout limit condition is met. For the default and maximum limits on the Timeout value, see Concurrency, looping, and debatching limits. |
Review run history for Until loop iterations
When you view the run history for a workflow that includes an Until loop, the detailed status and results for actions inside the loop are available only after the entire loop completes its run. While the Until loop is still executing its iterations, the loop action shows the Running status, but you can't expand or traverse the individual iteration results until the loop exits.
The loop exits when one of the following conditions is met:
- The specified expression evaluates to true.
- The loop reaches the Count limit.
- The loop reaches the Timeout limit.
After the loop completes, you can select the Until action in run history to view each iteration and the status of the child actions within that iteration.
Note
If your Until loop runs for an extended period, you must wait for the loop to fully complete before you can inspect the run history for the results from individual iterations. To monitor long running, in-progress loops, consider adding logging or notification actions inside the loop that independently emit status, for example, by sending a message to a queue or updating a variable that a parallel branch can read.
Until action definition (JSON)
If you're working in code view, you can define an Until action in your workflow's JSON definition, for example:
"actions": {
   "Initialize_variable": {
      // Definition for initialize variable action
   },
   "Send_an_email": {
      // Definition for send email action
   },
   "Until": {
      "type": "Until",
      "actions": {
         "Increment_variable": {
            "type": "IncrementVariable",
            "inputs": {
               "name": "Limit",
               "value": 1
            },
            "runAfter": {}
         }
      },
      "expression": "@equals(variables('Limit'), 10)",
      // To prevent endless loops, an "Until" loop
      // includes these default limits that stop the loop.
      "limit": {
         "count": 60,
         "timeout": "PT1H"
      },
      "runAfter": {
         "Initialize_variable": [
            "Succeeded"
         ]
      }
   }
}
This example Until loop calls an HTTP endpoint, which creates a resource. The loop stops when the HTTP response body returns with Completed status. To prevent endless loops, the loop also stops if any of the following conditions happen:
The loop ran 10 times as specified by the
countattribute. The default is 60 times.The loop ran for two hours as specified by the
timeoutattribute in ISO 8601 format. The default is one hour.
"actions": {
   "myUntilLoopName": {
      "type": "Until",
      "actions": {
         "Create_new_resource": {
            "type": "Http",
            "inputs": {
               "body": {
                  "resourceId": "@triggerBody()"
               },
               "url": "https://domain.com/provisionResource/create-resource"
            },
            "runAfter": {},
            "type": "ApiConnection"
         }
      },
      "expression": "@equals(body('Create_new_resource'), 'Completed')",
      "limit": {
         "count": 10,
         "timeout": "PT2H"
      },
      "runAfter": {}
   }
}