หมายเหตุ
การเข้าถึงหน้านี้ต้องได้รับการอนุญาต คุณสามารถลอง ลงชื่อเข้าใช้หรือเปลี่ยนไดเรกทอรีได้
การเข้าถึงหน้านี้ต้องได้รับการอนุญาต คุณสามารถลองเปลี่ยนไดเรกทอรีได้
Note
This article applies to the preview version of Copilot in SharePoint (previously referred to as AI in SharePoint)
Structured document generation lets you turn Word document templates into intelligent, AI-powered forms. When a user submits a form, the system automatically generates a new document from the template with the submitted values merged into the appropriate fields. This process creates consistent, governed documents every time - without requiring manual edits to the template.
This feature is useful for organizations that regularly produce standardized documents, such as:
- Legal and compliance - Contracts, NDAs, statements of work, settlement agreements, vendor agreements.
- Procurement and finance - Purchase orders, invoices, payment authorizations.
- Human resources - Employment verification letters, offer letters, travel and visa support letters.
- Sales and operations - Proposals, bid documents, statements of compliance, customer letters.
How structured document generation works
The document generation process involves two roles and a handoff between them.
Content manager (template creator) - Creates and governs templates and forms. They define the document structure, required fields, and conditional rules to ensure that every generated document is consistent and compliant.
Content consumer (form submitter) - Submits forms to generate documents. They fill out the form with the requested information, and the system generates a new document that preserves the approved layout and language - only the field values change.
Prerequisites
- Content managers, or users who create and configure forms, must have a Microsoft 365 Copilot license assigned.
- To create a form, users must have Edit permissions on the document library.
- The source document must be a Microsoft Word document (.docx format).
Create a form from a document
You can create a form from any Word document stored in a SharePoint document library.
In a SharePoint document library, select Forms from the command bar.
Select Document generation form to start the form creation process.
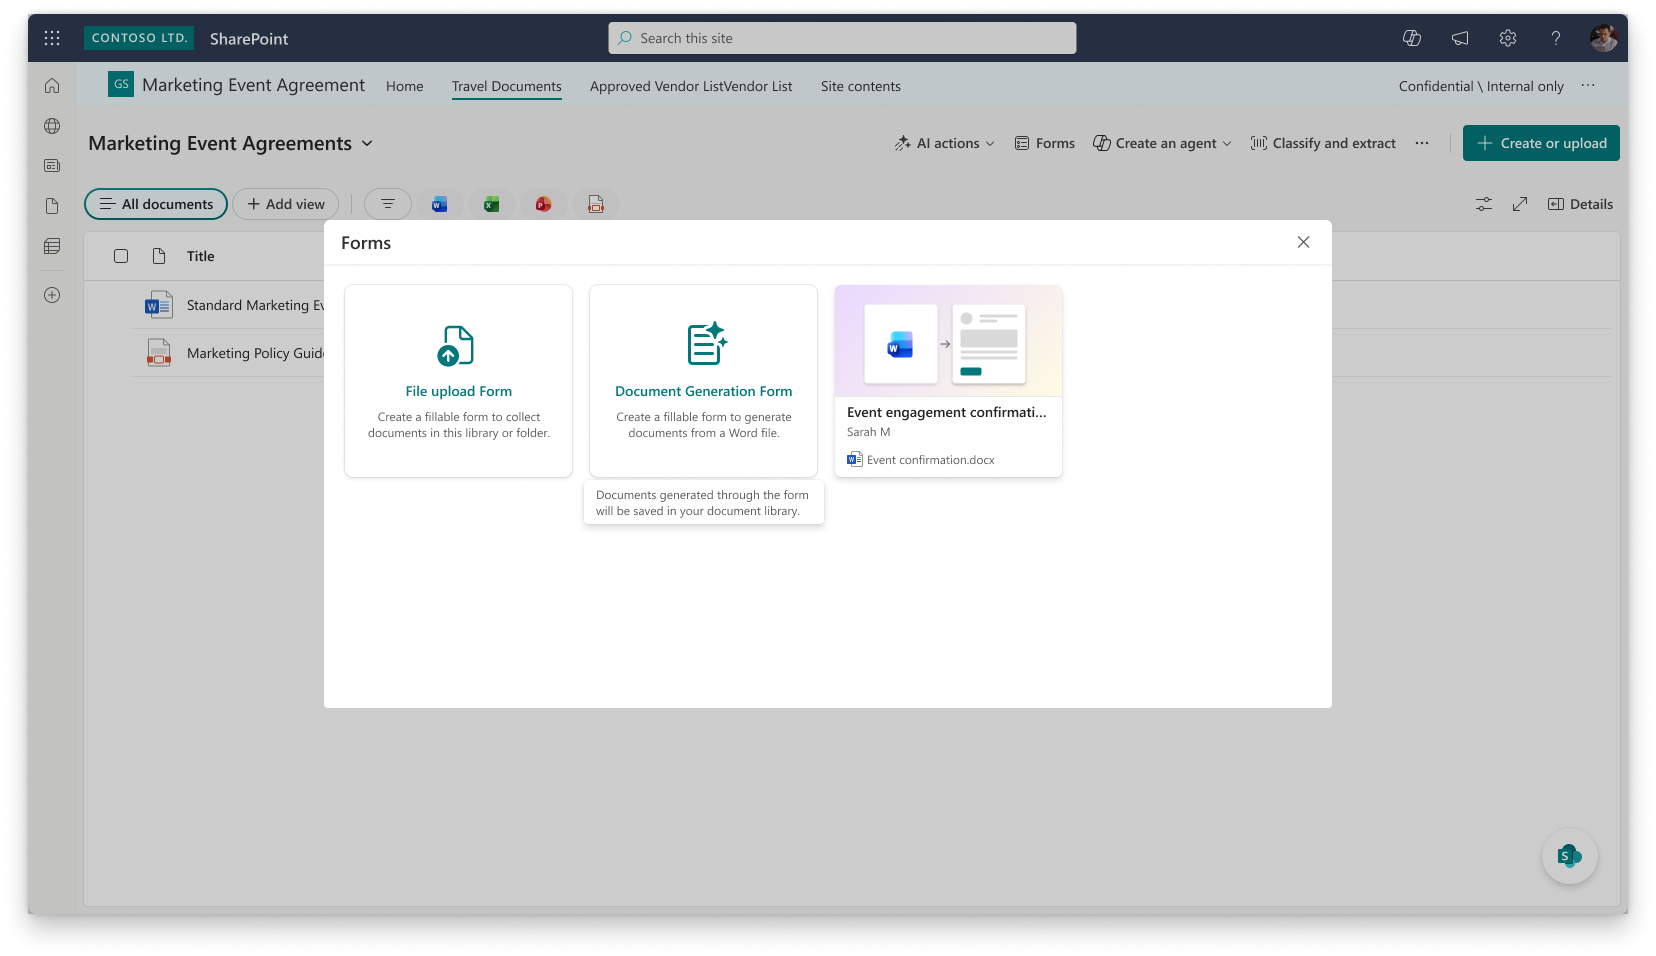
You're given a high-level step pane that highlights how you'll go about the flow, so you know what to expect at each stage of form creation.
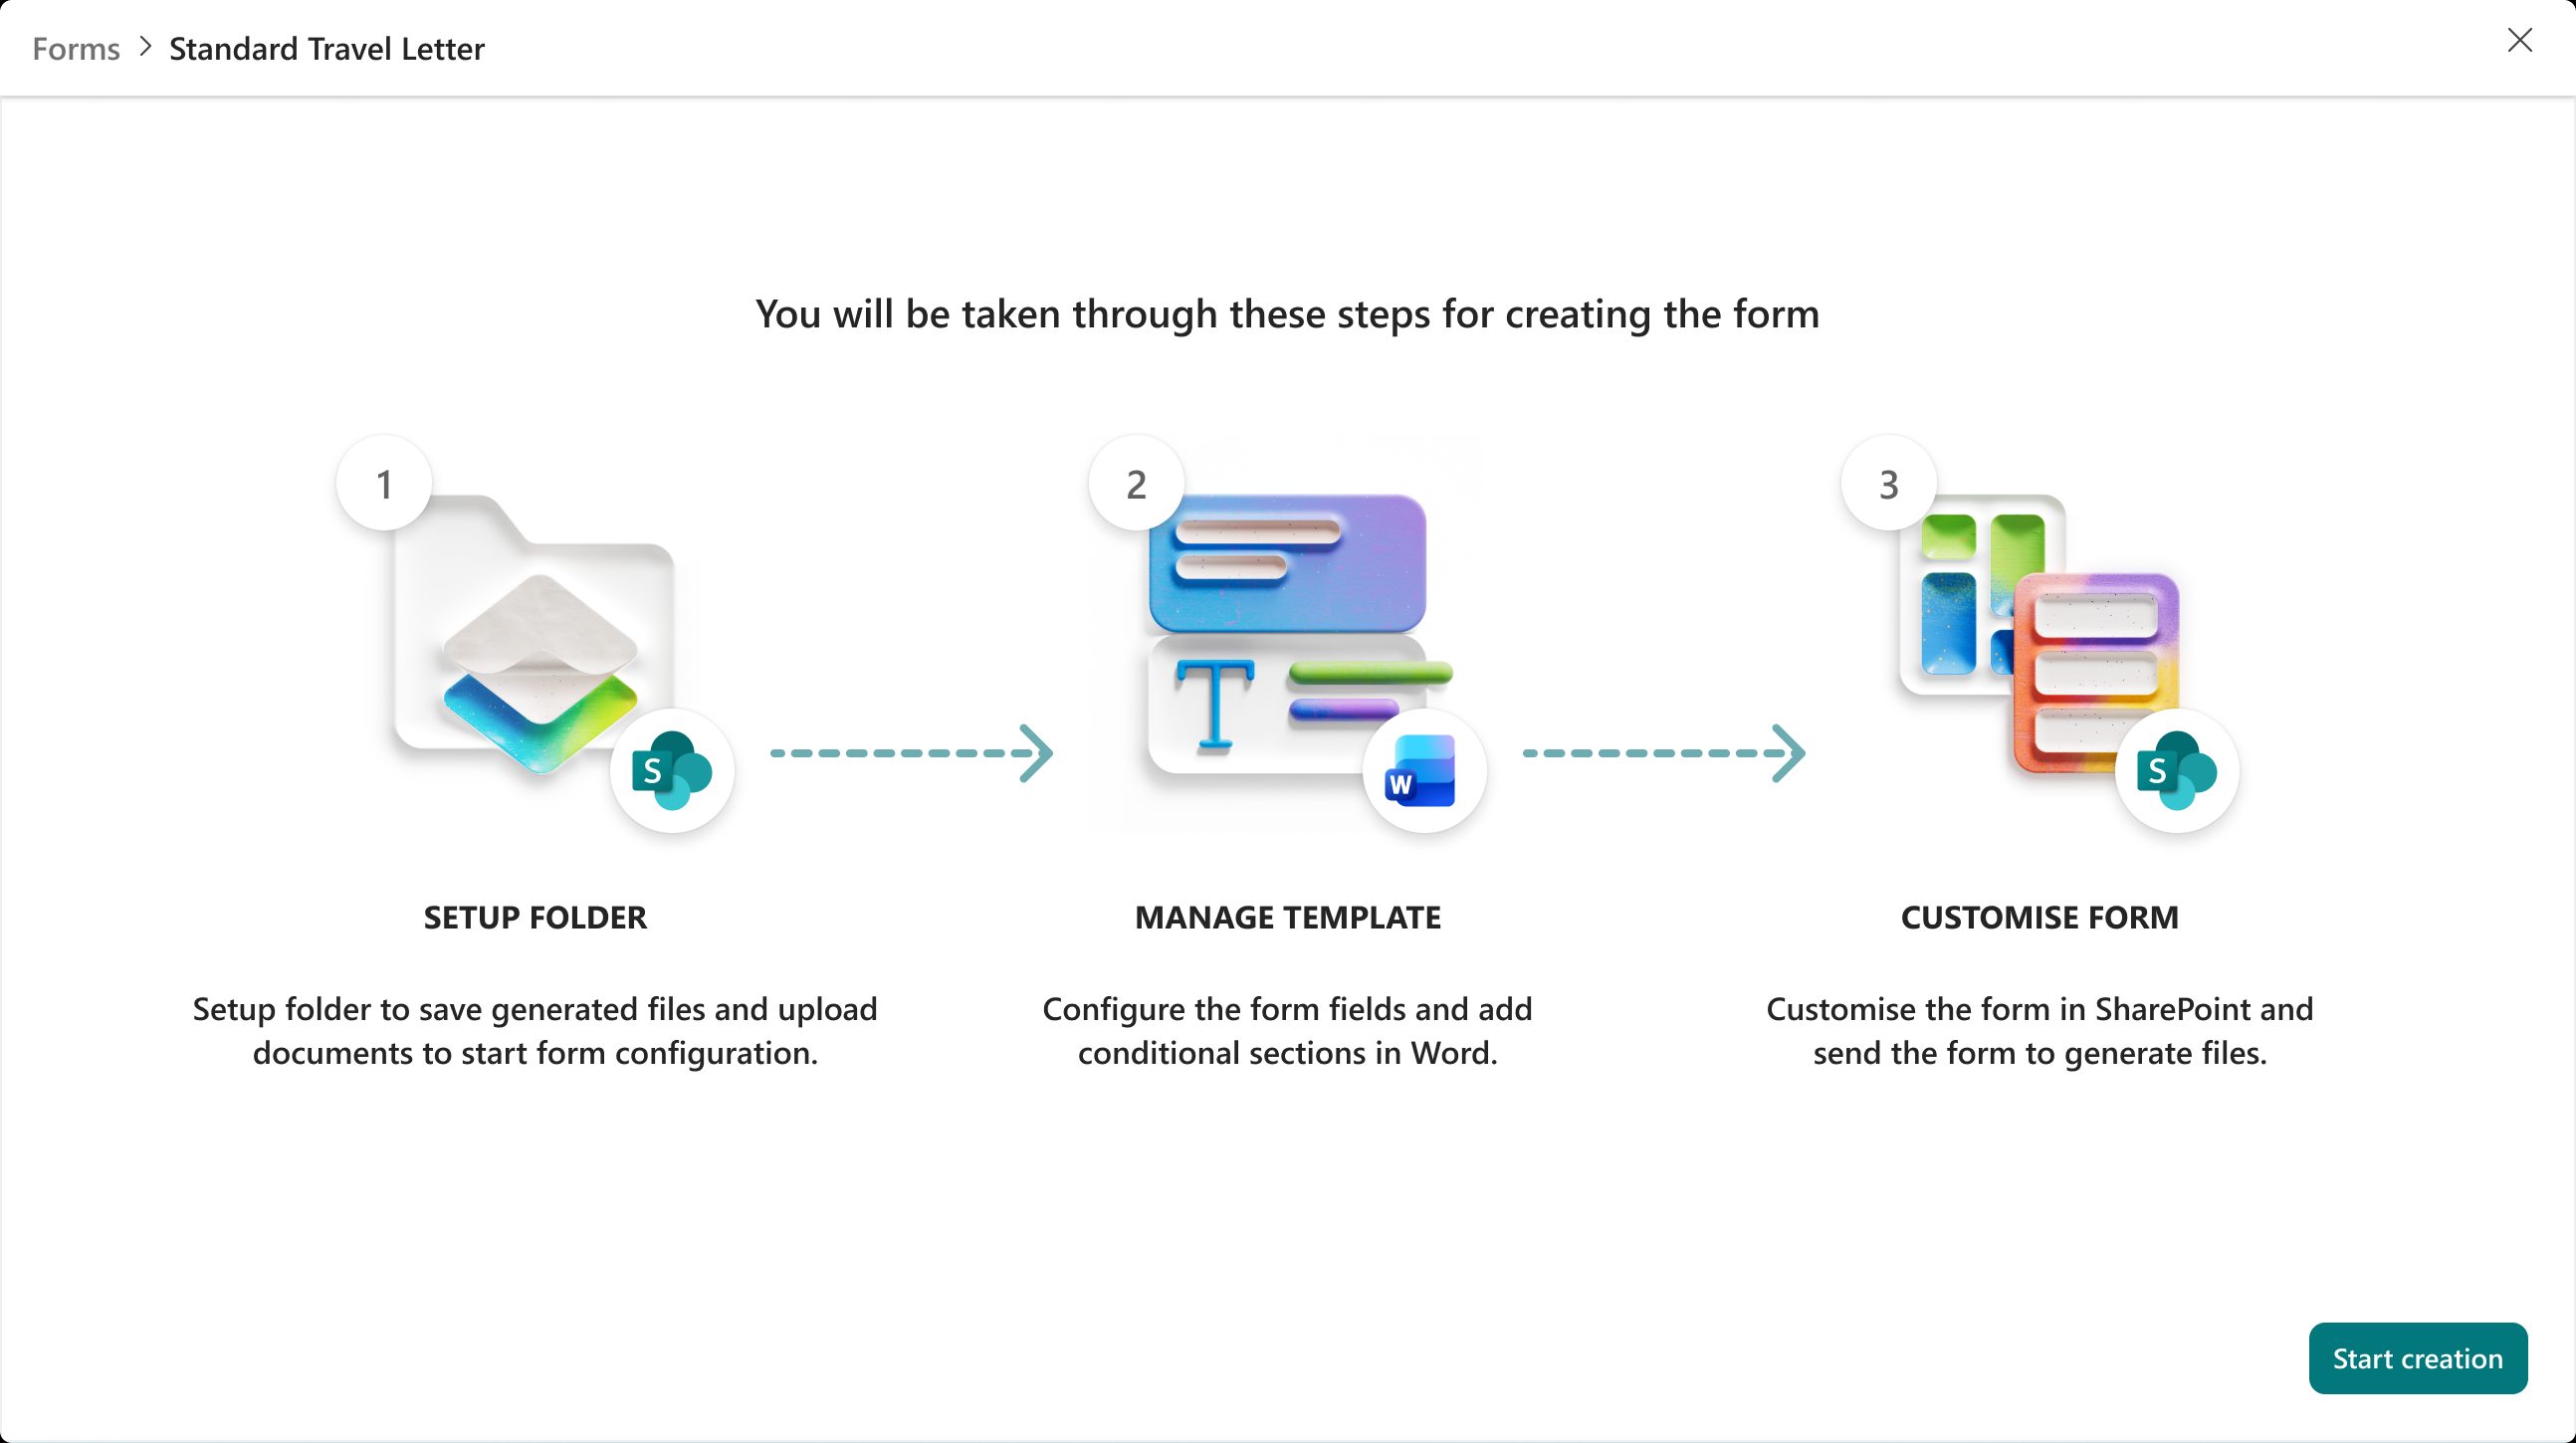
If you're on the document library home page, you're prompted to create a target folder. Each document generated from the form is saved into this folder.
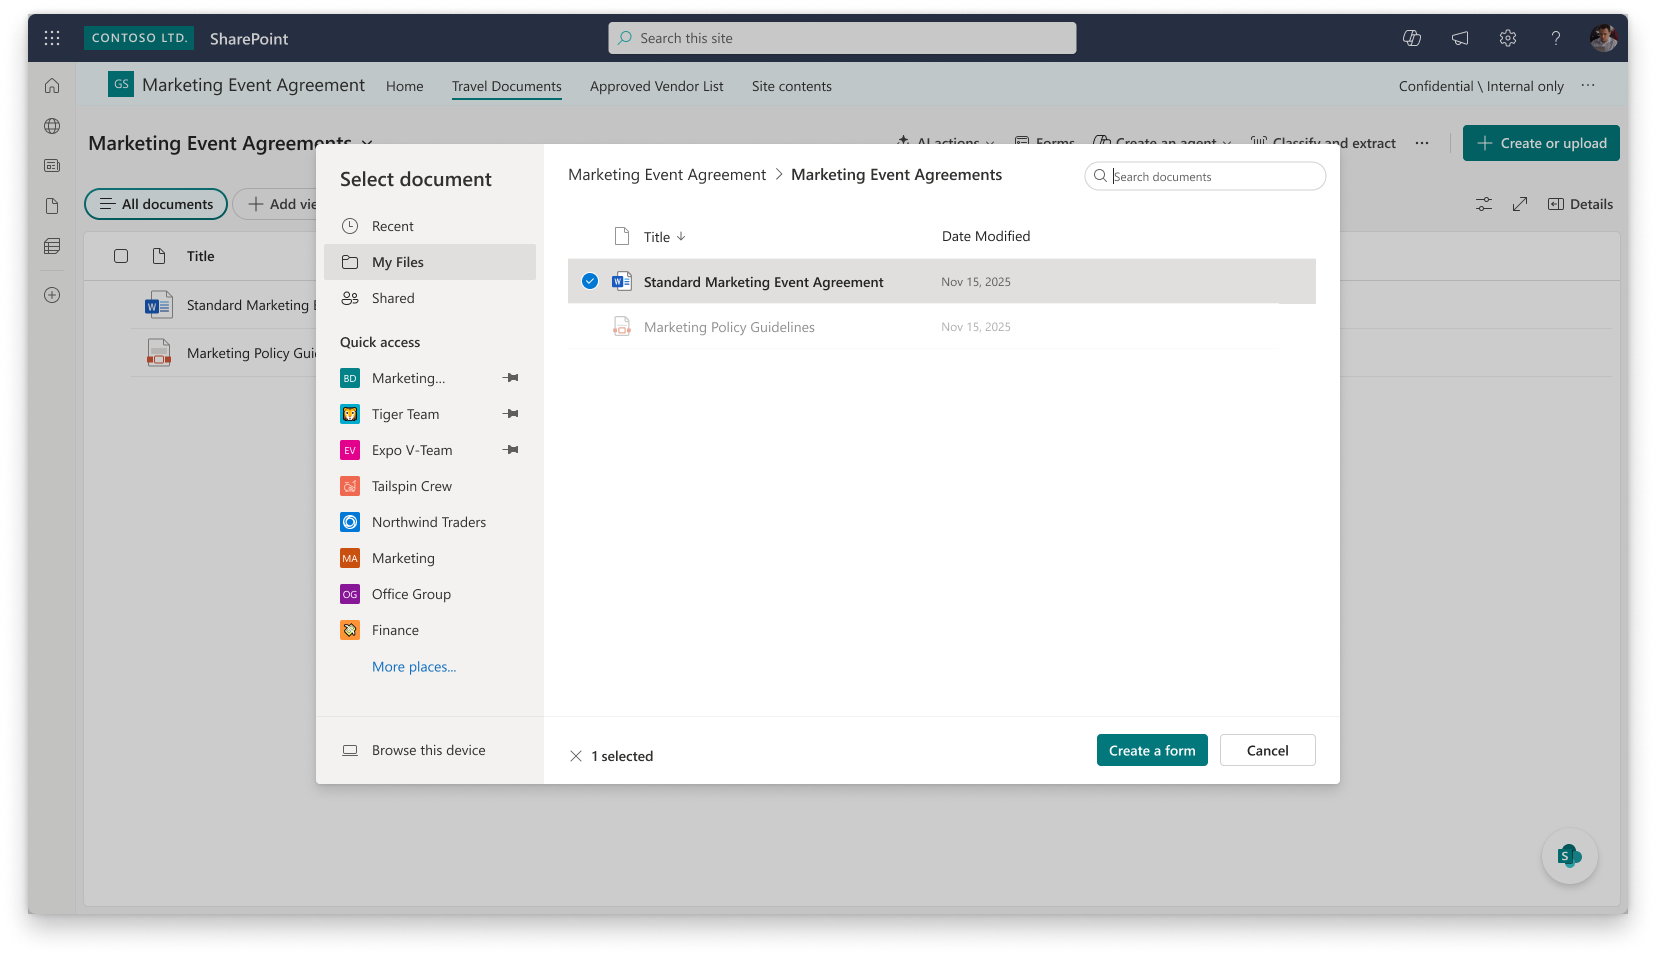
Upload the Word document you want to use as a template. You can select a document from:
- The current SharePoint document library
- A OneDrive location
- Your local device
Tip
It is recommended to upload a Word document with annotated placeholders such as {} or [] for best results.
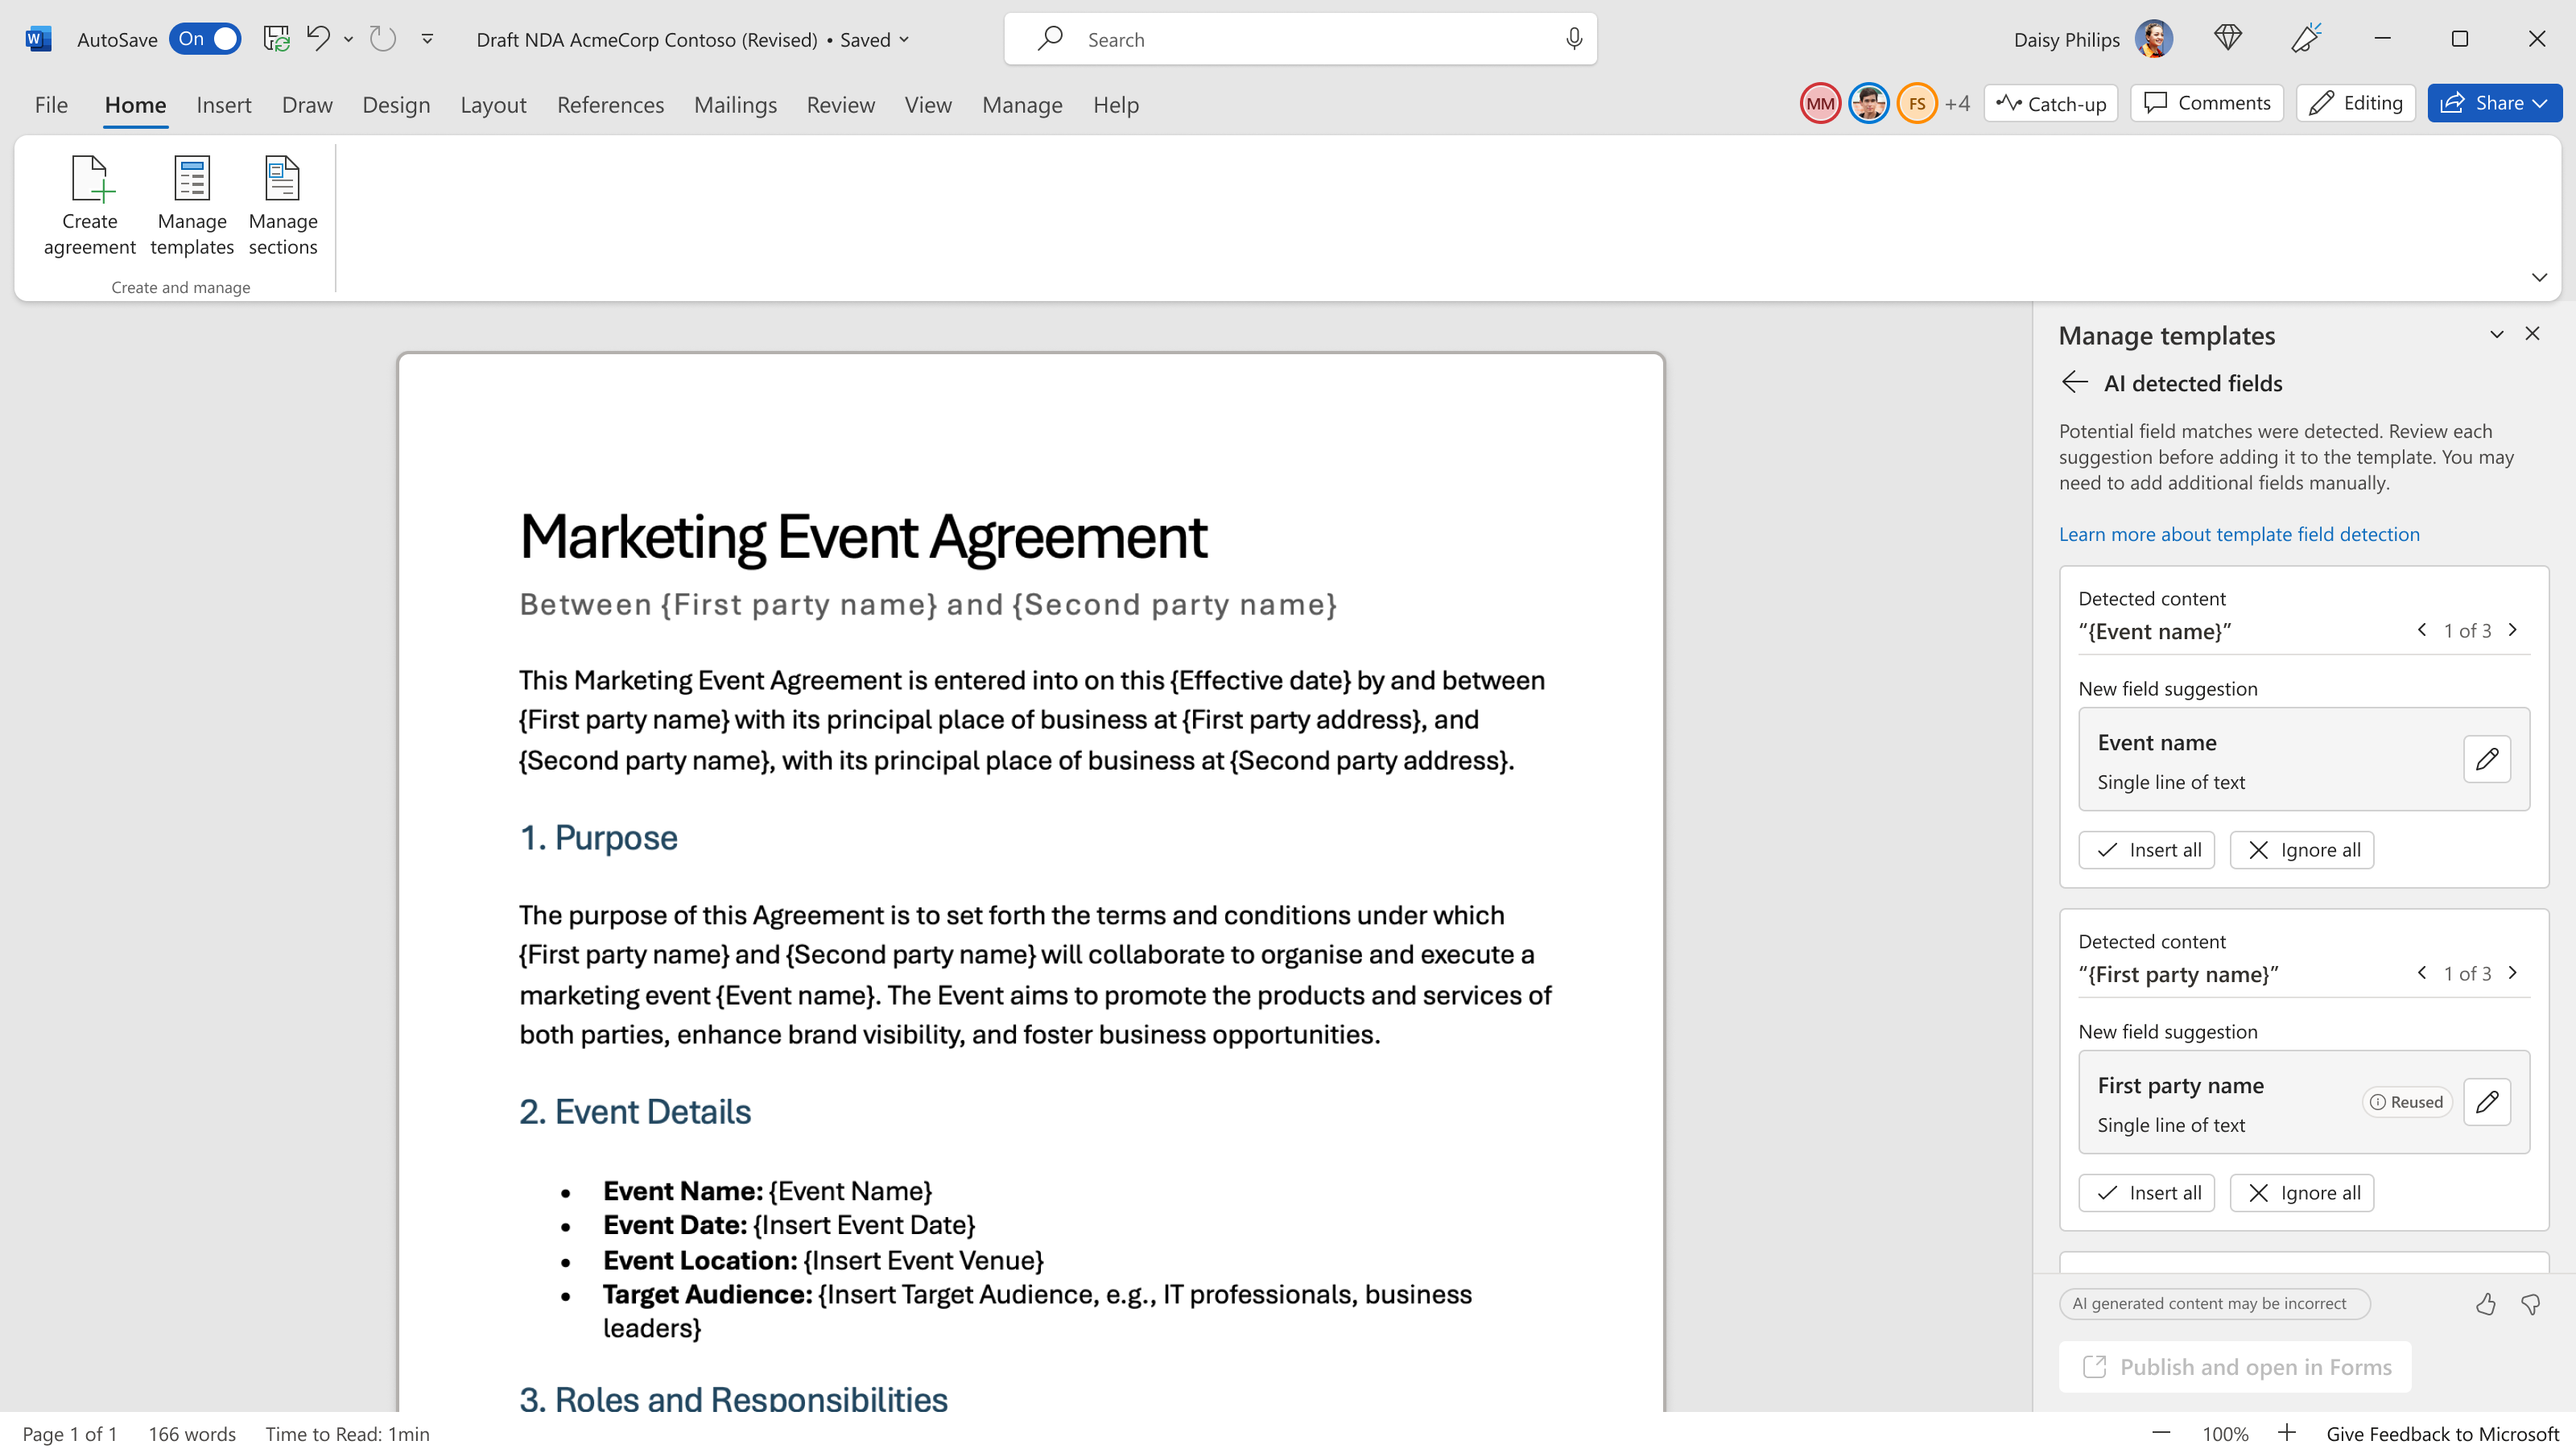
Copilot in SharePoint analyzes the structure of the document and automatically suggests fields—such as names, dates, addresses, and responsibilities—so you don't have to do manual setup.
Note
If you have other forms in the document library, you may see a reused indicator that calls out that this field "Matches an existing column in this site. Saving this field will reuse that column instead of creating a new one." More on this.
Review the suggested fields. You can:
- Confirm which fields are required.
- Refine field names to match your organization's terminology.
- See how each field maps back to locations in the document.
Customise fields section
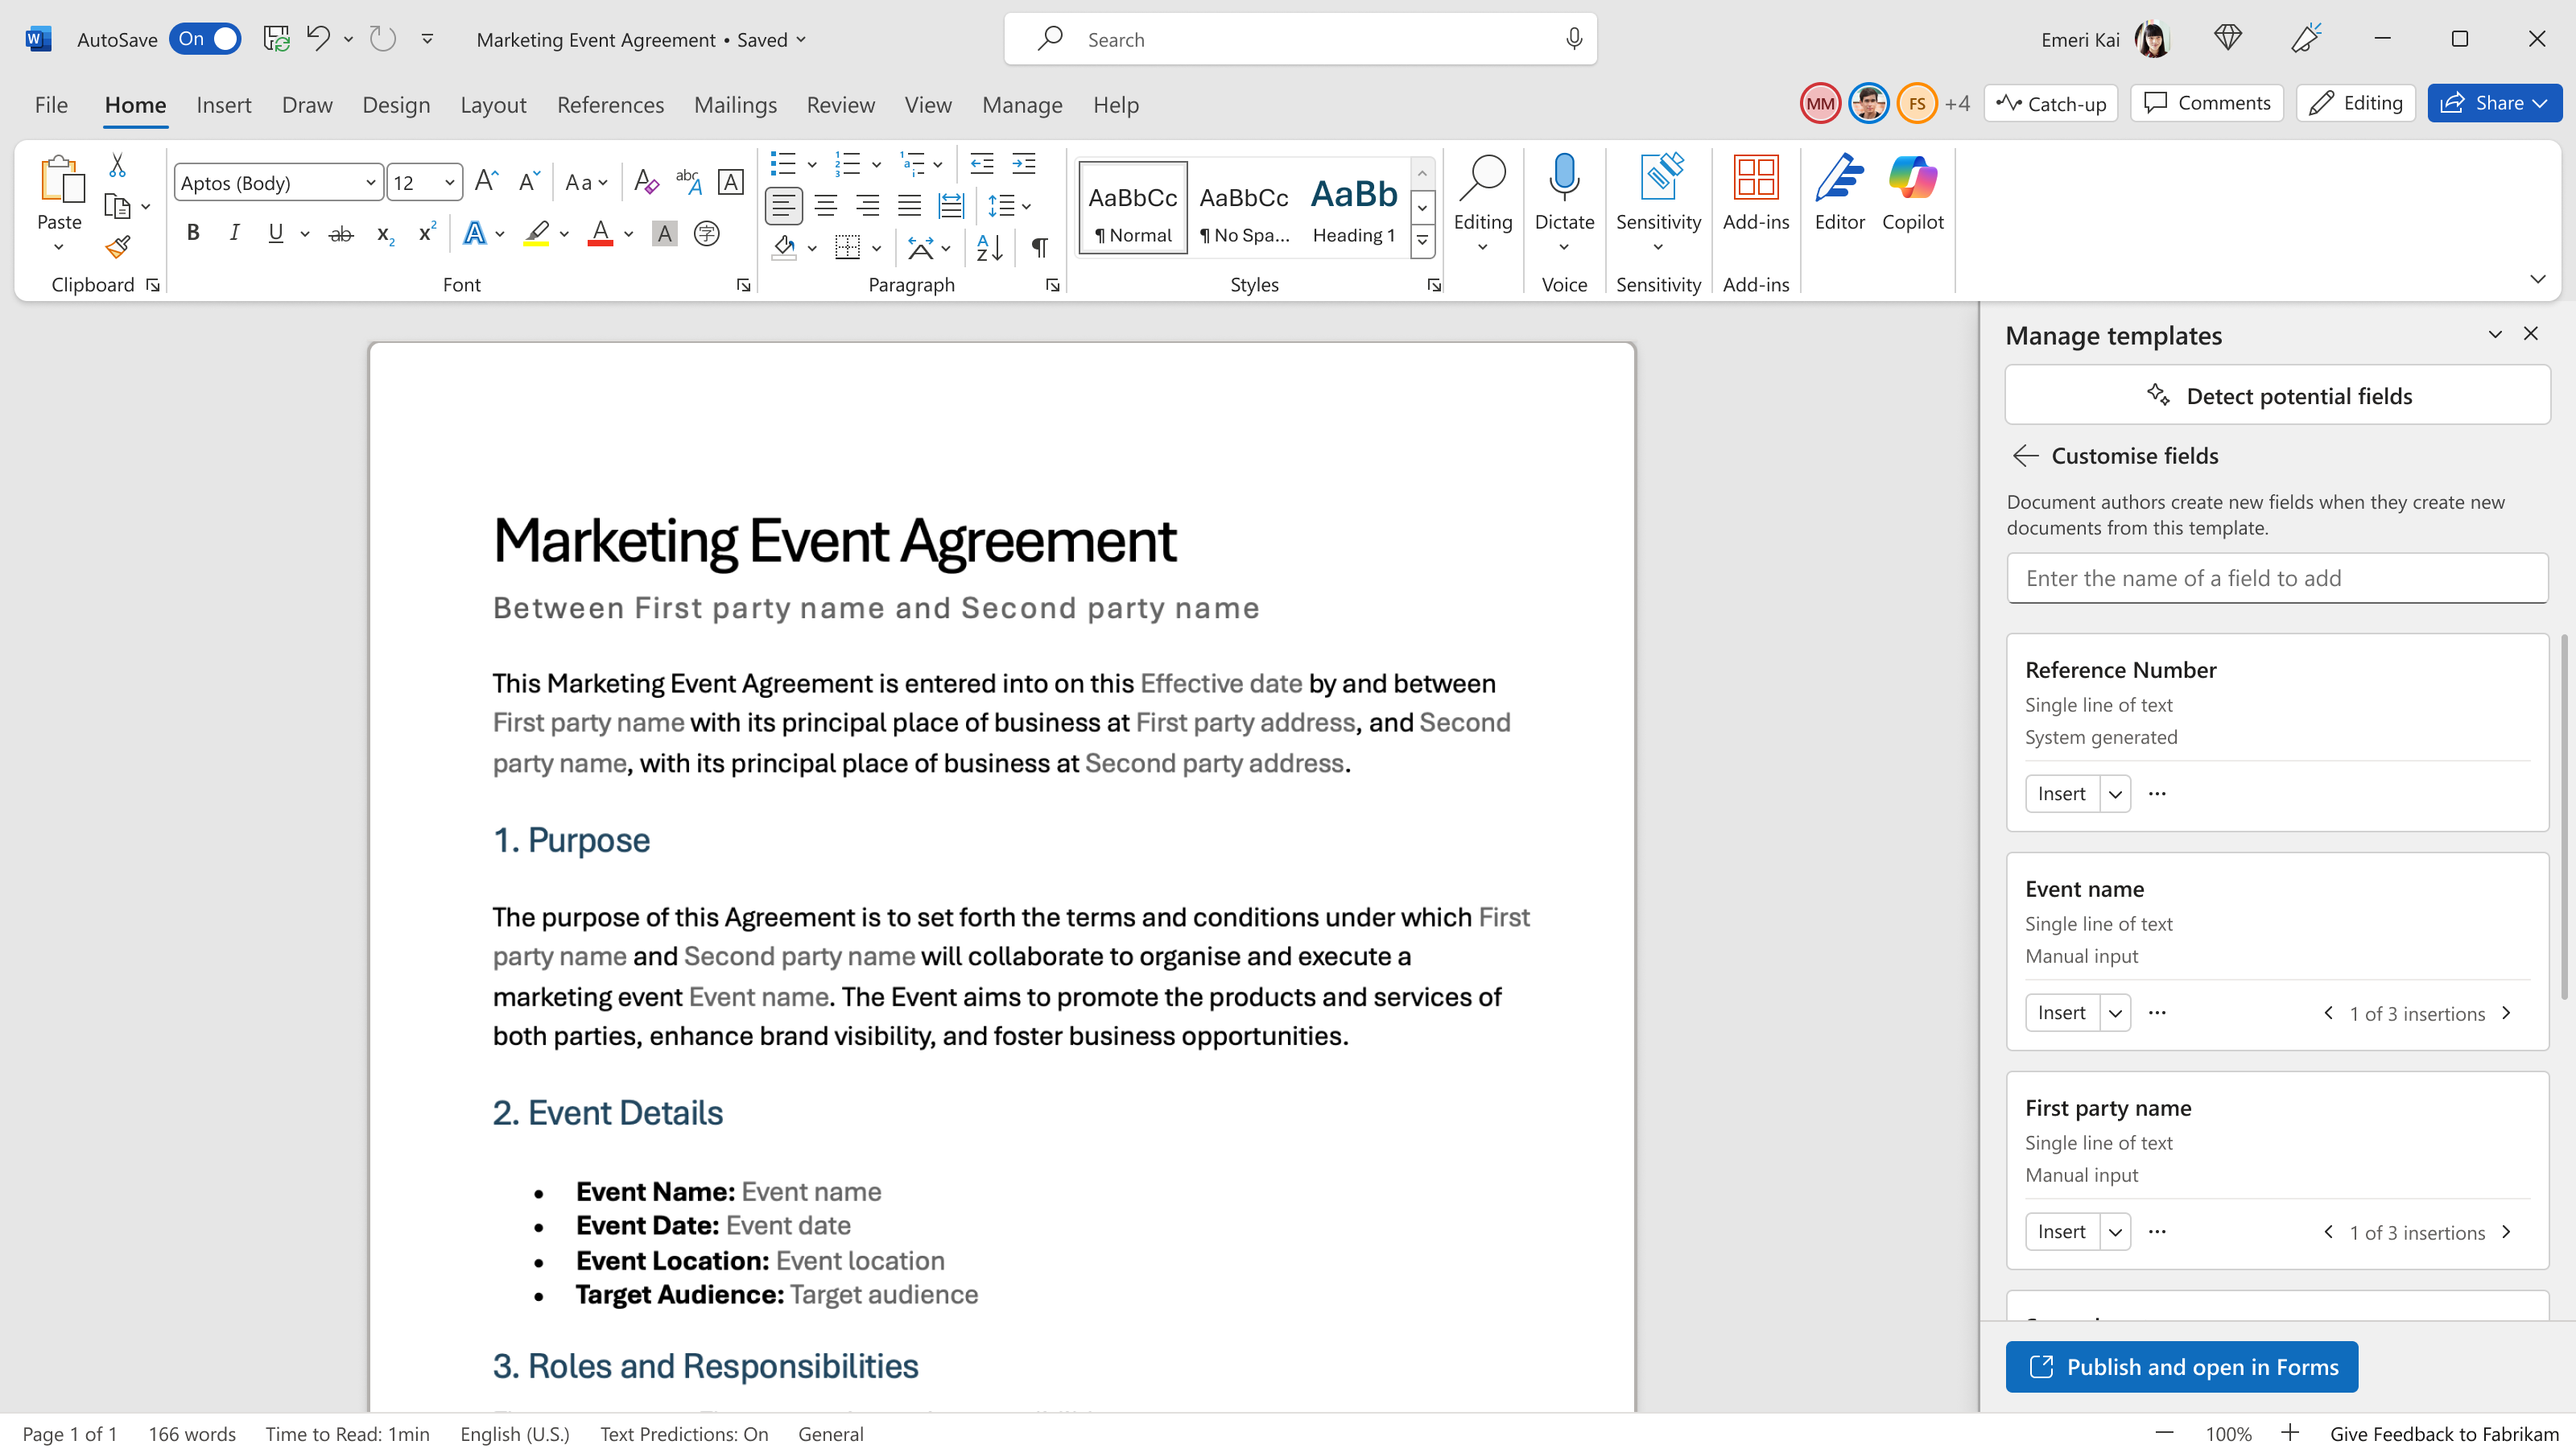
In the Customise fields section, you can:
Use the search pane to look for existing columns to reuse, or add new fields.
Select Detect potential fields to run AI detection on the document content.
Use the Insert dropdown on each field to map it to specific locations in the document.
Select the ... (more options) menu on a field to rename it, change help text, or delete it.
Note
Each field shows the number of insertions in the document (for example, "1 of 3 insertions"), so you can see exactly where values will appear in the generated document.
Configure field details
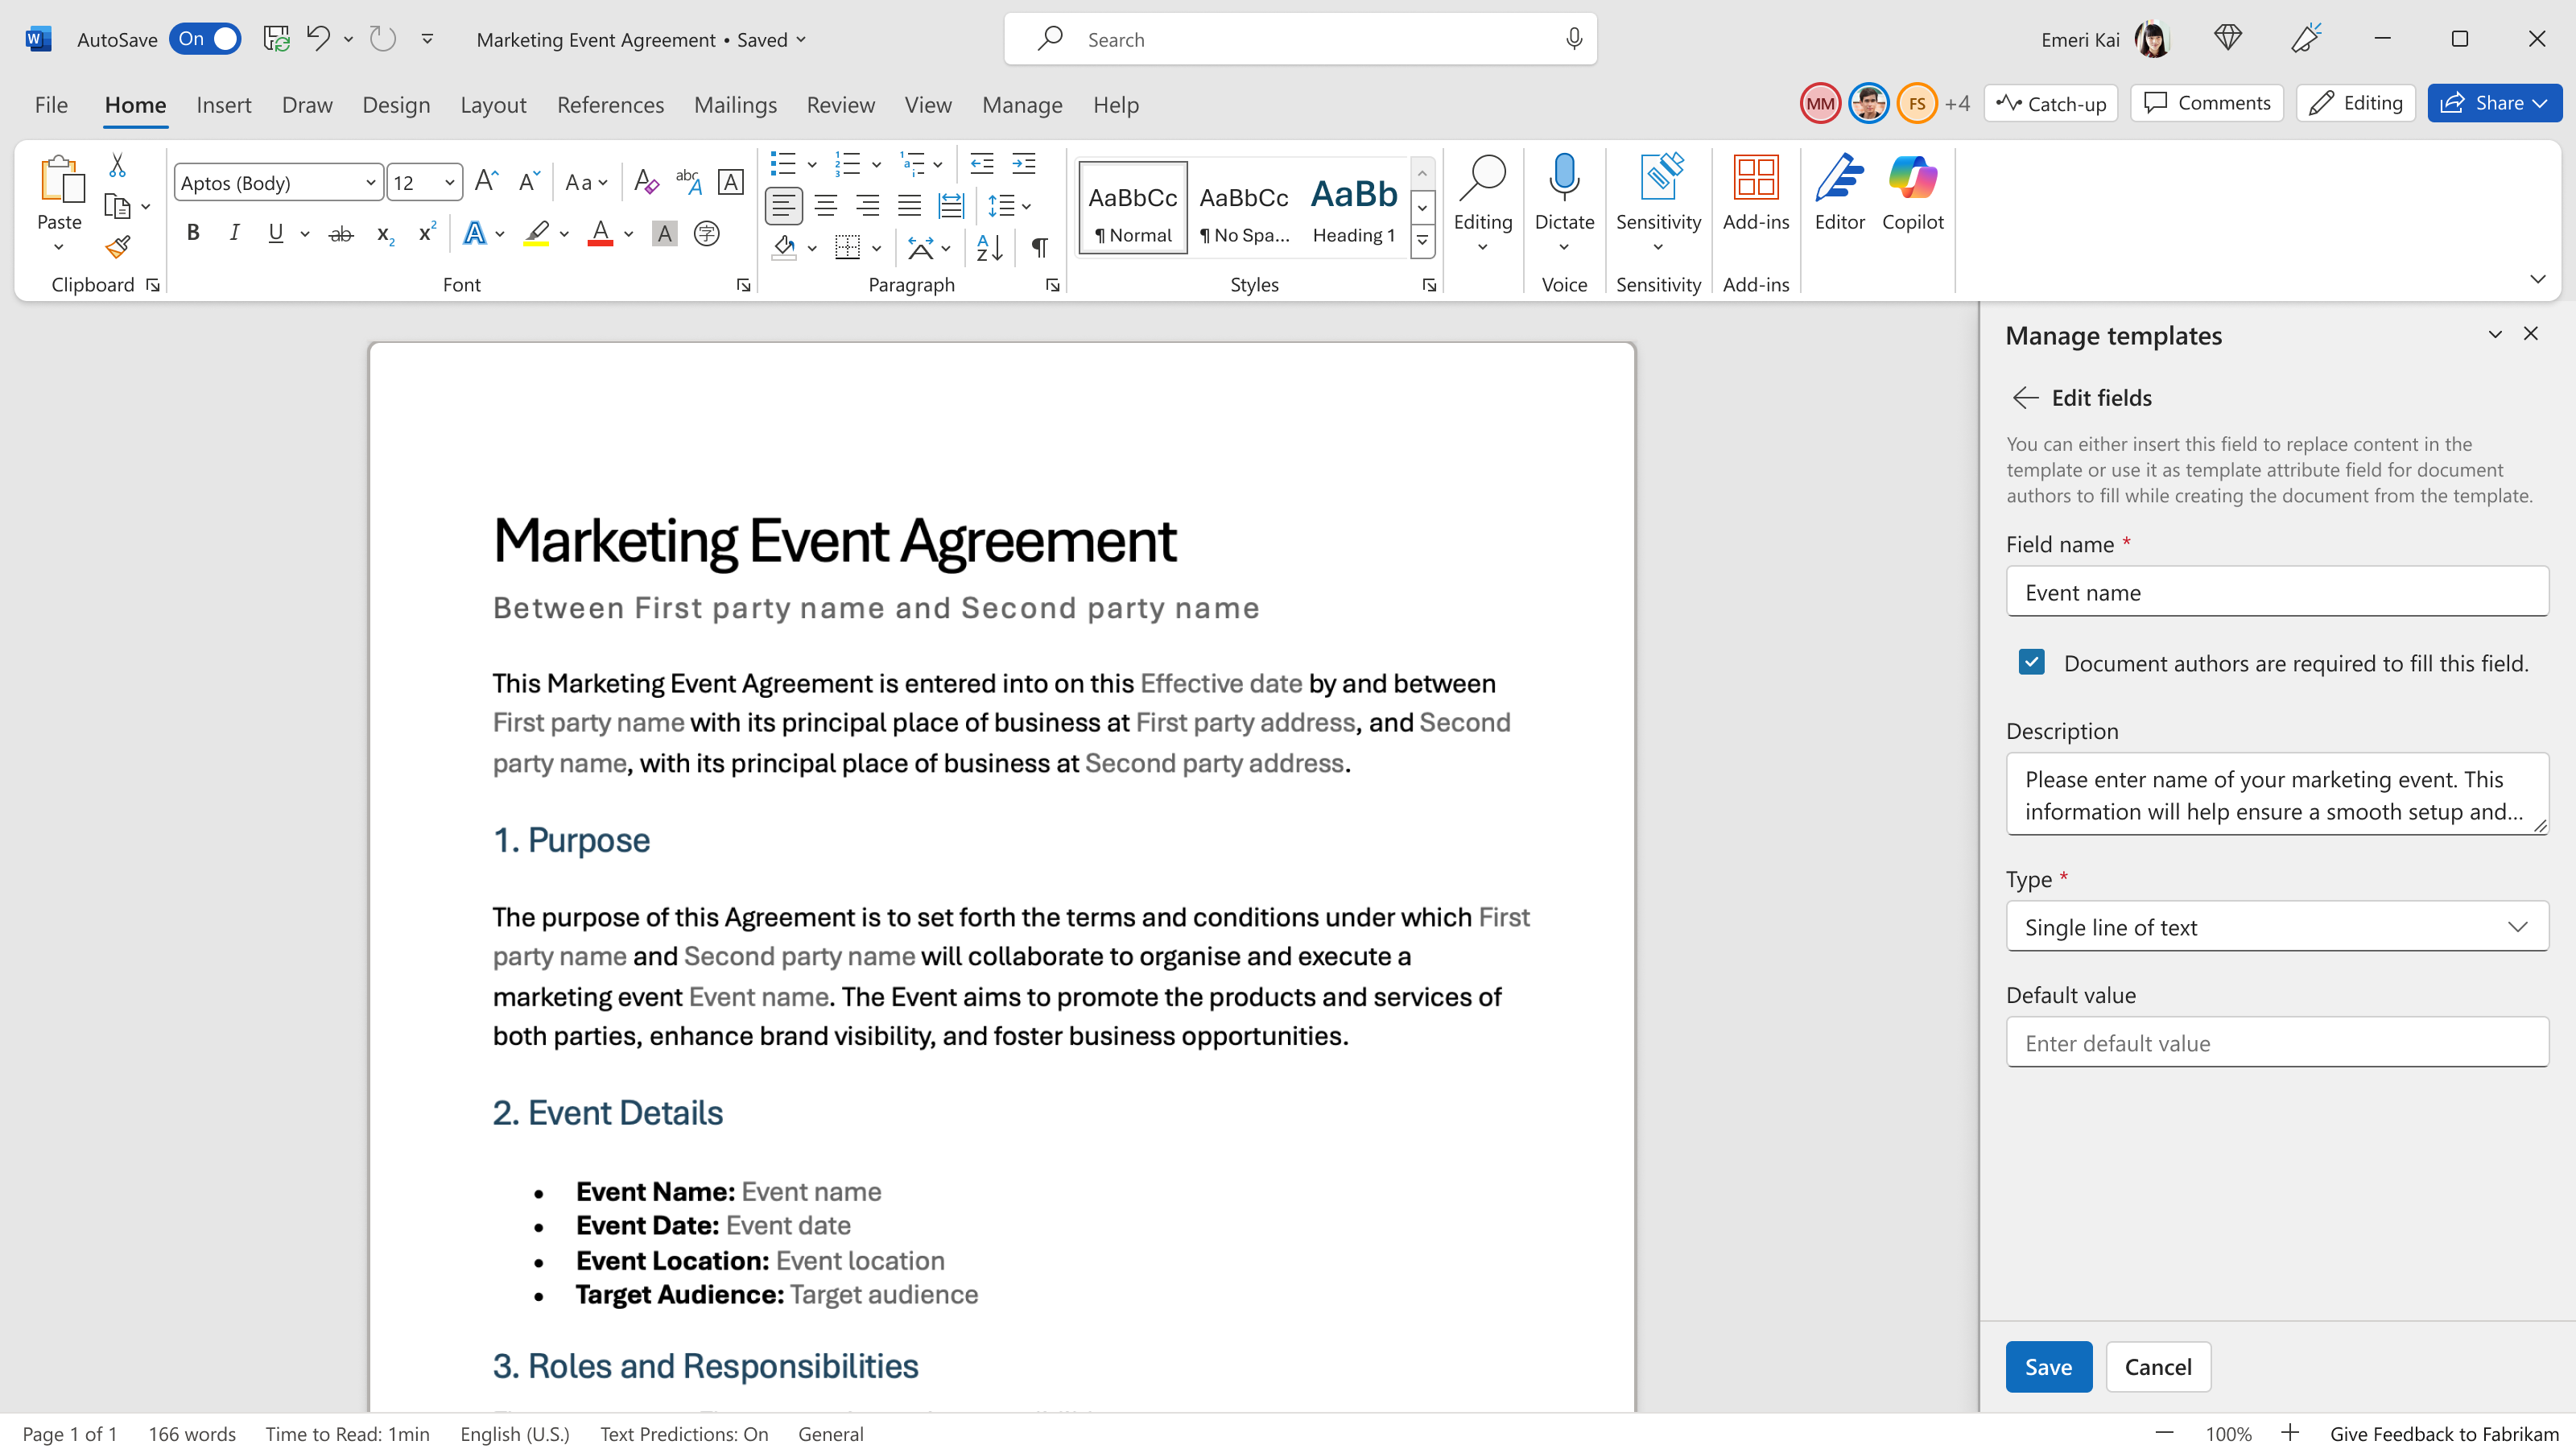
When you create or edit a field, configure the following details:
Field name — Enter a descriptive name for the field.
Description — A free-form text field for summaries or explanatory notes that give additional context about the field.
Required — Select the Document authors are required to fill this field checkbox to make the field mandatory.
Type — Select the data type for the field from the Type dropdown.
Default value — Enter a value that prefills the field on the form, so submitters can accept it as-is or change it before submitting.
Reuse fields across forms
If other forms already exist in the same document library, you can reuse an existing field instead of creating a duplicate one. When adding a field, use the search bar to find matching columns in the library—you'll see each match along with its data type—and choose whether to reuse an existing column or create a new one.
Reusing a field means multiple forms share the same underlying library column, so it appears only once in the library view. This eliminates duplicate columns (such as several "Contractor Name" fields), keeps your library schema clean, and ensures consistent metadata across every form.
When a column is shared by more than one form, its name and data type are locked and can only be changed through SharePoint column settings, not from the form. Form-specific properties such as help text and the required checkbox remain editable per form. If you need a different data type for a shared field, the system warns you and, if you proceed, creates a new "forked" column—leaving the original unchanged for other forms. Deleting a shared field removes it only from the current form; once just one form uses it, the field becomes fully editable again.
Supported field types
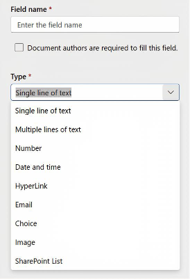
The following field data types are supported:
- Single line of text — A short text input for names, titles, or brief descriptions.
- Multiple lines of text — A longer text input for detailed content such as responsibilities or clauses.
- Number — A numeric input for quantities, amounts, or identifiers.
- Currency — Stores monetary values with currency formatting and precision for financial calculations.
- Date and time — A date picker for selecting dates or date and time values.
- Hyperlink — A URL input for linking to external resources or references.
- Email — An email address input field.
- Choice — A dropdown selection from predefined options.
- Image — An image field for inserting logos, signatures, or other visual content into the document.
- SharePoint List — A lookup field that references values from a column in a SharePoint list.
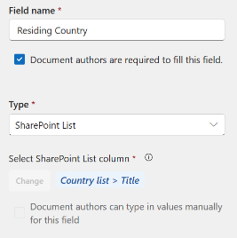
When you select SharePoint List as the field type, you're prompted to select the SharePoint list column to associate with the field. You can also select the Document authors can type in values manually for this field option to allow form submitters to enter values directly in addition to selecting from the list.
Set up conditional sections
You can define business rules as conditional logic and map them to multiple sections in the document. Conditional sections let you control which parts of the generated document are included based on the values that form submitters enter.
For example, a legal agreement might include country-specific clauses that only appear when the submitter selects a particular country.
To set up a conditional section:
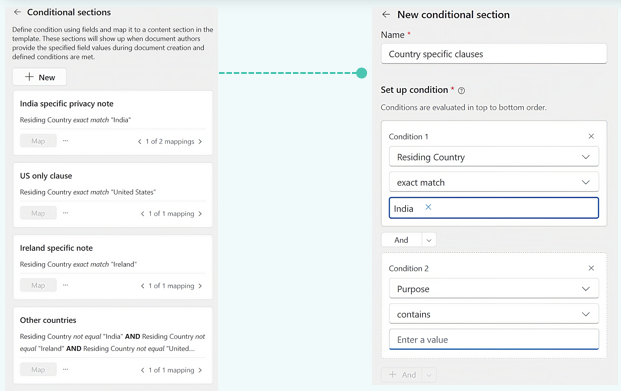
Open the template document. In the Manage templates pane, go to Conditional sections and select + New.
Enter a Name for the conditional section, such as "Country specific clauses".
Under Set up condition, configure one or more conditions. The system evaluates conditions in top-to-bottom order. For each condition:
- Select the field to evaluate, such as "Residing Country".
- Select the matching rule, such as exact match or contains.
- Enter the value to match against.
To add multiple conditions, select And or Or to combine them.
Select Map to associate the conditional section with one or more sections in the document content.
Note
You can create multiple conditional sections, each with different rules. For example, you might have separate conditions for "India specific privacy note," "US only clause," and "Other countries," each mapped to different sections of the document.
When you're finished configuring fields and conditional sections, select Publish and open in Forms at the bottom of the pane. Word closes the template and transitions to the form view in SharePoint. A loading indicator shows "Closing template and opening form" during the transition.
Customize the form
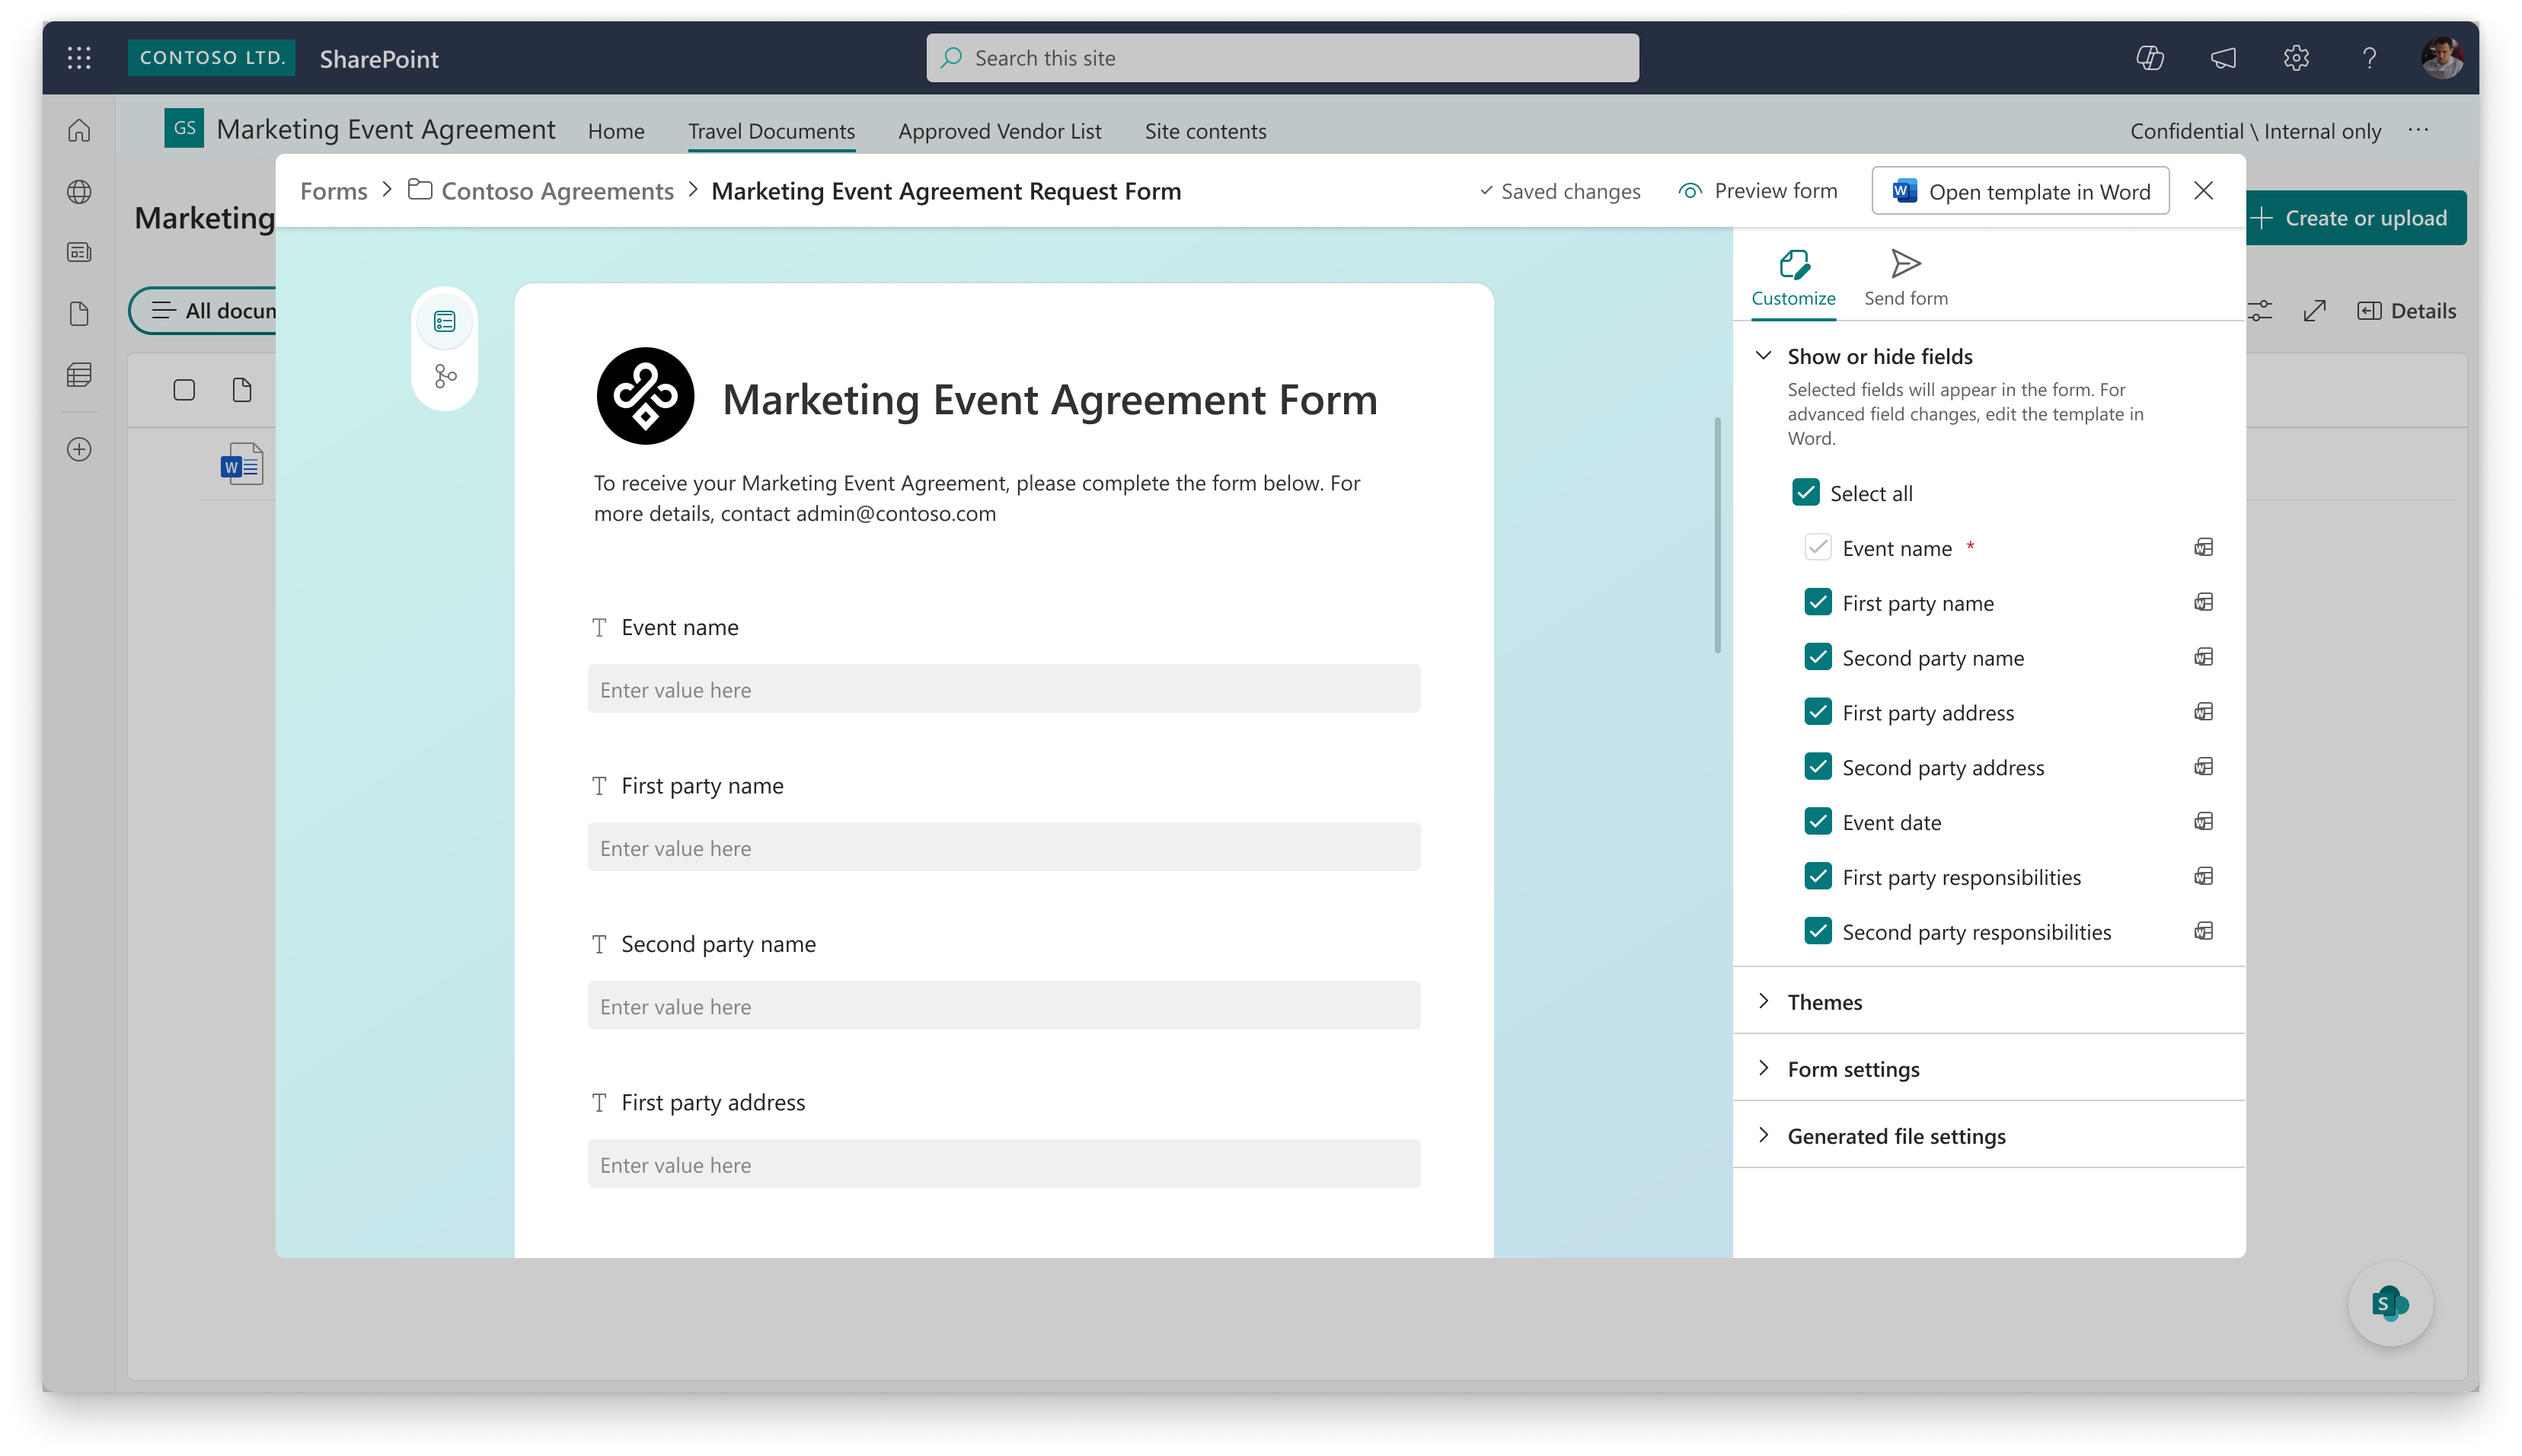
After you publish the template, the form opens in SharePoint with a customization pane on the right side. The pane has two tabs: Customize and Send form.
Show or hide fields
On the Customize tab, the Show or hide fields section lists all fields from the template with a checkbox for each one. Selected fields appear in the form. Clear the checkbox for any field you don't want to show to form submitters.
Note
For advanced field changes, edit the template in Word. The Show or hide fields section controls field visibility only.
Themes and settings
Expand the Themes section to change the visual appearance of the form.
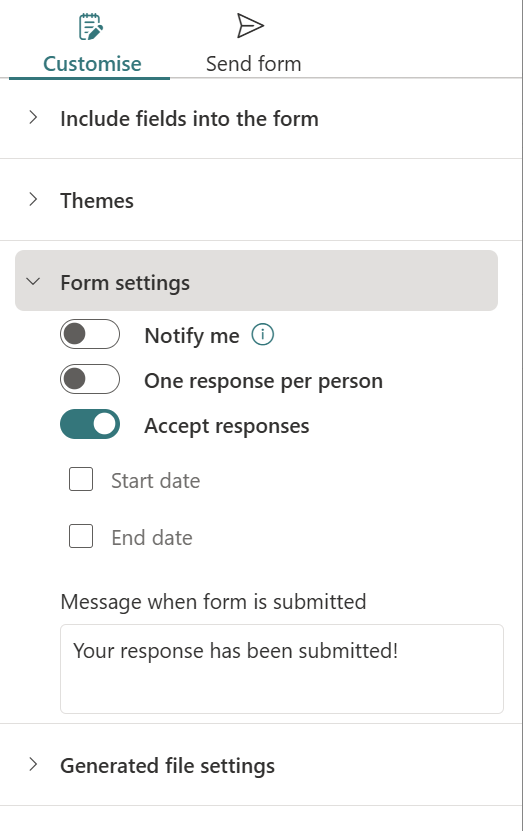
Expand the Settings section to configure form-level options:
Notify me — Toggle to receive a notification when a form is submitted.
One response per person — Toggle to limit each user to a single form submission.
Accept responses — Toggle to start or stop accepting form submissions.
Message when form is closed — Customize the message displayed to users when the form is no longer accepting responses (default: "We're not accepting responses at the moment.").
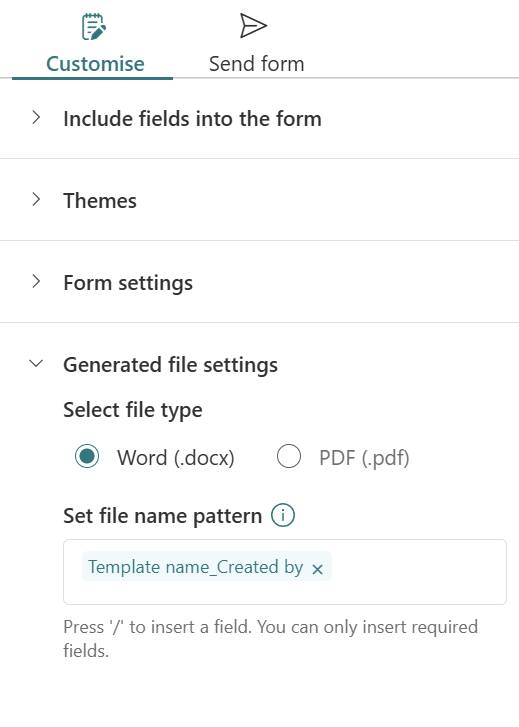
Expand the Generated file settings section to control the output format and naming of the documents the form produces.
Select file type — Choose the format for the generated document: Word (.docx) or PDF (.pdf).
Set file name pattern — Define how generated files are named by combining fields and text (for example, "Template name_Created by"). Press / to insert a field; only required fields can be inserted.
Share the form link
After you publish the form, share the form link so users in your organization can submit forms and generate documents.
Select the Send form tab in the customization pane to access the form link.
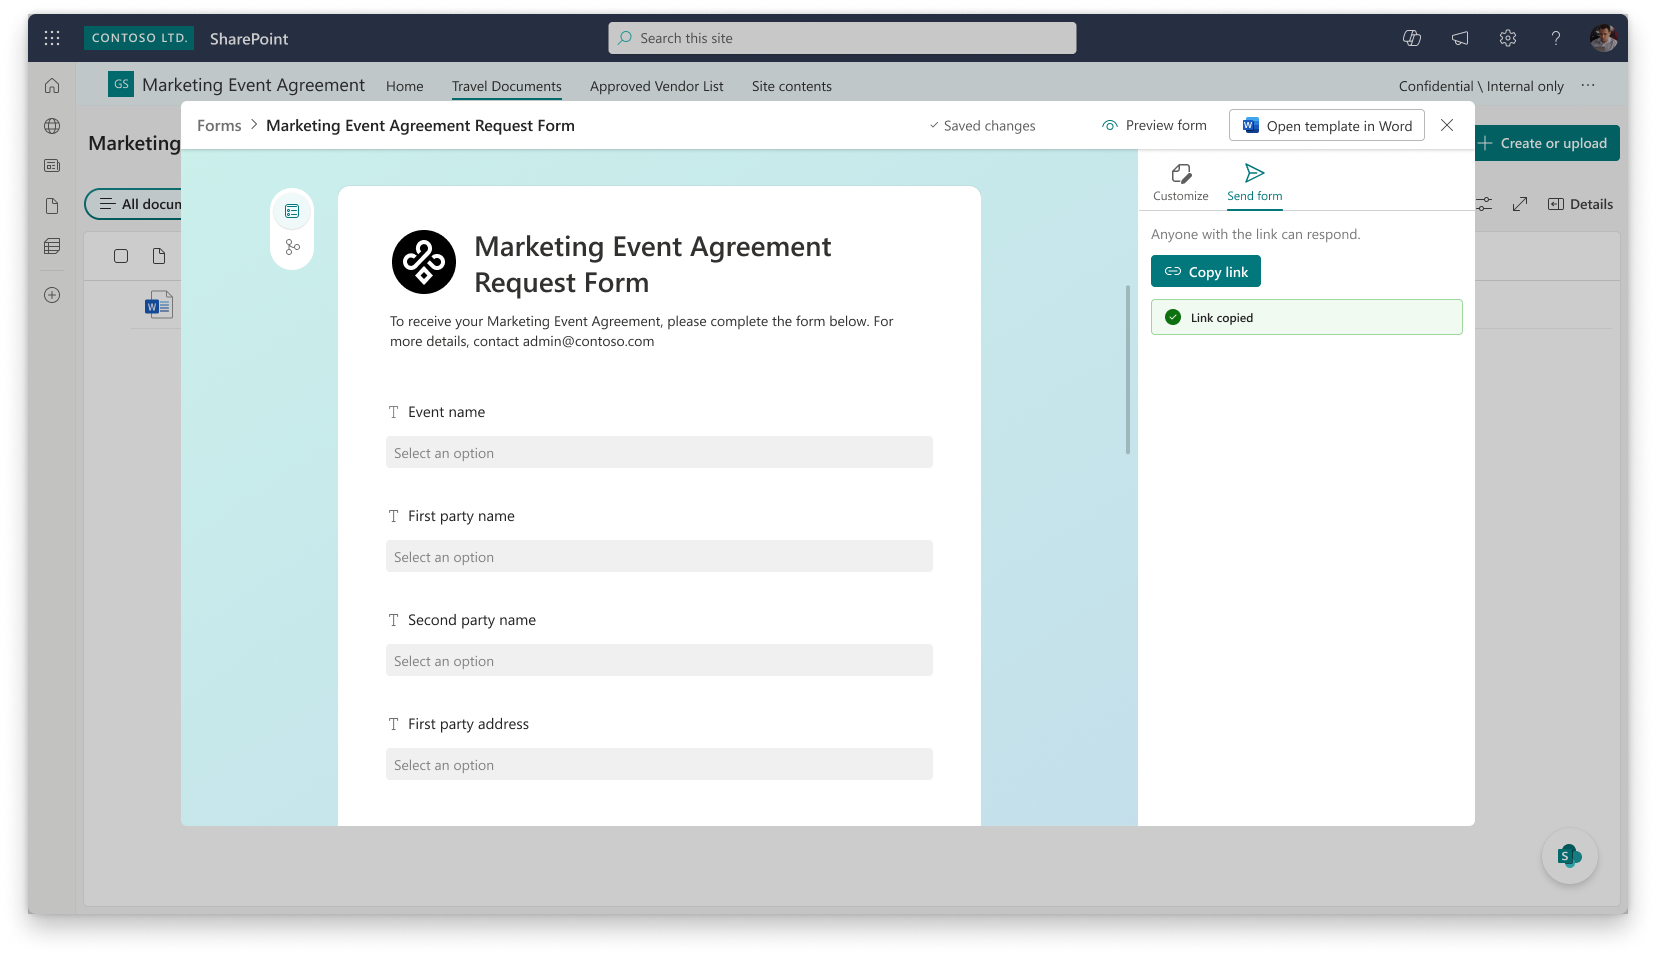
Copy the form link and distribute it through any collaboration channel:
- Microsoft Teams
- Outlook
- SharePoint agents
- SharePoint site pages
Tip
You can embed the form link directly on a SharePoint site page so that users can find and access it alongside other resources on your internal sites.
The form link is persistent—it stays the same URL even when you update and republish the template. Form submitters always see the latest published version.
Fill out and submit a form
Content consumers use the shared form link to generate documents.
Open the form link from the location where you shared it—for example, a SharePoint site page, a Teams message, or an email. A simple form opens in the browser.
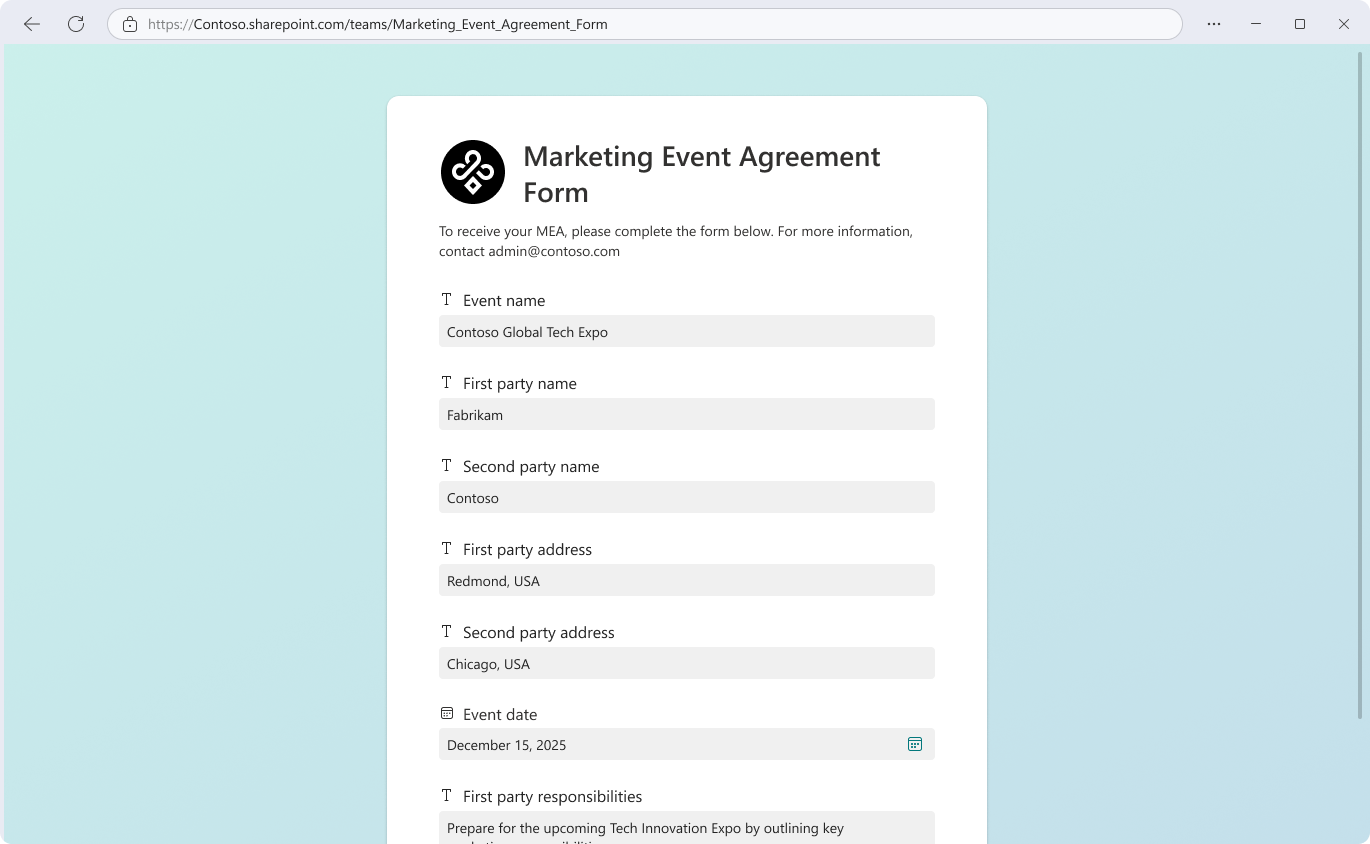
Fill in the requested fields, such as event details, vendor information, roles, responsibilities, and key dates. Each field shows its data type with an icon. Required fields are clearly indicated.
Select Submit to generate the document.
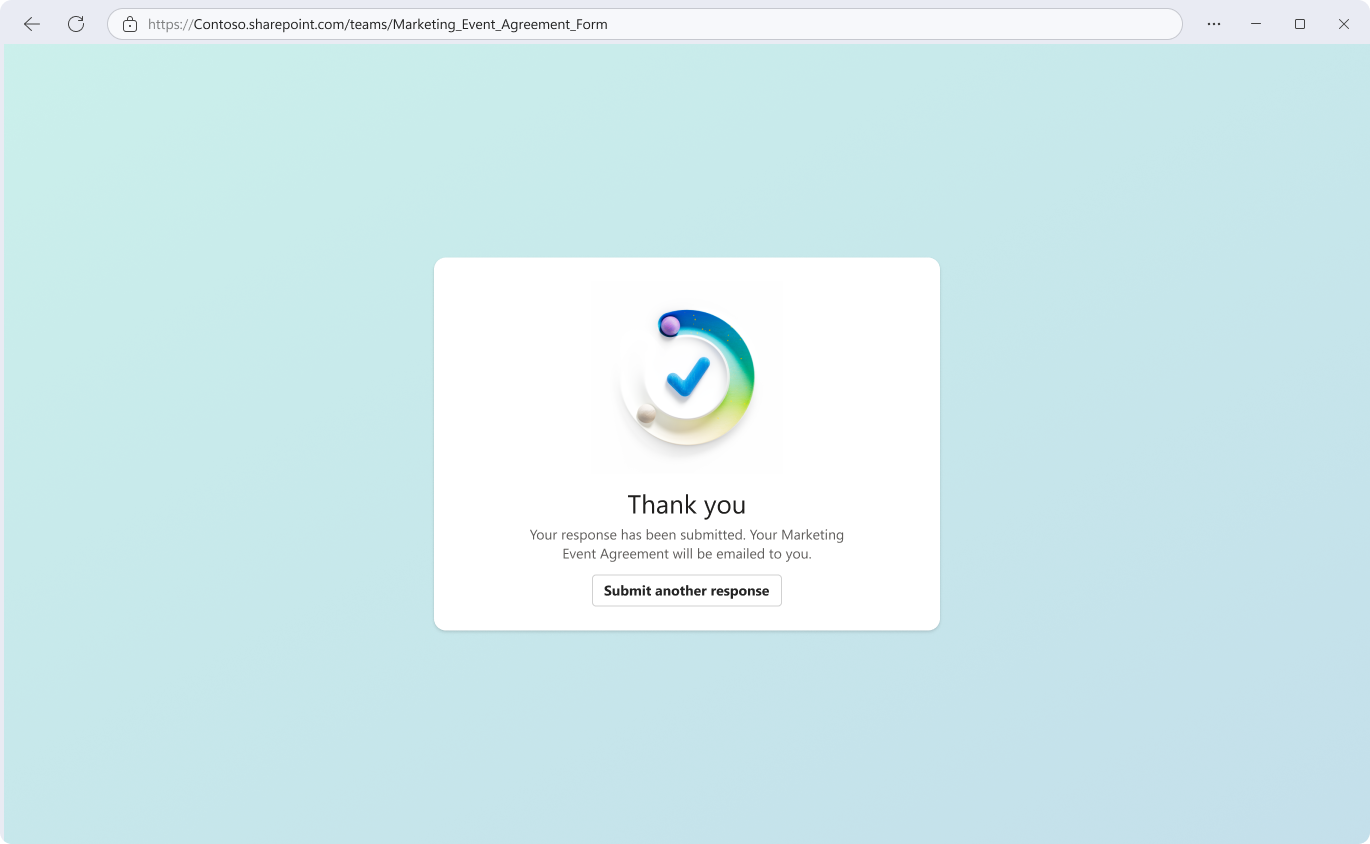
The system generates a professionally formatted document using the approved template. The field placeholders in the template are replaced with the values you entered—no copying, no manual edits.
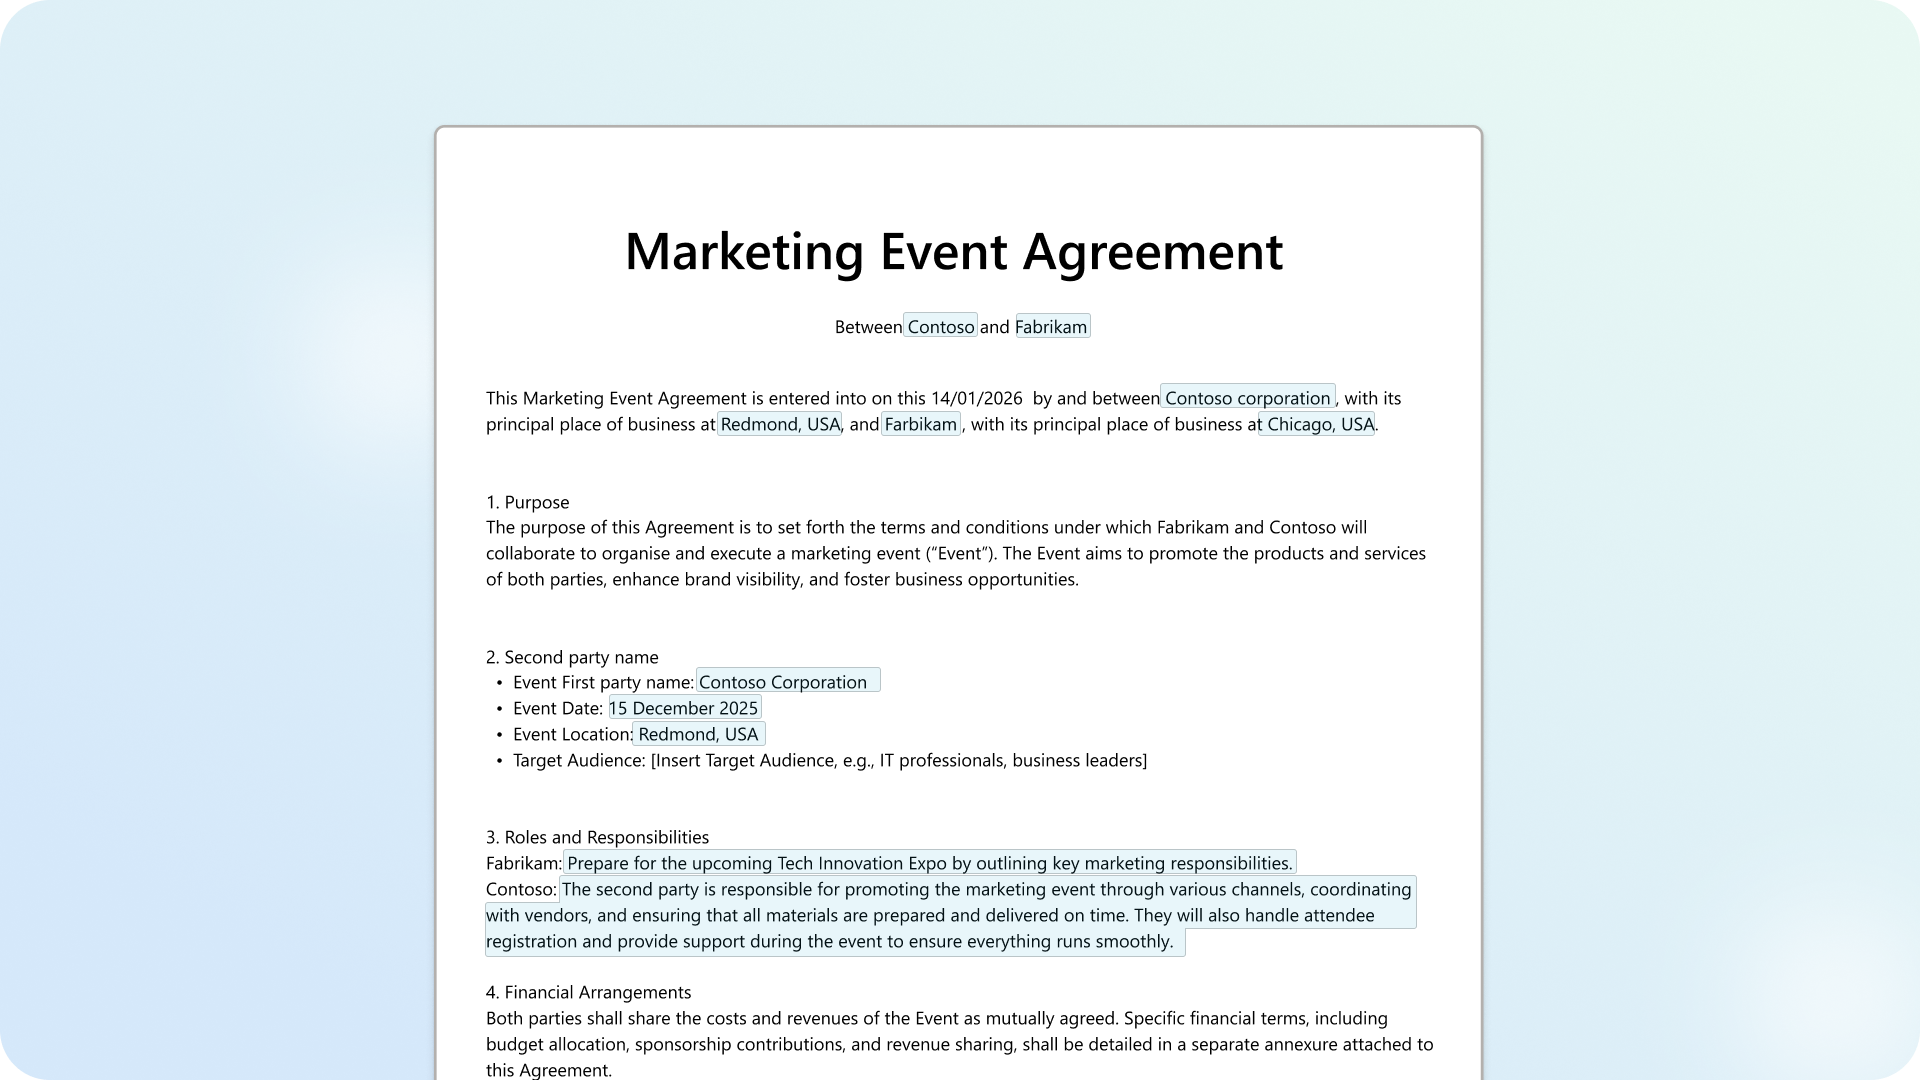
Behind the scenes, the generated document lands in the governed SharePoint library configured by the form creator, with metadata automatically captured from the form submission.
Note
You don't need access to the destination document library to submit the form. You only need access to view the generated document afterward.
Manage generated documents
Each form submission generates a new document that's stored in the SharePoint library where you configure the form. To view generated documents:
Go to the SharePoint document library where you set up the form.
Open the folder that's linked with the form. Each generated document is stored here with the submitted values merged into the template.
Review the document metadata. Because the form captures rich, structured metadata from each submission, the library columns automatically populate with the field values - such as names, dates, and other details - making it easy to sort, filter, and search across generated documents.
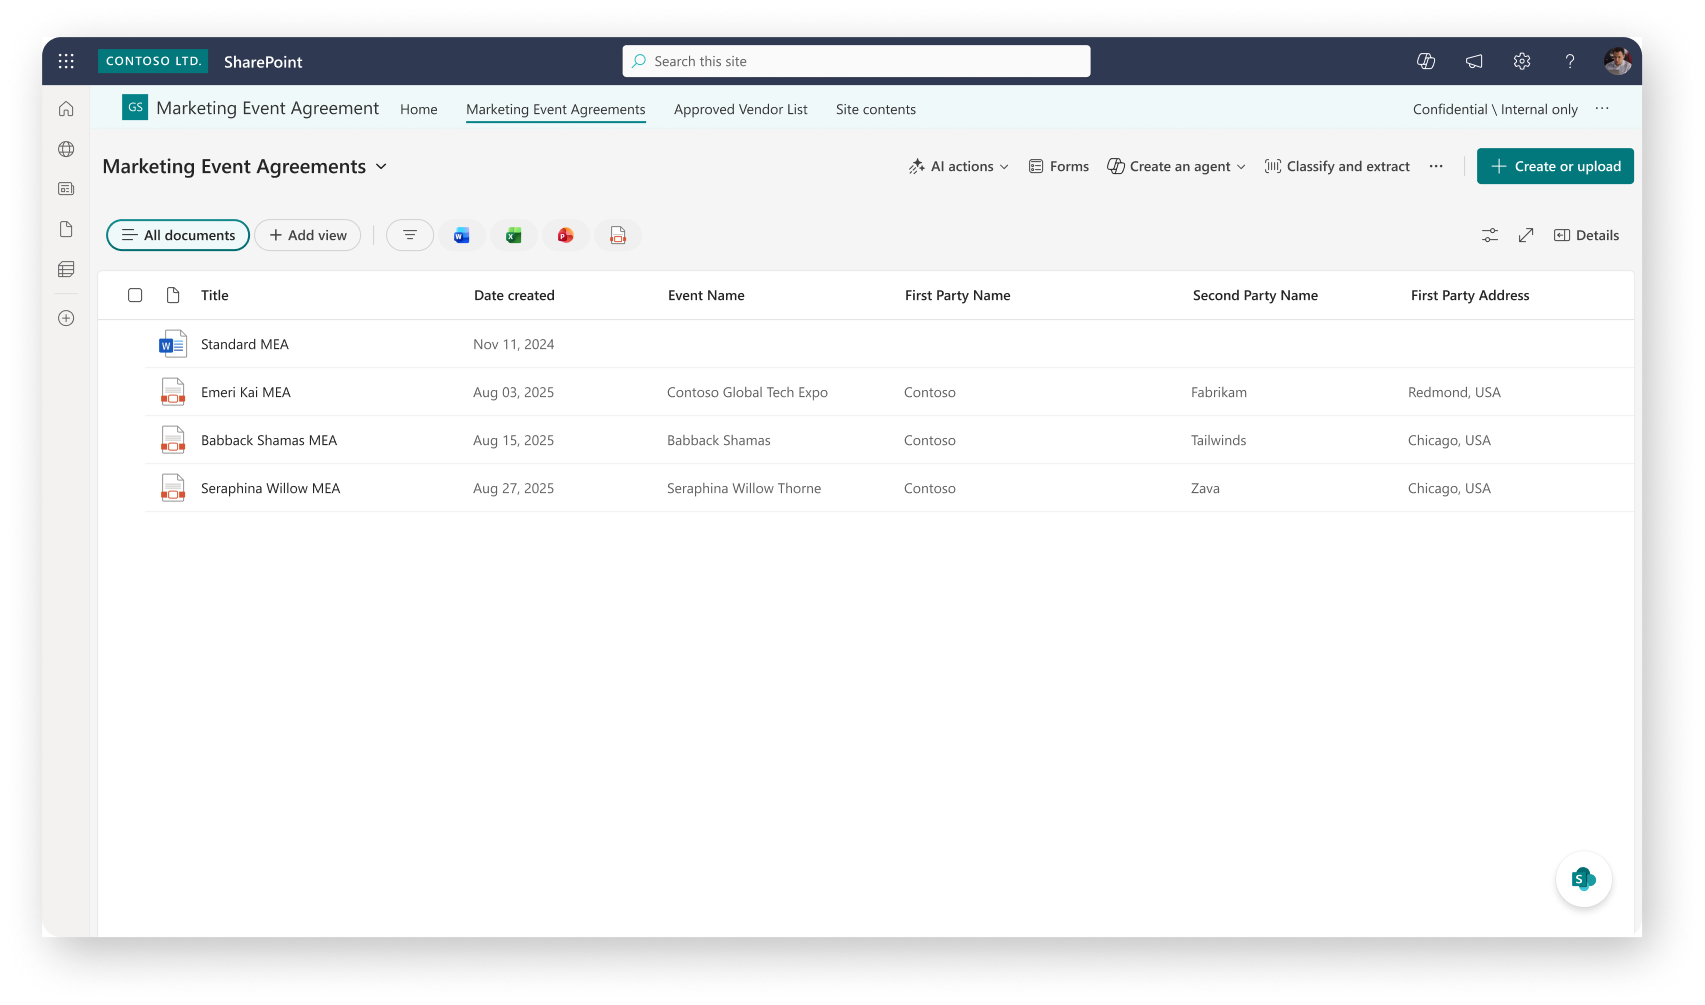
Note
Every generated document automatically receives a reference number—a unique identifier that stays with the document for its entire life, independent of its file name, location, or format. Each reference number is created once, never reused, and is unique across the site. The reference number becomes a usable field that you can insert into the document template just like any other field, and it stays the same when documents are copied or moved. If a document is regenerated, it gets a new reference number.
Content managers can decide how it appears by adding a prefix and suffix around an automatic, system-controlled running number that's at least four digits. The prefix and suffix can include text or contextual details—such as a fiscal year, department, or vendor name—letting you build a readable format, for example MEA-2026-0001.
Set up downstream automation
The rich metadata captured from form submissions makes it straightforward to configure downstream automation workflows. For example, you can:
- Set up notifications - Use SharePoint rules or Power Automate to notify stakeholders when a new document is generated.
- Trigger approval workflows - Route generated documents for review and approval based on metadata values.
- Move or copy documents - Automatically organize generated documents into specific folders based on field values.
- Integrate with other systems - Use Power Automate to send document details to external systems, CRM tools, or reporting dashboards.
Tip
Because each form submission creates a list item with structured metadata, you can use the full range of SharePoint list automation capabilities - including rules, Power Automate flows, and API integrations - to build end-to-end business processes around your generated documents.
Edit a published form
After you publish a form, the form fields are read-only in the SharePoint form view. To make structural changes to fields, edit the template in Word.
From the form view in SharePoint, select the option to open the template in Word.
In Word, select Edit template in the Manage templates pane. You can now add, update, or remove fields.
When you finish making changes, select Publish and open in Forms to republish the template and return to the form view.
The form link stays the same. Form submitters automatically see the updated fields after republishing.
Important
After you publish a form, make structural changes to fields (adding, deleting, or modifying field types) in Word. Make non-structural changes such as showing or hiding fields, changing themes, and updating settings directly in the SharePoint form view.
Manage forms
You can view and manage all forms associated with a document library from the Forms menu.
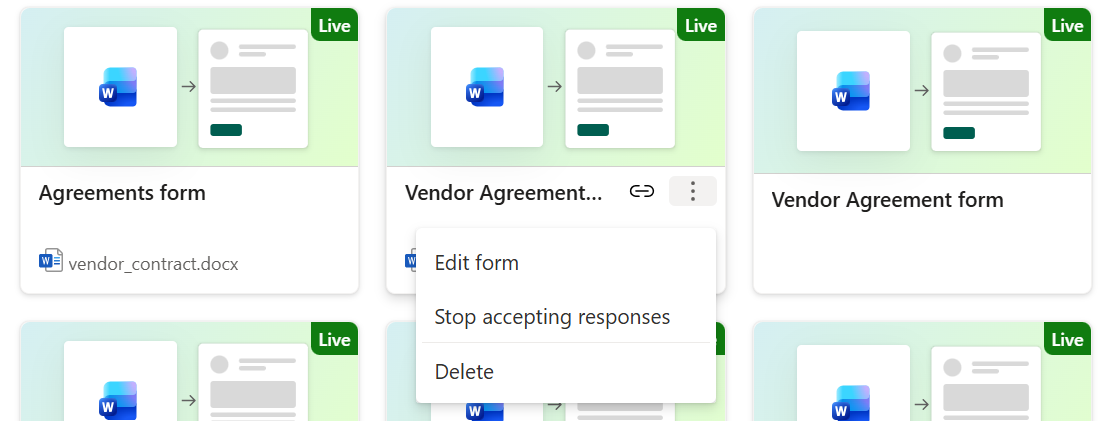
In the document library, select Forms from the command bar to see all created forms. Each form has a one-to-one mapping with a template.
From the forms list, you can:
- Edit form — Open the form configuration to make changes.
- Delete form — Remove the form. The underlying template is preserved.
- Start or stop accepting responses — Toggle form availability.
Use Power Automate with structured document generation
Use Power Automate to automate document generation and build end-to-end workflows that use forms in SharePoint.
Form submitted (Preview) triggers a flow when a form is submitted, so you can start workflows such as approvals or notifications.
Get form metadata (Preview) retrieves the form structure, so you can map responses to fields without manual configuration.
Generate document from form (Preview) creates documents by mapping input data to a document generation template and saves the output to a SharePoint library.
By using these capabilities, you can automate document creation as part of larger workflows, such as generating contracts or reports based on business events.
For more details on triggers and actions, see https://learn.microsoft.com/en-us/sharepoint/dev/business-apps/power-automate/sharepoint-connector-actions-triggers.
Requirements and limitations
Supported file types — Only Microsoft Word documents (.docx) support creating templates.
Permissions — Form creators need Edit access on the document library. Form submitters need only the form link (Read access to the template is granted automatically).
Limitations:
- Forms are read-only once published. To make structural field changes, edit the template in Word and republish.
- Form submitters don't automatically receive access to the destination document library. You must grant access to view the generated document separately, or the form creator can enable the receipt option.
- PDF generation doesn't work if sensitivity labels are enabled for the site or library. Support for that feature is coming soon.