Build a decomposable LUIS application
Important
LUIS will be retired on October 1st 2025 and starting April 1st 2023 you will not be able to create new LUIS resources. We recommend migrating your LUIS applications to conversational language understanding to benefit from continued product support and multilingual capabilities.
In this tutorial, you will be able to create a telecom LUIS application that can predict different user intentions. By the end of the tutorial, we should have a telecom application that can predict user intentions based on text provided by users.
We will be handling different user scenarios (intents) such as:
- Signing up for a new telecom line
- Updating an existing tier
- Paying a bill
In this tutorial you will learn how to:
- Create a LUIS application
- Create intents
- Add entities
- Add utterances
- Label example utterances
- Train an app
- Publish an app
- Get predictions from the published endpoint
Create a LUIS application
Sign in to the LUIS portal
Create a new application by selecting +New app.
In the window that appears, enter the name "Telecom Tutorial", keeping the default culture, English. The other fields are optional, do not set them. Select Done.
User intentions as intents
The first thing you will see in the Build section are the app's intents. Intents represent a task or an action a user want to perform.
Imagine a telecom LUIS application, what would a user need?
They would probably need to perform some type of user action or ask for help. Another user might want to update their tier or pay a bill
The resulting schema is as follows. For more information, see best practices about planning the schema.
| Intent | Purpose |
|---|---|
| UserActions | Determine user actions |
| Help | Request help |
| UpdateTier | Update current tier |
| PayBill | Pay outstanding bill |
| None | Determine if user is asking something the LUIS app is not designed to answer. This intent is provided as part of app creation and can't be deleted. |
Create a new Intent
An intent is used to classify user utterances based on the user's intention, determined from the natural language text.
To classify an utterance, the intent needs examples of user utterances that should be classified with this intent.
Select Build from the top navigation menu, then select Intents on the left side of the screen. Select + Create to create a new intent. Enter the new intent name, "UserAction", then select Done
UserAction could be one of many intents. For example, some users might want to sign up for a new line, while others might ask to retrieve information.
Add several example utterances to this intent that you expect a user to ask:
- Hi! I want to sign up for a new line
- Can I Sign up for a new line?
- Hello, I want a new line
- I forgot my line number!
- I would like a new line number
For the PayBill intent, some utterances could be:
- I want to pay my bill
- Settle my bill
- Pay bill
- I want to close my current balance
- Hey! I want to pay the current bill
By providing example utterances, you are teaching LUIS about what kinds of utterances should be predicted for this intent. These are positive examples. The utterances in all the other intents are treated as negative examples for this intent. Ideally, the more example utterances you add, the better your app's predictions will be.
These few utterances are for demonstration purposes only. A real-world app should have at least 15-30 utterances of varying length, word order, tense, grammatical correctness, punctuation, and word count.
Creating the remaining intents
Perform the above steps to add the following intents to the app:
"Help"
- "I need help"
- "I need assistance"
- "Help please"
- "Can someone support me?"
- "I'm stuck, can you help me"
- "Can I get help?"
"UpdateTier"
- "I want to update my tier"
- "Update my tier"
- "I want to change to VIP tier"
- "Change my subscription to standard tier"
Example utterances for the None intent
The client application needs to know if an utterance is not meaningful or appropriate for the application. The "None" intent is added to each application as part of the creation process to determine if an utterance shouldn't be answered by the client application.
If LUIS returns the "None" intent for an utterance, your client application can ask if the user wants to end the conversation or give more directions for continuing the conversation.
If you leave the "None" intent empty, an utterance that should be predicted outside the subject domain will be predicted in one of the existing subject domain intents. The result is that the client application, such as a chat bot, will perform incorrect operations based on an incorrect prediction.
Select Intents from the left panel.
Select the None intent. Add three utterances that your user might enter but are not relevant to your Telecom app. These examples shouldn't use words you expect in your subject domain such as Tier, upgrade, signup, bill.
- "When is my flight?"
- "I need to change my pizza order please"
- "What is the weather like for today?"
Add entities
An entity is an item or element that is relevant to the user's intent. Entities define data that can be extracted from the utterance and is essential to complete a user's required action.
In the build section, select Entities.
To add a new entity, select +Create
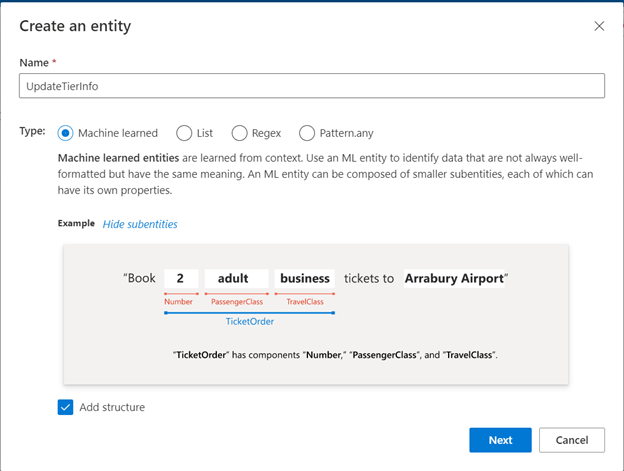
In this example, we will be creating two entities, "UpdateTierInfo" as a machine-learned entity type, and "Tier" as a list entity type. Luis also lets you create different entity types.
In the window that appears, enter "UpdateTierInfo", and select Machine learned from the available types. Select the Add structure box to be able to add a structure to this entity.
Select Next.
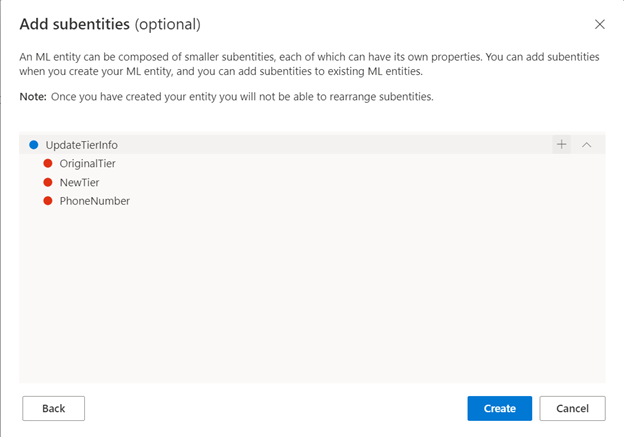
To add a child subentity, select the "+" symbol and start adding the child. For our entity example, "UpdateTierInfo", we require three things:
- OriginalTier
- NewTier
- PhoneNumber
Select Create after adding all THE subentities.
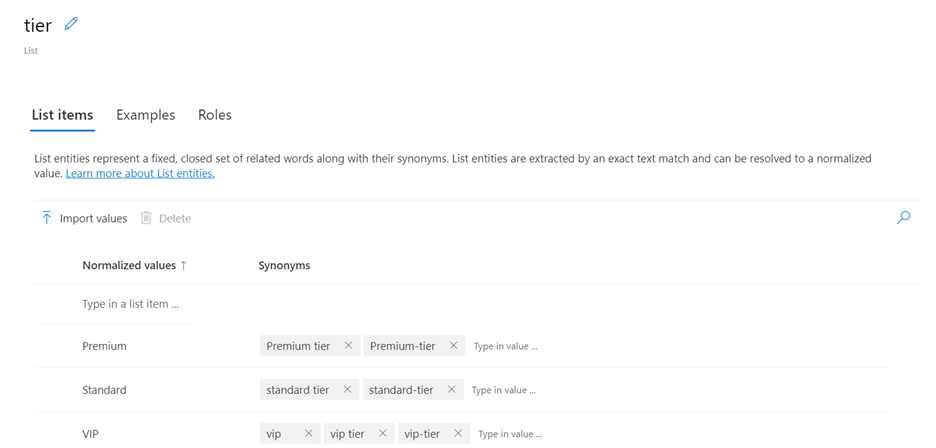
We will create another entity named "Tier", but this time it will be a list entity, and it will include all the tiers that we might provide: Standard tier, Premium tier, and VIP tier.
To do this, go to the entities tab, and press on +create and select list from the types in the screen that appears.
Add the items to your list, and optionally, you can add synonyms to make sure that all cases of that mention will be understood.
Now go back to the "UpdateTierInfo" entity and add the "tier" entity as a feature for the "OriginalTier" and "newTier" entities we created earlier. It should look something like this:
We added tier as a feature for both "originalTier" and "newTier", and we added the "Phonenumber" entity, which is a Regex type. It can be created the same way we created an ML and a list entity.
Now we have successfully created intents, added example utterances, and added entities. We created four intents (other than the "none" intent), and three entities.
Label example utterances
The machine learned entity is created and the subentities have features. To complete the extraction improvement, the example utterances need to be labeled with the subentities.
There are two ways to label utterances:
Using the labeling tool
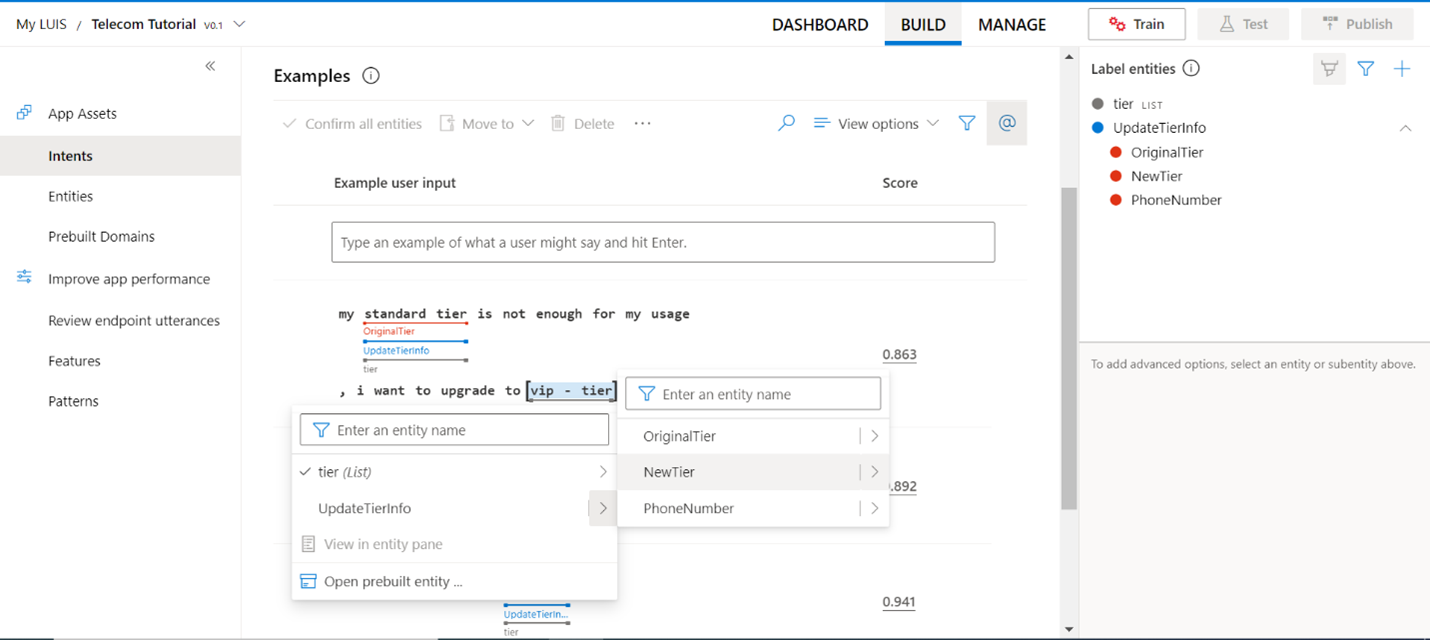
- Open the Entity Palette , and select the "@" symbol in the contextual toolbar.
- Select each entity row in the palette, then use the palette cursor to select the entity in each example utterance.
Highlight the text by dragging your cursor. Using the cursor, highlight over the text you want to label. In the following image, we highlighted "vip - tier" and select the "NewTier" entity.
Train the app
In the top-right side of the LUIS website, select the Train button.
Before training, make sure there is at least one utterance for each intent.
Publish the app
In order to receive a LUIS prediction in a chat bot or other client application, you need to publish the app to the prediction endpoint. In order to publish, you need to train you application fist.
Select Publish in the top-right navigation.
Select the Production slot, then select Done.
Select Access your endpoint URLs in the notification to go to the Azure Resources page. You will only be able to see the URLs if you have a prediction resource associated with the app. You can also find the Azure Resources page by clicking Manage on the left of the screen.
Get intent prediction
Select Manage in the top-right menu, then select Azure Resources on the left.
Copy the Example Query URL and paste it into a new web browser tab.
The endpoint URL will have the following format.
https://YOUR-CUSTOM-SUBDOMAIN.api.cognitive.microsoft.com/luis/prediction/v3.0/apps/YOUR-APP-ID/slots/production/predict?subscription-key=YOUR-KEY-ID&verbose=true&show-all-intents=true&log=true&query=YOUR\_QUERY\_HEREGo to the end of the URL in the address bar and replace the
query=string parameter with:"Hello! I am looking for a new number please."
The utterance query is passed in the URI. This utterance is not the same as any of the example utterances, and should be a good test to check if LUIS predicts the UserAction intent as the top scoring intent.
{
    "query": "hello! i am looking for a new number please",
    "prediction":
    {
        "topIntent": "UserAction",
        "intents":
        {
            "UserAction": {
            "score": 0.8607431},
            "Help":{
            "score": 0.031376917},
            "PayBill": {
            "score": 0.01989629},
            "None": {
            "score": 0.013738701},
            "UpdateTier": {
            "score": 0.012313577}
        },
    "entities": {}
    }
}
The JSON result identifies the top scoring intent as prediction.topIntent property. All scores are between 1 and 0, with the better score being closer to 1.
Client-application next steps
This tutorial created a LUIS app, created intents, entities, added example utterances to each intent, added example utterances to the None intent, trained, published, and tested at the endpoint. These are the basic steps of building a LUIS model.
LUIS does not provide answers to user utterances, it only identifies what type of information is being asked for in natural language. The conversation follow-up is provided by the client application such as an Azure Bot.
Clean up resources
When no longer needed, delete the LUIS app. To do so, select My apps from the top-left menu. Select the ellipsis ( ... ) to the right of the app name in the app list, select Delete. In the pop-up dialog named Delete app? , select Ok.


