Get started with Azure SQL Managed Instance auditing
Applies to:
Azure SQL Managed Instance
Azure SQL Managed Instance auditing tracks database events and writes them to an audit log in your Azure storage account. Auditing also:
- Helps you maintain regulatory compliance, understand database activity, and gain insight into discrepancies and anomalies that could indicate business concerns or suspected security violations.
- Enables and facilitates adherence to compliance standards, although it doesn't guarantee compliance. For more information, see the Microsoft Azure Trust Center where you can find the most current list of SQL Managed Instance compliance certifications.
Important
Auditing for Azure SQL Database, Azure Synapse and Azure SQL Managed Instance is optimized for availability and performance. During very high activity, or high network load, Azure SQL Database, Azure Synapse and Azure SQL Managed Instance allow operations to proceed and may not record some audited events.
Set up auditing for your server to Azure Storage
The following section describes the configuration of auditing on your managed instance.
Go to the Azure portal.
Create an Azure Storage container where audit logs are stored.
Navigate to the Azure storage account where you would like to store your audit logs.
- Use a storage account in the same region as the managed instance to avoid cross-region reads/writes.
- If your storage account is behind a Virtual Network or a Firewall, see Grant access from a virtual network.
- If you change retention period from 0 (unlimited retention) to any other value, retention will only apply to logs written after retention value was changed (logs written during the period when retention was set to unlimited are preserved, even after retention is enabled).
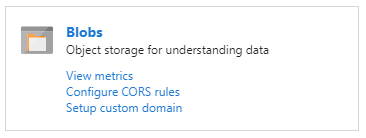
In the storage account, go to Overview and select Blobs.

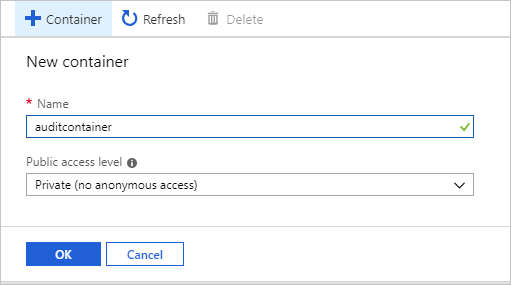
In the top menu, select + Container to create a new container.

Provide a container Name, set Public access level to Private, and then select OK.

Important
Customers wishing to configure an immutable log store for their server- or database-level audit events should follow the instructions provided by Azure Storage. (Please ensure you have selected Allow additional appends when you configure the immutable blob storage.)
After you create the container for the audit logs, there are two ways to configure it as the target for the audit logs: using T-SQL or using the SQL Server Management Studio (SSMS) UI:
Configure blob storage for audit logs using T-SQL:
In the containers list, select the newly created container and then select Container properties.

Copy the container URL by selecting the copy icon and save the URL (for example, in Notepad) for future use. The container URL format should be
https://<StorageName>.blob.core.windows.net/<ContainerName>
Generate an Azure Storage SAS token to grant managed instance auditing access rights to the storage account:
Navigate to the Azure storage account where you created the container in the previous step.
Select Shared access signature in the Storage Settings menu.

Configure the SAS as follows:
Allowed services: Blob
Start date: to avoid time zone-related issues, use yesterday's date
End date: choose the date on which this SAS token expires
Note
Renew the token upon expiry to avoid audit failures.
Select Generate SAS.

The SAS token appears at the bottom. Copy the token by selecting on the copy icon, and save it (for example, in Notepad) for future use.

Important
Remove the question mark (
?) character from the beginning of the token.
Connect to your managed instance via SQL Server Management Studio or any other supported tool.
Execute the following T-SQL statement to create a new credential using the container URL and SAS token that you created in the previous steps:
CREATE CREDENTIAL [<container_url>]
WITH IDENTITY='SHARED ACCESS SIGNATURE',
SECRET = '<SAS KEY>'
GO
Execute the following T-SQL statement to create a new server audit (choose your own audit name, and use the container URL that you created in the previous steps). If not specified, the
RETENTION_DAYSdefault is 0 (unlimited retention):CREATE SERVER AUDIT [<your_audit_name>] TO URL (PATH ='<container_url>', RETENTION_DAYS = <integer>); GOContinue by creating a server audit specification or database audit specification.
Configure blob storage for audit logs, using SQL Server Management Studio 18 and later versions:
Connect to the managed instance using the SQL Server Management Studio UI.
Expand the root note of Object Explorer.
Expand the Security node, right-click on the Audits node, and select New Audit:

Make sure URL is selected in Audit destination and select Browse:

(Optional) Sign in to your Azure account:

Select a subscription, storage account, and blob container from the dropdowns, or create your own container by selecting on Create. Once you have finished, select OK:

Select OK in the Create Audit dialog.
Note
When using SQL Server Management Studio UI to create audit, a credential to the container with SAS key will be automatically created.
After you configure the blob container as target for the audit logs, create and enable a server audit specification or database audit specification as you would for SQL Server:
Enable the server audit that you created in step 3:
ALTER SERVER AUDIT [<your_audit_name>]
WITH (STATE = ON);
GO
For additional information:
- Auditing differences between Azure SQL Managed Instance and a database in SQL Server
- CREATE SERVER AUDIT
- ALTER SERVER AUDIT
Auditing of Microsoft Support operations
Auditing of Microsoft Support operations for SQL Managed Instance allows you to audit Microsoft support engineers' operations when they need to access your server during a support request. The use of this capability, along with your auditing, enables more transparency into your workforce and allows for anomaly detection, trend visualization, and data loss prevention.
To enable auditing of Microsoft Support operations, navigate to Create Audit under Security > Audit in your SQL Manage Instance, and select Microsoft support operations.

Note
You must create a separate server audit for auditing Microsoft operations. If you enable this check box for an existing audit then it will overwrite the audit and only log support operations.
Set up auditing for your server to Event Hubs or Azure Monitor logs
Audit logs from a managed instance can be sent to Azure Event Hubs or Azure Monitor logs. This section describes how to configure this:
Navigate in the Azure portal to the managed instance.
Select Diagnostic settings.
Select Turn on diagnostics. If diagnostics is already enabled, +Add diagnostic setting will show instead.
Select SQLSecurityAuditEvents in the list of logs.
If you are configuring Microsoft support operations, select DevOps operations Audit Logs in the list of logs.
Select a destination for the audit events: Event Hubs, Azure Monitor logs, or both. Configure for each target the required parameters (for example, Log Analytics workspace).
Select Save.

Connect to the managed instance using SQL Server Management Studio (SSMS) or any other supported client.
Execute the following T-SQL statement to create a server audit:
CREATE SERVER AUDIT [<your_audit_name>] TO EXTERNAL_MONITOR;
GO
Create and enable a server audit specification or database audit specification as you would for SQL Server:
Enable the server audit created in step 8:
ALTER SERVER AUDIT [<your_audit_name>]
WITH (STATE = ON);
GO
Set up audit using T-SQL
-- Create audit without OPERATOR_AUDIT - Will audit standard SQL Audit events
USE [master];
GO

CREATE SERVER AUDIT testingauditnodevops TO EXTERNAL_MONITOR;
GO

CREATE SERVER AUDIT SPECIFICATION testingaudit_Specification_nodevops
FOR SERVER AUDIT testingauditnodevops ADD (SUCCESSFUL_LOGIN_GROUP),
    ADD (BATCH_COMPLETED_GROUP),
    ADD (FAILED_LOGIN_GROUP)
WITH (STATE = ON);
GO

ALTER SERVER AUDIT testingauditnodevops
    WITH (STATE = ON);
GO

-- Create separate audit without OPERATOR_AUDIT ON - Will audit Microsoft Support Operations
USE [master]

CREATE SERVER AUDIT testingauditdevops TO EXTERNAL_MONITOR
    WITH (OPERATOR_AUDIT = ON);
GO

CREATE SERVER AUDIT SPECIFICATION testingaudit_Specification_devops
FOR SERVER AUDIT testingauditdevops ADD (SUCCESSFUL_LOGIN_GROUP),
    ADD (BATCH_COMPLETED_GROUP),
    ADD (FAILED_LOGIN_GROUP)
WITH (STATE = ON);
GO

ALTER SERVER AUDIT testingauditdevops
    WITH (STATE = ON);
GO
Consume audit logs
Consume logs stored in Azure Storage
There are several methods you can use to view blob auditing logs.
Use the system function
sys.fn_get_audit_file(T-SQL) to return the audit log data in tabular format. For more information on using this function, see the sys.fn_get_audit_file documentation.You can explore audit logs by using a tool such as Azure Storage Explorer. In Azure Storage, auditing logs are saved as a collection of blob files within a container that was defined to store the audit logs. For more information about the hierarchy of the storage folder, naming conventions, and log format, see the Blob Audit Log Format Reference.
For a full list of audit log consumption methods, refer to Get started with Azure SQL Database auditing.
Consume logs stored in Event Hubs
To consume audit logs data from Event Hubs, you will need to set up a stream to consume events and write them to a target. For more information, see the Azure Event Hubs documentation.
Consume and analyze logs stored in Azure Monitor logs
If audit logs are written to Azure Monitor logs, they are available in the Log Analytics workspace, where you can run advanced searches on the audit data. As a starting point, navigate to the Log Analytics workspace. Under the General section, select Logs and enter a basic query, such as: search "SQLSecurityAuditEvents" to view the audit logs.
Azure Monitor logs gives you real-time operational insights using integrated search and custom dashboards to readily analyze millions of records across all your workloads and servers. For more information about Azure Monitor logs search language and commands, see Azure Monitor logs search reference.
Note
This article was recently updated to use the term Azure Monitor logs instead of Log Analytics. Log data is still stored in a Log Analytics workspace and is still collected and analyzed by the same Log Analytics service. We are updating the terminology to better reflect the role of logs in Azure Monitor. See Azure Monitor terminology changes for details.
Audit differences between databases in Azure SQL Managed Instance and databases in SQL Server
The key differences between auditing in databases in Azure SQL Managed Instance and databases in SQL Server are:
- With Azure SQL Managed Instance, auditing works at the server level and stores
.xellog files in Azure Blob storage. - In SQL Server, audit works at the server level, but stores events in the file system and Windows event logs.
XEvent auditing in managed instances supports Azure Blob storage targets. File and Windows logs are not supported.
The key differences in the CREATE AUDIT syntax for auditing to Azure Blob storage are:
- A new syntax
TO URLis provided and enables you to specify the URL of the Azure Blob storage container where the.xelfiles are placed. - A new syntax
TO EXTERNAL MONITORis provided to enable Event Hubs and Azure Monitor log targets. - The syntax
TO FILEis not supported because Azure SQL Managed Instance can't access Windows file shares. - Shutdown option is not supported.
queue_delayof 0 is not supported.
Next steps
- For a full list of audit log consumption methods, refer to Get started with Azure SQL Database auditing.