Using the Azure Cloud Shell window
This document explains how to use the Cloud Shell window.
Swap between Bash and PowerShell environments
Use the environment selector in the Cloud Shell toolbar to switch between Bash and PowerShell environments.

Restart Cloud Shell
Select the restart icon in the Cloud Shell toolbar to reset machine state.

Warning
Restarting Cloud Shell resets machine state and any files not persisted in your Azure fileshare are lost.
Change the text size
Select the settings icon on the top left of the window, then hover over the Text size option and select your desired text size. Your selection is persisted across sessions.

Change the font
Select the settings icon on the top left of the window, then hover over the Font option and select your desired font. Your selection is persisted across sessions.

Upload and download files
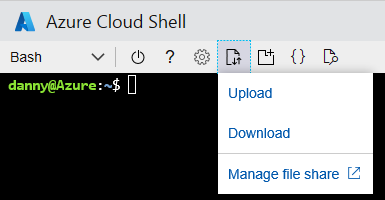
Select the upload/download files icon on the top left of the window, then select Upload or Download.

- For uploading files, use the pop-up to browse to the file on your local computer, select the
desired file, and select the Open button. The file is uploaded into the
/home/userdirectory. - For downloading file, enter the fully qualified file path into the pop-up window. For example, the
path under the
/home/userdirectory that shows up by default. Then, select the Download button.
Note
File and path names are case sensitive in Cloud Shell. Double check your casing in your file path.
Open another Cloud Shell window
Cloud Shell enables multiple concurrent sessions across browser tabs by allowing each session to exist as a separate process. If exiting a session, be sure to exit from each session window as each process runs independently although they run on the same machine. Select the open new session icon on the top left of the window. A new tab opens with another session connected to the existing container.

Cloud Shell editor
Refer to the Using the Azure Cloud Shell editor page.
Web preview
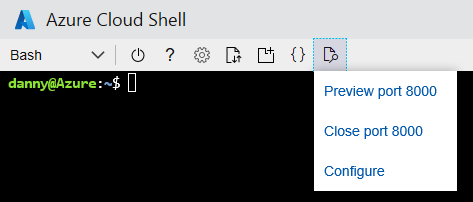
Select the web preview icon on the top left of the window, select Configure, specify the desired port to open.

Select either Open port to only open the port, or Open and browse to open the port and preview the port in a new tab.

To preview an open port in a new tab, select the web preview icon on the top left of the window then select Preview port.
To close the open port, select the web preview icon on the top left of the window the select Close port.

Minimize & maximize Cloud Shell window
Select the minimize icon on the top right of the window to hide it. Select the Cloud Shell icon again to unhide. Select the maximize icon to set window to max height. To restore window to previous size, select restore.

Copy and paste
- Windows: Ctrl-C to copy is supported but use
Shift-Insert to paste.
- Firefox and Internet Explorer may not support clipboard permissions properly.
- macOS: Cmd-C to copy and Cmd-V to paste.
- Linux: CTRL-C to copy and CTRL-SHIFT-V to paste.
Note
If no text is selected when you type Ctrl-C, Cloud Shell sends the Ctrl C
character to the shell. This could terminate the currently running command.
Resize Cloud Shell window
Drag the top edge of the toolbar up or down to resize the Cloud Shell window.
Scrolling text display
Scroll with your mouse or touchpad to move terminal text.
Exit command
The exit command terminates the active session. Cloud Shell also terminates your session after 20
minutes without interaction.