Introduction to provisioned throughput in Azure Cosmos DB
APPLIES TO:
NoSQL
MongoDB
Cassandra
Gremlin
Table
Azure Cosmos DB allows you to set provisioned throughput on your databases and containers. There are two types of provisioned throughput, standard (manual) or autoscale. This article gives an overview of how provisioned throughput works.
An Azure Cosmos DB database is a unit of management for a set of containers. A database consists of a set of schema-agnostic containers. An Azure Cosmos DB container is the unit of scalability for both throughput and storage. A container is horizontally partitioned across a set of machines within an Azure region and is distributed across all Azure regions associated with your Azure Cosmos DB account.
With Azure Cosmos DB, you can provision throughput at two granularities:
- Azure Cosmos DB containers
- Azure Cosmos DB databases
Set throughput on a container
The throughput provisioned on an Azure Cosmos DB container is exclusively reserved for that container. The container receives the provisioned throughput all the time. The provisioned throughput on a container is financially backed by SLAs. To learn how to configure standard (manual) throughput on a container, see Provision throughput on an Azure Cosmos DB container. To learn how to configure autoscale throughput on a container, see Provision autoscale throughput.
Setting provisioned throughput on a container is the most frequently used option. You can elastically scale throughput for a container by provisioning any amount of throughput by using Request Units (RUs).
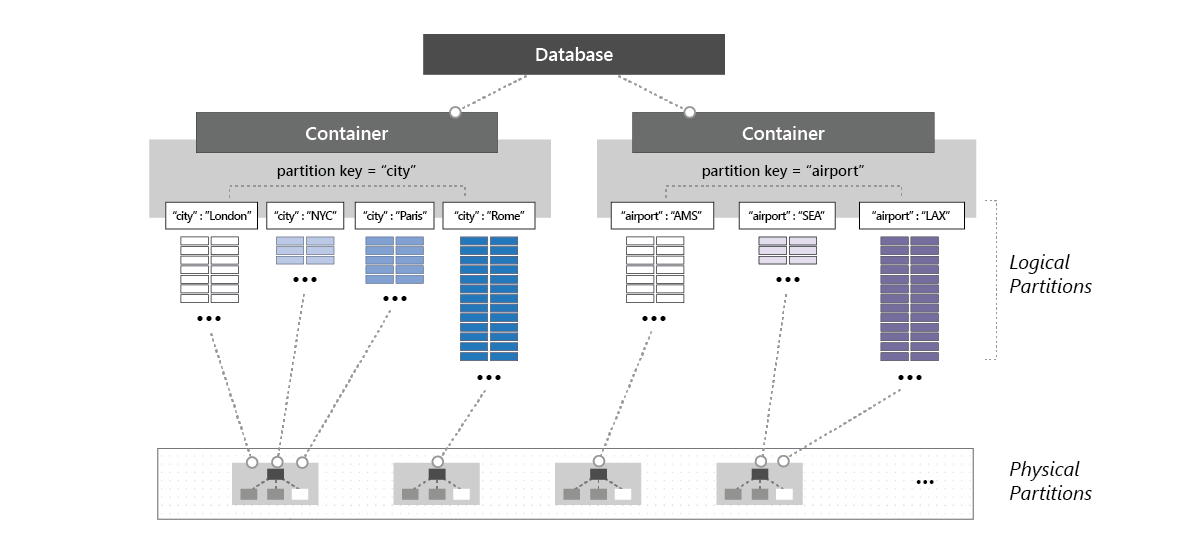
The throughput provisioned for a container is evenly distributed among its physical partitions, and assuming a good partition key that distributes the logical partitions evenly among the physical partitions, the throughput is also distributed evenly across all the logical partitions of the container. You can't selectively specify the throughput for logical partitions. Because one or more logical partitions of a container are hosted by a physical partition, the physical partitions belong exclusively to the container and support the throughput provisioned on the container.
If the workload running on a logical partition consumes more than the throughput that was allocated to the underlying physical partition, it's possible that your operations will be rate-limited. What is known as a hot partition occurs when one logical partition has disproportionately more requests than other partition key values.
When rate-limiting occurs, you can either increase the provisioned throughput for the entire container or retry the operations. You also should ensure that you choose a partition key that evenly distributes storage and request volume. For more information about partitioning, see Partitioning and horizontal scaling in Azure Cosmos DB.
We recommend that you configure throughput at the container granularity when you want predictable performance for the container.
The following image shows how a physical partition hosts one or more logical partitions of a container:

Set throughput on a database
When you provision throughput on an Azure Cosmos DB database, the throughput is shared across all the containers (called shared database containers) in the database. An exception is if you specified a provisioned throughput on specific containers in the database. Sharing the database-level provisioned throughput among its containers is analogous to hosting a database on a cluster of machines. Because all containers within a database share the resources available on a machine, you naturally don't get predictable performance on any specific container. To learn how to configure provisioned throughput on a database, see Configure provisioned throughput on an Azure Cosmos DB database. To learn how to configure autoscale throughput on a database, see Provision autoscale throughput.
Because all containers within the database share the provisioned throughput, Azure Cosmos DB doesn't provide any predictable throughput guarantees for a particular container in that database. The portion of the throughput that a specific container can receive is dependent on:
- The number of containers.
- The choice of partition keys for various containers.
- The distribution of the workload across various logical partitions of the containers.
We recommend that you configure throughput on a database when you want to share the throughput across multiple containers, but don't want to dedicate the throughput to any particular container.
The following examples demonstrate where it's preferred to provision throughput at the database level:
Sharing a database's provisioned throughput across a set of containers is useful for a multitenant application. Each user can be represented by a distinct Azure Cosmos DB container.
Sharing a database's provisioned throughput across a set of containers is useful when you migrate a NoSQL database, such as MongoDB or Cassandra, hosted on a cluster of VMs or from on-premises physical servers to Azure Cosmos DB. Think of the provisioned throughput configured on your Azure Cosmos DB database as a logical equivalent, but more cost-effective and elastic, to that of the compute capacity of your MongoDB or Cassandra cluster.
All containers created inside a database with provisioned throughput must be created with a partition key. At any given point in time, the throughput allocated to a container within a database is distributed across all the logical partitions of that container. When you have containers that share provisioned throughput configured on a database, you can't selectively apply the throughput to a specific container or a logical partition.
If the workload on a logical partition consumes more than the throughput that's allocated to a specific logical partition, your operations are rate-limited. When rate-limiting occurs, you can either increase the throughput for the entire database or retry the operations. For more information on partitioning, see Logical partitions.
Containers in a shared throughput database share the throughput (RU/s) allocated to that database. With standard (manual) provisioned throughput, you can have up to 25 containers with a minimum of 400 RU/s on the database. With autoscale provisioned throughput, you can have up to 25 containers in a database with autoscale minimum 1000 RU/s (scales between 100 - 1000 RU/s).
Note
In February 2020, we introduced a change that allows you to have a maximum of 25 containers in a shared throughput database, which better enables throughput sharing across the containers. After the first 25 containers, you can add more containers to the database only if they are provisioned with dedicated throughput, which is separate from the shared throughput of the database.
If your Azure Cosmos DB account already contains a shared throughput database with >=25 containers, the account and all other accounts in the same Azure subscription are exempt from this change. Please contact product support if you have feedback or questions.
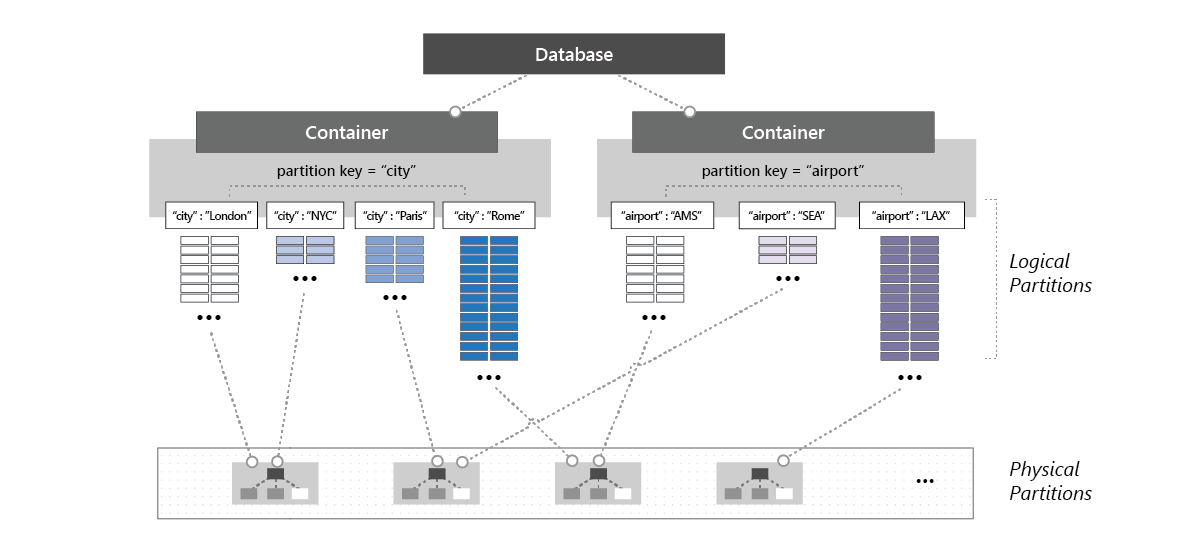
If your workloads involve deleting and recreating all the collections in a database, it's recommended that you drop the empty database and recreate a new database prior to collection creation. The following image shows how a physical partition can host one or more logical partitions that belong to different containers within a database:

Set throughput on a database and a container
You can combine the two models. Provisioning throughput on both the database and the container is allowed. The following example shows how to provision standard (manual) provisioned throughput on an Azure Cosmos DB database and a container:
You can create an Azure Cosmos DB database named Z with standard (manual) provisioned throughput of "K" RUs.
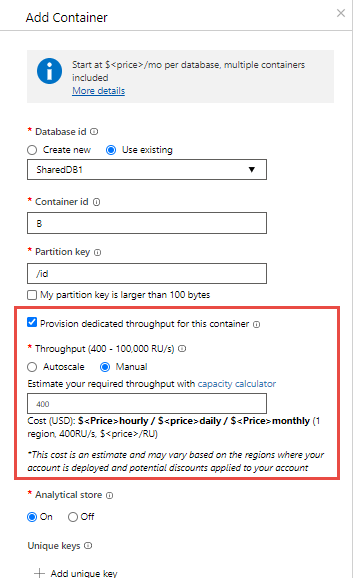
Next, create five containers named A, B, C, D, and E within the database. When creating container B, make sure to enable Provision dedicated throughput for this container option and explicitly configure "P" RUs of provisioned throughput on this container. You can configure shared and dedicated throughput only when creating the database and container.

The "K" RU/s throughput is shared across the four containers A, C, D, and E. The exact amount of throughput available to A, C, D, or E varies. There are no SLAs for each individual container's throughput.
The container named B is guaranteed to get the "P" RU/s throughput all the time. It's backed by SLAs.
Note
A container with provisioned throughput cannot be converted to shared database container. Conversely a shared database container cannot be converted to have a dedicated throughput. You will need to move the data to a container with the desired throughput setting. (Container copy jobs for NoSQL, MongoDB and Cassandra APIs help with this process.)
Update throughput on a database or a container
After you create an Azure Cosmos DB container or a database, you can update the provisioned throughput. There's no limit on the maximum provisioned throughput that you can configure on the database or the container.
Current provisioned throughput
You can retrieve the provisioned throughput of a container or a database in the Azure portal or by using the SDKs:
- Container.ReadThroughputAsync on the .NET SDK.
- CosmosContainer.readThroughput on the Java SDK.
The response of those methods also contains the minimum provisioned throughput for the container or database:
- ThroughputResponse.MinThroughput on the .NET SDK.
- ThroughputResponse.getMinThroughput() on the Java SDK.
The actual minimum RU/s might vary depending on your account configuration. For more information, see the autoscale FAQ.
Changing the provisioned throughput
You can scale the provisioned throughput of a container or a database through the Azure portal or by using the SDKs:
- Container.ReplaceThroughputAsync on the .NET SDK.
- CosmosContainer.replaceThroughput on the Java SDK.
If you're reducing the provisioned throughput, you'll be able to do it up to the minimum.
If you're increasing the provisioned throughput, most of the time, the operation is instantaneous. There are however, cases where the operation can take longer time due to the system tasks to provision the required resources. In this case, an attempt to modify the provisioned throughput while this operation is in progress yields an HTTP 423 response with an error message explaining that another scaling operation is in progress.
Learn more in the Best practices for scaling provisioned throughput (RU/s) article.
Note
If you are planning for a very large ingestion workload that will require a big increase in provisioned throughput, keep in mind that the scaling operation has no SLA and, as mentioned in the previous paragraph, it can take a long time when the increase is large. You might want to plan ahead and start the scaling before the workload starts and use the below methods to check progress.
You can programmatically check the scaling progress by reading the current provisioned throughput and using:
- ThroughputResponse.IsReplacePending on the .NET SDK.
- ThroughputResponse.isReplacePending() on the Java SDK.
You can use Azure Monitor metrics to view the history of provisioned throughput (RU/s) and storage on a resource.
Comparison of models
This table shows a comparison between provisioning standard (manual) throughput on a database vs. on a container.
| Parameter | Standard (manual) throughput on a database | Standard (manual) throughput on a container | Autoscale throughput on a database | Autoscale throughput on a container |
|---|---|---|---|---|
| Entry point (minimum RU/s) | 400 RU/s. Can have up to 25 containers with no RU/s minimum per container. | 400 | Autoscale between 100 - 1000 RU/s. Can have up to 25 containers with no RU/s minimum per container. | Autoscale between 100 - 1000 RU/s. |
| Minimum RU/s per container | -- | 400 | -- | Autoscale between 100 - 1000 RU/s |
| Maximum RUs | Unlimited, on the database. | Unlimited, on the container. | Unlimited, on the database. | Unlimited, on the container. |
| RUs assigned or available to a specific container | No guarantees. RUs assigned to a given container depend on the properties. Properties can be the choice of partition keys of containers that share the throughput, the distribution of the workload, and the number of containers. | All the RUs configured on the container are exclusively reserved for the container. | No guarantees. RUs assigned to a given container depend on the properties. Properties can be the choice of partition keys of containers that share the throughput, the distribution of the workload, and the number of containers. | All the RUs configured on the container are exclusively reserved for the container. |
| Maximum storage for a container | Unlimited. | Unlimited | Unlimited | Unlimited |
| Maximum throughput per logical partition of a container | 10K RU/s | 10K RU/s | 10K RU/s | 10K RU/s |
| Maximum storage (data + index) per logical partition of a container | 20 GB | 20 GB | 20 GB | 20 GB |
Next steps
- Learn more about logical partitions.
- Learn how to provision standard (manual) on an Azure Cosmos DB container.
- Learn how to provision standard (manual) throughput on an Azure Cosmos DB database.
- Learn how to provision autoscale throughput on an Azure Cosmos DB database or container.
- Trying to do capacity planning for a migration to Azure Cosmos DB? You can use information about your existing database cluster for capacity planning.
- If all you know is the number of vcores and servers in your existing database cluster, read about estimating request units using vCores or vCPUs
- If you know typical request rates for your current database workload, read about estimating request units using Azure Cosmos DB capacity planner