หมายเหตุ
การเข้าถึงหน้านี้ต้องได้รับการอนุญาต คุณสามารถลอง ลงชื่อเข้าใช้หรือเปลี่ยนไดเรกทอรีได้
การเข้าถึงหน้านี้ต้องได้รับการอนุญาต คุณสามารถลองเปลี่ยนไดเรกทอรีได้
In this quickstart, you learn how to query data in the stand-alone Azure Data Explorer web UI. Azure Data Explorer provides a web experience that connects to your Azure Data Explorer clusters so you can write, run, and share Kusto Query Language (KQL) commands and queries. You can access the web experience in the Azure portal or as a stand-alone web application, the Azure Data Explorer web UI.
In the Azure Data Explorer web UI, the query editor provides suggestions and warnings as you write your queries. To customize which suggestions and warnings you receive, see Set query recommendations.
In this quickstart, you:
- Add a cluster connection.
- Run KQL queries against sample data.
- Format a query and render a chart.
- Provide feedback and clean up resources.
Prerequisites
Before you begin, make sure you have the following items:
- A Microsoft account or a Microsoft Entra user identity. An Azure subscription isn't required.
- An Azure Data Explorer cluster and database. Use the publicly available help cluster or create a cluster and database.
- Sign in to the Azure Data Explorer web UI.
Add clusters
When you first open the web UI, on the Query page, you see a connection to the help cluster. The examples in this quickstart use the StormEvents table in the Samples database of the help cluster.
To run queries on a different cluster, add a connection to that cluster. To add a new cluster connection, follow these steps:
- On the left menu, select Query.
- In the upper left pane, select Add connection.
- In the Add connection dialog box, enter the cluster Connection URI and Display name.
- Select Add to add the connection.
If you don't see the help cluster, add it by using the preceding steps and enter help as the Connection URI.
Run a query
To run a query, select the database where you want to run the query to set the query context.
In the Cluster connection pane, under the help cluster, select the Samples database.

Copy and paste the following query into the query window. At the top of the window, select Run.
StormEvents
| sort by StartTime desc
| take 10
This query returns the 10 newest records in the StormEvents table. The result should look like the following table.

Copy and paste the following query into the query window, below the first query. Notice how it isn't formatted on separate lines like the first query.
StormEvents | sort by StartTime desc
| project StartTime, EndTime, State, EventType, DamageProperty, EpisodeNarrative | take 10
Select the new query. Press Shift+Alt+F to format the query so it looks like the following query.

Select Run or press Shift+Enter to run the query. This query returns the same records as the first one, but includes only the columns specified in the
projectstatement. The result should look like the following table.
Tip
Select Recall at the top of the query window to show the result set from the first query without having to rerun the query. Often during analysis, you run multiple queries, and Recall lets you retrieve the results of previous queries.
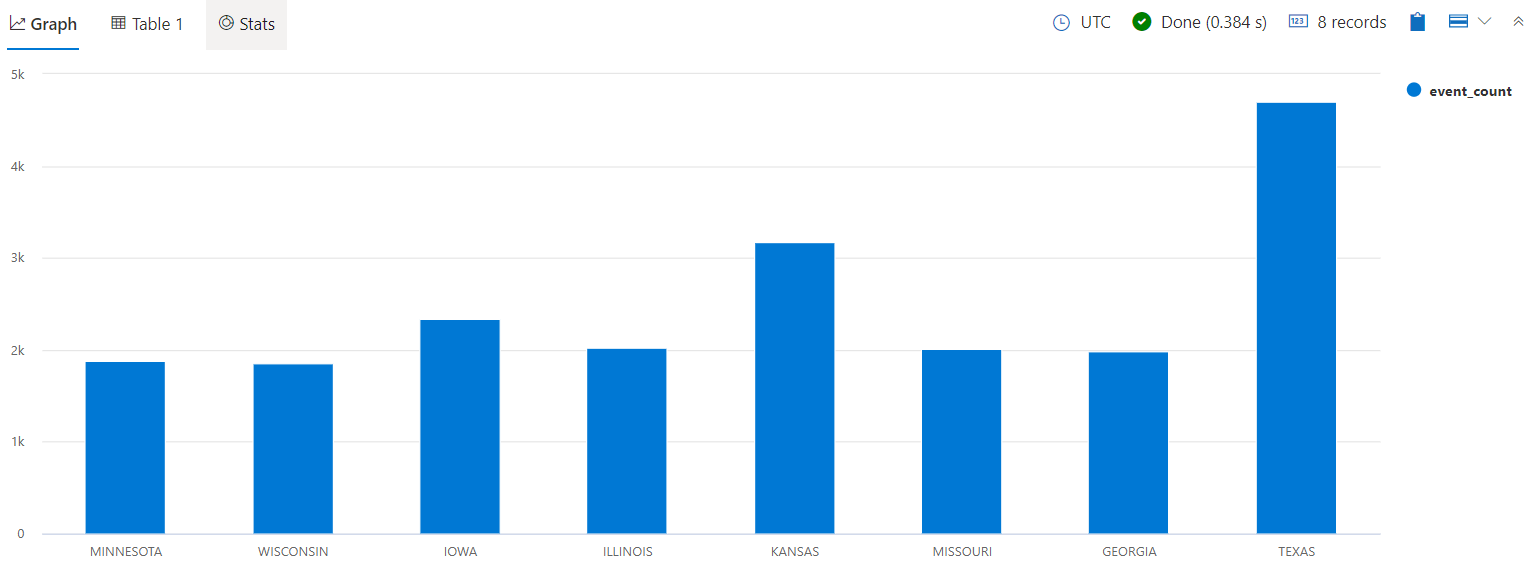
Run one more query to see a different type of output.
StormEvents
| summarize event_count=count(), mid = avg(BeginLat) by State
| sort by mid
| where event_count > 1800
| project State, event_count
| render columnchart
The result should look like the following chart.
Note
Blank lines in the query expression can affect which part of the query runs.
- If you don't select any text, the query or command is assumed to be separated by empty lines.
- If you select text, the selected text runs.
Provide feedback
To provide feedback, follow these steps:
- In the upper right of the application, select the feedback icon
 .
. - Enter your feedback, then select Submit.
Clean up resources
You didn't create any resources in this quickstart. To remove one or both clusters from the application, right-click the cluster and select Remove connection. Another option is to select Clear local state on the Settings > General tab. This action removes all cluster connections and closes all open query tabs.