Share and receive data from Azure Blob Storage and Azure Data Lake Storage
APPLIES TO:  Azure Blob Storage
Azure Data Lake Storage Gen1
Azure Data Lake Storage Gen2
Azure Blob Storage
Azure Data Lake Storage Gen1
Azure Data Lake Storage Gen2
Azure Data Share allows you to securely share data snapshots from your Azure storage resources to other Azure subscriptions. Including Azure subscriptions outside your tenant.
This article describes sharing data from Azure Blob Storage, Azure Data Lake Storage Gen1, and Azure Data Lake Storage Gen2.
This article will guide you through:
- What kinds of data can be shared
- How to prepare your environment
- How to create a share
- How to receive shared data
You can use the table of contents to jump to the section you need, or continue with this article to follow the process from start to finish.
What's supported
Azure Data Share supports sharing data from Azure Data Lake Gen1, Azure Data Lake Gen2, and Azure storage.
| Resource type | Sharable resource |
|---|---|
| Azure Data Lake Gen1 and Gen2 | Files |
| Folders | |
| File systems | |
| Azure Storage | *Blobs |
| Folders | |
| Containers |
Note
*Block, append, and page blobs are all supported. However, when they are shared they will be received as block blobs.
Data shared from these sources can be received by Azure Data Lake Gen2 or Azure Blob Storage.
Share behavior
For file systems, containers, or folders, you can choose to make full or incremental snapshots of your data.
A full snapshot copies all specified files and folders at every snapshot.
An incremental snapshot copies only new or updated files, based on the last modified time of the files.
Existing files that have the same name are overwritten during a snapshot. A file that is deleted from the source isn't deleted on the target. Empty subfolders at the source aren't copied over to the target.
Prerequisites to share data
- If you don't have an Azure subscription, create a free account before you begin.
- An Azure Data Share account.
- Your data recipient's Azure sign-in e-mail address (using their e-mail alias won't work).
- If your Azure SQL resource is in a different Azure subscription than your Azure Data Share account, register the Microsoft.DataShare resource provider in the subscription where your source Azure SQL resource is located.
Prerequisites for the source storage account
- An Azure Storage account. If you don't already have an account, create one.
- Permission to write to the storage account. Write permission is in Microsoft.Storage/storageAccounts/write. It's part of the Contributor role.
- Permission to add role assignment to the storage account. This permission is in Microsoft.Authorization/role assignments/write. It's part of the Owner role.
Create a share
Sign in to the Azure portal.
Go to your data share Overview page.
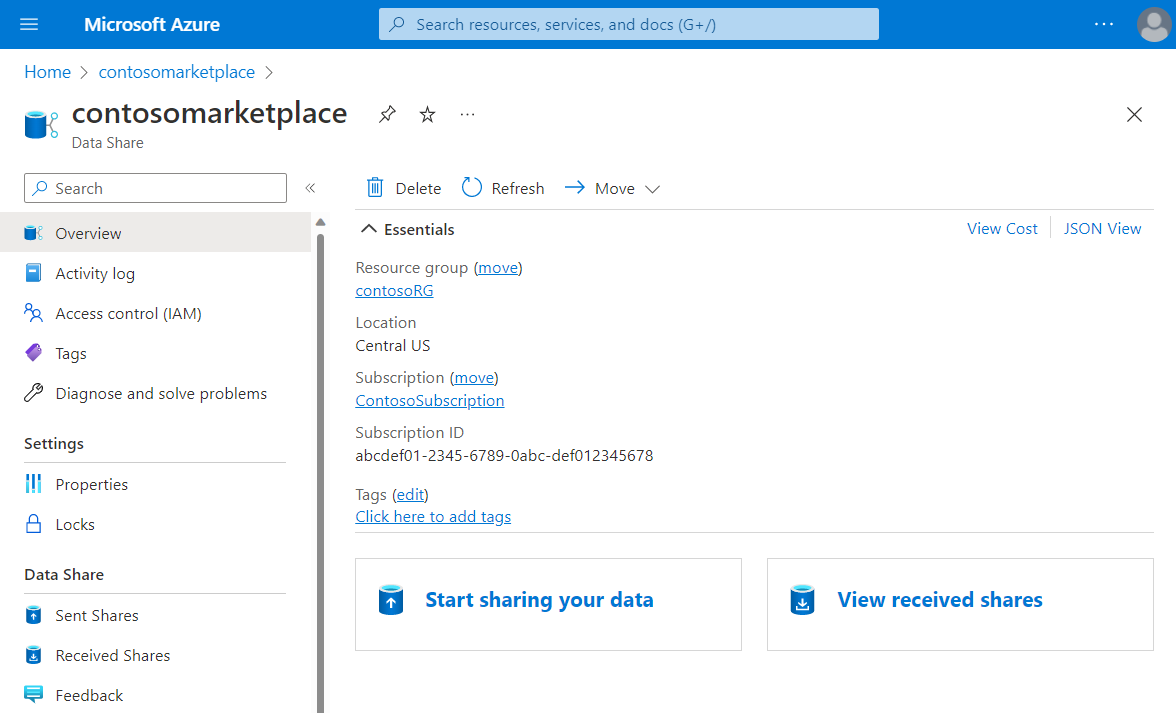
Select Start sharing your data.
Select Create.
Provide the details for your share. Specify a name, share type, description of share contents, and terms of use (optional).
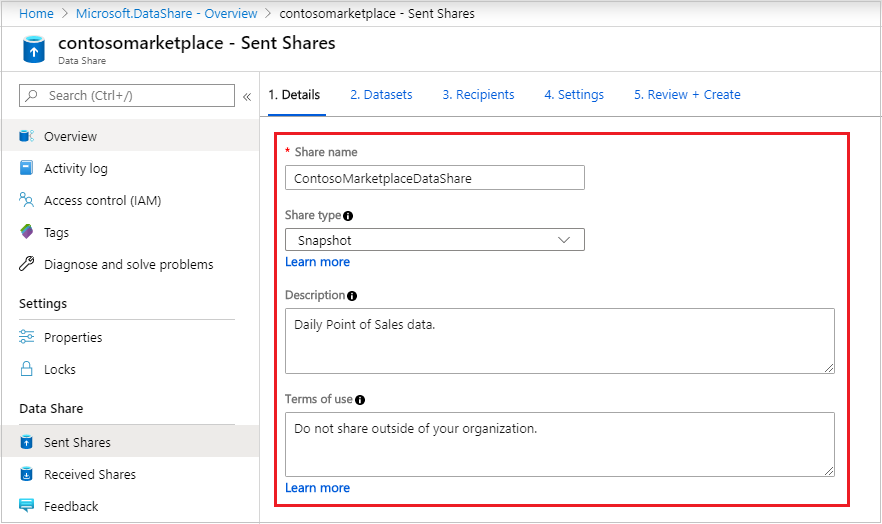
Select Continue.
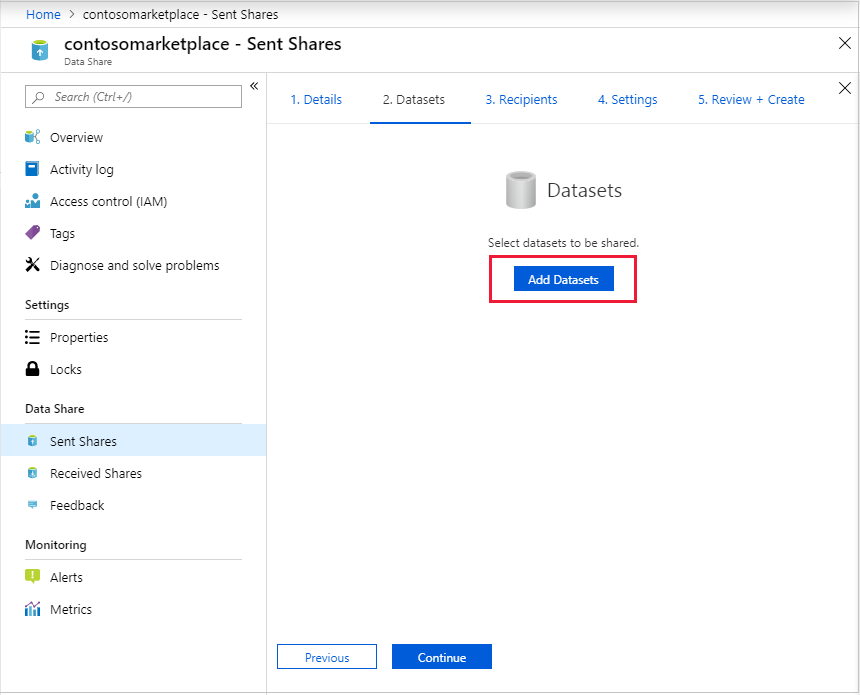
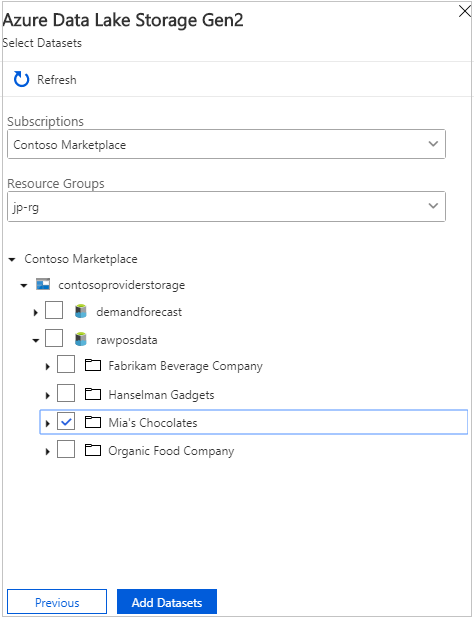
To add datasets to your share, select Add Datasets.
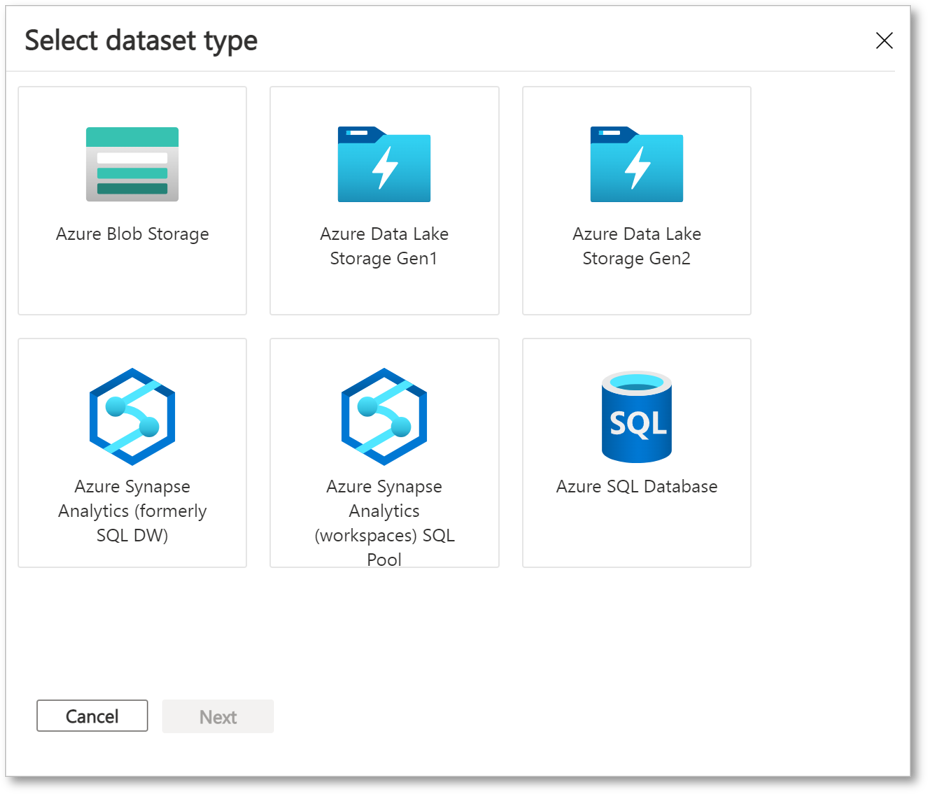
Select a dataset type to add. The list of dataset types depends on whether you selected snapshot-based sharing or in-place sharing in the previous step.
Go to the object you want to share. Then select Add Datasets.
On the Recipients tab, add the email address of your data consumer by selecting Add Recipient.
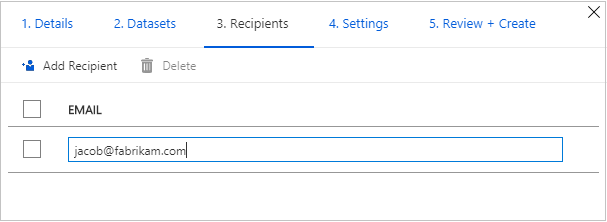
Select Continue.
If you selected a snapshot share type, you can set up the snapshot schedule to update your data for the data consumer.
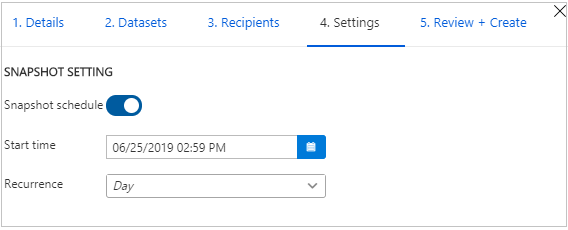
Select a start time and recurrence interval.
Select Continue.
On the Review + Create tab, review your package contents, settings, recipients, and synchronization settings. Then select Create.
You've now created your Azure data share. The recipient of your data share can accept your invitation.
Prerequisites to receive data
Before you accept a data share invitation, make sure you have the following prerequisites:
- An Azure subscription. If you don't have a subscription, create a free account.
- An invitation from Azure. The email subject should be "Azure Data Share invitation from <yourdataprovider@domain.com>".
- A registered Microsoft.DataShare resource provider in:
- The Azure subscription where you'll create a Data Share resource.
- The Azure subscription where your target Azure data stores are located.
Prerequisites for a target storage account
- An Azure Storage account. If you don't already have one, create an account.
- Permission to write to the storage account. This permission is in Microsoft.Storage/storageAccounts/write. It's part of the Contributor role.
- Permission to add role assignment to the storage account. This assignment is in Microsoft.Authorization/role assignments/write. It's part of the Owner role.
Receive shared data
Open an invitation
You can open an invitation from email or directly from the Azure portal.
To open an invitation from email, check your inbox for an invitation from your data provider. The invitation from Microsoft Azure is titled "Azure Data Share invitation from <yourdataprovider@domain.com>". Select View invitation to see your invitation in Azure.
To open an invitation from the Azure portal, search for Data Share invitations. You see a list of Data Share invitations.
If you're a guest user of a tenant, you'll be asked to verify your email address for the tenant prior to viewing Data Share invitation for the first time. Once verified, it's valid for 12 months.
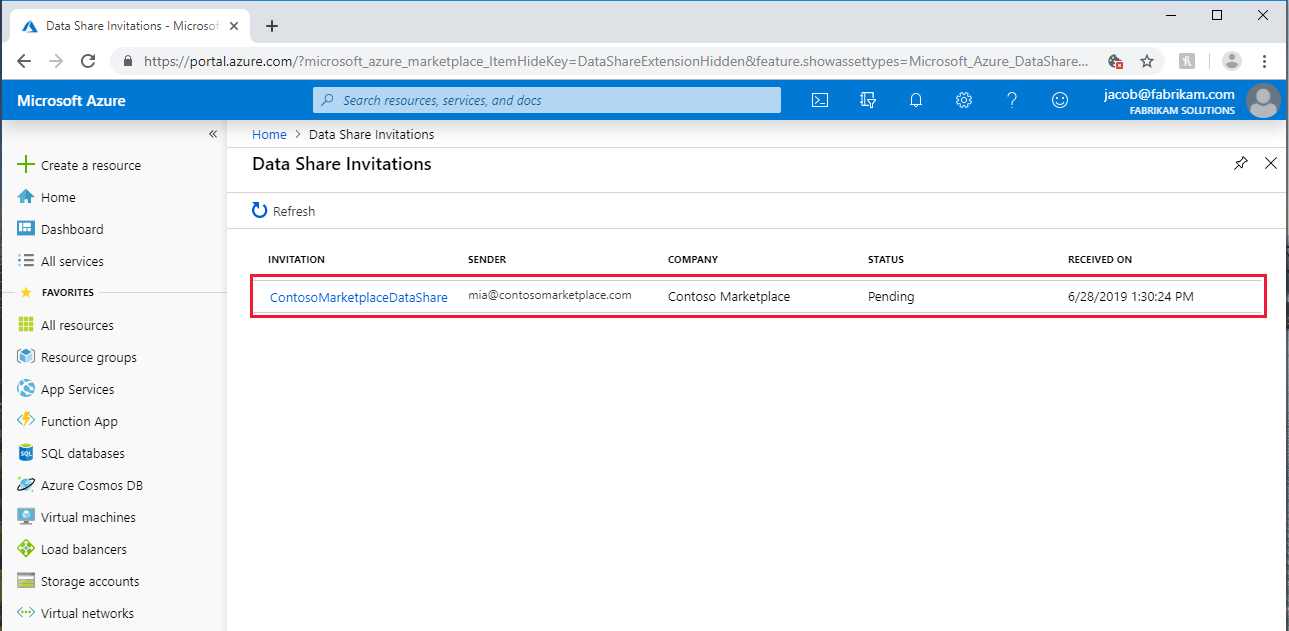
Select the share you want to view.
Accept an invitation
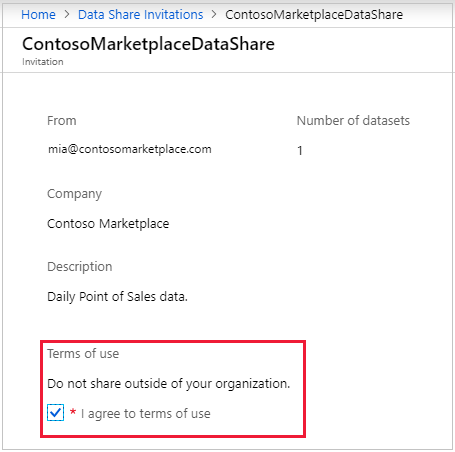
Review all of the fields, including the Terms of use. If you agree to the terms, select the check box.
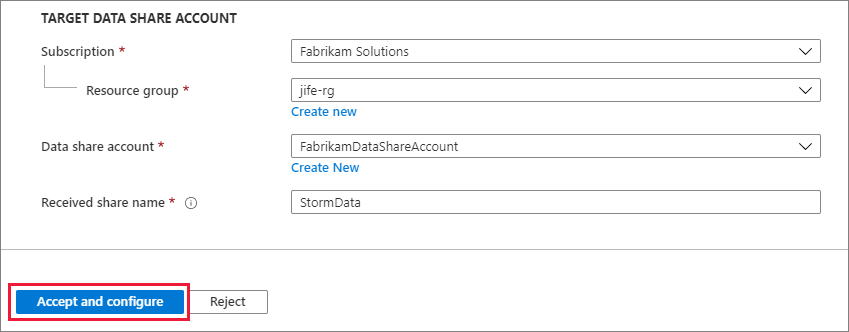
Under Target Data Share account, select the subscription and resource group where you'll deploy your Data Share. Then fill in the following fields:
In the Data share account field, select Create new if you don't have a Data Share account. Otherwise, select an existing Data Share account that will accept your data share.
In the Received share name field, either leave the default that the data provider specified or specify a new name for the received share.
Select Accept and configure. A share subscription is created.
The received share appears in your Data Share account.
If you don't want to accept the invitation, select Reject.
Configure a received share
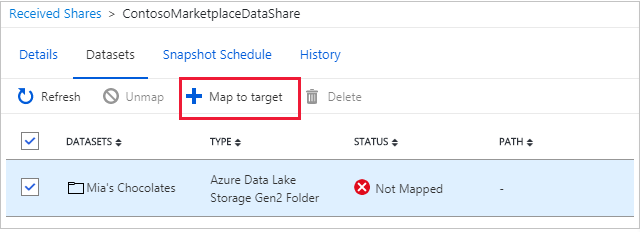
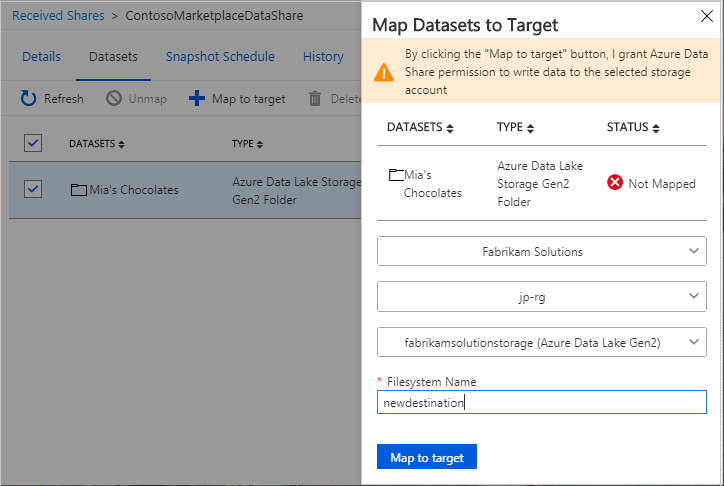
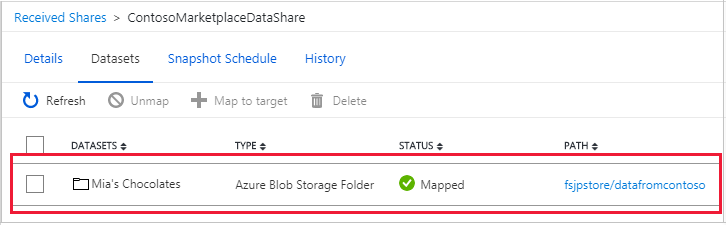
On the Datasets tab, select the check box next to the dataset where you want to assign a destination. Select Map to target to choose a target data store.
Select a target data store for the data. Files in the target data store that have the same path and name as files in the received data will be overwritten.
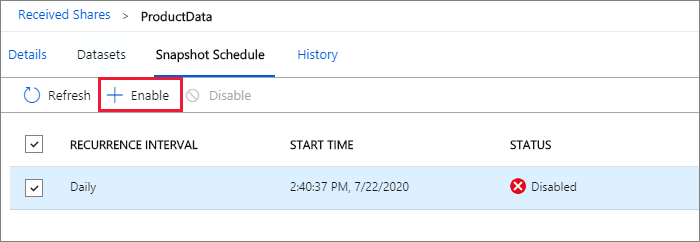
For snapshot-based sharing, if the data provider uses a snapshot schedule to regularly update the data, you can enable the schedule from the Snapshot Schedule tab. Select the box next to the snapshot schedule. Then select Enable. The first scheduled snapshot will start within one minute of the schedule time and subsequent snapshots will start within seconds of the scheduled time.
Trigger a snapshot
The steps in this section apply only to snapshot-based sharing.
You can trigger a snapshot from the Details tab. On the tab, select Trigger snapshot. You can choose to trigger a full snapshot or incremental snapshot of your data. If you're receiving data from your data provider for the first time, select Full copy. When a snapshot is executing, subsequent snapshots won't start until the previous one complete.
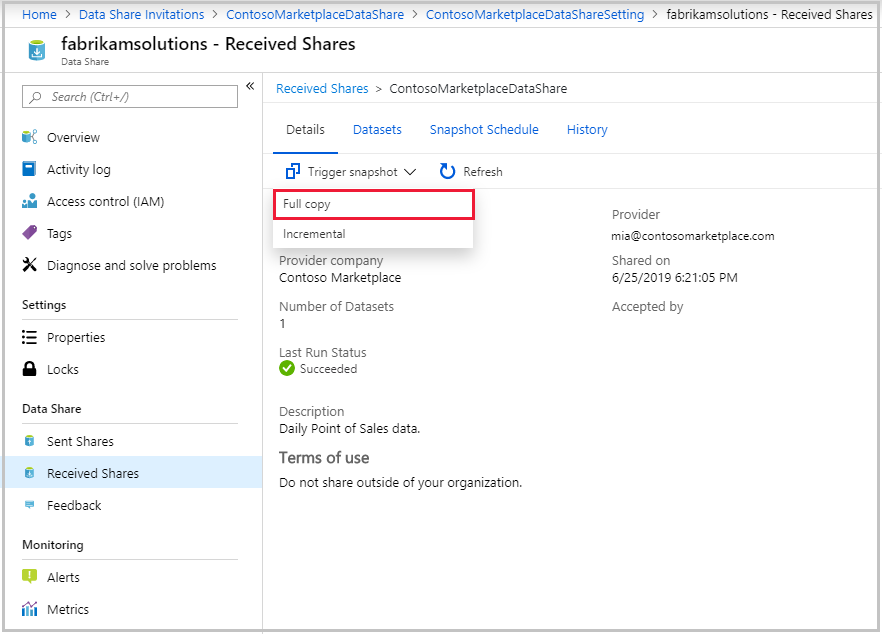
When the last run status is successful, go to the target data store to view the received data. Select Datasets, and then select the target path link.
View history
You can view the history of your snapshots only in snapshot-based sharing. To view the history, open the History tab. Here you see the history of all of the snapshots that were generated in the past 30 days.
Storage snapshot performance
Storage snapshot performance is impacted by many factors in addition to number of files and size of the shared data. It's always recommended to conduct your own performance testing. Below are some example factors impacting performance.
- Concurrent access to the source and target data stores.
- Location of source and target data stores.
- For incremental snapshot, the number of files in the shared dataset can affect the time it takes to find the list of files with last modified time after the last successful snapshot.
Next steps
You've learned how to share and receive data from a storage account by using the Azure Data Share service. To learn about sharing from other data sources, see the supported data stores.
คำติชม
เร็วๆ นี้: ตลอดปี 2024 เราจะขจัดปัญหา GitHub เพื่อเป็นกลไกคำติชมสำหรับเนื้อหา และแทนที่ด้วยระบบคำติชมใหม่ สำหรับข้อมูลเพิ่มเติม ให้ดู: https://aka.ms/ContentUserFeedback
ส่งและดูข้อคิดเห็นสำหรับ