หมายเหตุ
การเข้าถึงหน้านี้ต้องได้รับการอนุญาต คุณสามารถลอง ลงชื่อเข้าใช้หรือเปลี่ยนไดเรกทอรีได้
การเข้าถึงหน้านี้ต้องได้รับการอนุญาต คุณสามารถลองเปลี่ยนไดเรกทอรีได้
Important
While many Azure services have Jenkins plug-ins, most of these plug-ins ended support as of February 29, 2024. Azure CLI is the currently recommended way to integrate Jenkins with Azure services. For more information, refer to the article Jenkins plug-ins for Azure.
This tutorial shows how to create a Linux virtual machines in Azure and add the VM as a work node to Jenkins.
In this tutorial, you will:
- Create agent machine
- Add agent to Jenkins
- Create a new Jenkins freestyle job
- Run the job on an Azure VM agent
Prerequisites
- Jenkins installation: If you don't have access to a Jenkins installation, configure Jenkins using Azure CLI
Configure agent virtual machine
Use az group create to create an Azure resource group.
az group create --name <resource_group> --location <location>Use az vm create to create a virtual machine.
az vm create --resource-group <resource-group> --name <vm_name> --image UbuntuLTS --admin-username azureuser --admin-password "<password>"Key points:
- You can also upload your ssh key with the following command
--ssh-key-value <ssh_path>.
- You can also upload your ssh key with the following command
Install the JDK.
Log in to the virtual machine using an SSH tool.
ssh username@123.123.123.123Install the JDK with apt. You can also install with other package manager tools such as yum or pacman.
sudo apt-get install -y default-jdkAfter installation is complete, run
java -versionto verify the Java environment. The output will include the version numbers associated with various parts of the JDK.
Configure Jenkins URL
If you use JNLP, you'll need to configure the Jenkins URL.
From the menu, select Manage Jenkins.
Under System Configuration, select Configure System.
Verify that the Jenkins URL is set to the HTTP address of your Jenkins installation -
http://<your_host>.<your_domain>:8080/.Select Save.
Add agent to Jenkins
From the menu, select Manage Jenkins.
Under System Configuration, select Manage Nodes and Clouds.
From the menu, select New Node.
Enter a value for Node Name.
Select Permanent Agent.
Select OK.
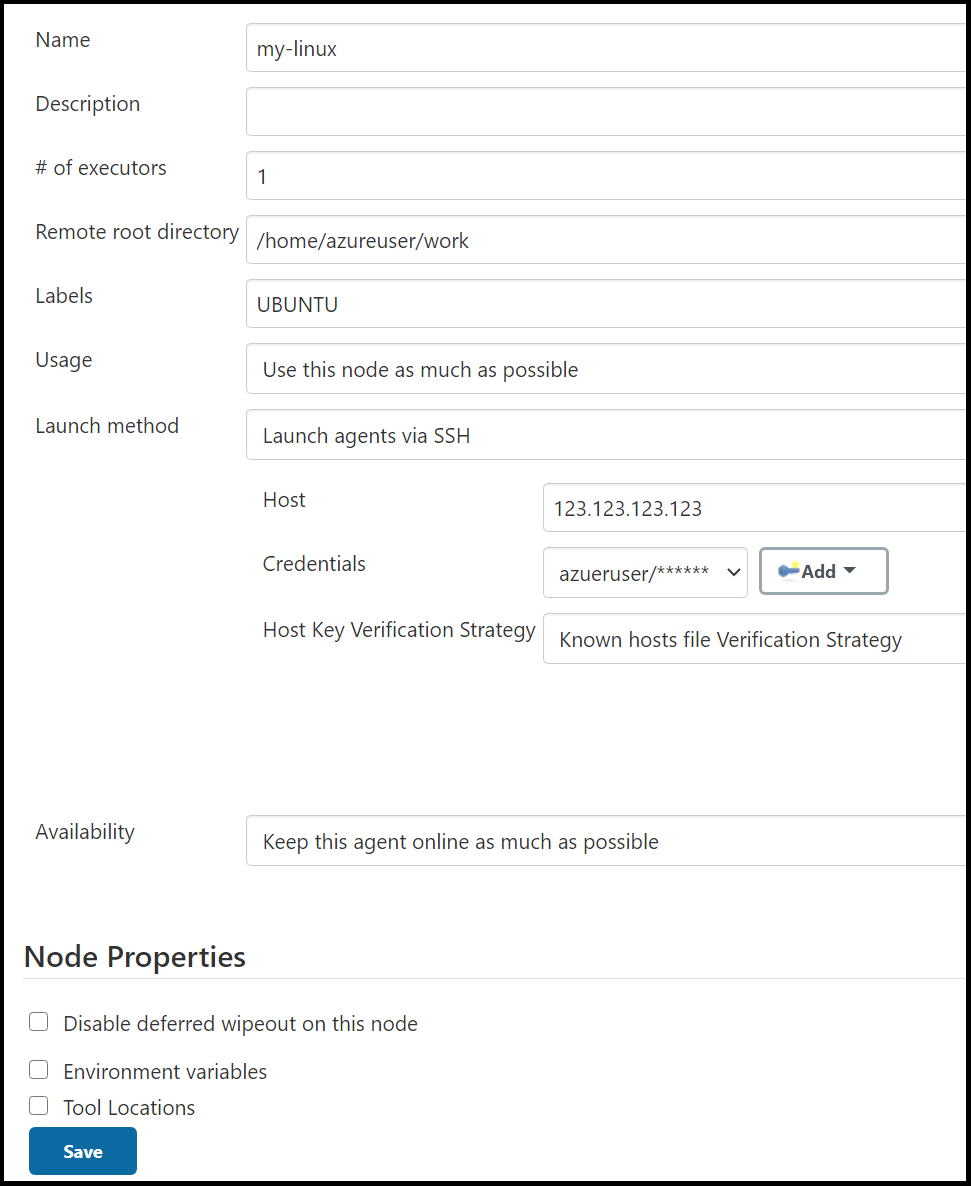
Specify values for the following fields:
Name: Specify a unique name that identifies an agent within the new Jenkins installation. This value can be different from the agent hostname. However, it's convenient to make them the two values the same. The name value is allowed any special character from the following list:
?*/\%!@#$^&|<>[]:;.Remote root directory: An agent needs to have a directory dedicated to Jenkins. Specify the path to this directory on the agent. It is best to use an absolute path, such as
/home/azureuser/workorc:\jenkins. This should be a path local to the agent machine. There is no need for this path to be visible from the master. If you use a relative path, such as ./jenkins-agent, the path will be relative to the working directory provided by the Launch method.Labels: Labels are used to group semantically related agents into one logical group. For example, you could define a label of
UBUNTUfor all your agents running the Ubuntu distro of Linux.Launch method: There are two options to start the remote Jenkins node: Launch agents via SSH and Launch agent via execution of command on the master:
Launch agents via SSH: Specify the values for the following fields:
Host: VM public IP address or domain name. For example,
123.123.123.123orexample.comCredentials: Select a credential to be used for logging in to the remote host. You can also select the Add button to define a new credential and then select that new credential once it's create.
Host Key Verification Strategy: Controls how Jenkins verifies the SSH key presented by the remote host whilst connecting.

Launch agent via execution of command on the master:
Download the
agent.jarfromhttps://<your_jenkins_host_name>/jnlpJars/agent.jar. For example,https://localhost:8443/jnlpJars/agent.jar.Upload
agent.jarto your virtual machineStart Jenkins with command
ssh <node_host> java -jar <remote_agentjar_path>. For example,ssh azureuser@99.99.999.9 java -jar /home/azureuser/agent.jar.

Select Save.
After you define the configurations, Jenkins adds the virtual machine as a new work node.

Create a job in Jenkins
From the menu, select New Item.
Enter
demoproject1for the name.Select Freestyle project.
Select OK.
In the General tab, choose Restrict where project can be run and type
ubuntuin Label Expression. You see a message confirming that the label is served by the cloud configuration created in the previous step.
In the Source Code Management tab, select Git and add the following URL into the Repository URL field:
https://github.com/spring-projects/spring-petclinic.gitIn the Build tab, select Add build step, then Invoke top-level Maven targets. Enter
packagein the Goals field.Select Save.
Build the new job on an Azure VM agent
Select the job you created in the previous step.
Select Build now. A new build is queued, but doesn't start until an agent VM is created in your Azure subscription.
Once the build is complete, go to Console output. You see that the build was performed remotely on an Azure agent.
