Replicate virtual machines running in an Azure Public MEC to Azure region
Important
The Azure Site Recovery functionality for Public MEC is in preview state.
This article describes how to replicate, failover, and failback Azure virtual machines (VMs) running on Azure Public MEC to the parent Azure region where Azure Public MEC is an extension.
Disaster recovery in Azure Public MEC
Site Recovery ensures business continuity by keeping workloads running during outages by continuously replicating the workload from primary to secondary location. The ASR functionality for MEC is in preview.
Here the primary location is an Azure Public MEC and secondary location is the parent region to which the Azure Public MEC is connected.
Set up disaster recovery for VMs in an Azure Public MEC using PowerShell
Prerequisites
Ensure Azure Az PowerShell module is installed. For information on how to install, see Install the Azure Az PowerShell module.
The minimum Azure Az PowerShell version must be 4.1.0. Use the following command to see the current version:
Get-InstalledModule -Name AzEnsure the Linux distro version and kernel is supported by Azure Site Recovery. For more information, see the support matrix.
Replicate Virtual machines running in an Azure Public MEC to Azure region
To replicate VMs running in an Azure Public MEC to Azure region, Follow these steps:
Note
For this example, the primary location is an Azure Public MEC, and the secondary/recovery location is the Azure Public MEC's region.
Sign-in to your Azure account.
Connect-AzAccountSelect Right subscription.
$subscription = Get-AzSubscription -SubscriptionName "<SubscriptionName>"
Set-AzContext $subscription.Id
Get the details of the virtual machine that you plan to replicate.
$VM = Get-AzVM -ResourceGroupName "<ResourceGroupName>" -Name "<VMName>"

Write-Output $VM
Create a resource group for the recovery services vault in the secondary Azure region.
New-AzResourceGroup -Name "edgezonerecoveryrg" -Location "<EdgeZoneRegion>"Create a new Recovery services vault in the secondary region.
$vault = New-AzRecoveryServicesVault -Name "EdgeZoneRecoveryVault" -
ResourceGroupName "edgezonerecovery" -Location "\<EdgeZoneRegion\>"
Write-Output $vault
Set the vault context.
Set-AzRecoveryServicesAsrVaultContext -Vault $vaultCreate Primary Site Recovery fabric.
$TempASRJob = New-AzRecoveryServicesAsrFabric -Azure -Location “<EdgeZoneRegion>” -
Name "EdgeZoneFabric"
Track Job status to check for completion.
while (($TempASRJob.State -eq "InProgress") -or ($TempASRJob.State -eq "NotStarted")){If the job hasn't completed, sleep for 10 seconds before checking the job status again.
sleep 10;
$TempASRJob = Get-AzRecoveryServicesAsrJob -Job $TempASRJob
}
On successful completion, the job state must be Succeeded.
Write-Output $TempASRJob.State
$PrimaryFabric = Get-AzRecoveryServicesAsrFabric -Name "EdgeZoneFabric"
Use the primary fabric to create both primary and recovery protection containers.
$TempASRJob = New-AzRecoveryServicesAsrProtectionContainer -InputObject
$PrimaryFabric -Name "EdgeZoneProtectionContainer"
Track Job status to check for completion.
while (($TempASRJob.State -eq "InProgress") -or ($TempASRJob.State -eq
"NotStarted")){
 sleep 10;
 $TempASRJob = Get-AzRecoveryServicesAsrJob -Job $TempASRJob
}
Write-Output $TempASRJob.State
Both primary and recovery Protection containers get created in the primary region (within the Primary fabric).
$PrimaryProtectionContainer = Get-AzRecoveryServicesAsrProtectionContainer -Fabric
$primaryFabric -Name "EdgeZoneProtectionContainer"
$RecoveryProtectionContainer = Get-AzRecoveryServicesAsrProtectionContainer -Fabric
$primaryFabric -Name "EdgeZoneProtectionContainer-t"
Create a replication policy.
$TempASRJob = New-AzRecoveryServicesAsrPolicy -AzureToAzure -Name
"ReplicationPolicy" -RecoveryPointRetentionInHours 24 -
ApplicationConsistentSnapshotFrequencyInHours 4
Track Job status to check for completion.
while (($TempASRJob.State -eq "InProgress") -or ($TempASRJob.State -eq
"NotStarted")){
 sleep 10;
 $TempASRJob = Get-AzRecoveryServicesAsrJob -Job $TempASRJob
}
On successful completion, the job state must be Succeeded.
Write-Output $TempASRJob.State

$ReplicationPolicy = Get-AzRecoveryServicesAsrPolicy -Name "ReplicationPolicy"
Create a protection container mapping between the primary and recovery protection containers with the Replication policy.
$TempASRJob = New-AzRecoveryServicesAsrProtectionContainerMapping -Name
"PrimaryToRecovery" -Policy $ReplicationPolicy -PrimaryProtectionContainer
$PrimaryProtectionContainer -RecoveryProtectionContainer
$RecoveryProtectionContainer
Track Job status to check for completion.
while (($TempASRJob.State -eq "InProgress") -or ($TempASRJob.State -eq
"NotStarted")){
 sleep 10;
 $TempASRJob = Get-AzRecoveryServicesAsrJob -Job $TempASRJob
}
On successful completion, the job state must be Succeeded.
Write-Output $TempASRJob.State

$EdgeZoneToAzurePCMapping = Get-AzRecoveryServicesAsrProtectionContainerMapping -
ProtectionContainer $PrimaryProtectionContainer -Name "PrimaryToRecovery"
Create a protection container mapping for failback, between the recovery and primary protection containers with the Replication policy.
$TempASRJob = New-AzRecoveryServicesAsrProtectionContainerMapping -Name
"RecoveryToPrimary" -Policy $ReplicationPolicy -PrimaryProtectionContainer
$RecoveryProtectionContainer -RecoveryProtectionContainer
$PrimaryProtectionContainer
Track Job status to check for completion.
while (($TempASRJob.State -eq "InProgress") -or ($TempASRJob.State -eq
"NotStarted")){
 sleep 10;
 $TempASRJob = Get-AzRecoveryServicesAsrJob -Job $TempASRJob
}
On successful completion, the job state must be Succeeded.
Write-Output $TempASRJob.State
$AzureToEdgeZonePCMapping = Get-AzRecoveryServicesAsrProtectionContainerMapping -
ProtectionContainer $RecoveryProtectionContainer -Name "RecoveryToPrimary"
Create a cache storage account for replication logs in the primary region. The cache storage account is created in the primary region.
$CacheStorageAccount = New-AzStorageAccount -Name "cachestorage" -ResourceGroupName
"<primary ResourceGroupName>" -Location '<EdgeZoneRegion>' -SkuName Standard_LRS -
Kind Storage
Ensure to create a virtual network in the target location. Create a Recovery Network in the recovery region.
$recoveryVnet = New-AzVirtualNetwork -Name "recoveryvnet" -ResourceGroupName
"recoveryrg" -Location '<EdgeZoneRegion>' -AddressPrefix "10.0.0.0/16"
Add-AzVirtualNetworkSubnetConfig -Name "defaultsubnetconf" -VirtualNetwork
$recoveryVnet -AddressPrefix "10.0.0.0/24" | Set-AzVirtualNetwork
$recoveryNetwork = $recoveryVnet.Id
Use the following PowerShell cmdlet to replicate an Azure Public MEC Azure virtual machine with managed disks. This step may take around 20 minutes to complete.
Get the resource group that the virtual machine must be created in when it's failed over.
$RecoveryRG = Get-AzResourceGroup -Name "edgezonerecoveryrg" -Location "
<EdgeZoneRegion>"
Get VM and display contents.
$vm = Get-AzVM -Name $vmName -ResourceGroupName $primaryResourceGroupNameSpecify replication properties for each disk of the VM that must be replicated (create disk replication configuration).
#OsDisk
$OSdiskId = $vm.StorageProfile.OsDisk.ManagedDisk.Id
$RecoveryOSDiskAccountType = $vm.StorageProfile.OsDisk.ManagedDisk.StorageAccountType
$RecoveryReplicaDiskAccountType =
$vm.StorageProfile.OsDisk.ManagedDisk.StorageAccountType
$OSDiskReplicationConfig = New-AzRecoveryServicesAsrAzureToAzureDiskReplicationConfig -
ManagedDisk -LogStorageAccountId $CacheStorageAccount.Id `
 -DiskId $OSdiskId -RecoveryResourceGroupId $RecoveryRG.ResourceId -
RecoveryReplicaDiskAccountType $RecoveryReplicaDiskAccountType `
 -RecoveryTargetDiskAccountType $RecoveryOSDiskAccountType
Data disk
If VM has data disk, use the following command to create disk configuration. If not, you can skip this section. From
$datadiskIdto$DataDisk1ReplicationConfig $datadiskId = $vm.StorageProfile.OSDisk.ManagedDisk.Id.Alternatively,
$RecoveryReplicaDiskAccountType = "Premium_LRS"
$RecoveryTargetDiskAccountType = "Premium_LRS"
$RecoveryRGId = $RecoveryRG.ResourceId
$DataDisk1ReplicationConfig = New-AzRecoveryServicesAsrAzureToAzureDiskReplicationConfig
-ManagedDisk -LogStorageAccountId $CacheStorageAccount.Id `
 -DiskId $OSdiskId -RecoveryResourceGroupId $RecoveryRGId -
RecoveryReplicaDiskAccountType $RecoveryReplicaDiskAccountType `
 -RecoveryTargetDiskAccountType $RecoveryTargetDiskAccountType
Create a replication protected item to start the replication. Use a GUID for the name of the replication protected item to ensure uniqueness of name. If you are not recovering to an Availability Zone, then don’t provide the
-RecoveryAvailabilityZoneparameter.$TempASRJob = New-AzRecoveryServicesAsrReplicationProtectedItem -AzureToAzure -AzureVmId $VM.Id -Name $vm.Name -ProtectionContainerMapping $EdgeZoneToAzurePCMapping - AzureToAzureDiskReplicationConfiguration $DataDisk1ReplicationConfig - RecoveryResourceGroupId $RecoveryRGId -RecoveryAvailabilityZone “1” - RecoveryAzureNetworkId $recoveryVnet.Id -RecoveryAzureSubnetName “defaultsubnetconf”Track Job status to check for completion.
while (($TempASRJob.State -eq "InProgress") -or ($TempASRJob.State -eq "NotStarted")){
sleep 10;
$TempASRJob = Get-AzRecoveryServicesAsrJob -Job $TempASRJob
}
Check if the Job is successfully completed. The updated job state of a successfully completed job must be Succeeded.
Write-Output $TempASRJob.StateAfter the operation to start replication succeeds, virtual machine data is replicated to the recovery region.
Initially, when the replication process starts, it creates a copy of the replicating disks of the virtual machine in the recovery region. This phase is called the initial replication phase. This step takes around 20 minutes. See the status of the replication in the Vault blade under Replicated items.

When the replication is completed, the Vault replication items will show as below:
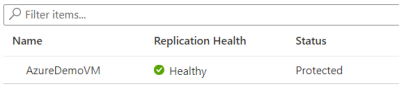
Now the virtual machine is protected, and you can perform a test failover operation. The replication state of the replicated item that represents the virtual machine goes to the protected state after initial replication completes.
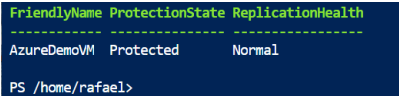
Monitor the replication state and replication health for the virtual machine by getting details of the replication protected item that corresponds to it:
$PE = Get-AzRecoveryServicesAsrReplicationProtectedItem
 -ProtectionContainer $PrimaryProtectionContainer
| Select FriendlyName, ProtectionState, ReplicationHealth
$PE
If you see Protected in the ProtectionState, you are ready to proceed to test failover.
Perform, validate, and clean up a test failover. You can skip the Test failover. However, we recommend executing test failover to ensure that your secondary region comes up as expected.
Create a separate network for test failover (not connected to my DR network).
$TFOVnet = New-AzVirtualNetwork -Name "TFOvnet" -ResourceGroupName "edgezonerecoveryrg"
-Location '<EdgeZoneRegion>' -AddressPrefix "10.3.0.0/26"

Add-AzVirtualNetworkSubnetConfig -Name "default" -VirtualNetwork $TFOVnet -AddressPrefix
"10.3.0.0/26" | Set-AzVirtualNetwork

$TFONetwork= $TFOVnet.Id
Perform a test failover.
$ReplicationProtectedItem = Get-AzRecoveryServicesAsrReplicationProtectedItem -
FriendlyName "<VMName>" -ProtectionContainer $PrimaryProtectionContainer

$TFOJob = Start-AzRecoveryServicesAsrTestFailoverJob -ReplicationProtectedItem
$ReplicationProtectedItem -AzureVMNetworkId $TFONetwork -Direction PrimaryToRecovery
Wait until job is finished.
while (($TFOJob.State -eq "InProgress") -or ($TFOJob.State -eq
"NotStarted")){
 sleep 10;
 $TFOJob = Get-AzRecoveryServicesAsrJob -Job $TFOJob
}
Wait for the test failover to complete.
Get-AzRecoveryServicesAsrJob -Job $TFOJob
Note
You can also check the progress of the job by going to portal, selecting the Vault and then select the Site Recovery Jobs.
After the test failover job completes successfully, you can connect to the test failed over virtual machine and validate the test failover. Once testing is complete on the test failed over virtual machine, clean up the test copy by starting the cleanup test failover operation. This operation deletes the test copy of the virtual machine that was created by the test failover. Verify that all the target settings are right in the test failover VM including location, network setting, no data corruption, and no data is lost in the target VM. Now you can delete the test failover and start the failover.
$Job_TFOCleanup = Start-AzRecoveryServicesAsrTestFailoverCleanupJob -
ReplicationProtectedItem $ReplicationProtectedItem
Get-AzRecoveryServicesAsrJob -Job $Job_TFOCleanup | Select State
Next step would be to fail over the virtual machine. This step will create the VM using the replicated disks in recovery region.
$ReplicationProtectedItem = Get-AzRecoveryServicesAsrReplicationProtectedItem -
FriendlyName "<VMName>" -ProtectionContainer $PrimaryProtectionContainer
$RecoveryPoints = Get-AzRecoveryServicesAsrRecoveryPoint -ReplicationProtectedItem
$ReplicationProtectedItem
The list of recovery points returned may not be sorted chronologically. You need to sort these first to find the oldest or the latest recovery points for the virtual machine.
 "{0} {1}" -f $RecoveryPoints[0].RecoveryPointType, $RecoveryPoints[-
1].RecoveryPointTime
Start the failover job.
$Job_Failover = Start-AzRecoveryServicesAsrUnplannedFailoverJob -
ReplicationProtectedItem $ReplicationProtectedItem -Direction PrimaryToRecovery -
RecoveryPoint $RecoveryPoints[-1]
do {
$Job_Failover = Get-AzRecoveryServicesAsrJob -Job $Job_Failover;
sleep 30;
} while (($Job_Failover.State -eq "InProgress") -or ($JobFailover.State -eq
"NotStarted"))
$Job_Failover.State
When the failover job is successful, you can commit the failover.
 $CommitFailoverJob = Start-AzRecoveryServicesAsrCommitFailoverJob -
ReplicationProtectedItem $ReplicationProtectedItem
Wait until commit failover job is finished.
while (($CommitFailoverJob.State -eq "InProgress") -or ($CommitFailoverJob.State
-eq "NotStarted")){
 sleep 10;
 $CommitFailoverJob = Get-AzRecoveryServicesAsrJob -Job $CommitFailoverJob
}
 Get-AzRecoveryServicesAsrJob -Job $CommitFailoverJOb
After a failover, when you're ready to go back to the original region, start reverse replication for the replication protected item using the
Update-AzRecoveryServicesAsrProtectionDirectioncmdlet.Create Cache storage account for replication logs in the recovery region.
$EdgeZoneCacheStorageAccount = New-AzStorageAccount -Name "cachestorageedgezone" -
ResourceGroupName "<ResourceGroupName>" -Location '<EdgeZoneRegion>' -SkuName
Standard_LRS -Kind Storage
Use the recovery protection container, the new cache storage account in Azure Public MEC's region, and the source region VM resource group.
$ReplicationProtectedItem = Get-AzRecoveryServicesAsrReplicationProtectedItem -
FriendlyName $vm.name -ProtectionContainer $PrimaryProtectionContainer
 $sourceVMResourcegroupId = $(Get-AzResourceGroup -Name $vm.ResourceGroupName).
ResourceId
Update-ASRProtectionDirection -ReplicationProtectedItem $ReplicationProtectedItem `
 -AzureToAzure `
 -ProtectionContainerMapping $AzureToEdgeZonePCMapping `
 -LogStorageAccountId $EdgeZoneCacheStorageAccount.Id `
 -RecoveryResourceGroupID $sourceVMResourcegroupId
This step takes ~20 minutes and the status will move from In progress to Successful.

Disable replication.
Remove-AzRecoveryServicesAsrReplicationProtectedItem -ReplicationProtectedItem
$ReplicationProtectedItem
Clean the environment. This step is optional and can be used to remove the resource group.
Remove-AzResourceGroup -Name $Name -Force

คำติชม
เร็วๆ นี้: ตลอดปี 2024 เราจะขจัดปัญหา GitHub เพื่อเป็นกลไกคำติชมสำหรับเนื้อหา และแทนที่ด้วยระบบคำติชมใหม่ สำหรับข้อมูลเพิ่มเติม ให้ดู: https://aka.ms/ContentUserFeedback
ส่งและดูข้อคิดเห็นสำหรับ