Get incident notifications by email in Microsoft Defender XDR
Applies to:
- Microsoft Defender XDR
Important
Some information in this article relates to a prereleased product which may be substantially modified before it's commercially released. Microsoft makes no warranties, expressed or implied, with respect to the information provided here.
You can set up Microsoft Defender XDR to notify your staff with an email about new incidents or updates to existing incidents. You can choose to get notifications based on:
- Alert severity
- Alert sources
- Device group
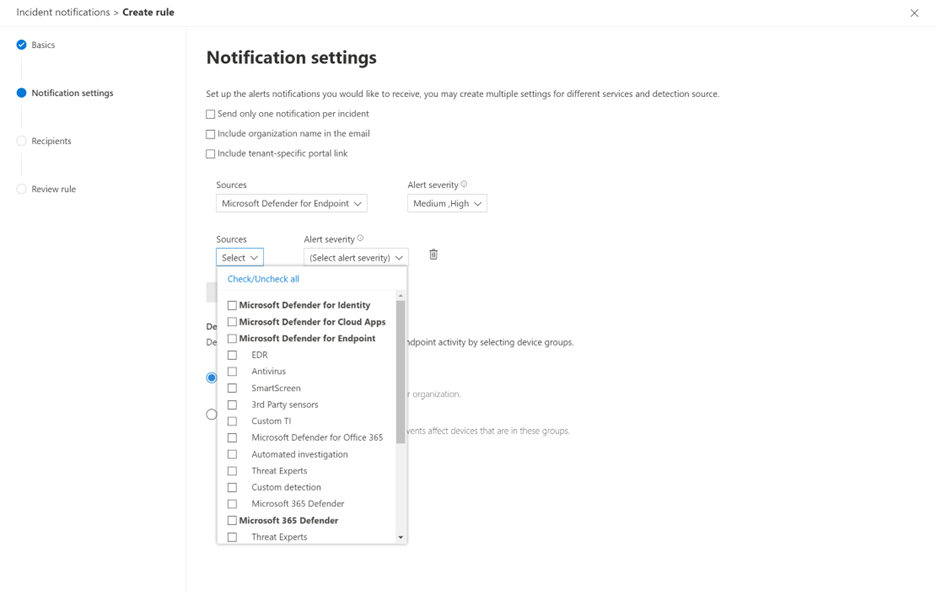
Choose to receive email notifications only for specific service source: You can easily select specific service sources that you want to get email notifications for.
Get more granularity with specific detection sources: You can get notifications only for a specific detection source.
Set the severity per detection or service source: You can choose to get email notifications only on specific severities per source. For example, you can get notified for Medium and High alerts for EDR and all severities for Microsoft Defender Experts.
The email notification contains important details about the incident like the incident name, severity, and categories, among others. You can also go directly to the incident and start your analysis right away. For more information, see Investigate incidents.
You can add or remove recipients in the email notifications. New recipients get notified about incidents after they're added.
Note
You need the Manage security settings permission to configure email notification settings. If you've chosen to use basic permissions management, users with Security Administrator or Global Administrator roles can configure email notifications.
Likewise, if your organization is using role-based access control (RBAC), you can only create, edit, delete, and receive notifications based on device groups that you are allowed to manage.
Note
Microsoft recommends using roles with fewer permissions for better security. The Global Administrator role, which has many permissions, should only be used in emergencies when no other role fits.
Create a rule for email notifications
Follow these steps to create a new rule and customize email notification settings.
Go to Microsoft Defender XDR in the navigation pane, select Settings > Microsoft Defender XDR > Incident email notifications.
Select Add item.
On the Basics page, type the rule name and a description, and then select Next.
On the Notification settings page, configure:
- Alert severity - Choose the alert severities that will trigger an incident notification. For example, if you only want to be informed about high-severity incidents, select High.
- Device group scope - You can specify all device groups or select from the list of device groups in your tenant.
- Send only one notification per incident - Select if you want one notification per incident.
- Include organization name in the email - Select if you want your organization name to appear in the email notification.
- Include tenant-specific portal link - Select if you want to add a link with the tenant ID in the email notification for access to a specific Microsoft 365 tenant.
Select Next. On the Recipients page, add the email addresses that will receive the incident notifications. Select Add after typing each new email address. To test notifications and ensure that the recipients receive them in the inboxes, select Send test email.
Select Next. On the Review rule page, review the settings of the rule, and then select Create rule. Recipients will start receiving incident notifications through email based on the settings.
To edit an existing rule, select it from the list of rules. On the pane with the rule name, select Edit rule and make your changes on the Basics, Notification settings, and Recipients pages.
To delete a rule, select it from the list of rules. On the pane with the rule name, select Delete.
Once you get the notification, you can go directly to the incident and start your investigation right away. For more information on investigating incidents, see Investigate incidents in Microsoft Defender XDR.
Next steps
- Get email notifications on response actions
- Get email notifications about new reports in Threat analytics
