หมายเหตุ
การเข้าถึงหน้านี้ต้องได้รับการอนุญาต คุณสามารถลอง ลงชื่อเข้าใช้หรือเปลี่ยนไดเรกทอรีได้
การเข้าถึงหน้านี้ต้องได้รับการอนุญาต คุณสามารถลองเปลี่ยนไดเรกทอรีได้
You can use role-based access control and scope tags to make sure that your Intune admins have the correct access and visibility to the Intune objects you expect them to manage. Roles determine what access admins have to which objects. Scope tags determine which objects admins can see.
For example, let's say a Seattle regional office admin has the Policy and Profile Manager role. You want this admin to see and manage only the profiles and policies that only apply to Seattle devices, a group of devices that are all located at the Seattle office. To set up this access, you would:
- Create a scope tag called Seattle.
- Create a role assignment for the Policy and Profile Manager role with:
- Members (Groups) = A security group named Seattle IT admins. All admins in this group have permission to manage policies and profiles for users/devices in the Scope (Groups).
- Scope (Groups) = A security group named Seattle users. All users/devices in this group can have their profiles and policies managed by the admins in the Members (Groups).
- Scope (Tags) = Seattle. Admins in the Member (Groups) can see Intune objects that also have the Seattle scope tag.
- Add the Seattle scope tag to policies and profiles that you want admins in Members (Groups) to have access to.
- Add the Seattle scope tag to devices that you want visible to admins in the Members (Groups).
Default scope tag
The default scope tag is automatically added to all untagged objects that support scope tags.
The default scope tag feature is similar to the security scopes feature in Microsoft Configuration Manager.
Note
When you configure or edit Intune policies, some policy types might not display the Scope Tags configuration page if there are no custom defined scope tags for the tenant. If you don't see the Scope Tag option, ensure that at least one tag in addition to the default scope tag is defined.
To create a scope tag
Creating, updating, or deleting scope tags requires an administrator assigned the Global Administrator or Intune Administrator Entra ID role. Administrators with a scope tag in their role assignment can't update or delete the scope tag from the master list of scope tags.
In the Microsoft Intune admin center, choose Tenant administration > Roles > Scope (Tags) > Create.
On the Basics page, provide a Name and optional Description. Choose Next.
On the Assignments page, choose the groups containing the devices that you want to assign this scope tag. Choose Next.
On the Review + create page, choose Create.
Important
Auto scope tags assignments overwrite manually assigned scope tags. If a device is assigned multiple scope tags through group assignment, all scope tags apply.
To assign a scope tag to a role
In the Microsoft Intune admin center, choose Tenant administration > Roles > All roles > choose a role > Assignments > Assign.
On the Basics page, provide an Assignment name and Description. Choose Next.
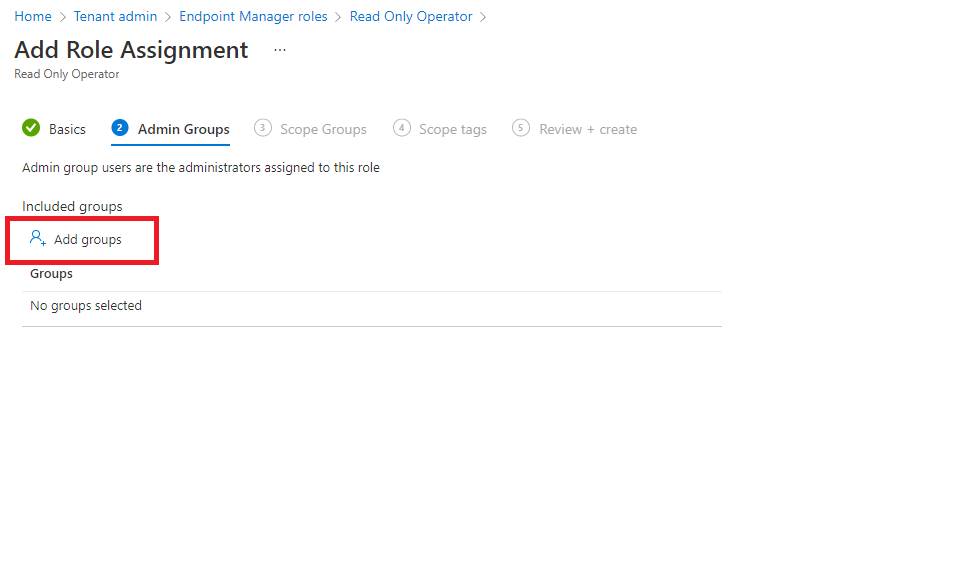
On the Admin Groups page, choose Add groups, and select the groups that you want as part of this assignment. Users in these groups have permissions to manage users/devices in the Scope (Groups). Choose Next.
On the Scope Groups page, select one of the following options for Included groups:
- Add groups: Select the groups containing the users/devices that you want to manage. All users/devices in the selected groups are managed by the users in the Admin Groups.
- Add All users: Users in the Admin Groups can manage all users.
- Add All devices: Users in the Admin Groups can manage all devices.
Choose Next
On the Scope tags page, select the tags that you want to add to this role. Users in the Admin Groups have access to Intune objects that also have the same scope tag. You can assign a maximum of 100 scope tags to a role.
Choose Next to go to the Review + create page and then choose Create.
Assign scope tags to other objects
For objects that support scope tags, scope tags usually appear under Properties. For example, to assign a scope tag to a configuration profile, follow these steps:
In the Microsoft Intune admin center, choose Devices > Manage devices > Configuration > choose a profile.
Choose Properties > Scope (Tags) > Edit > Select scope tags > choose the tags that you want to add to the profile. You can assign a maximum of 100 scope tags to an object.
Choose Select > Review + save.
Scope tag details
When working with scope tags, remember these details:
- You can assign scope tags to an Intune object type if the tenant can have multiple versions of that object (such as role assignments or apps).
The following Intune objects are exceptions to this rule and don't currently support scope tags:
- Corp Device Identifiers
- Windows Autopilot Devices
- Device compliance locations
- Jamf devices
- Volume Purchase Program (VPP) apps and ebooks associated with the VPP token inherit the scope tags assigned to the associated VPP token.
- When an admin creates an object in Intune, all scope tags assigned to that admin are automatically assigned to the new object.
- Intune RBAC doesn't apply to Microsoft Entra roles. So, the Intune Service Admins and Global Admins roles have full admin access to Intune no matter what scope tags they have.
- If a role assignment has no scope tag, that IT admin can see all objects based on the IT admins permissions. Admins that have no scope tags essentially have all scope tags.
- You can only assign a scope tag that you have in your role assignments.
- You can only target groups that are listed in the Scope (Groups) of your role assignment.
- If you have a scope tag assigned to your role, you can't delete all scope tags on an Intune object. At least one scope tag is required.
Next steps
Learn how scope tags behave when there are multiple role assignments. Manage your roles and profiles.