หมายเหตุ
การเข้าถึงหน้านี้ต้องได้รับการอนุญาต คุณสามารถลอง ลงชื่อเข้าใช้หรือเปลี่ยนไดเรกทอรีได้
การเข้าถึงหน้านี้ต้องได้รับการอนุญาต คุณสามารถลองเปลี่ยนไดเรกทอรีได้
การเริ่มต้นใช้งานด่วนนี้จะแนะนําคุณในการสร้าง ตัวแทนกลไกจัดการแบบกําหนดเอง ที่ตอบกลับด้วยข้อความใดก็ตามที่คุณส่งไป
ข้อกำหนดเบื้องต้น
Python 3.9 หรือใหม่กว่า
- เมื่อต้องการติดตั้ง Python ให้ไปที่ https://www.python.org/downloads/และทําตามคําแนะนําสําหรับระบบปฏิบัติการของคุณ
- เมื่อต้องการตรวจสอบเวอร์ชัน ในชนิด
python --versionหน้าต่างเทอร์มินัล
ตัวแก้ไขโค้ดที่คุณเลือก คําแนะนําเหล่านี้ใช้ Visual Studio Code
หากคุณใช้ Visual Studio Code ให้ติดตั้ง ส่วนขยาย Python
เริ่มต้นโครงการและติดตั้ง SDK
สร้างโครงการ Python และติดตั้งการขึ้นต่อกันที่จําเป็น
เปิดเทอร์มินัลและสร้างโฟลเดอร์ใหม่
mkdir echo
cd echo
เปิดโฟลเดอร์โดยใช้รหัส Visual Studio โดยใช้คําสั่งนี้:
code .สร้างสภาพแวดล้อมเสมือนด้วยวิธีการที่คุณเลือกและเปิดใช้งานผ่าน Visual Studio Code หรือในเทอร์มินัล
เมื่อใช้ Visual Studio Code คุณสามารถใช้ขั้นตอนเหล่านี้กับ ส่วนขยาย Python ที่ติดตั้งไว้
กด F1 พิมพ์
Python: Create environmentและกด Enterเลือก Venv เพื่อสร้าง
.venvสภาพแวดล้อมเสมือนในพื้นที่ทํางานปัจจุบันเลือกการติดตั้ง Python เพื่อสร้างสภาพแวดล้อมเสมือน
ค่าอาจมีลักษณะดังนี้:
Python 1.13.6 ~\AppData\Local\Programs\Python\Python313\python.exe
ติดตั้ง Agents SDK
ใช้ pip เพื่อติดตั้งแพคเกจ microsoft-agents-hosting-aiohttp ด้วยคําสั่งนี้:
pip install microsoft-agents-hosting-aiohttp
สร้างแอปพลิเคชันเซิร์ฟเวอร์และนําเข้าไลบรารีที่จําเป็น
สร้างไฟล์ที่ชื่อ คัดลอก
start_server.pyโค้ดต่อไปนี้ และวางใน:# start_server.py from os import environ from microsoft_agents.hosting.core import AgentApplication, AgentAuthConfiguration from microsoft_agents.hosting.aiohttp import ( start_agent_process, jwt_authorization_middleware, CloudAdapter, ) from aiohttp.web import Request, Response, Application, run_app def start_server( agent_application: AgentApplication, auth_configuration: AgentAuthConfiguration ): async def entry_point(req: Request) -> Response: agent: AgentApplication = req.app["agent_app"] adapter: CloudAdapter = req.app["adapter"] return await start_agent_process( req, agent, adapter, ) APP = Application(middlewares=[jwt_authorization_middleware]) APP.router.add_post("/api/messages", entry_point) APP.router.add_get("/api/messages", lambda _: Response(status=200)) APP["agent_configuration"] = auth_configuration APP["agent_app"] = agent_application APP["adapter"] = agent_application.adapter try: run_app(APP, host="localhost", port=environ.get("PORT", 3978)) except Exception as error: raise errorรหัสนี้จะกําหนด
start_serverฟังก์ชันที่เราจะใช้ในไฟล์ถัดไปในไดเรกทอรีเดียวกัน สร้างไฟล์ที่
app.pyชื่อด้วยโค้ดต่อไปนี้# app.py from microsoft_agents.hosting.core import ( AgentApplication, TurnState, TurnContext, MemoryStorage, ) from microsoft_agents.hosting.aiohttp import CloudAdapter from start_server import start_server
สร้างอินสแตนซ์ของเอเจนต์เป็น AgentApplication
ใน app.pyให้เพิ่มรหัสต่อไปนี้เพื่อสร้าง AGENT_APP เป็นอินสแตนซ์ของ AgentApplicationและใช้กระบวนการผลิตสามเส้นทางเพื่อตอบสนองต่อเหตุการณ์สามเหตุการณ์:
- ปรับปรุงการสนทนา
- ข้อความ
/help - กิจกรรมอื่นๆ
AGENT_APP = AgentApplication[TurnState](
    storage=MemoryStorage(), adapter=CloudAdapter()
)

async def _help(context: TurnContext, _: TurnState):
    await context.send_activity(
        "Welcome to the Echo Agent sample 🚀. "
        "Type /help for help or send a message to see the echo feature in action."
    )

AGENT_APP.conversation_update("membersAdded")(_help)

AGENT_APP.message("/help")(_help)


@AGENT_APP.activity("message")
async def on_message(context: TurnContext, _):
    await context.send_activity(f"you said: {context.activity.text}")
เริ่มเว็บเซิร์ฟเวอร์เพื่อฟังใน localhost:3978
ที่ส่วนท้ายของ app.pyเริ่มต้นเว็บเซิร์ฟเวอร์โดยใช้start_server
if __name__ == "__main__":
    try:
        start_server(AGENT_APP, None)
    except Exception as error:
        raise error
เรียกใช้ตัวแทนภายในโหมดไม่ระบุชื่อ
จากเทอร์มินัลของคุณ ให้เรียกใช้คําสั่งนี้:
python app.py
เทอร์มินัลควรส่งกลับรายการต่อไปนี้:
======== Running on http://localhost:3978 ========
(Press CTRL+C to quit)
ทดสอบเอเจนต์ภายในเครื่อง
จากเทอร์มินัลอื่น (เพื่อให้ตัวแทนทํางาน) ติดตั้ง Microsoft 365 Agents Playground ด้วยคําสั่งนี้:
npm install -g @microsoft/teams-app-test-toolหมายเหตุ
คําสั่งนี้ใช้ npm เนื่องจาก Microsoft 365 Agents Playground ไม่พร้อมใช้งานโดยใช้ pip
เทอร์มินัลควรส่งกลับบางอย่างเช่น:
added 1 package, and audited 130 packages in 1s

19 packages are looking for funding
run `npm fund` for details

found 0 vulnerabilities
เรียกใช้เครื่องมือทดสอบเพื่อโต้ตอบกับตัวแทนของคุณโดยใช้คําสั่งนี้:
teamsapptesterเทอร์มินัลควรส่งกลับบางอย่างเช่น:
Telemetry: agents-playground-cli/serverStart {"cleanProperties":{"options":"{\"configFileOptions\":{\"path\":\"<REDACTED: user-file-path>\"},\"appConfig\":{},\"port\":56150,\"disableTelemetry\":false}"}}

Telemetry: agents-playground-cli/cliStart {"cleanProperties":{"isExec":"false","argv":"<REDACTED: user-file-path>,<REDACTED: user-file-path>"}}

Listening on 56150
Microsoft 365 Agents Playground is being launched for you to debug the app: http://localhost:56150
started web socket client
started web socket client
Waiting for connection of endpoint: http://127.0.0.1:3978/api/messages
waiting for 1 resources: http://127.0.0.1:3978/api/messages
wait-on(37568) complete
Telemetry: agents-playground-server/getConfig {"cleanProperties":{"internalConfig":"{\"locale\":\"en-US\",\"localTimezone\":\"America/Los_Angeles\",\"channelId\":\"msteams\"}"}}

Telemetry: agents-playground-server/sendActivity {"cleanProperties":{"activityType":"installationUpdate","conversationId":"5305bb42-59c9-4a4c-a2b6-e7a8f4162ede","headers":"{\"x-ms-agents-playground\":\"true\"}"}}

Telemetry: agents-playground-server/sendActivity {"cleanProperties":{"activityType":"conversationUpdate","conversationId":"5305bb42-59c9-4a4c-a2b6-e7a8f4162ede","headers":"{\"x-ms-agents-playground\":\"true\"}"}}
คําสั่ง teamsapptester เปิดเบราว์เซอร์เริ่มต้นของคุณและเชื่อมต่อกับตัวแทนของคุณ
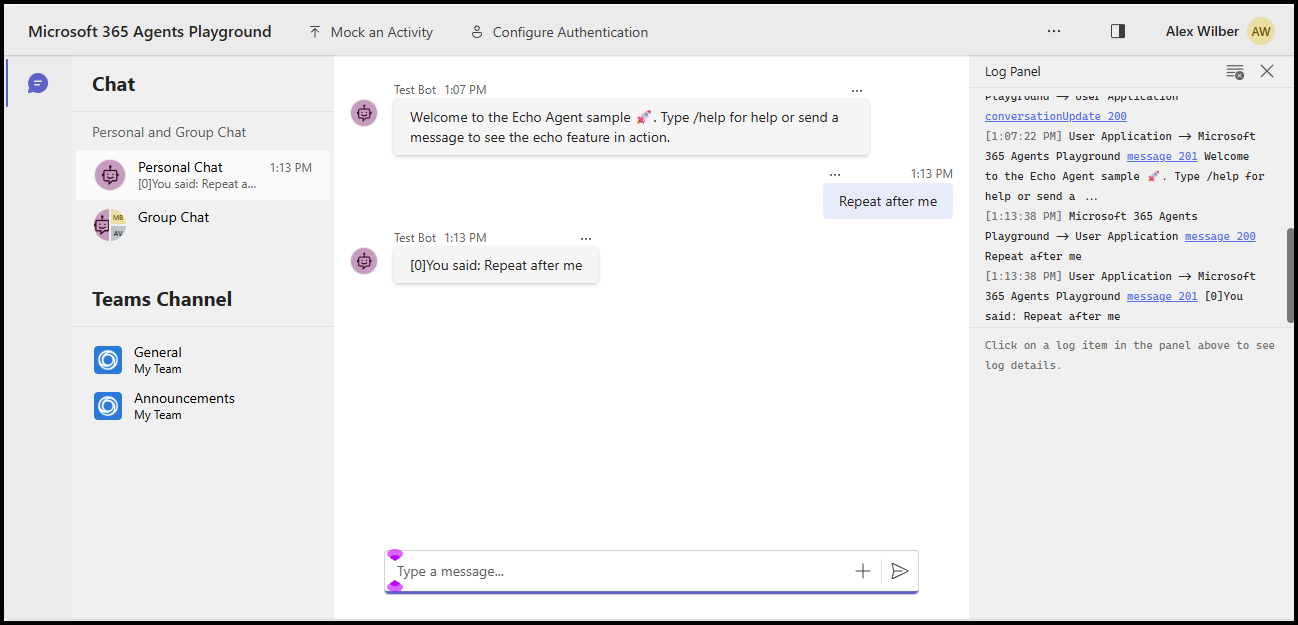
ในตอนนี้ คุณสามารถส่งข้อความเพื่อดูการตอบกลับ echo หรือส่งข้อความ /help เพื่อดูว่าข้อความนั้นถูกส่งไปยัง _help ตัวจัดการได้อย่างไร
การเริ่มต้นใช้งานด่วนนี้จะแนะนําคุณในการสร้าง ตัวแทนกลไกจัดการแบบกําหนดเอง ที่ตอบกลับด้วยข้อความใดก็ตามที่คุณส่งไป
ข้อกำหนดเบื้องต้น
Node.js v22 หรือใหม่กว่า
- เมื่อต้องการติดตั้ง Node.js ให้ไปที่ nodejs.org แล้วทําตามคําแนะนําสําหรับระบบปฏิบัติการของคุณ
- เมื่อต้องการตรวจสอบเวอร์ชัน ในชนิด
node --versionหน้าต่างเทอร์มินัล
ตัวแก้ไขโค้ดที่คุณเลือก คําแนะนําเหล่านี้ใช้ Visual Studio Code
เริ่มต้นโครงการและติดตั้ง SDK
ใช้ npm เพื่อเริ่มต้นโครงการ node.js โดยการสร้าง package.json และติดตั้งการขึ้นต่อกันที่จําเป็น
เปิดเทอร์มินัลและสร้างโฟลเดอร์ใหม่
mkdir echo
cd echo
เตรียมใช้งานโครงการ node.js
npm init -yติดตั้ง Agents SDK
npm install @microsoft/agents-hosting-expressเปิดโฟลเดอร์โดยใช้ Visual Studio Code โดยใช้คําสั่งนี้:
code .
นําเข้าไลบรารีที่จําเป็น
สร้างไฟล์ index.mjs และนําเข้าแพคเกจ NPM ต่อไปนี้ลงในรหัสแอปพลิเคชันของคุณ:
// index.mjs
import { startServer } from '@microsoft/agents-hosting-express'
import { AgentApplication, MemoryStorage } from '@microsoft/agents-hosting'
ใช้ EchoAgent เป็นตัวแทนแอป
ใน index.mjsเพิ่มรหัสต่อไปนี้เพื่อสร้าง EchoAgent การขยาย AgentApplication และใช้สามเส้นทางเพื่อตอบสนองต่อเหตุการณ์สามเหตุการณ์:
- ปรับปรุงการสนทนา
- ข้อความ
/help - กิจกรรมอื่นๆ
class EchoAgent extends AgentApplication {
  constructor (storage) {
    super({ storage })

    this.onConversationUpdate('membersAdded', this._help)
    this.onMessage('/help', this._help)
    this.onActivity('message', this._echo)
  }

  _help = async context =>
    await context.sendActivity(`Welcome to the Echo Agent sample 🚀.
      Type /help for help or send a message to see the echo feature in action.`)

  _echo = async (context, state) => {
    let counter= state.getValue('conversation.counter') || 0
    await context.sendActivity(`[${counter++}]You said: ${context.activity.text}`)
    state.setValue('conversation.counter', counter)
  }
}
เริ่มเว็บเซิร์ฟเวอร์เพื่อฟังใน localhost:3978
เมื่อสิ้นสุด index.mjs เริ่มต้นเว็บเซิร์ฟเวอร์โดยใช้ startServer ตาม Express และใช้ MemoryStorage เป็นที่เก็บการเปลี่ยนแปลงสถานะ
startServer(new EchoAgent(new MemoryStorage()))
เรียกใช้ตัวแทนภายในโหมดไม่ระบุชื่อ
จากเทอร์มินัลของคุณ ให้เรียกใช้คําสั่งนี้:
node index.mjs
เทอร์มินัลควรส่งกลับค่านี้:
Server listening to port 3978 on sdk 0.6.18 for appId undefined debug undefined
ทดสอบเอเจนต์ภายในเครื่อง
จากเทอร์มินัลอื่น (เพื่อให้ตัวแทนทํางาน) ติดตั้ง Microsoft 365 Agents Playground ด้วยคําสั่งนี้:
npm install -D @microsoft/teams-app-test-toolเทอร์มินัลควรส่งกลับบางอย่างเช่น:
added 1 package, and audited 130 packages in 1s

19 packages are looking for funding
run `npm fund` for details

found 0 vulnerabilities
เรียกใช้เครื่องมือทดสอบเพื่อโต้ตอบกับตัวแทนของคุณโดยใช้คําสั่งนี้:
node_modules/.bin/teamsapptesterเทอร์มินัลควรส่งกลับบางอย่างเช่น:
Telemetry: agents-playground-cli/serverStart {"cleanProperties":{"options":"{\"configFileOptions\":{\"path\":\"<REDACTED: user-file-path>\"},\"appConfig\":{},\"port\":56150,\"disableTelemetry\":false}"}}

Telemetry: agents-playground-cli/cliStart {"cleanProperties":{"isExec":"false","argv":"<REDACTED: user-file-path>,<REDACTED: user-file-path>"}}

Listening on 56150
Microsoft 365 Agents Playground is being launched for you to debug the app: http://localhost:56150
started web socket client
started web socket client
Waiting for connection of endpoint: http://127.0.0.1:3978/api/messages
waiting for 1 resources: http://127.0.0.1:3978/api/messages
wait-on(37568) complete
Telemetry: agents-playground-server/getConfig {"cleanProperties":{"internalConfig":"{\"locale\":\"en-US\",\"localTimezone\":\"America/Los_Angeles\",\"channelId\":\"msteams\"}"}}

Telemetry: agents-playground-server/sendActivity {"cleanProperties":{"activityType":"installationUpdate","conversationId":"5305bb42-59c9-4a4c-a2b6-e7a8f4162ede","headers":"{\"x-ms-agents-playground\":\"true\"}"}}

Telemetry: agents-playground-server/sendActivity {"cleanProperties":{"activityType":"conversationUpdate","conversationId":"5305bb42-59c9-4a4c-a2b6-e7a8f4162ede","headers":"{\"x-ms-agents-playground\":\"true\"}"}}
คําสั่ง teamsapptester เปิดเบราว์เซอร์เริ่มต้นของคุณและเชื่อมต่อกับตัวแทนของคุณ
ในตอนนี้ คุณสามารถส่งข้อความเพื่อดูการตอบกลับ echo หรือส่งข้อความ /help เพื่อดูว่าข้อความนั้นถูกส่งไปยัง _help ตัวจัดการได้อย่างไร
การเริ่มต้นใช้งานด่วนนี้จะแนะนําคุณในการสร้าง ตัวแทนกลไกจัดการแบบกําหนดเอง ที่ตอบกลับด้วยข้อความใดก็ตามที่คุณส่งไป
ข้อกำหนดเบื้องต้น
.NET 8.0 SDK หรือใหม่กว่า
- เมื่อต้องการติดตั้ง .NET SDK ให้ไปที่ dotnet.microsoft.com และทําตามคําแนะนําสําหรับระบบปฏิบัติการของคุณ
- เมื่อต้องการตรวจสอบเวอร์ชัน ในชนิด
dotnet --versionหน้าต่างเทอร์มินัล
ตัวแก้ไขโค้ดที่คุณเลือก คําแนะนําเหล่านี้ใช้ Visual Studio Code
เริ่มต้นโครงการและติดตั้ง SDK
ใช้ dotnet เพื่อสร้างโครงการเว็บใหม่ และติดตั้งการขึ้นต่อกันที่จําเป็น
เปิดเทอร์มินัลและสร้างโฟลเดอร์ใหม่
mkdir echo
cd echo
เริ่มต้นโครงการ .NET
dotnet new webติดตั้ง Agents SDK
dotnet add package Microsoft.Agents.Hosting.AspNetCoreเปิดโฟลเดอร์โดยใช้รหัส Visual Studio โดยใช้คําสั่งนี้:
code .
นําเข้าไลบรารีที่จําเป็น
ใน Program.csแทนที่เนื้อหาที่มีอยู่ และเพิ่มคําสั่งต่อไปนี้ using เพื่อนําเข้าแพคเกจ SDK ลงในรหัสแอปพลิเคชันของคุณ:
// Program.cs
using Microsoft.Agents.Builder;
using Microsoft.Agents.Builder.App;
using Microsoft.Agents.Builder.State;
using Microsoft.Agents.Core.Models;
using Microsoft.Agents.Hosting.AspNetCore;
using Microsoft.Agents.Storage;
using Microsoft.AspNetCore.Builder;
ใช้ EchoAgent เป็นตัวแทนแอป
ใน Program.csหลังจาก using คําสั่ง ให้เพิ่มรหัสต่อไปนี้เพื่อสร้าง EchoAgent การขยาย AgentApplication และใช้เส้นทางเพื่อตอบสนองต่อเหตุการณ์:
- ปรับปรุงการสนทนา
- กิจกรรมอื่นๆ
public class EchoAgent : AgentApplication
{
   public EchoAgent(AgentApplicationOptions options) : base(options)
   {
      OnConversationUpdate(ConversationUpdateEvents.MembersAdded, WelcomeMessageAsync);
      OnActivity(ActivityTypes.Message, OnMessageAsync, rank: RouteRank.Last);
   }

   private async Task WelcomeMessageAsync(ITurnContext turnContext, ITurnState turnState, CancellationToken cancellationToken)
   {
        foreach (ChannelAccount member in turnContext.Activity.MembersAdded)
        {
            if (member.Id != turnContext.Activity.Recipient.Id)
            {
                await turnContext.SendActivityAsync(MessageFactory.Text("Hello and Welcome!"), cancellationToken);
            }
        }
    }

   private async Task OnMessageAsync(ITurnContext turnContext, ITurnState turnState, CancellationToken cancellationToken)
   {
      await turnContext.SendActivityAsync($"You said: {turnContext.Activity.Text}", cancellationToken: cancellationToken);
   }
}
ตั้งค่าเว็บเซิร์ฟเวอร์และลงทะเบียนแอพลิเคชันของบริษัทตัวแทน
ใน Program.csหลังจาก using คําสั่ง ให้เพิ่มรหัสต่อไปนี้เพื่อกําหนดค่าโฮสต์เว็บ ลงทะเบียนตัวแทน และแมป /api/messages จุดสิ้นสุด:
var builder = WebApplication.CreateBuilder(args);

builder.Services.AddHttpClient();
builder.AddAgentApplicationOptions();
builder.AddAgent<EchoAgent>();
builder.Services.AddSingleton<IStorage, MemoryStorage>();

var app = builder.Build();

app.MapPost("/api/messages", async (HttpRequest request, HttpResponse response, IAgentHttpAdapter adapter, IAgent agent, CancellationToken cancellationToken) =>
{
    await adapter.ProcessAsync(request, response, agent, cancellationToken);
});

app.Run();
ตั้งค่าเว็บเซิร์ฟเวอร์ที่จะรอรับการเชื่อมต่อใน localhost:3978
ใน launchSettings.jsonอัปเดต applicationURL ไปยัง http://localhost:3978 เพื่อให้แอปฟังบนพอร์ตที่ถูกต้อง
เรียกใช้ตัวแทนภายในโหมดไม่ระบุชื่อ
จากเทอร์มินัลของคุณ ให้เรียกใช้คําสั่งนี้:
dotnet run
เทอร์มินัลควรส่งกลับบางอย่างเช่น:
info: Microsoft.Hosting.Lifetime[14]
      Now listening on: http://localhost:3978
ทดสอบเอเจนต์ภายในเครื่อง
จากเทอร์มินัลอื่น (เพื่อให้ตัวแทนทํางาน) ติดตั้ง Microsoft 365 Agents Playground ด้วยคําสั่งต่อไปนี้:
npm install -g @microsoft/teams-app-test-toolหมายเหตุ
คําสั่งนี้ใช้ npm เนื่องจาก Microsoft 365 Agents Playground กระจายเป็นแพคเกจ npm
เทอร์มินัลควรส่งกลับบางอย่างเช่น:
added 1 package, and audited 130 packages in 1s

19 packages are looking for funding
run `npm fund` for details

found 0 vulnerabilities
เรียกใช้เครื่องมือทดสอบเพื่อโต้ตอบกับตัวแทนของคุณโดยใช้คําสั่งนี้:
teamsapptesterเทอร์มินัลควรส่งกลับบางอย่างเช่น:
Telemetry: agents-playground-cli/serverStart {"cleanProperties":{"options":"{\"configFileOptions\":{\"path\":\"<REDACTED: user-file-path>\"},\"appConfig\":{},\"port\":56150,\"disableTelemetry\":false}"}}

Telemetry: agents-playground-cli/cliStart {"cleanProperties":{"isExec":"false","argv":"<REDACTED: user-file-path>,<REDACTED: user-file-path>"}}

Listening on 56150
Microsoft 365 Agents Playground is being launched for you to debug the app: http://localhost:56150
started web socket client
started web socket client
Waiting for connection of endpoint: http://127.0.0.1:3978/api/messages
waiting for 1 resources: http://127.0.0.1:3978/api/messages
wait-on(37568) complete
Telemetry: agents-playground-server/getConfig {"cleanProperties":{"internalConfig":"{\"locale\":\"en-US\",\"localTimezone\":\"America/Los_Angeles\",\"channelId\":\"msteams\"}"}}

Telemetry: agents-playground-server/sendActivity {"cleanProperties":{"activityType":"installationUpdate","conversationId":"5305bb42-59c9-4a4c-a2b6-e7a8f4162ede","headers":"{\"x-ms-agents-playground\":\"true\"}"}}

Telemetry: agents-playground-server/sendActivity {"cleanProperties":{"activityType":"conversationUpdate","conversationId":"5305bb42-59c9-4a4c-a2b6-e7a8f4162ede","headers":"{\"x-ms-agents-playground\":\"true\"}"}}
คําสั่ง teamsapptester เปิดเบราว์เซอร์เริ่มต้นของคุณและเชื่อมต่อกับตัวแทนของคุณ
ในการป้อนข้อความ ใส่ และส่งข้อความใด ๆ เพื่อดูการตอบกลับ echo
ขั้นตอนถัดไป
- ตรวจสอบตัวอย่าง SDK ของตัวแทนบน GitHub
- เรียนรู้เพิ่มเติมเกี่ยวกับกิจกรรมและการทํางานกับกิจกรรม
- ตรวจสอบเหตุการณ์ของ AgentApplication ที่คุณสามารถตอบสนองได้จากไคลเอ็นต์
- ตรวจสอบเหตุการณ์ TurnContext ที่คุณสามารถส่งกลับไปยังไคลเอ็นต์
- เตรียมใช้ทรัพยากร Azure Bot เพื่อใช้กับ Agents SDK
- กําหนดค่า .NET Agent ของคุณเพื่อใช้ OAuth
ตามค่าเริ่มต้น Agents Playground จะพร้อมใช้งานหากคุณกําลังใช้ชุดเครื่องมือ Microsoft 365 Agents อยู่แล้ว คุณสามารถใช้หนึ่งในคําแนะนําต่อไปนี้ถ้าคุณต้องการเริ่มต้นใช้งานชุดเครื่องมือ: