แก้ไข

แชร์ผ่าน


Manage billing and invoices for Microsoft 365 Backup

As a first step to start using Microsoft 365 Backup, you should link an Azure subscription in Microsoft Syntex pay-as-you-go, if you haven't already done so. Although Microsoft 365 Backup isn't part of the Microsoft Syntex product suite, this offering is still using the Syntex billing setup for consistency with other Microsoft 365 pay-as-you-go offerings.

Set up pay-as-you-go billing

Use these steps to set up pay-as-you-go billing for Microsoft 365 Backup.

  1. In the Microsoft 365 admin center, select Setup.

  2. Under Files and content, select Automate content processes with Syntex.

  3. On the Automate content processes with Syntex page, select Go to Syntex settings.

    Screenshot of the Set up billing option in the Microsoft 365 admin center.

    Note

    To set up pay-as-you-go billing for Microsoft 365 Backup, you must provide an owner or contribution role on the Azure subscription to be used.

  4. If you don't have an Azure subscription or resource group, follow these steps. If you have an Azure subscription and resource group, go directly to step 5.

    To create a new Azure subscription with the same organization and Microsoft Entra tenant as your Microsoft 365 subscription:

    1. Sign in to the Azure portal with your Microsoft 365 admin, Microsoft Entra DC admin, or Global Administrator account.

      Important

      Microsoft recommends that you use roles with the fewest permissions. This helps improve security for your organization. Global Administrator is a highly privileged role that should be limited to emergency scenarios when you can't use an existing role.

    2. In the left navigation, select Subscriptions, and then select Add.

    3. On the Add subscription page, select an offer and complete the payment information and agreement.

    To create a new Azure resource group:

    1. On the Set up pay-as-you-go billing panel, select Learn more about Azure resource groups.

    2. Or, you can follow steps in Manage Azure resource groups by using the Azure portal to create a resource group.

    Screenshot of the Set up pay-as-you-go billing panel in the Microsoft 365 admin center.

    Note

    The resource group should be mapped to the Azure subscription you provided when you set up pay-as-you-go.

  5. If you have an Azure subscription, follow these steps:

    1. On the Set up pay-as-you-go billing panel, under Azure subscription, select the subscription from the dropdown list.

      Note

      The subscription dropdown list will not populate if you don't have an owner or contributor on the subscription.

      Screenshot of the Set up pay-as-you-go billing panel showing the Azure subscription dropdown list.

    2. Under Resource group, select the resource group from the dropdown list.

    3. Under Region, select the region from the dropdown list.

    4. Review and accept the terms of service, and then select Save.

You have successfully set up billing. You can proceed to Step 2: Turn on Microsoft 365 Backup.

Note

Any subsequent changes made to the billing for Microsoft 365 Backup in the Microsoft 365 admin center or the Azure portal can take up to 24 hours to become effective.

Manage consumption and invoices in the Azure portal

You can view actual and accumulated cost breakdown by tenants and service type for OneDrive, SharePoint, and Exchange in Microsoft Cost Management in the Azure portal or access the information by using the Cost Management public APIs. Cost breakdown by application ID is coming soon.

  1. Sign in to the Azure portal.

  2. Search for Cost Management + Billing.

  3. Select Cost analysis to see:

    • Accumulated cost and forecast cost.

    • Select +Add Filter to see breakdown of cost by meters and tags.
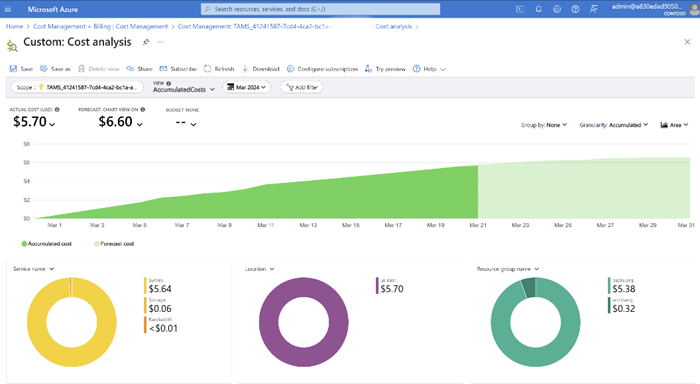
      Screenshot of the cost analysis page in Microsoft Cost Management.

You can also export daily cost information using billing export feature in Azure portal. For more information, see Tutorial: Create and manage exported data.

Billing attribution by tenants, service type, and applications

You can see actual cost breakdown by tags in Azure portal. There are currently two tags available for Microsoft 365 Backup: tenants and servicetype.

To view tags:

  1. Select +Add Filter to see breakdown of cost by meters and tags.

  2. Select the tag:

    • In the key-value pair, select tenants or servicetype, and then select the respective tenant ID or service type.

      • tenants shows a list of tenant IDs.

      • servicetype is OneDrive, SharePoint, or Exchange.

      • applications shows a list of app IDs.

      • Exchange mailbox - Not available.

      • OneDrive account - SiteId of the corresponding OneDrive site.

      • SharePoint site - SiteId of the corresponding SharePoint site.

    • Azure cost analysis - filter by tag.

  3. In the left navigation, select Billing to see monthly invoices.

    We recommend using this view to see the costs by resources for Microsoft 365 Backup.

    Screenshot of the recommended view to see costs by resources in Microsoft Cost Management.

  4. Set up budget alerts on cost by following the steps in the Cost Management public APIs.

Warning

The MailboxDbGuid tag in the Azure consumption report is intended for Microsoft internal use only. We recommend that you do not rely on it because its value might change. Note that this is different from the MailboxId.