ใช้แท็กบริการด้วย Power BI
คุณสามารถใช้แท็กบริการ Azure ด้วย Power BI เพื่อเปิดใช้งานอินสแตนซ์ที่จัดการแล้วของ Azure SQL (MI) เพื่ออนุญาตการเชื่อมต่อขาเข้าจากบริการของ Power BI ใน Azure แท็ก บริการคือกลุ่มกําหนดของที่อยู่ IP ที่คุณสามารถกําหนดค่าที่จะจัดการโดยอัตโนมัติเป็นกลุ่มเพื่อลดความซับซ้อนของการอัปเดตหรือการเปลี่ยนแปลงกฎความปลอดภัยของเครือข่าย ด้วยการใช้แท็กบริการด้วย Power BI คุณสามารถเปิดใช้งาน SQL Managed Instance เพื่ออนุญาตการเชื่อมต่อขาเข้าจากบริการของ Power BI
การตั้งค่าคอนฟิกต่อไปนี้จําเป็นเพื่อเปิดใช้งานจุดสิ้นสุดสําหรับการใช้งานในบริการของ Power BI ให้เสร็จสมบูรณ์:
- เปิดใช้งานจุดสิ้นสุดสาธารณะในอินสแตนซ์ที่จัดการแล้วของ SQL
- สร้างกฎกลุ่มความปลอดภัยเครือข่ายเพื่ออนุญาตการรับส่งข้อมูลขาเข้า
- ป้อนข้อมูลประจําตัวใน Power BI
ส่วนต่อไปนี้จะดูที่แต่ละขั้นตอนเหล่านี้ตามลําดับ
เปิดใช้งานจุดสิ้นสุดสาธารณะ
ส่วนแรกของกระบวนการคือ การเปิดใช้งานจุดสิ้นสุดสาธารณะในอินสแตนซ์ที่จัดการแล้วของ SQL ทําตามขั้นตอนต่อไปนี้:
ลงชื่อเข้าใช้ พอร์ทัล Azure และนําทางไปยัง SQL Managed Instance ของคุณ
ทางด้านซ้ายของหน้า ให้เลือก เครือข่าย
เลื่อนจุดสิ้นสุดสาธารณะ (ข้อมูล) ไปยัง เปิดใช้งาน จากนั้นตั้งค่าเวอร์ชัน TLS ต่ําสุดเป็น 1.2 รูปภาพต่อไปนี้แสดงหน้าจอในพอร์ทัล Azure
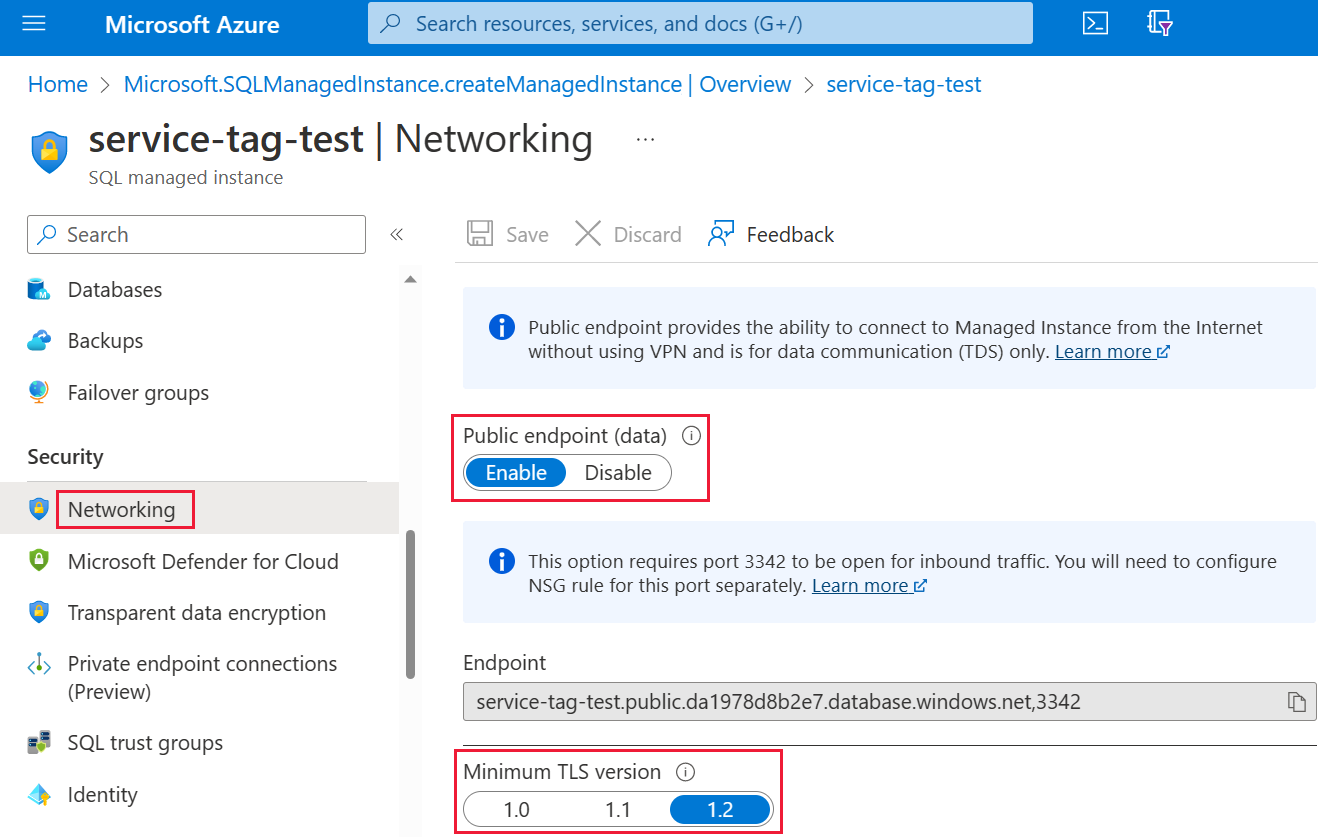
เลือก บันทึก เพื่อบันทึกการตั้งค่าของคุณ
สร้างกฎกลุ่มความปลอดภัยเครือข่าย
คอลเลกชันถัดไปของขั้นตอนกําหนดให้คุณสร้างกฎกลุ่มความปลอดภัยเครือข่าย (NSG) เพื่ออนุญาตการรับส่งข้อมูลขาเข้าสําหรับบริการของ Power BI การดําเนินการนี้สามารถดําเนินการให้แล้วเสร็จได้ในพอร์ทัล Azure โดยใช้ประโยชน์จาก "แท็กบริการต้นทาง" ของ Power BI หรือโดยใช้อินเทอร์เฟซ บรรทัดคําสั่ง (CLI) หรือ PowerShell
หมายเหตุ
ระดับความสําคัญของกฎที่คุณตั้งค่าต้องสูงกว่ากฎ deny_all_inbound 4096 ซึ่งหมายความว่าค่าลําดับความสําคัญต้องต่ํากว่า 4096 ในตัวอย่างต่อไปนี้ จะใช้ค่าลําดับความสําคัญ 400
สคริปต์ CLI ต่อไปนี้มีไว้เป็นตัวอย่างการอ้างอิง สําหรับข้อมูลเพิ่มเติม ดู กฎ nsg ของเครือข่าย az คุณอาจต้องเปลี่ยนค่าหลายค่าเพื่อให้ตัวอย่างทํางานได้อย่างถูกต้องในสถานการณ์ของคุณ มีสคริปต์ PowerShell ให้ในภายหลัง
#login to azure
az login

#set subscription that contains SQL MI instance
$subname = "mysubscriptionname"
az account set --subscription $subname

#set NSG rule for inbound PowerBI traffic

#update $RG to your resource group name
$rg = 'myresourcegroup'
#update $nsg to your Network Security Group name
$nsg = 'nsgresourcename'
# Name the NSG rule
$rule = 'allow_inbound_PowerBI'
#set the priority - this must be higher priority (lower number) than the deny_all_inbound rule
$priority = 400
#specifiy the service tag to use
$servicetag = 'PowerBI'
#specify the public endpoint port defined in step 1
$port = 3342
#set the rule to inbound direction
$direction = 'Inbound'
#set the access type to "Allow"
$access = 'Allow'
#Set the protocol as TCP
$protocol = 'tcp'
#Provide a description for the rule
$desc = 'Allow PowerBI Access to SQL MI for Direct Query or Data Refresh.'

#create the NSG rule
az network nsg rule create -g $rg \
--nsg-name $nsg -n $rule --priority $priority \
--source-address-prefixes $servicetag --destination-address-prefixes '*' \
--destination-port-ranges $port --direction $direction --access $access \
--protocol $protocol --description $desc
สคริปต์ PowerShell ต่อไปนี้เป็นการอ้างอิงอื่นในการสร้างกฎ NSG สําหรับข้อมูลเพิ่มเติม ให้ดู เพิ่มกฎกลุ่มความปลอดภัยเครือข่ายใน PowerShell คุณอาจต้องเปลี่ยนค่าหลายค่าเพื่อให้ตัวอย่างทํางานได้อย่างถูกต้องในสถานการณ์ของคุณ
#login to azure
Login-AzAccount

#get your subscription ID
Get-AzSubscription

####
#Script to create Network Security Group Rule
###

#enter your subscription ID
Set-AzContext -SubscriptionId "yoursubscriptionID"

#Provide the resource group for your Network Security Group
$RGname="yourRG"
#Enter the port for the SQL Managed Instance Public Endpoint
$port=3342
#name the NSG rule
$rulename="allow_inbound_PowerBI"
#provide the name of the Network Security Group to add the rule to
$nsgname="yourNSG"
#set direction to inbound to allow PowerBI to access SQL MI
$direction ="Inbound"
#set the priority of the rule. Priority must be higher (ie. lower number) than the deny_all_inbound (4096)
$priority=400
#set the service tags for the source to \u201cPowerBI\u201d
$serviceTag = "PowerBI"

# Get the NSG resource
$nsg = Get-AzNetworkSecurityGroup -Name $nsgname -ResourceGroupName $RGname

# Add the inbound security rule.
$nsg | Add-AzNetworkSecurityRuleConfig -Name $rulename -Description "Allow app port" -Access Allow `
    -Protocol * -Direction $direction -Priority $priority -SourceAddressPrefix $serviceTag -SourcePortRange * `
    -DestinationAddressPrefix * -DestinationPortRange $port

# Update the NSG.
$nsg | Set-AzNetworkSecurityGroup
ป้อนข้อมูลประจําตัวใน Power BI
ส่วนสุดท้ายของกระบวนการจะใส่ข้อมูลประจําตัวในบริการของ Power BI
ลงชื่อเข้าใช้บริการของ Power BI และนําทางไปยังพื้นที่ทํางานที่มีชุดข้อมูลที่กําลังใช้อินสแตนซ์ที่จัดการของ SQL ในตัวอย่างต่อไปนี้ พื้นที่ทํางานดังกล่าวเรียกว่าชุดข้อมูล ASAdataset และชุดข้อมูลเรียกว่า Contoso SQL MI Demo
เลือกการตั้งค่าจากมุมบนขวา แล้วเลือกการตั้งค่าจากเมนูดรอปดาวน์

ภายใต้ ชุดข้อมูล ขยายส่วน ข้อมูลประจําตัว ของแหล่งข้อมูล
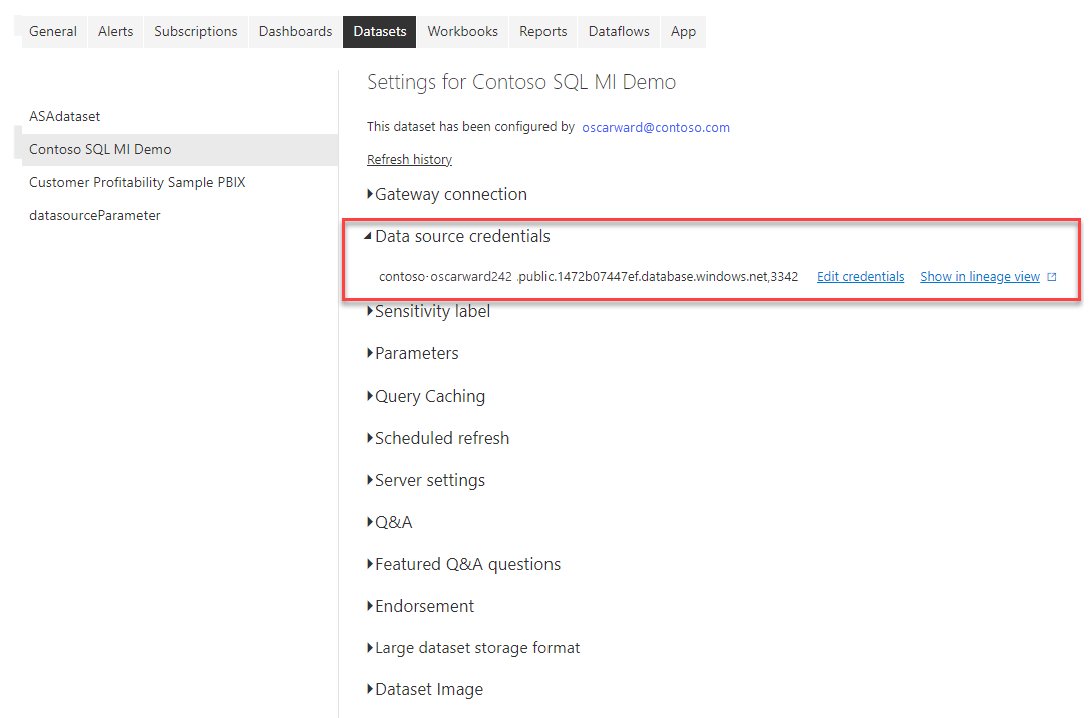
เลือกลิงก์ แก้ไขข้อมูลประจําตัว ในกล่องโต้ตอบที่ปรากฏขึ้น ให้ใส่ข้อมูลประจําตัวที่ถูกต้อง
บันทึกการตั้งค่าของคุณและออก มีการกําหนดค่าอินสแตนซ์ที่จัดการแล้วของ SQL ของคุณเพื่ออนุญาตการเชื่อมต่อขาเข้าจากบริการของ Power BI
เนื้อหาที่เกี่ยวข้อง
คำติชม
เร็วๆ นี้: ตลอดปี 2024 เราจะขจัดปัญหา GitHub เพื่อเป็นกลไกคำติชมสำหรับเนื้อหา และแทนที่ด้วยระบบคำติชมใหม่ สำหรับข้อมูลเพิ่มเติม ให้ดู: https://aka.ms/ContentUserFeedback
ส่งและดูข้อคิดเห็นสำหรับ