หมายเหตุ
การเข้าถึงหน้านี้ต้องได้รับการอนุญาต คุณสามารถลอง ลงชื่อเข้าใช้หรือเปลี่ยนไดเรกทอรีได้
การเข้าถึงหน้านี้ต้องได้รับการอนุญาต คุณสามารถลองเปลี่ยนไดเรกทอรีได้
ในคู่มือนี้ คุณจะตั้งค่าเว็บเพจที่จะใช้ตรรกะเซิร์ฟเวอร์ในการอ่าน เขียน อัปเดต และลบระเบียนจากวัตถุเซิร์ฟเวอร์ httpclient ของบริการภายนอก
Note
ตัวอย่างนี้ใช้ https://services.odata.org/TripPinRESTierService แต่คุณสามารถใช้เครื่องมือทดสอบฟรีอื่นๆ ที่พร้อมใช้งานแบบสาธารณะได้
ขั้นตอนที่ 1: สร้างตรรกะเซิร์ฟเวอร์
ลงชื่อเข้าใช้ Power Pages
เลือกไซต์ + แก้ไข
นําทางไปยัง ตั้งค่า พื้นที่ทํางาน จากนั้นเลือก ตรรกะเซิร์ฟเวอร์ (ตัวอย่าง)
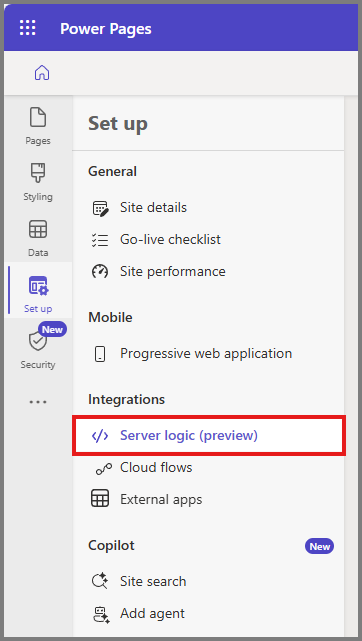
เลือก +ตรรกะเซิร์ฟเวอร์ใหม่
ป้อนชื่อสําหรับตรรกะของเซิร์ฟเวอร์ ชื่อนี้ถูกใช้ใน API เป็นตัวระบุทรัพยากรขณะสร้าง API ตรรกะของเซิร์ฟเวอร์ เช่น:
ทรัพย์สิน ค่าตัวอย่าง ชื่อ services.odata.orgชื่อที่ใช้แสดง Performing CRUD operations using OData serviceเลือก +เพิ่มบทบาท เพื่อกําหนดบทบาทของเว็บที่เหมาะสม
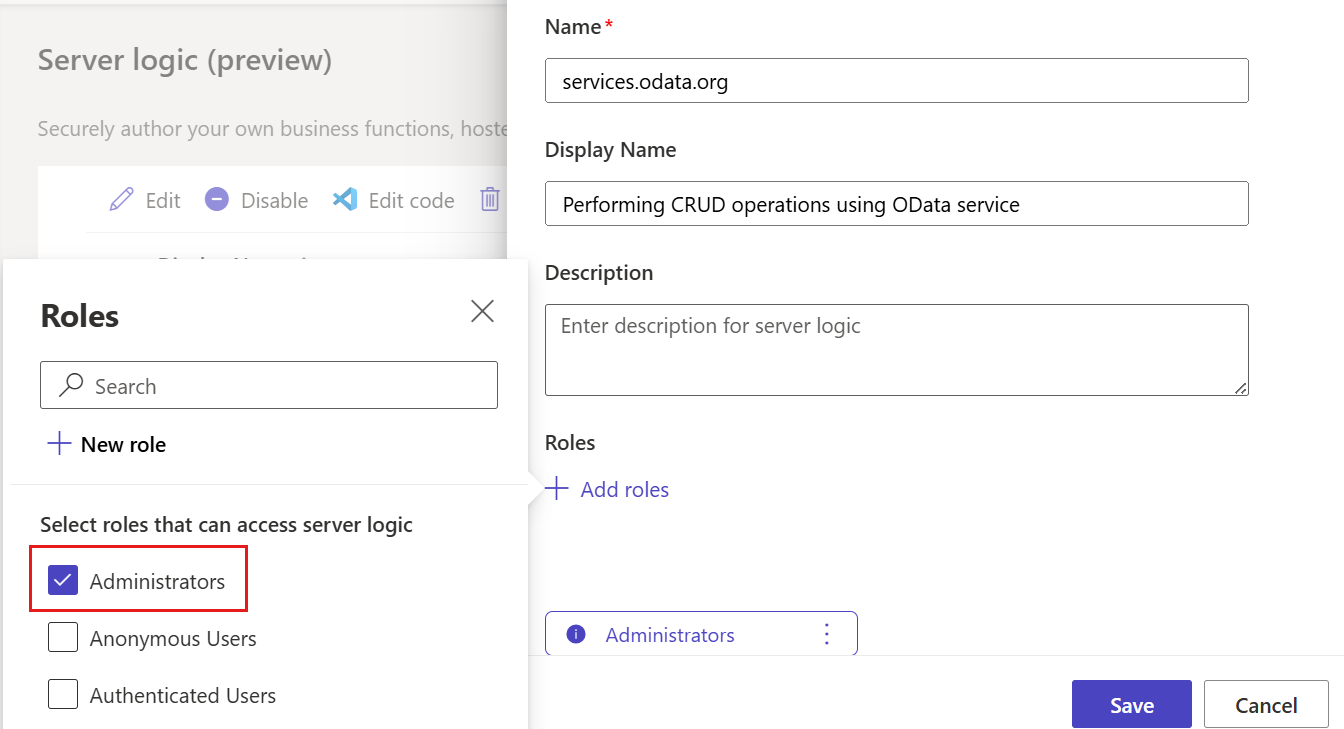 ในตัวอย่างนี้ เลือก ผู้ดูแลระบบ และลงชื่อเข้าใช้ในฐานะผู้ดูแลระบบเพื่อดําเนินการต่อ
เลือก เพิ่ม
เลือกตรรกะเซิร์ฟเวอร์และเลือก แก้ไขโค้ด
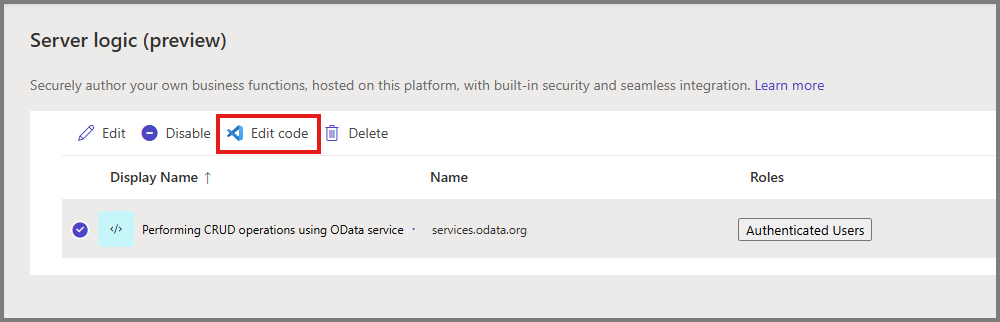
ใน การแก้ไขใน Microsoft Visual Studio Code สําหรับกล่องโต้ตอบเว็บ เลือก เปิดรหัส Visual Studio เพื่อเขียนตรรกะแบบกําหนดเอง
คุณจะพบวิธีการและสคริปต์ที่กําหนดไว้ล่วงหน้าในไฟล์
กําหนดวิธีการตรรกะของเซิร์ฟเวอร์เพื่ออ่าน แก้ไข สร้าง ลบการดําเนินการโดยใช้บริการภายนอก
เพิ่มค่าคงที่ต่อไปนี้
baseUrlก่อนget()วิธีการconst baseUrl = "https://services.odata.org/TripPinRESTierService";แทนที่
getฟังก์ชัน ,post,putและdelตัวอย่าง ด้วยรหัสต่อไปนี้async function get() { try { Server.Logger.Log("GET called"); // Logger reference if (!Server.Context.QueryParameters["username"]) { const response = await Server.Connector.HttpClient.GetAsync( `${baseUrl}/People?$select=UserName,FirstName,LastName,MiddleName,Age`, {'content-type':'application/json'}); return response; } else { const id = Server.Context.QueryParameters["username"]; // Context reference const response = await Server.Connector.HttpClient.GetAsync( `${baseUrl}(${id})/People?$select=UserName,FirstName,LastName,MiddleName,Age`, {'content-type':'application/json'}); return response; } } catch (err) { Server.Logger.Error("GET failed: " + err.message); return JSON.stringify({ status: "error", method: "GET", message: err.message }); } } async function post() { try { Server.Logger.Log("POST called"); const data = JSON.parse(Server.Context.Body); const url = `${baseUrl}/${data.serviceSession}/People`; const { serviceSession, ...body } = data; const response = await Server.Connector.HttpClient.PostAsync( url, JSON.stringify(body), {'content-type':'application/json'}); return response; } catch (err) { Server.Logger.Error("POST failed: " + err.message); return JSON.stringify({ status: "error", method: "POST", message: err.message }); } } async function put() { try { Server.Logger.Log("PUT called"); const data = JSON.parse(Server.Context.Body); const url = `${baseUrl}/${data.serviceSession}/People('${data.UserName}')`; const { UserName, ...body1 } = data; const { serviceSession, ...body } = body1; const response = await Server.Connector.HttpClient.PatchAsync( url, JSON.stringify(body), {'content-type':'application/json'}); return response; } catch (err) { Server.Logger.Error("PUT failed: " + err.message); return JSON.stringify({ status: "error", method: "PUT", message: err.message }); } } async function del() { try { // "delete" keyword should not be used in script file. Server.Logger.Log("DEL called"); const username = Server.Context.QueryParameters["username"]; const serviceSession = Server.Context.QueryParameters["serviceSession"]; const url = `${baseUrl}/${serviceSession}/People('${username}')`; const response = await Server.Connector.HttpClient.DeleteAsync( url, {'content-type':'application/json'}); return response; } catch (err) { Server.Logger.Error("Deletion failed: " + err.message); return JSON.stringify({ status: "error", method: "DEL", message: err.message }); } }บันทึกไฟล์
เคล็ดลับ
ใช้ Ctrl+S เพื่อบันทึก
ขั้นตอนที่ 2: สร้างเว็บเพจ
เปิดใช้สตูดิโอออกแบบ Power Pages
ในพื้นที่ทํางานของหน้า ให้เลือก+ หน้า
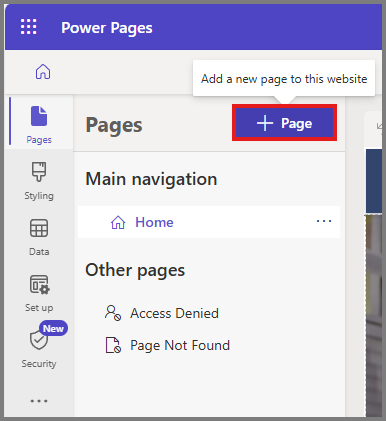
ในกล่องโต้ตอบ อธิบายหน้าเพื่อสร้าง ให้เลือก วิธีอื่นๆ เพื่อเพิ่มหน้า
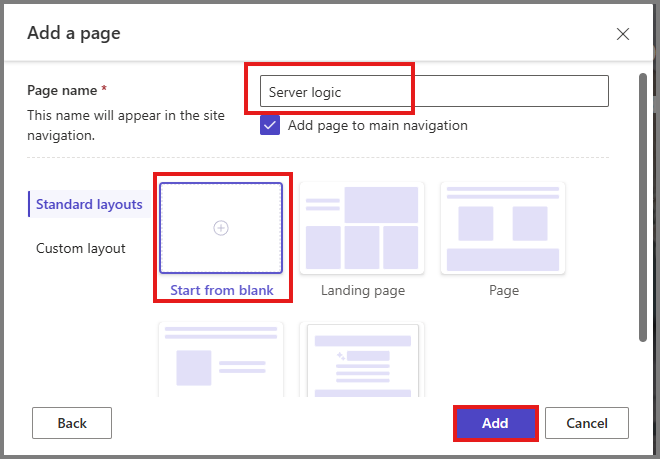
ในกล่องโต้ตอบ เพิ่มหน้า ให้ป้อนรายละเอียด
- ในกล่อง ชื่อ ให้ใส่ ตรรกะของเซิร์ฟเวอร์ และเลือก เริ่มต้นจากเค้าโครงว่างเปล่า
- เลือก เพิ่ม
เลือกตัวเลือก แก้ไขรหัส ที่มุมขวาบน
ในแก้ไขใน Visual Studio Code สําหรับกล่องโต้ตอบเว็บ เลือกเปิดรหัส Visual Studio
แทนที่โค้ดที่พบในหน้า HTML ด้วยข้อมูลต่อไปนี้:
<div class="row sectionBlockLayout text-left" style="min-height: auto; padding: 8px;">
<div class="container" style="display: flex; flex-wrap: wrap;">
   <div class="col-md-12 columnBlockLayout" style="padding: 16px; margin: 60px 0px; min-height: 200px;">
      <!-- Sample code for Web API demonstration -->
      <style>
      #processingMsg {
         padding: 6px 12px;
         background: #eee;
         border-radius: 4px;
         position: fixed;
         top: 10px;
         left: 50%;
         transform: translateX(-50%);
         display: none;
         z-index: 9999;
         text-align: center;
         font-weight: bold;
      }

      table {
         border-collapse: collapse;
         width: 100%;
         margin-top: 10px;
         font-family: Arial, sans-serif;
      }

      th,
      td {
         border: 1px solid #ccc;
         padding: 6px;
         text-align: left;
      }

      button {
         cursor: pointer;
         border: 1px solid #aaa;
         padding: 4px 8px;
         border-radius: 4px;
         background: #fff;
         font-size: 14px;
         margin-right: 2px;
      }

      button.add {
         color: green;
      }

      button.save {
         color: green;
      }

      button.cancel {
         color: orange;
      }

      button.delete {
         color: red;
      }

      input {
         width: 95%;
         box-sizing: border-box;
      }

      td.actions {
         white-space: nowrap;
      }

      td[data-attribute="UserName"] {
         background: #f9f9f9;
         cursor: default;
      }
      </style>

      <div id="processingMsg">Processing...</div>
      <div id="dataTable"></div>

      <script src="https://code.jquery.com/jquery-3.6.0.min.js"></script>
      <script>
      $(function () {

         // Safe WebAPI wrapper for Power Pages
         (function (webapi, $) {
            function safeAjax(opts) {
            var d = $.Deferred();
            shell.getTokenDeferred().done(function (token) {
               opts.headers = opts.headers || {};
               opts.headers["__RequestVerificationToken"] = token;
               $.ajax(opts)
                  .done((data, ts, jq) => validateLoginSession(data, ts, jq, d.resolve))
                  .fail(d.reject);
            }).fail(() => d.rejectWith(this, arguments));
            return d.promise();
            }
            webapi.safeAjax = safeAjax;
         })(window.webapi = window.webapi || {}, jQuery);

         // Notification overlay
         const notify = (() => {
            const $m = $('#processingMsg'); let s = 0, t;
            return {
            show: (msg = 'Processing...') => { $m.text(msg); if (!s) $m.show(); s++; },
            hide: () => { s = Math.max(0, s - 1); if (!s) t = setTimeout(() => $m.hide(), 200); }
            };
         })();

         function ajaxCall(msg, opts) {
            notify.show(msg);
            return webapi.safeAjax(opts)
            .fail(r => alert(r.responseJSON?.error?.message || 'Server error'))
            .always(notify.hide);
         }

         // Table columns
         const cols = [
            { name: 'UserName', label: 'User Name', editable: false },
            { name: 'FirstName', label: 'First Name' },
            { name: 'LastName', label: 'Last Name' },
            { name: 'MiddleName', label: 'Middle Name' },
            { name: 'Age', label: 'Age' }
         ];

         let data = [];
         let serviceSession = '';
         function render() {
            const html = `<table>
            <thead>
               <tr>
                  ${cols.map(c => `<th>${c.label}</th>`).join('')}
                  <th>Actions <button class="add">➕</button></th>
               </tr>
            </thead>
            <tbody>
               ${data.map(r => `<tr data-UserName="${r.UserName}">
                  ${cols.map(c => `<td data-attribute="${c.name}" data-value="${r[c.name] || ''}">
                        ${r[c.name] || ''}
                  </td>`).join('')}
                  <td class="actions">
                        <button class="delete">🗑️</button>
                  </td>
               </tr>`).join('')}
            </tbody>
      </table>`;
            $('#dataTable').html(html);
         }

         // Double click row to edit except username
         $('#dataTable').on('dblclick', 'tr', function () {
            const $tr = $(this);
            if ($tr.hasClass('editing')) return;
            $tr.addClass('editing');
            $tr.find('td[data-attribute]').each(function () {
            const $td = $(this);
            if ($td.data('attribute') === 'UserName') return;
            const old = $td.text().trim();
            $td.html(`<input type="text" value="${old}" data-attr="${$td.data('attribute')}"/>`);
            });
            $tr.find('.actions').append('<button class="save">✅</button><button class="cancel">❌</button>');
         });

         $('#dataTable').on('click', '.save', function () {
            const $tr = $(this).closest('tr');
            const username = $tr.data('username');
            const updates = {};
            $tr.find('input').each(function () {
            const attr = $(this).data('attr');
            let value = $(this).val().trim();

            if (attr === 'Age') {
               value = Number(value);
               if (isNaN(value)) value = null; // safety fallback
            }

            updates[attr] = value;
            });

            ajaxCall('Updating...', {
            type: 'PUT',
            url: `/_api/serverlogics/services.odata.org`,
            contentType: 'application/json',
            data: JSON.stringify(Object.assign({ UserName: username, serviceSession: `${serviceSession}` }, updates)),
            success: () => { Object.assign(data.find(x => x.UserName === username), updates); render(); }
            });
         });

         $('#dataTable').on('click', '.cancel', () => render());

         $('#dataTable').on('click', '.delete', function () {
            const username = $(this).closest('tr').data('username');
            if (!confirm('Delete ' + username + '?')) return;
            ajaxCall('Deleting...', {
            type: 'DELETE',
            url: `/_api/serverlogics/services.odata.org?username=${username}&serviceSession=${serviceSession}`,
            success: () => { data = data.filter(x => x.UserName !== username); render(); }
            });
         });

         $('#dataTable').on('click', '.add', function () {
            const r = {
            serviceSession: `${serviceSession}`,
            UserName: 'user' + Math.floor(Math.random() * 9000 + 1000),
            FirstName: 'New',
            LastName: 'Person',
            MiddleName: '',
            Age: 25
            };
            ajaxCall('Adding...', {
            type: 'POST',
            url: `/_api/serverlogics/services.odata.org`,
            contentType: 'application/json',
            data: JSON.stringify(r),
            success: () => { data.unshift(r); render(); }
            });
         });

         // Initial load
         ajaxCall('Loading...', {
            type: 'GET',
            url: `/_api/serverlogics/services.odata.org`,
            contentType: 'application/json'
         }).done(resp => {
            const parsed = JSON.parse(resp.data);
            const body = JSON.parse(parsed.Body);

            const ctx = body['@odata.context'];
            const match = ctx.match(/\\S\\[^)]*\\/);
            serviceSession = match ? match[0] : '';

            data = (body.value || []).map(r => ({
            UserName: r.UserName,
            FirstName: r.FirstName,
            LastName: r.LastName,
            MiddleName: r.MiddleName,
            Age: r.Age
            }));
            render();
         });

      });
      </script>
   </div>
</div>
</div>
บันทึกไฟล์
Note
โค้ดนี้สร้างอินเทอร์เฟสตารางข้อมูลแบบโต้ตอบเพื่อสาธิตการดําเนินการ CRUD (สร้าง อ่าน อัปเดต ลบ) ด้วยบริการ OData ภายนอกโดยใช้ตรรกะของเซิร์ฟเวอร์ Power Pages ซึ่งรวมถึงการกำหนดลักษณะ CSS สำหรับการแสดงผลตารางแบบตอบสนอง การแจ้งเตือนที่กำลังดำเนินการแบบซ้อน และการทำงานของ JavaScript ที่ช่วยให้ผู้ใช้สามารถดูข้อมูลที่ได้จากบริการภายนอก เพิ่มระเบียนใหม่โดยการคลิกปุ่ม ➕ แก้ไขระเบียนที่มีอยู่โดยคลิกสองทีบนแถวของตาราง (ยกเว้นเขตข้อมูล UserName) บันทึกการเปลี่ยนแปลงด้วย ✅ ยกเลิกการแก้ไขด้วย ❌ และลบระเบียนโดยใช้ปุ่ม 🗑️ รหัสนี้ใช้ jQuery และตัวคลุม WebAPI ที่ปลอดภัยเพื่อเรียก AJAX ที่ได้รับการรับรองความถูกต้องไปยัง /_api/serverlogics/services.odata.org endpoint จัดการข้อมูลการตอบสนองเพื่อแยกวิเคราะห์บริบท OData และจัดการเซสชันบริการสําหรับการดําเนินการที่ตามมา
กลับไปยังตัวออกแบบ Power Pages
ในคุณกําลังแก้ไขรหัสใน Visual Studio Code สําหรับกล่องโต้ตอบเว็บ ให้ทําตามคําแนะนําและคลิกปุ่ม ซิงค์
ขั้นตอนที่ 3: ใช้ตรรกะเซิร์ฟเวอร์เพื่ออ่าน ดู แก้ไข สร้าง และลบ
เมื่อต้องการทดสอบฟังก์ชันตรรกะของเซิร์ฟเวอร์:
- เลือกแสดงตัวอย่าง แล้วเลือกเดสก์ท็อป
- ลงชื่อเข้าใช้ไซต์ของคุณด้วยบัญชีผู้ใช้ที่ได้รับการกําหนดบทบาท ผู้ใช้เชิงตรรกะของเซิร์ฟเวอร์ ที่คุณสร้างไว้ก่อนหน้านี้ ขณะที่เราเลือกบทบาท ผู้ดูแลระบบ ในขั้นตอนก่อนหน้า ในตัวอย่างนี้ ให้ลงชื่อเข้าใช้ในฐานะผู้ดูแลระบบ
- ไปยังเว็บเพจ ตรรกะของเซิร์ฟเวอร์ ที่สร้างไว้ก่อนหน้านี้
- ตรวจสอบการดําเนินการ
ข้อมูลที่เกี่ยวข้อง
ภาพรวมตรรกะของเซิร์ฟเวอร์
ตรรกะของเซิร์ฟเวอร์ผู้เขียน
วัตถุเซิร์ฟเวอร์วิธีการโต้ตอบกับตาราง Dataverse โดยใช้ตรรกะของเซิร์ฟเวอร์