Game flow management
Note
This topic is part of the Create a simple Universal Windows Platform (UWP) game with DirectX tutorial series. The topic at that link sets the context for the series.
The game now has a window, has registered some event handlers, and has loaded assets asynchronously. This topic explains the use of game states, how to manage specific key game states, and how to create an update loop for the game engine. Then we'll learn about the user interface flow and, finally, understand more about the event handlers that are needed for a UWP game.
Game states used to manage game flow
We make use of game states to manage the flow of the game.
When the Simple3DGameDX sample game runs for the very first time on a machine, it's in a state where no game has been started. Subsequent times the game runs, it can be in any of these states.
- No game has been started, or the game is between levels (the high score is zero).
- The game loop is running, and is in the middle of a level.
- The game loop is not running due to a game having been completed (the high score has a non-zero value).
Your game can have as many states as it needs. But remember that it can be terminated at any time. And when it resumes, the user expects it to resume in the state it was in when it was terminated.
Game state management
So, during game initialization, you'll need to support cold-starting the game as well as resuming the game after stopping it in flight. The Simple3DGameDX sample always saves its game state in order to give the impression that it never stopped.
In response to a suspend event, gameplay is suspended, but the resources of the game are still in memory. Likewise, the resume event is handled to ensure that the sample game picks up in the state it was in when it was suspended or terminated. Depending on the state, different options are presented to the player.
- If the game resumes mid-level, then it appears paused, and the overlay offers the option to continue.
- If the game resumes in a state where the game is completed, then it displays the high scores and an option to play a new game.
- Lastly, if the game resumes before a level has started, then the overlay presents a start option to the user.
The sample game doesn't distinguish whether the game is cold starting, launching for the first time without a suspend event, or resuming from a suspended state. This is the proper design for any UWP app.
In this sample, initialization of the game states occurs in GameMain::InitializeGameState (an outline of that method is show in the next section).
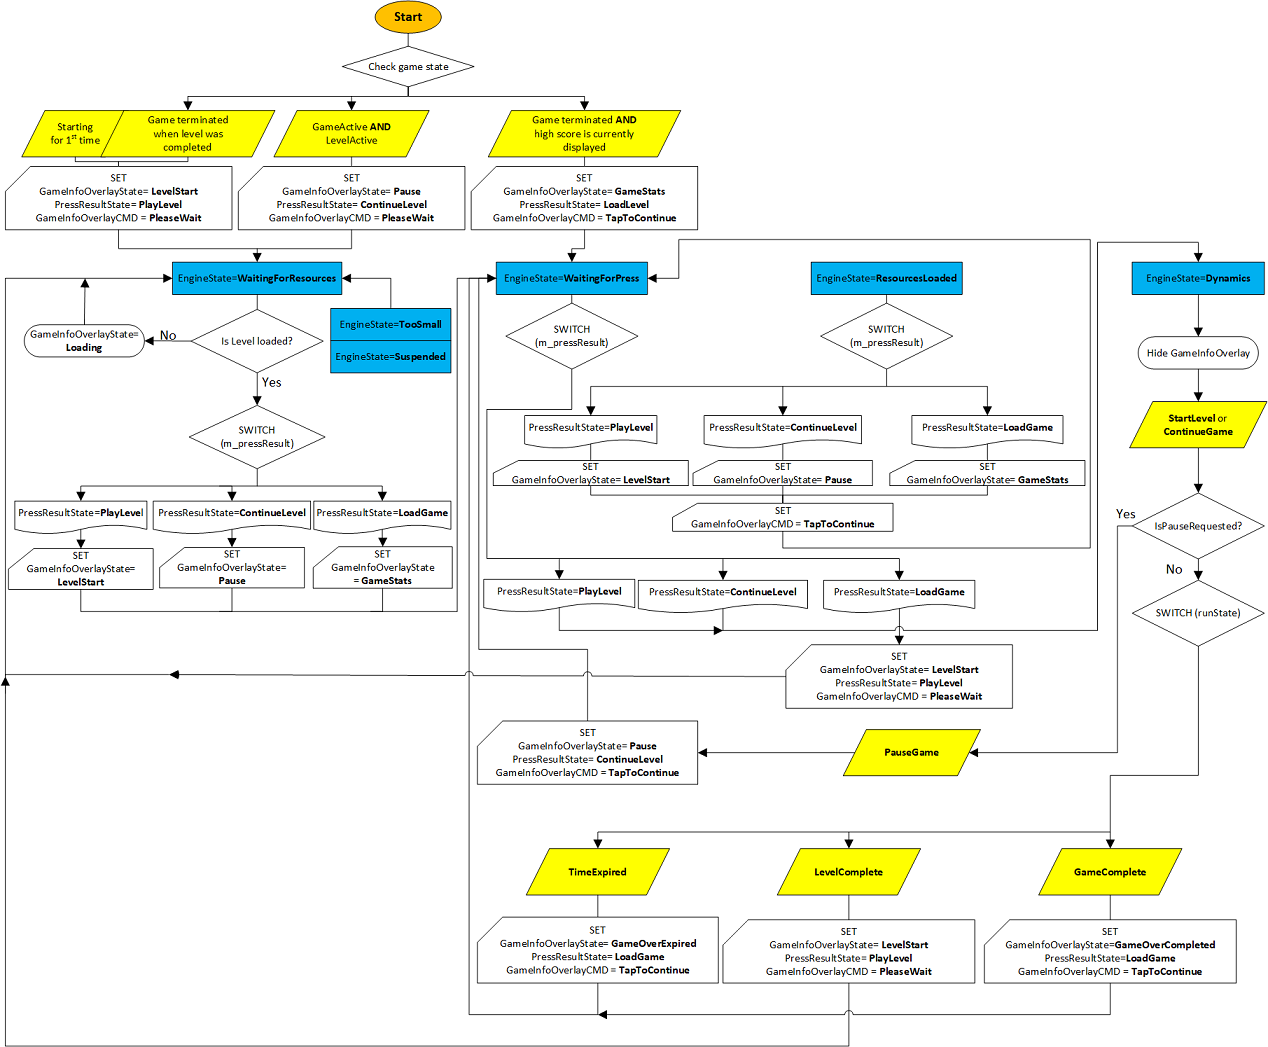
Here's a flowchart to help you visualize the flow. It covers both initialization and the update loop.
- Initialization begins at the Start node when you check for the current game state. For game code, see GameMain::InitializeGameState in the next section.
- For more info about the update loop, go to Update game engine. For game code, go to GameMain::Update.
The GameMain::InitializeGameState method
GameMain::InitializeGameState method is called indirectly via the GameMain class's constructor, which is the result of making a GameMain instance within App::Load.
GameMain::GameMain(std::shared_ptr<DX::DeviceResources> const& deviceResources) : ...
{
    m_deviceResources->RegisterDeviceNotify(this);
    ...
    ConstructInBackground();
}

winrt::fire_and_forget GameMain::ConstructInBackground()
{
    ...
    m_renderer->FinalizeCreateGameDeviceResources();

    InitializeGameState();
    ...
}

void GameMain::InitializeGameState()
{
    // Set up the initial state machine for handling Game playing state.
    if (m_game->GameActive() && m_game->LevelActive())
    {
        // The last time the game terminated it was in the middle
        // of a level.
        // We are waiting for the user to continue the game.
        ...
    }
    else if (!m_game->GameActive() && (m_game->HighScore().totalHits > 0))
    {
        // The last time the game terminated the game had been completed.
        // Show the high score.
        // We are waiting for the user to acknowledge the high score and start a new game.
        // The level resources for the first level will be loaded later.
        ...
    }
    else
    {
        // This is either the first time the game has run or
        // the last time the game terminated the level was completed.
        // We are waiting for the user to begin the next level.
        ...
    }
    m_uiControl->ShowGameInfoOverlay();
}
Update game engine
The App::Run method calls GameMain::Run. Within GameMain::Run is a basic state machine for handling all of the major actions that a user can take. The highest level of this state machine deals with loading a game, playing a specific level, or continuing a level after the game has been paused (by the system or by the user).
In the sample game, there are 3 major states (represented by the UpdateEngineState enum) that the game can be in.
- UpdateEngineState::WaitingForResources. The game loop is cycling, unable to transition until resources (specifically graphics resources) are available. When the async resource-loading tasks complete, we update the state to UpdateEngineState::ResourcesLoaded. This usually happens between levels when the level is loading new resources from disk, from a game server, or from a cloud backend. In the sample game, we simulate this behavior, because the sample doesn't need any additional per-level resources at that time.
- UpdateEngineState::WaitingForPress. The game loop is cycling, waiting for specific user input. This input is a player action to load a game, to start a level, or to continue a level. The sample code refers to these sub-states via the PressResultState enumeration.
- UpdateEngineState::Dynamics. The game loop is running with the user playing. While the user is playing, the game checks for 3 conditions that it can transition on:
- GameState::TimeExpired. Expiration of the time limit for a level.
- GameState::LevelComplete. Completion of a level by the player.
- GameState::GameComplete. Completion of all levels by the player.
A game is simply a state machine containing multiple smaller state machines. Each specific state must be defined by very specific criteria. Transitions from one state to another must be based on discrete user input, or system actions (such as graphics resource loading).
While planning for your game, consider drawing out the entire game flow to ensure that you've addressed all possible actions the user or the system can take. A game can be very complicated, so a state machine is a powerful tool to help you visualize this complexity, and make it more manageable.
Let's take a look at the code for the update loop.
The GameMain::Update method
This is the structure of the state machine used to update the game engine.
void GameMain::Update()
{
    // The controller object has its own update loop.
    m_controller->Update();

    switch (m_updateState)
    {
    case UpdateEngineState::WaitingForResources:
        ...
        break;

    case UpdateEngineState::ResourcesLoaded:
        ...
        break;

    case UpdateEngineState::WaitingForPress:
        if (m_controller->IsPressComplete())
        {
            ...
        }
        break;

    case UpdateEngineState::Dynamics:
        if (m_controller->IsPauseRequested())
        {
            ...
        }
        else
        {
            // When the player is playing, work is done by Simple3DGame::RunGame.
            GameState runState = m_game->RunGame();
            switch (runState)
            {
            case GameState::TimeExpired:
                ...
                break;

            case GameState::LevelComplete:
                ...
                break;

            case GameState::GameComplete:
                ...
                break;
            }
        }

        if (m_updateState == UpdateEngineState::WaitingForPress)
        {
            // Transitioning state, so enable waiting for the press event.
            m_controller->WaitForPress(
                m_renderer->GameInfoOverlayUpperLeft(),
                m_renderer->GameInfoOverlayLowerRight());
        }
        if (m_updateState == UpdateEngineState::WaitingForResources)
        {
            // Transitioning state, so shut down the input controller
            // until resources are loaded.
            m_controller->Active(false);
        }
        break;
    }
}
Update the user interface
We need to keep the player apprised of the state of the system, and allow the game state to change depending on the player's actions and the rules that define the game. Many games, including this sample game, commonly use user interface (UI) elements to present this info to the player. The UI contains representations of game state and other play-specific info such as score, ammo, or the number of chances remaining. UI is also called the overlay because it is rendered separately from the main graphics pipeline, and placed on top of the 3D projection.
Some UI info is also presented as a heads-up display (HUD) to allow the user to see that info without taking their eyes entirely off of the main gameplay area. In the sample game, we create this overlay by using the Direct2D APIs. Alternatively, we could create this overlay using XAML, which we discuss in Extending the sample game.
There are two components to the user interface.
- The HUD that contains the score and info about the current state of gameplay.
- The pause bitmap, which is a black rectangle with text overlaid during the paused/suspended state of the game. This is the game overlay. We discuss it further in Adding a user interface.
Unsurprisingly, the overlay has a state machine too. The overlay can display a level start or a game-over message. It's essentially a canvas on which we can output any info about game state that we want to display to the player while the game is paused or suspended.
The overlay rendered can be one of these six screens, depending on the state of the game.
- Resource-loading progress screen at the start of the game.
- Gameplay statistics screen.
- Level start message screen.
- Game-over screen when all of the levels are completed without the time running out.
- Game-over screen when time runs out.
- Pause menu screen.
Separating your user interface from your game's graphics pipeline allows you to work on it independently of the game's graphics rendering engine, and decreases the complexity of your game's code significantly.
Here's how the sample game structures the overlay's state machine.
void GameMain::SetGameInfoOverlay(GameInfoOverlayState state)
{
    m_gameInfoOverlayState = state;
    switch (state)
    {
    case GameInfoOverlayState::Loading:
        m_uiControl->SetGameLoading(m_loadingCount);
        break;

    case GameInfoOverlayState::GameStats:
        ...
        break;

    case GameInfoOverlayState::LevelStart:
        ...
        break;

    case GameInfoOverlayState::GameOverCompleted:
        ...
        break;

    case GameInfoOverlayState::GameOverExpired:
        ...
        break;

    case GameInfoOverlayState::Pause:
        ...
        break;
    }
}
Event-handling
As we saw in the Define the game's UWP app framework topic, many of the view-provider methods of the App class register event handlers. These methods need to correctly handle these important events before we add game mechanics or start graphics development.
The proper handling of the events in question is fundamental to the UWP app experience. Because a UWP app can at any time be activated, deactivated, resized, snapped, unsnapped, suspended, or resumed, the game must register for these events as soon as it can, and handle them in a way that keeps the experience smooth and predictable for the player.
These are the event handlers used in this sample, and the events they handle.
| Event handler | Description |
|---|---|
| OnActivated | Handles CoreApplicationView::Activated. The game app has been brought to the foreground, so the main window is activated. |
| OnDpiChanged | Handles Graphics::Display::DisplayInformation::DpiChanged. The DPI of the display has changed and the game adjusts its resources accordingly.
Note CoreWindow coordinates are in device-independent pixels (DIPs) for Direct2D. As a result, you must notify Direct2D of the change in DPI to display any 2D assets or primitives correctly.
|
| OnOrientationChanged | Handles Graphics::Display::DisplayInformation::OrientationChanged. The orientation of the display changes and rendering needs to be updated. |
| OnDisplayContentsInvalidated | Handles Graphics::Display::DisplayInformation::DisplayContentsInvalidated. The display requires redrawing and your game needs to be rendered again. |
| OnResuming | Handles CoreApplication::Resuming. The game app restores the game from a suspended state. |
| OnSuspending | Handles CoreApplication::Suspending. The game app saves its state to disk. It has 5 seconds to save state to storage. |
| OnVisibilityChanged | Handles CoreWindow::VisibilityChanged. The game app has changed visibility, and has either become visible or been made invisible by another app becoming visible. |
| OnWindowActivationChanged | Handles CoreWindow::Activated. The game app's main window has been deactivated or activated, so it must remove focus and pause the game, or regain focus. In both cases, the overlay indicates that the game is paused. |
| OnWindowClosed | Handles CoreWindow::Closed. The game app closes the main window and suspends the game. |
| OnWindowSizeChanged | Handles CoreWindow::SizeChanged. The game app reallocates the graphics resources and overlay to accommodate the size change, and then updates the render target. |
Next steps
In this topic, we've seen how the overall game flow is managed using game states, and that a game is made up of multiple different state machines. We've also seen how to update the UI, and manage key app event handlers. Now we're ready to dive into the rendering loop, the game, and its mechanics.
You can go through the remaining topics that document this game in any order.
คำติชม
เร็วๆ นี้: ตลอดปี 2024 เราจะขจัดปัญหา GitHub เพื่อเป็นกลไกคำติชมสำหรับเนื้อหา และแทนที่ด้วยระบบคำติชมใหม่ สำหรับข้อมูลเพิ่มเติม ให้ดู: https://aka.ms/ContentUserFeedback
ส่งและดูข้อคิดเห็นสำหรับ