GitHub Actions'ı kullanarak iş akışınızı otomatikleştirin ve GitHub'dan Azure App Service'e dağıtın.
Önkoşullar
Uygulama oluştururken GitHub Actions dağıtımını ayarlama
GitHub Actions dağıtımı, varsayılan Web Uygulaması Oluşturma işlemiyle tümleştirilir.
Dağıtım sekmesinde Sürekli dağıtım'ıEtkinleştir olarak ayarlayın ve seçtiğiniz kuruluşu, depoyu ve dalı yapılandırın.
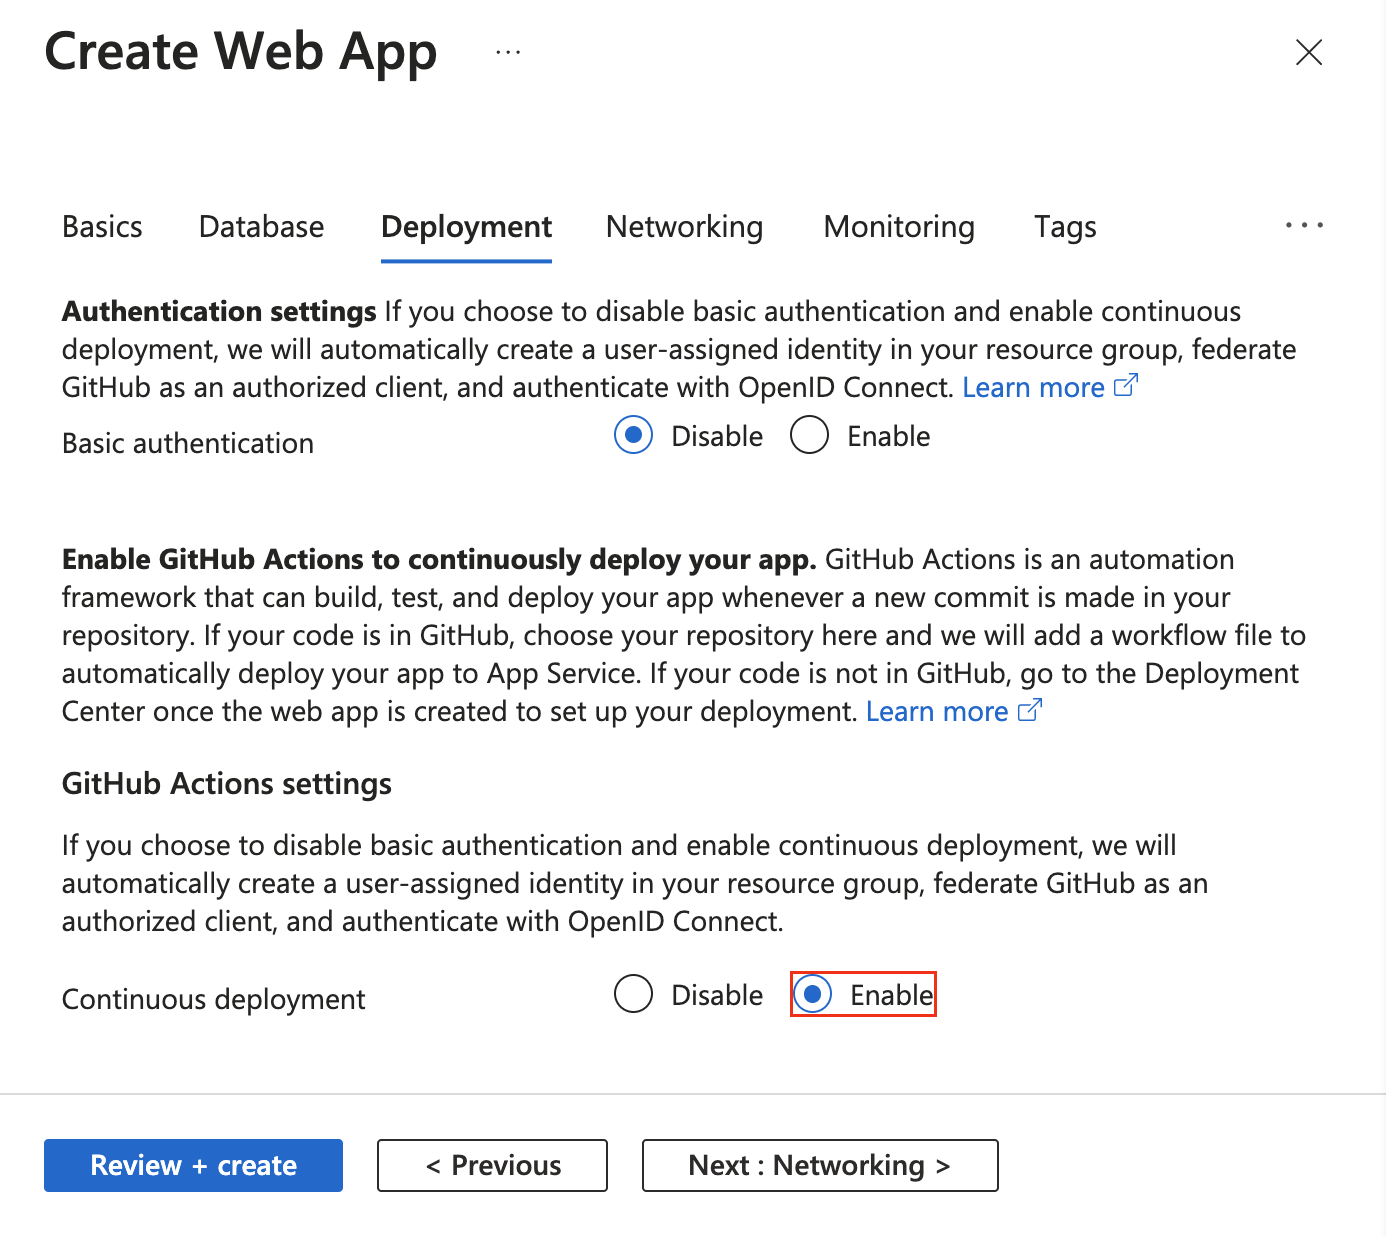
Sürekli dağıtımı etkinleştirdiğinizde , Web Uygulaması Oluştur işlemi temel kimlik doğrulama seçimine göre kimlik doğrulama yöntemini otomatik olarak seçer ve uygulamanızı ve GitHub deponuzu uygun şekilde yapılandırılır:
Dağıtım Merkezi'nden GitHub Actions dağıtımını ayarlama
Mevcut bir uygulama için App Service'te Dağıtım Merkezi'ne tıklayarak GitHub Actions'ı kullanmaya hızlı bir şekilde başlayabilirsiniz. Bu anahtar teslim yöntemi, uygulama yığınınızı temel alan bir GitHub Actions iş akışı dosyası oluşturur ve bunu GitHub deponuza işler.
Dağıtım Merkezi'ni kullanarak, kullanıcı tarafından atanan bir kimlikle daha güvenli OpenID Connect kimlik doğrulamasını kolayca yapılandırabilirsiniz. Daha fazla bilgi için kullanıcı tarafından atanan kimlik seçeneğine bakın.
Azure hesabınız gerekli izinlere sahipse, kullanıcı tarafından atanan bir kimlik oluşturabilirsiniz. Aksi takdirde, Kimlik açılan menüsünde kullanıcı tarafından atanan mevcut bir yönetilen kimliği seçebilirsiniz. Web Sitesi Katılımcısı rolüyle kullanıcı tarafından atanan bir yönetilen kimlik oluşturmak için Azure yöneticinizle birlikte çalışabilirsiniz.
Daha fazla bilgi için bkz. Azure Uygulaması Hizmetine sürekli dağıtım.
GitHub Actions iş akışını el ile ayarlama
Dağıtım Merkezi'ne gerek kalmadan iş akışı dağıtabilirsiniz. Şu üç adımı gerçekleştirin:
-
Dağıtım kimlik bilgileri oluşturun.
-
GitHub gizli bilgisini yapılandırın.
-
İş akışı dosyasını GitHub deponuza ekleyin.
Dağıtım kimlik bilgileri oluşturma
GitHub Actions için Azure App Service ile kimlik doğrulaması yapmak için OpenID Connect kullanmanızı öneririz. Bu kimlik doğrulama yöntemi kısa ömürlü belirteçler kullanır. GitHub Actions ile OpenID Connect'i ayarlamak daha karmaşıktır ancak sağlamlaştırılmış güvenlik sunar.
Ayrıca, kullanıcı tarafından atanan yönetilen kimlik, hizmet sorumlusu veya yayımlama profiliyle de kimlik doğrulaması yapabilirsiniz.
Aşağıdaki yordamda, Azure CLI deyimlerini kullanarak Microsoft Entra uygulaması, hizmet sorumlusu ve federasyon kimlik bilgileri oluşturma adımları açıklanmaktadır. Azure portalında Microsoft Entra uygulaması, hizmet sorumlusu ve federasyon kimlik bilgileri oluşturmayı öğrenmek için bkz. GitHub ve Azure'ı bağlama.
Mevcut bir uygulamanız yoksa kaynaklara erişebilen yeni bir Microsoft Entra uygulaması ve hizmet sorumlusu kaydedin. Microsoft Entra uygulamasını oluşturun.
az ad app create --display-name myApp
Bu komut, size appId olarak bir client-id içeren bir JSON çıktısı döndürür. GitHub gizli dizisi olarak AZURE_CLIENT_ID kullanılacak değeri daha sonra kaydedin.
Graph API ile federasyon kimlik bilgileri oluştururken objectId değerini kullanır ve APPLICATION-OBJECT-ID olarak buna başvurursunuz.
Hizmet sorumlusu oluşturma.
$appID öğesini JSON çıkışınızdaki appId öğesiyle değiştirin.
Bu komut, bir sonraki adımda kullanmak üzere farklı objectId bir JSON çıkışı oluşturur. Yeni objectId , şeklindedir assignee-object-id.
öğeyi appOwnerTenantId, daha sonra GitHub gizli anahtarı olarak kullanmak için AZURE_TENANT_ID kopyalayın.
az ad sp create --id $appId
Aboneliğe ve nesneye göre yeni bir rol ataması oluşturun. Varsayılan olarak, rol ataması varsayılan aboneliğinize bağlıdır. değerini abonelik kimliğiniz, $subscriptionId kaynak grubu adınız, $resourceGroupName web uygulamanızın adı ve $webappName oluşturulan $assigneeObjectIdile değiştirinid. Azure CLI ile Azure aboneliklerini yönetmeyi öğrenin.
az role assignment create --role "Website Contributor" --subscription $subscriptionId --assignee-object-id $assigneeObjectId --scope /subscriptions/$subscriptionId/resourceGroups/$resourceGroupName/providers/Microsoft.Web/sites/$webappName --assignee-principal-type ServicePrincipal
Microsoft Entra uygulamanız için yeni bir federasyon kimliği kimlik bilgisi oluşturmak için aşağıdaki komutu çalıştırın.
APPLICATION-OBJECT-ID öğesini, Active Directory uygulamanızın oluşturulması sırasında oluşturduğunuz appId öğesiyle değiştirin.
Daha sonra başvurmak için için CREDENTIAL-NAME bir değer ayarlayın.
öğesini subjectayarlayın. GitHub, değerini iş akışınıza bağlı olarak tanımlar:
- GitHub Actions ortamınızdaki işler için şunları kullanın:
repo:< Organization/Repository >:environment:< Name >
- Bir ortama bağlı olmayan işler için, iş akışını tetiklemek için kullanılan referans yoluna göre dal/etiket için referans yolunu ekleyin:
repo:< Organization/Repository >:ref:< ref path>. Örneğin, repo:n-username/ node_express:ref:refs/heads/my-branch veya repo:n-username/ node_express:ref:refs/tags/my-tag.
- Çekme isteği olayı tarafından tetiklenen iş akışları için şunu kullanın:
repo:< Organization/Repository >:pull_request.
az ad app federated-credential create --id <APPLICATION-OBJECT-ID> --parameters credential.json
("credential.json" contains the following content)
{
    "name": "<CREDENTIAL-NAME>",
    "issuer": "https://token.actions.githubusercontent.com",
    "subject": "repo:organization/repository:ref:refs/heads/main",
    "description": "Testing",
    "audiences": [
        "api://AzureADTokenExchange"
    ]
}
Yayımlama profili, uygulama düzeyinde bir kimlik bilgisidir. Yayımlama profilinizi GitHub gizli dizisi olarak ayarlayın.
Azure portalında App Service'e gidin.
Genel Bakış sayfasında Yayımlama profilini indir'i seçin.
İndirilen dosyayı kaydedin. GitHub gizli dizisi oluşturmak için dosyanın içeriğini kullanın.
Not
Ekim 2020 itibarıyla Linux web uygulamalarının yayımlama profilini indirmeden önce uygulama ayarının WEBSITE_WEBDEPLOY_USE_SCM olarak ayarlanması truegerekir.
Azure CLI'daki komutuyla az ad sp create-for-rbacbir hizmet sorumlusu oluşturabilirsiniz. Azure portalında Azure Cloud Shell'i kullanarak veya Cloud Shell'i Aç'ı seçerek bu komutu çalıştırın.
az ad sp create-for-rbac --name "myApp" --role "Website Contributor" \
                            --scopes /subscriptions/<subscription-id>/resourceGroups/<group-name>/providers/Microsoft.Web/sites/<app-name> \
                            --json-auth
Önceki örnekte yer tutucuları abonelik kimliğiniz, kaynak grubu adınız ve uygulama adınızla değiştirin. Çıkış, App Service uygulamanıza erişim sağlayan rol ataması kimlik bilgilerine sahip bir JSON nesnesidir. Çıktı aşağıdaki JSON kod parçacığına benzer olmalıdır. Bu JSON nesnesini daha sonra için kopyalayın.
  {
    "clientId": "<GUID>",
    "clientSecret": "<GUID>",
    "subscriptionId": "<GUID>",
    "tenantId": "<GUID>",
    (...)
  }
Önemli
Minimum erişim vermenizi öneririz. Önceki örnekteki kapsam, kaynak grubunun tamamıyla değil, belirli App Service uygulamasıyla sınırlıdır.
Eyleme uygulamanızın İstemci Kimliğini, Kiracı Kimliğini ve Abonelik KimliğiniAzure/login sağlamanız gerekir. Bu değerler doğrudan iş akışında sağlanabilir veya GitHub gizli dizilerinde depolanabilir ve iş akışınızda başvurulabilir. Değerleri GitHub gizli dizileri olarak kaydetmek daha güvenli bir seçenektir.
GitHub deponuzu açın ve Ayarlargidin.
, AZURE_CLIENT_IDve AZURE_TENANT_IDiçin AZURE_SUBSCRIPTION_IDgizli diziler oluşturun. GitHub gizli dizileriniz için Active Directory uygulamanızdaki şu değerleri kullanın:
| GitHub gizli anahtarı |
Active Directory uygulaması |
AZURE_CLIENT_ID |
Uygulama (istemci) kimliği |
AZURE_TENANT_ID |
Dizin (kiracı) kimliği |
AZURE_SUBSCRIPTION_ID |
Abonelik Kimliği |
Her gizli bilgiyi kaydetmek için Gizli bilgi ekle'yi seçin.
GitHub'da deponuza göz atın. Ayarlar
Önceki bölümde oluşturduğunuz uygulama düzeyindeki kimlik bilgilerini kullanmak için, indirilen yayımlama profili dosyasının içeriğini gizli bilginin değer alanına kopyalayın. Gizli diziyi AZURE_WEBAPP_PUBLISH_PROFILEolarak adlandırın.
GitHub iş akışı dosyasını daha sonra yapılandırırken AZURE_WEBAPP_PUBLISH_PROFILE eylemindeki öğesini kullanın. Örneğin:
- uses: azure/webapps-deploy@v2
  with:
    publish-profile: ${{ secrets.AZURE_WEBAPP_PUBLISH_PROFILE }}
GitHub'da deponuza göz atın. Ayarlar
Önceki bölümde oluşturduğunuz kullanıcı düzeyinde kimlik bilgilerini kullanmak için Azure CLI komutundaki JSON çıkışının tamamını gizli dizinin değer alanına yapıştırın. Gizli diziyi AZURE_CREDENTIALSolarak adlandırın.
GitHub iş akışı dosyasını daha sonra yapılandırdığınızda, creds girişinin Azure/login gizli anahtarını kullanın. Örneğin:
- uses: azure/login@v2
  with:
    creds: ${{ secrets.AZURE_CREDENTIALS }}
İş akışı dosyasını GitHub deponuza ekleme
GitHub deponuzdaki yoldaki /.github/workflows/ bir YAML (.yml) dosyası bir iş akışı tanımlar. Bu tanım, iş akışını oluşturan çeşitli adımları ve parametreleri içerir.
İş akışı dosyasında en azından aşağıdaki ayrı adımlar bulunur:
- Oluşturduğunuz GitHub sırrını kullanarak App Service ile kimlik doğrulaması yapın.
- Web uygulamasını oluşturun.
- Web uygulamasını dağıtın.
Kodunuzu bir App Service uygulamasına dağıtmak için eylemi kullanın azure/webapps-deploy@v3 . Eylem, app-name içinde web uygulamanızın adını ve dil yığınınza bağlı olarak dağıtılacak *.zip, *.war, *.jar veya klasör yolunu gerektirir. Eylem için olası girişlerin tam listesi için azure/webapps-deploy@v3 bkz . action.yml.
Aşağıdaki örnekler, iş akışının web uygulamasını oluşturan bölümünü desteklenen farklı dillerde gösterir.
OpenID Connect ile, yapılandırdığınız yönetilen kimliği kullanarak dağıtım yapmak için azure/login@v2 eylemi ile client-id, tenant-id, ve subscription-id anahtarlarını kullanın. Daha önce oluşturduğunuz GitHub gizli dizilerine başvurun.
name: .NET Core

on: [push]

permissions:
      id-token: write
      contents: read

env:
  AZURE_WEBAPP_NAME: my-app    # Set this to your application's name
  AZURE_WEBAPP_PACKAGE_PATH: '.'      # Set this to the path to your web app project, defaults to the repository root
  DOTNET_VERSION: '6.0.x'           # Set this to the dot net version to use

jobs:
  build:
    runs-on: ubuntu-latest

    steps:
      # Check out the repo
      - uses: actions/checkout@main
      - uses: azure/login@v2
        with:
          client-id: ${{ secrets.AZURE_CLIENT_ID }}
          tenant-id: ${{ secrets.AZURE_TENANT_ID }}
          subscription-id: ${{ secrets.AZURE_SUBSCRIPTION_ID }}


      # Setup .NET Core SDK
      - name: Setup .NET Core
        uses: actions/setup-dotnet@v3
        with:
          dotnet-version: ${{ env.DOTNET_VERSION }}

      # Run dotnet build and publish
      - name: dotnet build and publish
        run: |
          dotnet restore
          dotnet build --configuration Release
          dotnet publish -c Release --property:PublishDir='${{ env.AZURE_WEBAPP_PACKAGE_PATH }}/myapp'

      # Deploy to Azure Web apps
      - name: 'Run Azure webapp deploy action using publish profile credentials'
        uses: azure/webapps-deploy@v3
        with:
          app-name: ${{ env.AZURE_WEBAPP_NAME }} # Replace with your app name
          package: '${{ env.AZURE_WEBAPP_PACKAGE_PATH }}/myapp'

      - name: logout
        run: |
          az logout
Azure hizmet sorumlusu kullanarak bir ASP.NET model-görünüm denetleyicisi (MVC) uygulaması derleyin ve Azure'a dağıtın. Örnekte , client-idve tenant-id değerleri için subscription-idGitHub gizli dizileri kullanılmaktadır. Bu değerleri doğrudan oturum açma eyleminde de geçirebilirsiniz.
name: Deploy ASP.NET MVC App deploy to Azure Web App

on: [push]

permissions:
      id-token: write
      contents: read

env:
  AZURE_WEBAPP_NAME: my-app    # Set this to your application's name
  AZURE_WEBAPP_PACKAGE_PATH: '.'      # Set this to the path to your web app project, defaults to the repository root
  NUGET_VERSION: '5.3.x'           # Set this to the dot net version to use

jobs:
  build-and-deploy:
    runs-on: windows-latest
    steps:

    # Check out the repo
    - uses: actions/checkout@main

    - uses: azure/login@v2
      with:
        client-id: ${{ secrets.AZURE_CLIENT_ID }}
        tenant-id: ${{ secrets.AZURE_TENANT_ID }}
        subscription-id: ${{ secrets.AZURE_SUBSCRIPTION_ID }}

    - name: Install Nuget
      uses: nuget/setup-nuget@v1
      with:
        nuget-version: ${{ env.NUGET_VERSION}}
    - name: NuGet to restore dependencies as well as project-specific tools that are specified in the project file
      run: nuget restore

    - name: Add msbuild to PATH
      uses: microsoft/setup-msbuild@v1.0.2

    - name: Run MSBuild
      run: msbuild .\SampleWebApplication.sln

    - name: 'Run Azure webapp deploy action using publish profile credentials'
      uses: azure/webapps-deploy@v3
      with:
        app-name: ${{ env.AZURE_WEBAPP_NAME }} # Replace with your app name
        package: '${{ env.AZURE_WEBAPP_PACKAGE_PATH }}/SampleWebApplication/'

    # Azure logout
    - name: logout
      run: |
        az logout
Azure hizmet sorumlusu hesabı kullanarak bir Java Spring Boot uygulamasını oluşturun ve Azure’a dağıtın. Örnekte , client-idve tenant-id değerleri için subscription-idGitHub gizli dizileri kullanılmaktadır. Bu değerleri doğrudan oturum açma eyleminde de geçirebilirsiniz.
name: Java CI with Maven

on: [push]

permissions:
      id-token: write
      contents: read

jobs:
  build:

    runs-on: ubuntu-latest

    steps:
    - uses: actions/checkout@v4
    - uses: azure/login@v2
      with:
        client-id: ${{ secrets.AZURE_CLIENT_ID }}
        tenant-id: ${{ secrets.AZURE_TENANT_ID }}
        subscription-id: ${{ secrets.AZURE_SUBSCRIPTION_ID }}
    - name: Set up JDK 1.8
      uses: actions/setup-java@v3
      with:
        java-version: 1.8
    - name: Build with Maven
      run: mvn -B package --file pom.xml
      working-directory: complete
    - name: Azure WebApp
      uses: Azure/webapps-deploy@v3
      with:
        app-name: my-app-name
        package: my/target/*.jar

    # Azure logout
    - name: logout
      run: |
        az logout
name: Build and deploy WAR app to Azure Web App using OpenID Connect

env:
  JAVA_VERSION: '11'                  # Set this to the Java version to use
  DISTRIBUTION: microsoft             # Set this to the Java distribution
  AZURE_WEBAPP_NAME: sampleapp        # Set this to the name of your web app

on: [push]

permissions:
  id-token: write
  contents: read

jobs:
  build:
    runs-on: ubuntu-latest

    steps:
      - uses: actions/checkout@v4

      - name: Set up Java version
        uses: actions/setup-java@v3.0.0
        with:
          java-version: ${{ env.JAVA_VERSION }}
          distribution: ${{ env.DISTRIBUTION }}
          cache: 'maven'

      - name: Build with Maven
        run: mvn clean install

      - name: Login to Azure
        uses: azure/login@v2
        with:
          client-id: ${{ secrets.AZURE_CLIENT_ID }}
          tenant-id: ${{ secrets.AZURE_TENANT_ID }}
          subscription-id: ${{ secrets.AZURE_SUBSCRIPTION_ID }}

      - name: Deploy to Azure Web App
        id: deploy-to-webapp
        uses: azure/webapps-deploy@v3
        with:
          app-name: ${{ env.AZURE_WEBAPP_NAME }}
          package: '*.war'
Derleme ve dağıtım için birden çok iş kullanan tam bir örnek aşağıda verilmiştır.
Önemli
kullanarak azure/webapps-deploy@v3TypeScript veya diğer derlenmiş dillerle bir Node.js uygulaması dağıtıyorsanız, uygulamanızı önce GitHub Actions'ta derleyin ve ardından derlenmiş çıkış klasörünü (veya dist/gibibuild/) dağıtın. Bunun yerine App Service derleme otomasyonunu kullanmak istiyorsanız uygulama ayarını SCM_DO_BUILD_DURING_DEPLOYMENT olarak ayarlayıntrue.
name: JavaScript CI

on: [push]

permissions:
      id-token: write
      contents: read

name: Node.js

env:
  AZURE_WEBAPP_NAME: my-app   # Set this to your application's name
  AZURE_WEBAPP_PACKAGE_PATH: 'my-app-path'      # Set this to the path to your web app project, defaults to the repository root
  NODE_VERSION: '24.x'                # Set this to the node version to use

jobs:
  build-and-deploy:
    runs-on: ubuntu-latest
    steps:
    # Check out the repo
    - name: 'Checkout GitHub Action'
      uses: actions/checkout@main

    - uses: azure/login@v2
      with:
        client-id: ${{ secrets.AZURE_CLIENT_ID }}
        tenant-id: ${{ secrets.AZURE_TENANT_ID }}
        subscription-id: ${{ secrets.AZURE_SUBSCRIPTION_ID }}

    - name: Setup Node ${{ env.NODE_VERSION }}
      uses: actions/setup-node@v4
      with:
        node-version: ${{ env.NODE_VERSION }}

    - name: 'npm install, build, and test'
      run: |
        npm install
        npm run build --if-present
        npm run test --if-present
      working-directory:  my-app-path

    # Deploy web app by using Azure credentials
    - uses: azure/webapps-deploy@v3
      with:
        app-name: ${{ env.AZURE_WEBAPP_NAME }}
        package: ${{ env.AZURE_WEBAPP_PACKAGE_PATH }}

    # Azure logout
    - name: logout
      run: |
        az logout
name: Python application

on:
  [push]

permissions:
      id-token: write
      contents: read

env:
  AZURE_WEBAPP_NAME: my-app # Set this to your application's name
  AZURE_WEBAPP_PACKAGE_PATH: '.' # Set this to the path to your web app project, defaults to the repository root

jobs:
  build:
    runs-on: ubuntu-latest
    steps:
    - uses: actions/checkout@v4

    - uses: azure/login@v2
      with:
        client-id: ${{ secrets.AZURE_CLIENT_ID }}
        tenant-id: ${{ secrets.AZURE_TENANT_ID }}
        subscription-id: ${{ secrets.AZURE_SUBSCRIPTION_ID }}

    - name: Set up Python 3.x
      uses: actions/setup-python@v4
      with:
        python-version: 3.x
    - name: Install dependencies
      run: |
        python -m pip install --upgrade pip
        pip install -r requirements.txt
    - name: Deploy web App using GH Action azure/webapps-deploy
      uses: azure/webapps-deploy@v3
      with:
        app-name: ${{ env.AZURE_WEBAPP_NAME }}
        package: ${{ env.AZURE_WEBAPP_PACKAGE_PATH }}
    - name: logout
      run: |
        az logout
Giriş, publish-profile daha önce oluşturduğunuz GitHub gizli dizisine başvurmalıdır AZURE_WEBAPP_PUBLISH_PROFILE .
name: .NET Core CI

on: [push]

env:
  AZURE_WEBAPP_NAME: my-app-name    # Set this to your application's name
  AZURE_WEBAPP_PACKAGE_PATH: '.'      # Set this to the path to your web app project, defaults to the repository root
  DOTNET_VERSION: '6.0.x'           # Set this to the dot net version to use

jobs:
  build:
    runs-on: ubuntu-latest

    steps:
      # Check out the repo
      - uses: actions/checkout@main

      # Setup .NET Core SDK
      - name: Setup .NET Core
        uses: actions/setup-dotnet@v3
        with:
          dotnet-version: ${{ env.DOTNET_VERSION }}

      # Run dotnet build and publish
      - name: dotnet build and publish
        run: |
          dotnet restore
          dotnet build --configuration Release
          dotnet publish -c Release --property:PublishDir='${{ env.AZURE_WEBAPP_PACKAGE_PATH }}/myapp'

      # Deploy to Azure Web apps
      - name: 'Run Azure webapp deploy action using publish profile credentials'
        uses: azure/webapps-deploy@v3
        with:
          app-name: ${{ env.AZURE_WEBAPP_NAME }} # Replace with your app name
          publish-profile: ${{ secrets.AZURE_WEBAPP_PUBLISH_PROFILE  }} # Define secret variable in repository settings as per action documentation
          package: '${{ env.AZURE_WEBAPP_PACKAGE_PATH }}/myapp'
NuGet kullanan ve kimlik doğrulaması için bir ASP.NET model-view-controller (MVC) uygulaması derleyin ve publish-profile dağıtın.
name: Deploy ASP.NET MVC App deploy to Azure Web App

on: [push]

env:
  AZURE_WEBAPP_NAME: my-app    # Set this to your application's name
  AZURE_WEBAPP_PACKAGE_PATH: '.'      # Set this to the path to your web app project, defaults to the repository root
  NUGET_VERSION: '5.3.x'           # Set this to the dot net version to use

jobs:
  build-and-deploy:
    runs-on: windows-latest
    steps:

    - uses: actions/checkout@main

    - name: Install Nuget
      uses: nuget/setup-nuget@v1
      with:
        nuget-version: ${{ env.NUGET_VERSION}}
    - name: NuGet to restore dependencies as well as project-specific tools that are specified in the project file
      run: nuget restore

    - name: Add msbuild to PATH
      uses: microsoft/setup-msbuild@v1.0.2

    - name: Run MSBuild
      run: msbuild .\SampleWebApplication.sln

    - name: 'Run Azure webapp deploy action using publish profile credentials'
      uses: azure/webapps-deploy@v3
      with:
        app-name: ${{ env.AZURE_WEBAPP_NAME }} # Replace with your app name
        publish-profile: ${{ secrets.AZURE_WEBAPP_PUBLISH_PROFILE  }} # Define secret variable in repository settings as per action documentation
        package: '${{ env.AZURE_WEBAPP_PACKAGE_PATH }}/SampleWebApplication/'
Azure yayımlama profili kullanarak Bir Java Spring Boot uygulaması derleyin ve Azure'a dağıtın. Giriş, publish-profile daha önce oluşturduğunuz gizli diziye AZURE_WEBAPP_PUBLISH_PROFILE başvurur.
name: Java CI with Maven

on: [push]

jobs:
  build:

    runs-on: ubuntu-latest

    steps:
    - uses: actions/checkout@v4
    - name: Set up JDK 1.8
      uses: actions/setup-java@v3
      with:
        java-version: 1.8
    - name: Build with Maven
      run: mvn -B package --file pom.xml
      working-directory: my-app-path
    - name: Azure WebApp
      uses: Azure/webapps-deploy@v3
      with:
        app-name: my-app-name
        publish-profile: ${{ secrets.AZURE_WEBAPP_PUBLISH_PROFILE }}
        package: my/target/*.jar
yerine bir warjardağıtmak için değerini değiştirin package .
    - name: Azure WebApp
      uses: Azure/webapps-deploy@v3
      with:
        app-name: my-app-name
        publish-profile: ${{ secrets.AZURE_WEBAPP_PUBLISH_PROFILE }}
        package: my/target/*.war
Bir Azure yayımlama profili kullanarak Bir Tomcat uygulaması derleyin ve Azure'a dağıtın. Giriş, publish-profile daha önce oluşturduğunuz gizli diziye AZURE_WEBAPP_PUBLISH_PROFILE başvurur.
name: Build and deploy WAR app to Azure Web App using publish profile

env:
  JAVA_VERSION: '11'                  # Set this to the Java version to use
  DISTRIBUTION: microsoft             # Set this to the Java distribution
  AZURE_WEBAPP_NAME: sampleapp        # Set this to the name of your web app

on: [push]

permissions:
  id-token: write
  contents: read

jobs:
  build:
    runs-on: ubuntu-latest

    steps:
      - uses: actions/checkout@v4

      - name: Set up Java version
        uses: actions/setup-java@v3.0.0
        with:
          java-version: ${{ env.JAVA_VERSION }}
          distribution: ${{ env.DISTRIBUTION }}
          cache: 'maven'

      - name: Build with Maven
        run: mvn clean install

      - name: Deploy to Azure Web App
        id: deploy-to-webapp
        uses: azure/webapps-deploy@v3
        with:
          app-name: ${{ env.AZURE_WEBAPP_NAME }}
          publish-profile: ${{ secrets.AZURE_WEBAPP_PUBLISH_PROFILE }}
          package: '*.war'
Derleme ve dağıtım için birden çok iş kullanan tam bir örnek aşağıda verilmiştır.
Önemli
kullanarak azure/webapps-deploy@v3TypeScript veya diğer derlenmiş dillerle bir Node.js uygulaması dağıtıyorsanız, uygulamanızı önce GitHub Actions'ta derleyin ve ardından derlenmiş çıkış klasörünü (veya dist/gibibuild/) dağıtın. App Service derleme otomasyonunu kullanmak istiyorsanız, uygulama ayarını SCM_DO_BUILD_DURING_DEPLOYMENT olarak ayarlayıntrue.
Uygulamanın yayımlama profilini kullanarak bir Node.js uygulaması derleyin ve Azure'a dağıtın. Giriş, publish-profile daha önce oluşturduğunuz gizli diziye AZURE_WEBAPP_PUBLISH_PROFILE başvurur.
# File: .github/workflows/workflow.yml
name: JavaScript CI

on: [push]

env:
  AZURE_WEBAPP_NAME: my-app-name   # Set this to your application's name
  AZURE_WEBAPP_PACKAGE_PATH: 'my-app-path'      # Set this to the path to your web app project, defaults to the repository root
  NODE_VERSION: '24.x'                # Set this to the node version to use

jobs:
  build-and-deploy:
    name: Build and Deploy
    runs-on: ubuntu-latest
    steps:
    - uses: actions/checkout@main
    - name: Use Node.js ${{ env.NODE_VERSION }}
      uses: actions/setup-node@v4
      with:
        node-version: ${{ env.NODE_VERSION }}
    - name: npm install, build, and test
      run: |
        # Build and test the project, then
        # deploy to Azure Web App.
        npm install
        npm run build --if-present
        npm run test --if-present
      working-directory: my-app-path
    - name: 'Deploy to Azure WebApp'
      uses: azure/webapps-deploy@v3
      with:
        app-name: ${{ env.AZURE_WEBAPP_NAME }}
        publish-profile: ${{ secrets.AZURE_WEBAPP_PUBLISH_PROFILE }}
        package: ${{ env.AZURE_WEBAPP_PACKAGE_PATH }}
Uygulamanın yayımlama profilini kullanarak Bir Python uygulaması oluşturun ve Azure'a dağıtın. Girişin publish-profile daha önce oluşturduğunuz gizli diziye AZURE_WEBAPP_PUBLISH_PROFILE nasıl başvurduğunu unutmayın.
name: Python CI

on:
  [push]

env:
  AZURE_WEBAPP_NAME: my-web-app # Set this to your application's name
  AZURE_WEBAPP_PACKAGE_PATH: '.' # Set this to the path to your web app project, defaults to the repository root

jobs:
  build:
    runs-on: ubuntu-latest
    steps:
    - uses: actions/checkout@v4
    - name: Set up Python 3.x
      uses: actions/setup-python@v4
      with:
        python-version: 3.x
    - name: Install dependencies
      run: |
        python -m pip install --upgrade pip
        pip install -r requirements.txt
    - name: Building web app
      uses: azure/appservice-build@v2
    - name: Deploy web App using GH Action azure/webapps-deploy
      uses: azure/webapps-deploy@v3
      with:
        app-name: ${{ env.AZURE_WEBAPP_NAME }}
        publish-profile: ${{ secrets.AZURE_WEBAPP_PUBLISH_PROFILE }}
        package: ${{ env.AZURE_WEBAPP_PACKAGE_PATH }}
Yapılandırdığınız hizmet sorumlusuyla dağıtmak için anahtarıyla eylemini kullanın azure/login@v2 ve daha önce oluşturduğunuz gizli diziye creds başvurun.AZURE_CREDENTIALS
name: .NET Core

on: [push]

env:
  AZURE_WEBAPP_NAME: my-app    # Set this to your application's name
  AZURE_WEBAPP_PACKAGE_PATH: '.'      # Set this to the path to your web app project, defaults to the repository root
  DOTNET_VERSION: '6.0.x'           # Set this to the dot net version to use

jobs:
  build:
    runs-on: ubuntu-latest

    steps:
      # Check out the repo
      - uses: actions/checkout@main
      - uses: azure/login@v2
        with:
          creds: ${{ secrets.AZURE_CREDENTIALS }}


      # Set up .NET Core SDK
      - name: Setup .NET Core
        uses: actions/setup-dotnet@v3
        with:
          dotnet-version: ${{ env.DOTNET_VERSION }}

      # Run dotnet build and publish
      - name: dotnet build and publish
        run: |
          dotnet restore
          dotnet build --configuration Release
          dotnet publish -c Release --property:PublishDir='${{ env.AZURE_WEBAPP_PACKAGE_PATH }}/myapp'

      # Deploy to Azure Web apps
      - name: 'Run Azure webapp deploy action using Azure Credentials'
        uses: azure/webapps-deploy@v3
        with:
          app-name: ${{ env.AZURE_WEBAPP_NAME }} # Replace with your app name
          package: '${{ env.AZURE_WEBAPP_PACKAGE_PATH }}/myapp'

      - name: logout
        run: |
          az logout
Azure hizmet sorumlusu kullanarak bir ASP.NET model-görünüm denetleyicisi (MVC) uygulaması derleyin ve Azure'a dağıtın. Giriş, creds daha önce oluşturduğunuz gizli diziye AZURE_CREDENTIALS başvurur.
name: Deploy ASP.NET MVC App deploy to Azure Web App

on: [push]

env:
  AZURE_WEBAPP_NAME: my-app    # Set this to your application's name
  AZURE_WEBAPP_PACKAGE_PATH: '.'      # Set this to the path to your web app project, defaults to the repository root
  NUGET_VERSION: '5.3.x'           # Set this to the dot net version to use

jobs:
  build-and-deploy:
    runs-on: windows-latest
    steps:

    # Check out the repo
    - uses: actions/checkout@main

    - uses: azure/login@v2
      with:
        creds: ${{ secrets.AZURE_CREDENTIALS }}

    - name: Install Nuget
      uses: nuget/setup-nuget@v1
      with:
        nuget-version: ${{ env.NUGET_VERSION}}
    - name: NuGet to restore dependencies as well as project-specific tools that are specified in the project file
      run: nuget restore

    - name: Add msbuild to PATH
      uses: microsoft/setup-msbuild@v1.0.2

    - name: Run MSBuild
      run: msbuild .\SampleWebApplication.sln

    - name: 'Run Azure webapp deploy action using Azure Credentials'
      uses: azure/webapps-deploy@v3
      with:
        app-name: ${{ env.AZURE_WEBAPP_NAME }} # Replace with your app name
        package: '${{ env.AZURE_WEBAPP_PACKAGE_PATH }}/SampleWebApplication/'

    # Azure logout
    - name: logout
      run: |
        az logout
Azure hizmet sorumlusu hesabı kullanarak bir Java Spring Boot uygulamasını oluşturun ve Azure’a dağıtın. Giriş, creds daha önce oluşturduğunuz gizli diziye AZURE_CREDENTIALS başvurur.
name: Java CI with Maven

on: [push]

jobs:
  build:

    runs-on: ubuntu-latest

    steps:
    - uses: actions/checkout@v4
    - uses: azure/login@v2
      with:
        creds: ${{ secrets.AZURE_CREDENTIALS }}
    - name: Set up JDK 1.8
      uses: actions/setup-java@v3
      with:
        java-version: 1.8
    - name: Build with Maven
      run: mvn -B package --file pom.xml
      working-directory: complete
    - name: Azure WebApp
      uses: Azure/webapps-deploy@v3
      with:
        app-name: my-app-name
        package: my/target/*.jar

    # Azure logout
    - name: logout
      run: |
        az logout
Azure hizmet ilkesi kullanarak bir Tomcat uygulaması oluşturun ve Azure'a dağıtın. Giriş, creds daha önce oluşturduğunuz gizli diziye AZURE_CREDENTIALS başvurur.
name: Build and deploy WAR app to Azure Web App using Service Principal Connect

env:
  JAVA_VERSION: '11'                  # Set this to the Java version to use
  DISTRIBUTION: microsoft             # Set this to the Java distribution
  AZURE_WEBAPP_NAME: sampleapp        # Set this to the name of your web app

on: [push]

permissions:
  contents: read

jobs:
  build:
    runs-on: ubuntu-latest

    steps:
      - uses: actions/checkout@v4

      - name: Set up Java version
        uses: actions/setup-java@v3.0.0
        with:
          java-version: ${{ env.JAVA_VERSION }}
          distribution: ${{ env.DISTRIBUTION }}
          cache: 'maven'

      - name: Build with Maven
        run: mvn clean install

      - name: Login to Azure
        uses: azure/login@v2
        with:
          creds: ${{ secrets.AZURE_CREDENTIALS }}

      - name: Deploy to Azure Web App
        id: deploy-to-webapp
        uses: azure/webapps-deploy@v3
        with:
          app-name: ${{ env.AZURE_WEBAPP_NAME }}
          package: '*.war'
Derleme ve dağıtım için birden çok iş kullanan tam bir örnek aşağıda verilmiştır.
Önemli
kullanarak azure/webapps-deploy@v3TypeScript veya diğer derlenmiş dillerle bir Node.js uygulaması dağıtıyorsanız, uygulamanızı önce GitHub Actions'ta derleyin ve ardından derlenmiş çıkış klasörünü (veya dist/gibibuild/) dağıtın. Bunun yerine, App Service derleme otomasyonunu kullanmak istiyorsanız, uygulama ayarını SCM_DO_BUILD_DURING_DEPLOYMENT olarak true ayarlayın.
Azure hizmet sorumlusu kullanarak bir Node.js uygulaması derleyin ve Azure'a dağıtın. Giriş, creds daha önce oluşturduğunuz gizli diziye AZURE_CREDENTIALS başvurur.
name: JavaScript CI

on: [push]

name: Node.js

env:
  AZURE_WEBAPP_NAME: my-app   # Set this to your application's name
  AZURE_WEBAPP_PACKAGE_PATH: 'my-app-path'      # Set this to the path to your web app project, defaults to the repository root
  NODE_VERSION: '24.x'                # Set this to the node version to use

jobs:
  build-and-deploy:
    runs-on: ubuntu-latest
    steps:
    # Check out the repo
    - name: 'Checkout GitHub Action'
      uses: actions/checkout@main

    - uses: azure/login@v2
      with:
        creds: ${{ secrets.AZURE_CREDENTIALS }}

    - name: Setup Node ${{ env.NODE_VERSION }}
      uses: actions/setup-node@v4
      with:
        node-version: ${{ env.NODE_VERSION }}

    - name: 'npm install, build, and test'
      run: |
        npm install
        npm run build --if-present
        npm run test --if-present
      working-directory:  my-app-path

    # Deploy web app using Azure credentials
    - uses: azure/webapps-deploy@v3
      with:
        app-name: ${{ env.AZURE_WEBAPP_NAME }}
        package: ${{ env.AZURE_WEBAPP_PACKAGE_PATH }}

    # Azure logout
    - name: logout
      run: |
        az logout
Azure hizmet ilkesi kullanarak bir Python uygulaması oluşturun ve Azure’a dağıtın. Giriş, creds daha önce oluşturduğunuz gizli diziye AZURE_CREDENTIALS başvurur.
name: Python application

on:
  [push]

env:
  AZURE_WEBAPP_NAME: my-app # Set this to your application's name
  AZURE_WEBAPP_PACKAGE_PATH: '.' # Set this to the path to your web app project, defaults to the repository root

jobs:
  build:
    runs-on: ubuntu-latest
    steps:
    - uses: actions/checkout@v4

    - uses: azure/login@v2
      with:
        creds: ${{ secrets.AZURE_CREDENTIALS }}

    - name: Set up Python 3.x
      uses: actions/setup-python@v4
      with:
        python-version: 3.x
    - name: Install dependencies
      run: |
        python -m pip install --upgrade pip
        pip install -r requirements.txt
    - name: Deploy web App using GH Action azure/webapps-deploy
      uses: azure/webapps-deploy@v3
      with:
        app-name: ${{ env.AZURE_WEBAPP_NAME }}
        package: ${{ env.AZURE_WEBAPP_PACKAGE_PATH }}
    - name: logout
      run: |
        az logout
Sıkça sorulan sorular
Maven eklentisi aracılığıyla bir WAR dosyasını nasıl dağıtacağım?
Java Tomcat projenizi Maven eklentisiyle yapılandırdıysanız, bu eklenti aracılığıyla Azure App Service'e de dağıtabilirsiniz. Azure CLI GitHub eylemini kullanırsanız Azure kimlik bilgilerinizi kullanır.
    - name: Azure CLI script file
      uses: azure/cli@v2
      with:
        inlineScript: |
          mvn package azure-webapp:deploy
Maven eklentisini kullanma ve yapılandırma hakkında daha fazla bilgi için bkz. Azure App Service için Maven eklentisi wiki'si.
Azure CLI aracılığıyla bir WAR dosyasını nasıl dağıtacağım?
App Service'e dağıtmak için Azure CLI kullanmayı tercih ediyorsanız, Azure CLI için GitHub Eylemi'ni kullanabilirsiniz.
- name: Azure CLI script
  uses: azure/cli@v2
  with:
    inlineScript: |
      az webapp deploy --src-path '${{ github.workspace }}/target/yourpackage.war' --name ${{ env.AZURE_WEBAPP_NAME }} --resource-group ${{ env.RESOURCE_GROUP }}  --async true --type war
Azure CLI için GitHub eylemini kullanma ve yapılandırma hakkında daha fazla bilgi için bkz. Azure CLI GitHub eylemi.
Komutun az webapp deploy nasıl kullanılacağı ve parametre ayrıntıları da dahil olmak üzere komut hakkında daha fazla bilgi için belgelere bakınaz webapp deploy.
Başlangıç dosyası Nasıl yaparım? dağıtılır?
Azure CLI için GitHub Eylemi'ni kullanın. Örneğin:
- name: Deploy startup script
  uses: azure/cli@v2
  with:
    inlineScript: |
      az webapp deploy --src-path ${{ github.workspace }}/src/main/azure/createPasswordlessDataSource.sh --name ${{ env.AZURE_WEBAPP_NAME }} --resource-group ${{ env.RESOURCE_GROUP }} --type startup --track-status false
Bir kapsayıcıya nasıl yükleme yapabilirim?
Azure Web Dağıtımı eylemiyle GitHub Actions'ı kullanarak app service'e özel kapsayıcılar dağıtmak için iş akışınızı otomatikleştirebilirsiniz. Daha fazla bilgi için bkz. Kapsayıcıya dağıtma.
Dağıtım yuvasına nasıl dağıtım yapabilirim?
slot-name
azure/webapps-deploy@v3 eylemindeki parametreyi kullanarak üretim yuvası yerine bir dağıtım yuvasına dağıtabilirsiniz. Slot'a dağıtım yapmak için, iş akışınızın dağıtım adımına slot-name parametresini ekleyin.
- name: Deploy to Azure Web App
  uses: azure/webapps-deploy@v3
  with:
    app-name: 'my-app-name'
    slot-name: 'staging'  # Deploy to the 'staging' slot instead of production
    package: './output'
Not
OpenID Connect veya hizmet sorumlusu kimlik doğrulamasını kullandığınızda, kimliğin hem uygulamada hem de dağıtım yuvasında Web Sitesi Katılımcısı rolüne sahip olduğundan emin olun. Yayımlama profili kimlik doğrulaması için Azure portalından belirli bir yuva için yayımlama profilini indirin (Dağıtım>Dağıtım yuvaları> yuvayı seçin >Yayımlama profilini indir).
Dağıtımdan sonra Tomcat yapılandırmasını Nasıl yaparım? güncelleştirin?
Dağıtımdan sonra web uygulaması ayarlarınızı güncelleştirmek istiyorsanız App Service ayarları eylemini kullanabilirsiniz.
    - uses: azure/appservice-settings@v1
      with:
        app-name: 'my-app'
        slot-name: 'staging'  # Optional and needed only if the settings have to be configured on the specific deployment slot
        app-settings-json: '[{ "name": "CATALINA_OPTS", "value": "-Dfoo=bar" }]'
        connection-strings-json: '${{ secrets.CONNECTION_STRINGS }}'
        general-settings-json: '{"alwaysOn": "false", "webSocketsEnabled": "true"}' #'General configuration settings as Key Value pairs'
      id: settings
Bu eylemi kullanma ve yapılandırma hakkında daha fazla bilgi için bkz. App Service ayarları deposu.
İlgili içerik
Azure GitHub İşlemleri ve iş akışları ile ilgili aşağıdaki kaynaklara göz atın: