Not
Bu sayfaya erişim yetkilendirme gerektiriyor. Oturum açmayı veya dizinleri değiştirmeyi deneyebilirsiniz.
Bu sayfaya erişim yetkilendirme gerektiriyor. Dizinleri değiştirmeyi deneyebilirsiniz.
Bu makalede, Azure Stack'te SQL Server veritabanlarını korumak için Microsoft Azure Backup Sunucusu'nun (MABS) nasıl yapılandırıldığı açıklanır.
SQL Server veritabanları koruma iş akışı
SQL Server veritabanı yedeklemesinin Azure'a yönetimi ve Azure'dan kurtarma şunları içerir:
- SQL Server veritabanlarını korumak için yedekleme ilkesi oluşturma
- İsteğe bağlı yedekleme kopyaları oluşturma
- Veritabanını Disklerden ve Azure'dan kurtarma
Azure Stack'te SQL Server yedeklemesi için desteklenen senaryolar ve sınırlamalar
Azure Stack'te SQL Server'ı yedeklemeden önce aşağıdaki desteklenen senaryoları ve sınırlamaları gözden geçirin:
- Uzak dosya paylaşımında dosyaları olan bir veritabanınız varsa, koruma Hata Kimliği 104 ile başarısız olur. MABS, uzak bir dosya paylaşımındaki SQL Server verileri için korumayı desteklemez.
- MABS, uzak SMB paylaşımlarında depolanan veritabanlarını koruyamaz.
- Kullanılabilirlik grubu çoğaltmalarının yalnızca okunabilir olarak yapılandırıldığından emin olun.
- NTAuthority\System sistem hesabını SQL Server'da Sysadmin grubuna açıkça eklemeniz gerekir.
- Kısmen kapsanan bir veritabanı için alternatif bir konum kurtarma işlemi gerçekleştirdiğinizde, hedef SQL örneğinde Kapsanan Veritabanları özelliğinin etkinleştirildiğinden emin olmanız gerekir.
- Dosya akışı veritabanı için alternatif bir konum kurtarma işlemi gerçekleştirdiğinizde, hedef SQL örneğinde dosya akışı veritabanı özelliğinin etkinleştirildiğinden emin olmanız gerekir.
- SQL Server AlwaysOn için koruma:
- MABS, koruma grubu oluşturma sırasında sorgu çalıştırırken Kullanılabilirlik Gruplarını algılar.
- MABS bir yük devretme algılar ve veritabanını korumaya devam eder.
- MABS, SQL Server örneği için çok siteli küme yapılandırmalarını destekler.
- Always On özelliğini kullanan veritabanlarını koruduğunuzda MABS aşağıdaki sınırlamalara sahiptir:
- MABS, yedekleme tercihlerine göre SQL Server'da ayarlanan kullanılabilirlik grupları için yedekleme ilkesini aşağıdaki gibi kabul eder:
- İkincili Tercih Et - Yedeklemeler, birincil çoğaltma çevrimiçi olan tek çoğaltma ise hariç, ikincil çoğaltmada yapılmalıdır. Birden çok ikincil replika varsa, yedekleme amacıyla en yüksek yedekleme önceliğine sahip düğüm seçilir. Yalnızca birincil çoğaltma kullanılabiliyorsa, yedekleme birincil çoğaltmada gerçekleşmelidir.
- Sadece ikincil - Yedekleme birincil kopyada gerçekleştirilmemelidir. Eğer yalnızca birincil replikasyon çevrimiçiyse, yedekleme yapılmamalıdır.
- Birincil - Yedeklemeler her zaman birincil çoğaltmada gerçekleşmelidir.
- Herhangi Bir Kopya - Yedeklemeler, kullanılabilirlik grubundaki herhangi bir kullanılabilirlik kopyasında gerçekleşebilir. Yedekleme yapılacak olan düğüm, her bir düğümün yedekleme önceliklerine göre belirlenecektir.
-
Uyarı
- Yedeklemeler, okunabilir herhangi bir kopyadan (birincil, zaman uyumlu ikincil, zaman uyumsuz ikincil) gerçekleşebilir.
- Herhangi bir çoğaltma yedeklemenin dışında bırakılırsa, örneğin Çoğaltmayı Dışla etkinse veya okunabilir değil olarak işaretlenmişse, bu çoğaltma herhangi bir seçenek altında yedekleme için seçilmez.
- Birden çok çoğaltma varsa ve okunabiliyorsa, yedekleme için en yüksek önceliğe sahip düğüm seçilir.
- Seçilen düğümde yedekleme başarısız olursa yedekleme işlemi başarısız olur.
- Özgün konuma kurtarma desteklenmez.
- MABS, yedekleme tercihlerine göre SQL Server'da ayarlanan kullanılabilirlik grupları için yedekleme ilkesini aşağıdaki gibi kabul eder:
- SQL Server 2014 veya üzeri yedekleme sorunları:
- SQL Server 2014 , Microsoft Azure Blob depolamada şirket içi SQL Server için veritabanı oluşturmaya yönelik yeni bir özellik ekledi. MABS, bu yapılandırmayı korumak için kullanılamaz.
- SQL Always On seçeneği için "İkincil tercih et" yedekleme tercihiyle ilgili bilinen bazı sorunlar vardır. MABS her zaman ikincilden yedek alır. İkincil bulunamazsa yedekleme başarısız olur.
Önkoşullar
Azure Stack'te SQL Server'ı yedeklemeden önce Azure Backup Sunucusu'nu yükleyin ve hazırlayın.
Azure Stack'te SQL Server veritabanları için yedekleme ilkesi oluşturma
SQL Server veritabanlarını Azure'a korumak üzere bir yedekleme ilkesi oluşturmak için şu adımları izleyin:
Azure Backup Sunucusu'ndaKoruma çalışma alanını seçin.
Araç menüsünde Yeni'yi seçerek yeni bir koruma grubu oluşturun.
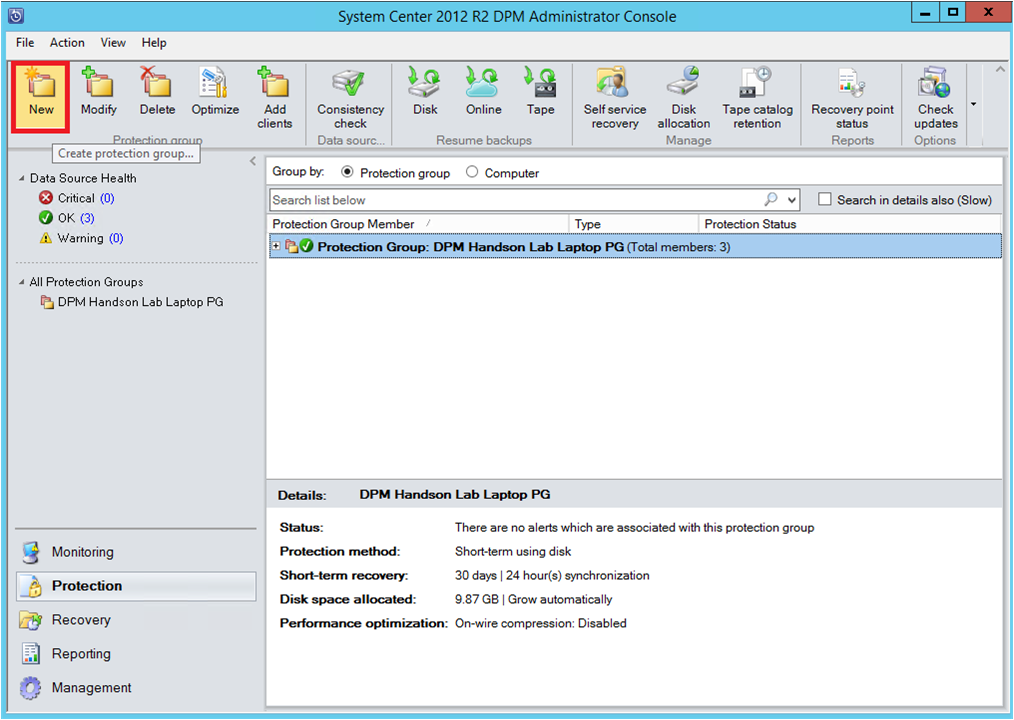
Azure Backup Sunucusu, Koruma Grubu sihirbazını başlatır ve bu sihirbaz, koruma grubu oluşturmanıza yol açar. sonrakiseçin.
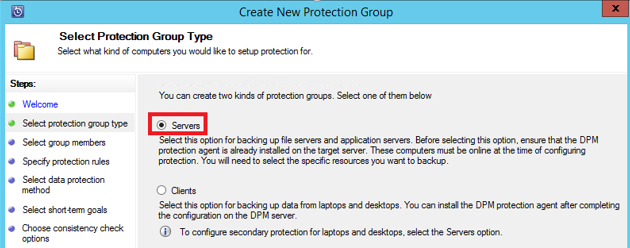
Koruma Grubu Türünü Seçin dikey penceresinde Sunucular'ı seçin.
Grup Üyelerini Seç dikey penceresinde, Kullanılabilir üyeler listesi çeşitli veri kaynaklarını görüntüler. Bir klasörü genişletmek ve alt klasörleri görüntülemek için seçin + . Öğe seçmek için onay kutusunu seçin.
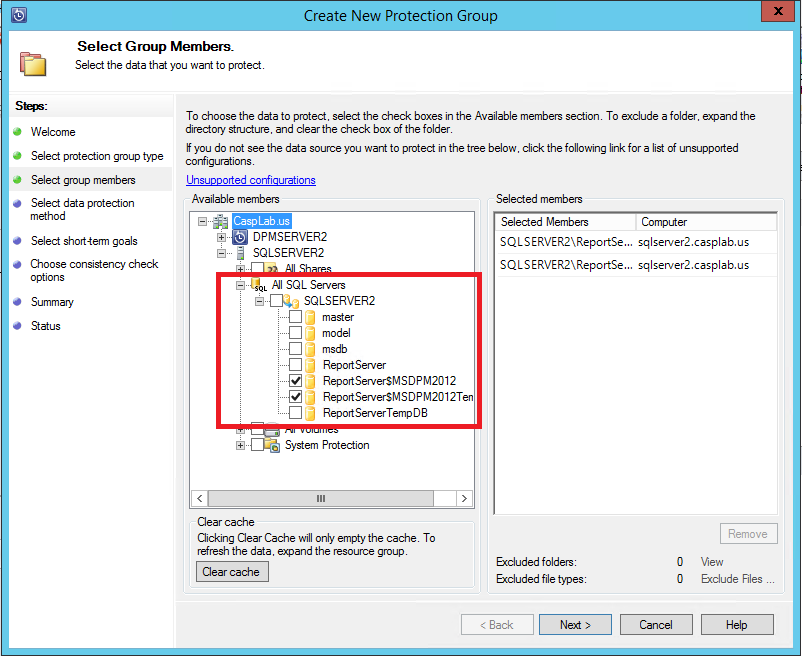
Seçilen tüm öğeler Seçili üyeler listesinde görünür. Korumak istediğiniz sunucuları veya veritabanlarını seçtikten sonra İleri'yi seçin.
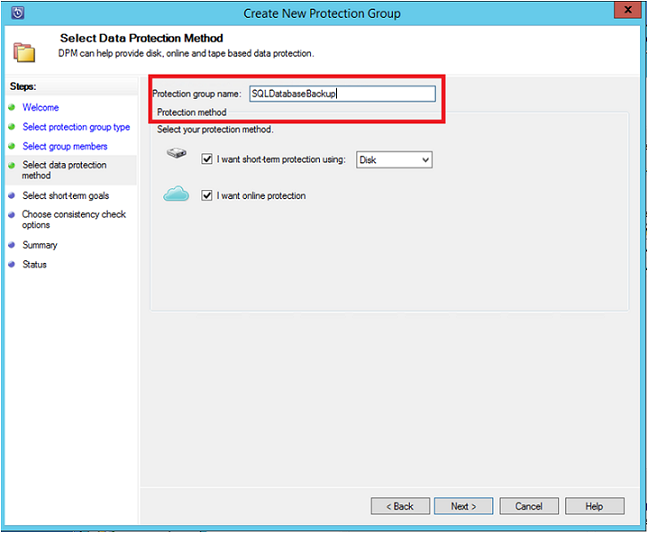
Veri Koruma Yöntemi Seç dikey penceresinde, koruma grubu için bir ad girin ve Çevrimiçi Koruma istiyorum onay kutusunu seçin.
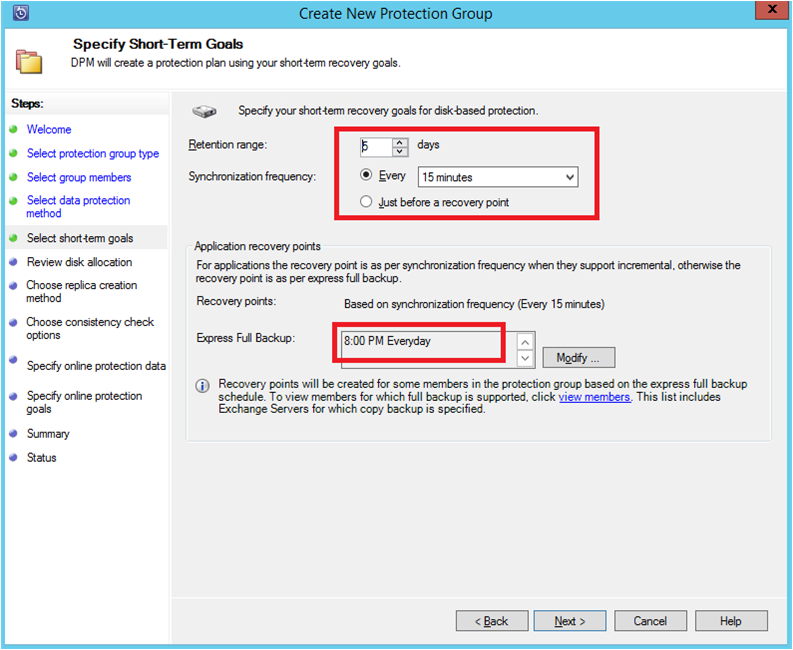
Short-Term Hedeflerini Belirt dikey penceresinde, diske yedekleme noktaları oluşturmak için gerekli girişleri ekleyin ve İleri'yi seçin.
Örnekte Bekletme aralığı5 gündür, Eşitleme sıklığı her 15 dakikada birdir ve bu da yedekleme sıklığıdır. Ekspres Tam Yedekleme saat 20:00 olarak ayarlanmış.
Uyarı
Gösterilen örnekte, önceki günün 20:00 yedekleme noktasından değiştirilen veriler aktarılarak her gün saat 20:00'de bir yedekleme noktası oluşturulur. Bu işleme Hızlı Tam Yedekleme adı verilir. İşlem günlükleri 15 dakikada bir senkronize edilir. Veritabanını 21:00'de kurtarmanız gerekiyorsa, nokta, en son 20:00'de yapılan hızlı tam yedeklemeden bu yana günlüklere dayanarak oluşturulur.
Disk ayırmayı gözden geçir penceresinde, genel kullanılabilir depolama alanını ve olası disk alanını doğrulayın. sonrakiseçin.
Çoğaltma Oluşturma Yöntemini Seçin bölümünde ilk kurtarma noktanızı oluşturmayı seçin. İlk yedeklemeyi bant genişliği tıkanıklığını önlemek için el ile (ağ harici) veya ağ üzerinden aktarabilirsiniz. İlk yedeklemeyi aktarmak için beklemeyi seçerseniz, ilk aktarımın zamanını belirtebilirsiniz. sonrakiseçin.
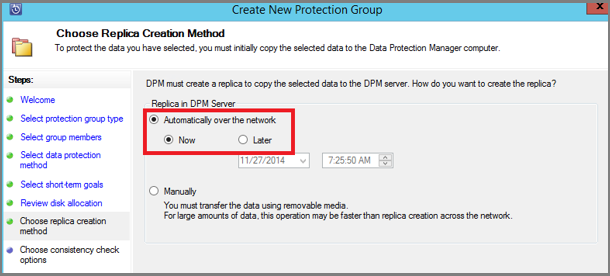
İlk yedekleme kopyası, tüm veri kaynağının (SQL Server veritabanı) üretim sunucusundan (SQL Server bilgisayarı) Azure Backup Sunucusu'na aktarılmasını gerektirir. Bu veriler büyük olabilir ve verilerin ağ üzerinden aktarılması bant genişliğini aşabilir. Bu nedenle ilk yedeklemeyi aktarmayı seçebilirsiniz: Bant genişliği tıkanıklığını önlemek için el ile (çıkarılabilir medya kullanarak) veya Ağ üzerinden otomatik olarak (belirtilen zamanda).
İlk yedekleme tamamlandıktan sonra, yedeklemelerin geri kalanı ilk yedekleme kopyasındaki artımlı yedeklemelerdir. Artımlı yedeklemeler küçük olma eğilimindedir ve ağ üzerinden kolayca aktarılır.
Tutarlılık denetiminin ne zaman çalışmasını istediğinizi seçin ve İleri'yi seçin.
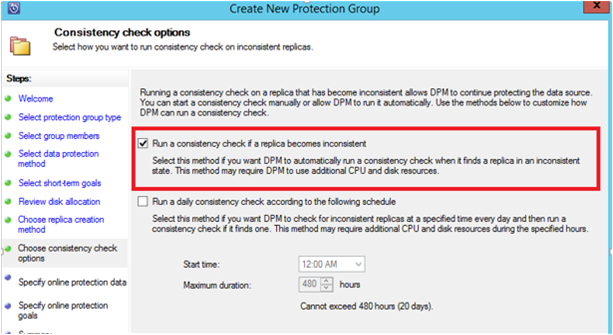
Azure Backup Sunucusu, yedekleme noktasının bütünlüğü üzerinde tutarlılık denetimi gerçekleştirir. Azure Backup Sunucusu, üretim sunucusundaki (bu senaryoda SQL Server bilgisayarı) yedekleme dosyasının sağlama toplamını ve bu dosyanın yedeklenen verilerini hesaplar. Bir çakışma varsa, Azure Backup Sunucusu'nda yedeklenen dosyanın bozuk olduğu varsayılır. Azure Backup Sunucusu, sağlama toplamı uyumsuzluğuna karşılık gelen blokları göndererek yedeklenen verileri düzeltir. Tutarlılık denetimleri performans açısından yoğun olduğundan, tutarlılık denetimini zamanlayabilir veya otomatik olarak çalıştırabilirsiniz.
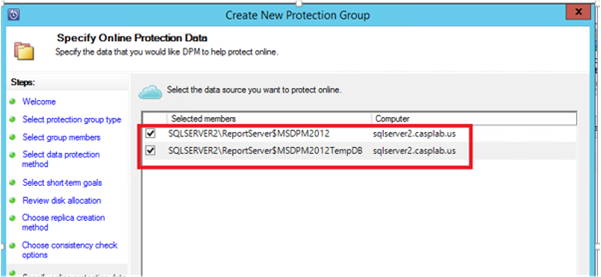
Veri kaynaklarının çevrimiçi korumasını belirtmek için Azure'da korunacak veritabanlarını seçin ve İleri'yi seçin.
Kuruluş ilkelerine uygun yedekleme zamanlamalarını ve bekletme ilkelerini seçin.
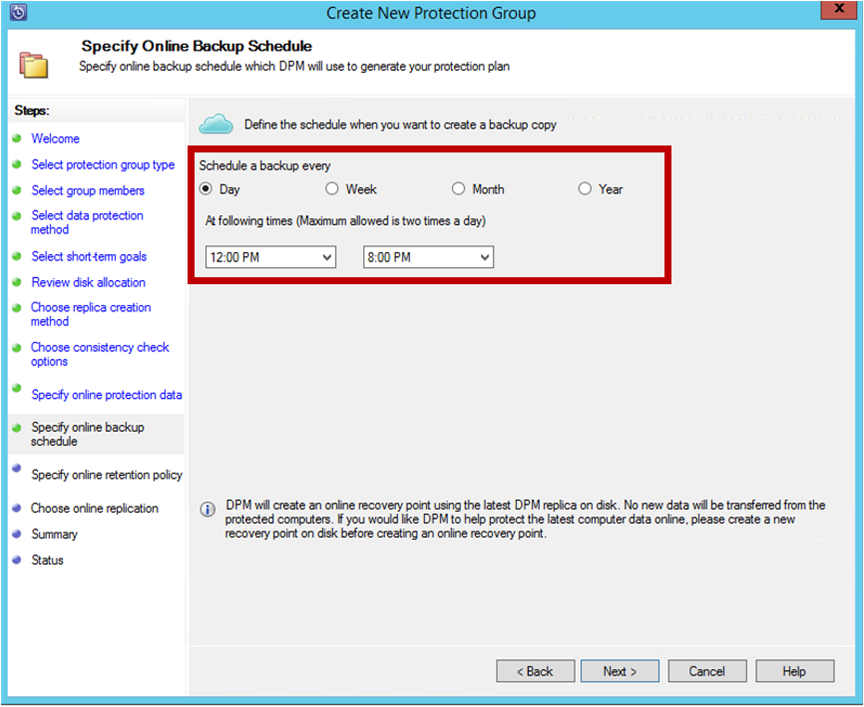
Bu örnekte yedeklemeler günde bir kez saat 23:00 ve 20:00'de alınır.
Uyarı
Hızlı kurtarma için diskte birkaç kısa vadeli kurtarma noktası olması iyi bir uygulamadır. Bu kurtarma noktaları, işletimsel kurtarma için kullanılır. Azure, daha yüksek SLA'lar ve garantili kullanılabilirlik ile iyi bir site dışı konum görevi görür.
En İyi Yöntem: Yerel disk yedeklemeleri tamamlandıktan sonra başlamak üzere Azure'a yedekleme zamanlarsanız, en son disk yedeklemeleri her zaman Azure'a kopyalanır.
Saklama politikası zamanlamasını seçin. Saklama ilkesinin nasıl çalıştığına ilişkin ayrıntılar , Bant altyapınızı değiştirmek için Azure Backup'ı kullanma makalesinde sağlanır.
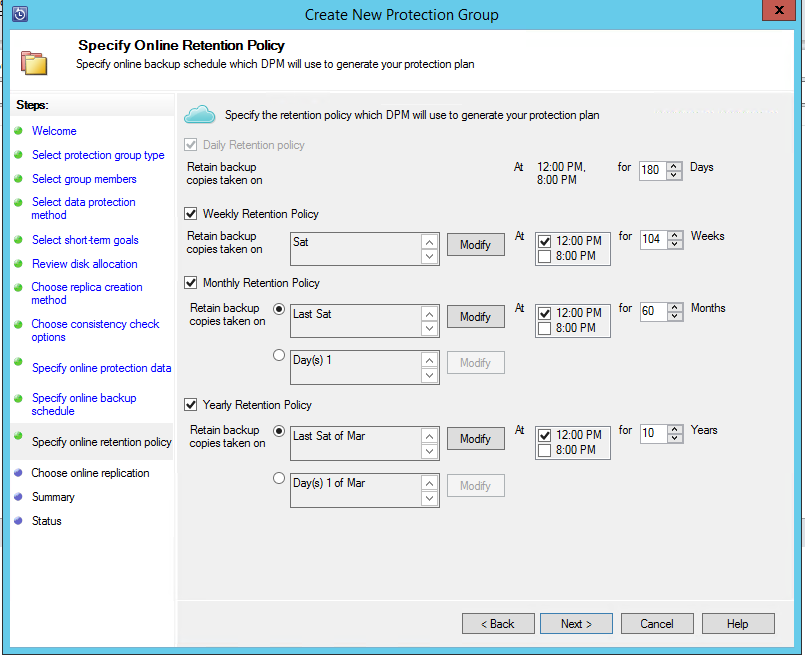
Bu örnekte:
- Yedeklemeler günde bir kez saat 23:00 ve 20:00'de alınır ve 180 gün boyunca saklanır.
- Cumartesi günü saat 12:00'de yedekleme 104 hafta boyunca saklanır
- Geçen Cumartesi saat 23:00'te yedekleme 60 ay boyunca saklanır
- Mart'ın Son Cumartesi günü saat 23:00'te yedekleme 10 yıl boyunca saklanır
İleri'yi seçin ve ilk yedekleme kopyasını Azure'a aktarmak için uygun seçeneği belirleyin. Ağ üzerinden Otomatik olarak'ı seçebilirsiniz
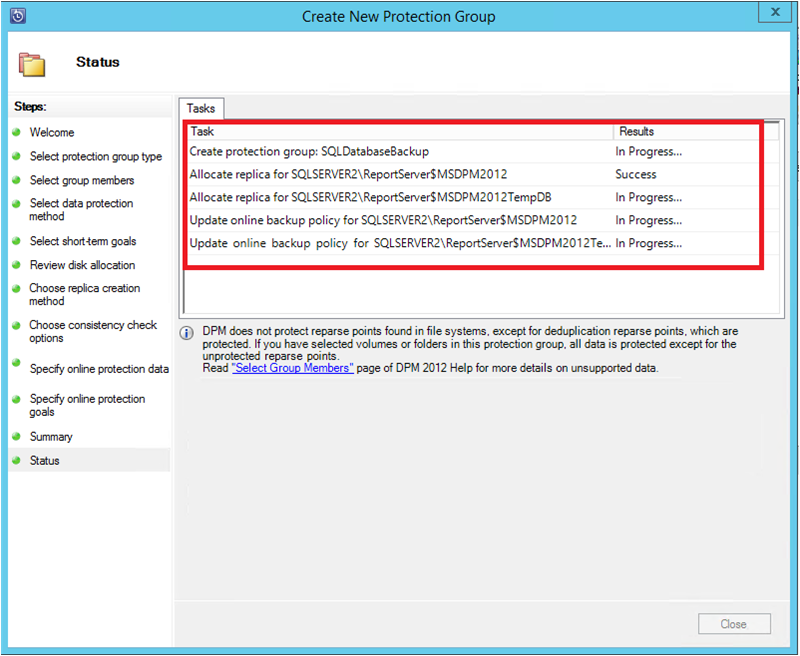
Özet dikey penceresinde ilke ayrıntılarını gözden geçirdikten sonra, iş akışını tamamlamak için Grup oluştur'u seçin. Kapat'ı seçip İzleme çalışma alanında işin ilerleme durumunu izleyebilirsiniz.
Azure Stack'te SQL Server veritabanları için isteğe bağlı yedekleme çalıştırma
Kurtarma noktası yalnızca ilk yedekleme gerçekleştiğinde oluşturulur. Yedekleme ilkesi oluşturduktan sonra, zamanlayıcının yedeklemeyi almasını beklemek yerine el ile bir kurtarma noktası oluşturulmasını tetikleyebilirsiniz.
SQL Server veritabanının isteğe bağlı yedeklemesini çalıştırmak için şu adımları izleyin:
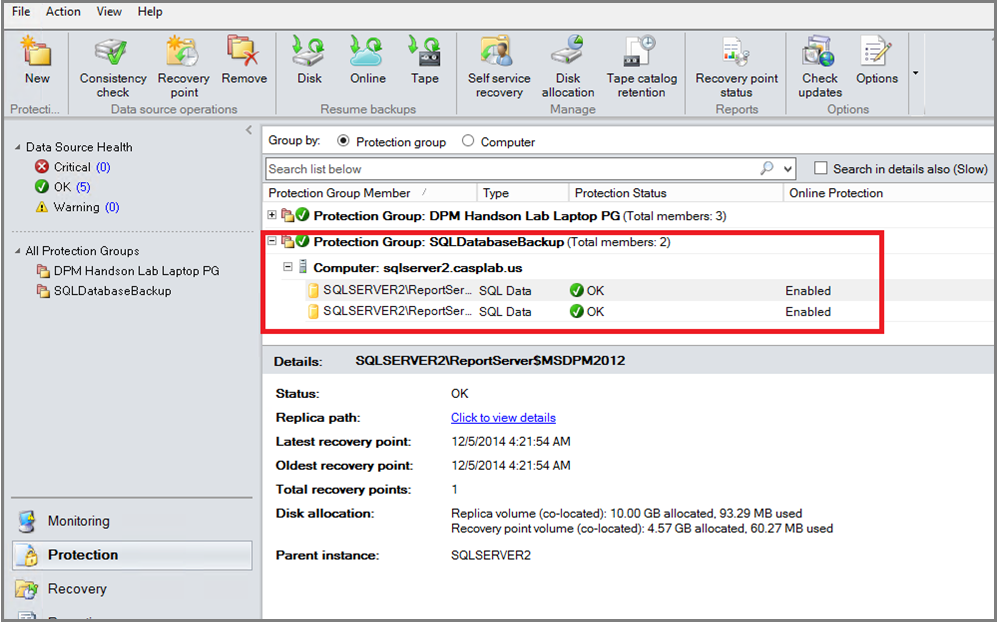
Kurtarma noktasını oluşturmadan önce koruma grubu durumu veritabanı için Tamam'ı gösterene kadar bekleyin.
Veritabanına sağ tıklayın ve Kurtarma Noktası Oluştur'u seçin.
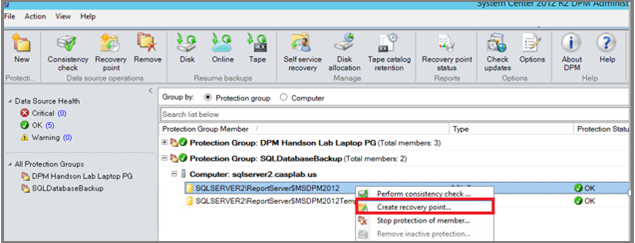
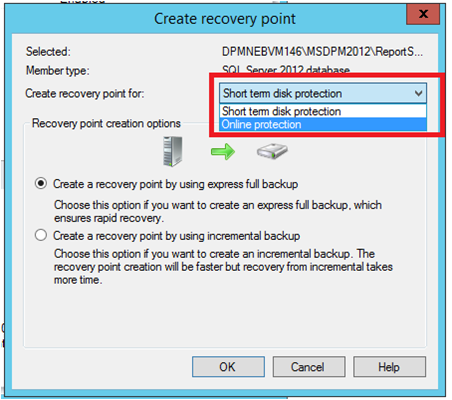
Açılan menüde Çevrimiçi Koruma'yı seçin ve Ardından Tamam'ı seçerek Azure'da bir kurtarma noktası oluşturmaya başlayın.
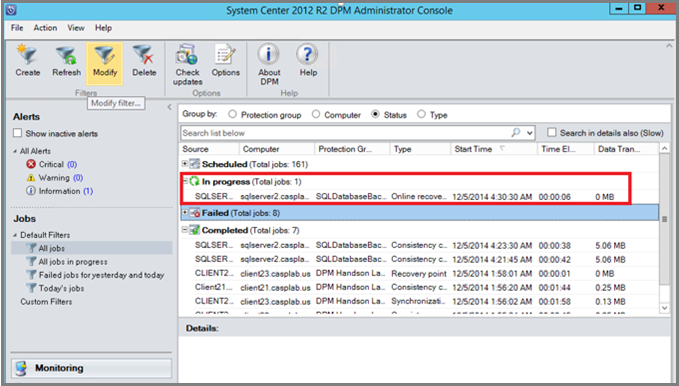
İzleme çalışma alanında işin ilerleme durumunu görüntüleyin.
Azure Stack'te SQL Server veritabanını Azure'dan kurtarma
Korumalı bir varlığı (SQL Server veritabanı) Azure'dan kurtarmak için şu adımları izleyin:
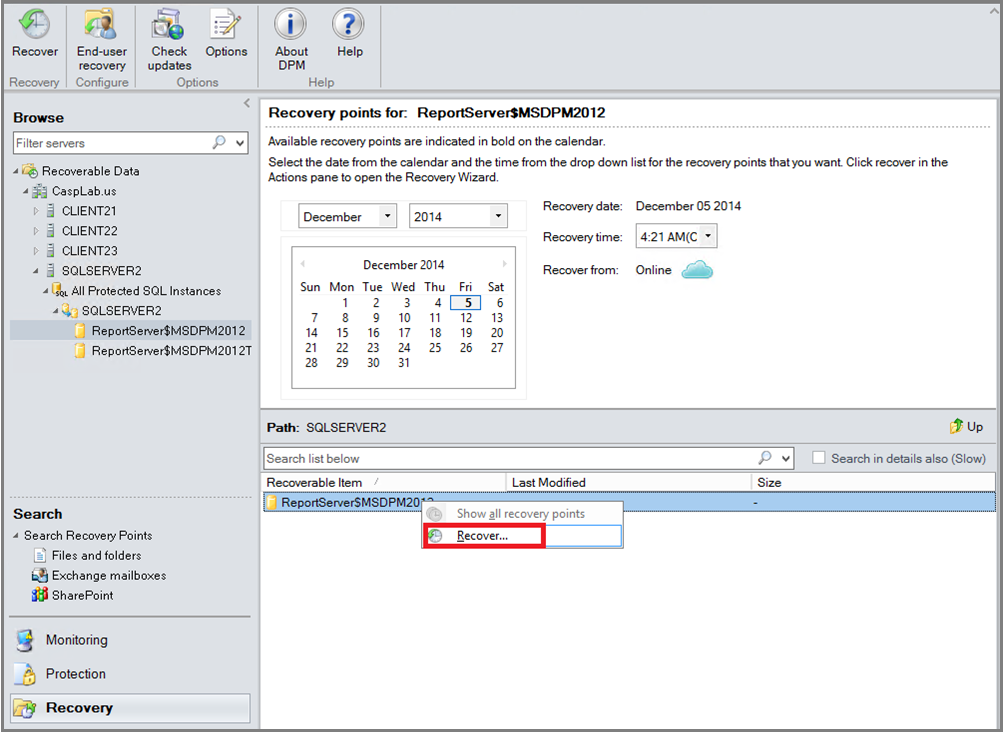
Azure Backup Sunucusu Yönetim Konsolu'nu açın. Korumalı sunucuları görebileceğiniz Kurtarma çalışma alanına gidin. Gerekli veritabanına göz atın (bu örnekte ReportServer$MSDPM2012). Zaman içinde Çevrimiçi nokta olarak belirtilen bir Kurtarma seçin.
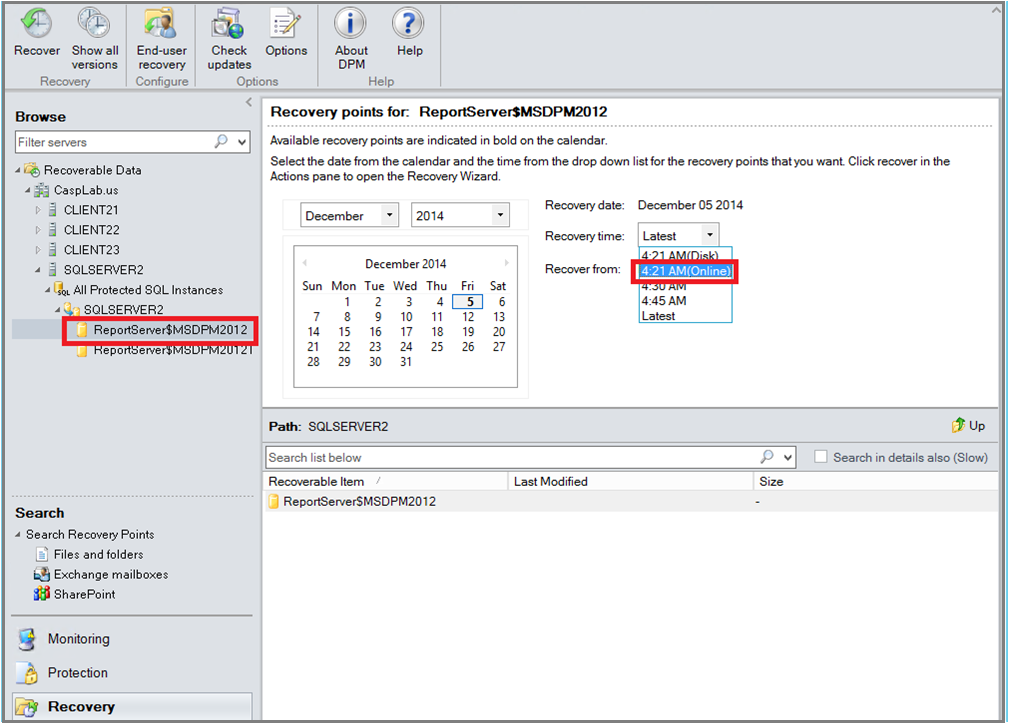
Veritabanı adına sağ tıklayın ve Kurtar'ı seçin.
MABS, kurtarma noktasının ayrıntılarını gösterir. sonrakiseçin. Veritabanını üzerine yazmak için, kurtarma türü olarak SQL Server'ın özgün örneğine kurtarma işlemini gerçekleştirin seçeneğini seçin. sonrakiseçin.
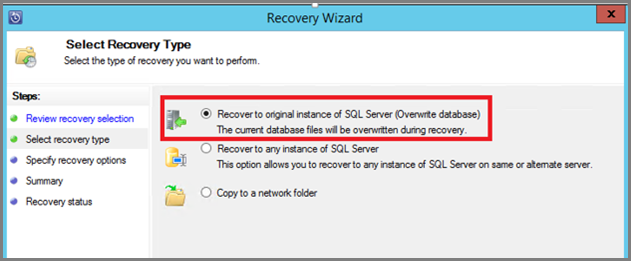
Bu örnekte MABS, veritabanını başka bir SQL Server örneğine veya tek başına bir ağ klasörüne kurtarır.
Kurtarma seçeneklerini belirtin penceresinde, ağ bant genişliği kullanımını sınırlama gibi kurtarma seçeneklerini seçebilirsiniz. sonrakiseçin.
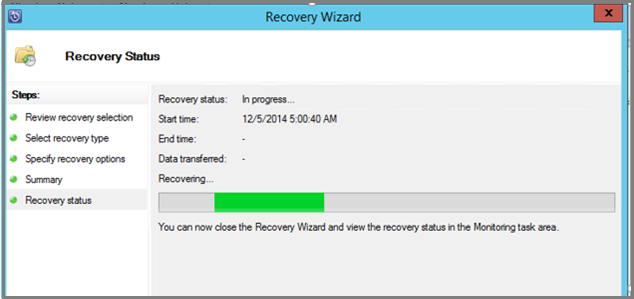
Özet dikey penceresinde, şimdiye kadar sağlanan tüm kurtarma yapılandırmalarını görürsünüz. Kurtar'ı seçin.
Kurtarma durumu kurtarılan veritabanını gösterir. Sihirbazı kapatmak ve İzleme çalışma alanında ilerleme durumunu görüntülemek için Kapat'ı seçebilirsiniz.
Kurtarma tamamlandıktan sonra, geri yüklenen veritabanı uygulamayla tutarlı hale getirilir.