Not
Bu sayfaya erişim yetkilendirme gerektiriyor. Oturum açmayı veya dizinleri değiştirmeyi deneyebilirsiniz.
Bu sayfaya erişim yetkilendirme gerektiriyor. Dizinleri değiştirmeyi deneyebilirsiniz.
Important
Bu makale, simetrik anahtar kimlik doğrulama olarak da adlandırılan paylaşılan erişim imzası kullanarak bir cihazı bağlama adımlarını içermektedir. Bu kimlik doğrulama yöntemi test ve değerlendirme için uygundur, ancak bir cihazı X.509 sertifikaları kullanarak doğrulamak daha güvenli bir yaklaşımdır. Daha fazla bilgi edinmek için bkz . IoT çözümleri > için en iyi güvenlik yöntemleri Bağlantı güvenliği.
Bu öğreticide bir istemci uygulamasını Azure IoT Central uygulamanıza nasıl bağlayacağınız gösterilmektedir. Uygulama bir sıcaklık denetleyicisi cihazının davranışını simüle eder. Uygulama IoT Central'a bağlandığında, sıcaklık denetleyicisi cihaz modelinin model kimliğini gönderir. IoT Central, cihaz modelini almak ve sizin için bir cihaz şablonu oluşturmak için model kimliğini kullanır. Operatörün bir cihazla etkileşim kurmasını sağlamak için cihaz şablonuna görünümler eklersiniz.
Bu eğitimde şunları öğreniyorsunuz:
- Cihaz kodunu oluşturup çalıştırın ve IoT Central uygulamanıza bağlanıp bağlanmasını görün.
- Cihazdan gönderilen sanal telemetriyi görüntüleyin.
- Cihaz şablonuna özel görünümler ekleyin.
- Cihaz şablonunu yayımlayın.
- Cihaz özelliklerini yönetmek için bir görünüm kullanın.
- Cihazı denetlemek için bir komut çağırın.

Important
Bu makale, simetrik anahtar kimlik doğrulama olarak da adlandırılan paylaşılan erişim imzası kullanarak bir cihazı bağlama adımlarını içermektedir. Bu kimlik doğrulama yöntemi test ve değerlendirme için uygundur, ancak bir cihazı X.509 sertifikaları kullanarak doğrulamak daha güvenli bir yaklaşımdır. Daha fazla bilgi edinmek için bkz . IoT çözümleri > için en iyi güvenlik yöntemleri Bağlantı güvenliği.
Prerequisites
Bu öğreticideki adımları tamamlamak için şunları yapmanız gerekir:
Etkin bir Azure aboneliği. Eğer bir Azure aboneliğiniz yoksa, başlamadan önce ücretsiz bir hesap oluşturun.
Özel uygulama şablonundan oluşturulan bir IoT Central uygulaması. Daha fazla bilgi edinmek için bkz. IoT Central uygulaması oluşturma ve Uygulamam hakkında nasıl bilgi alabilirim?.
Bu öğreticiyi Linux veya Windows üzerinde çalıştırabilirsiniz. Bu öğreticideki terminal komutları, '/' yol ayırıcıları için Linux kuralını izler. Windows kullanıyorsanız, bu ayırıcıları '\' ile değiştirdiğinizden emin olun.
Önkoşullar işletim sistemine göre farklılık gösterir:
Linux
Bu öğreticide Ubuntu Linux kullandığınız varsayılır. Bu öğreticideki adımlar Ubuntu 18.04 kullanılarak test edilmiştir.
Linux'ta bu öğreticiyi tamamlamak için yerel Linux ortamınıza aşağıdaki yazılımı yükleyin:
komutunu kullanarak GCC, Git, apt-get ve gerekli tüm bağımlılıkları yükleyin:
sudo apt-get update
sudo apt-get install -y git cmake build-essential curl libcurl4-openssl-dev libssl-dev uuid-dev
sürümünün cmake2.8.12'den büyük olduğunu ve GCC sürümünün 4.4.7'den büyük olduğunu doğrulayın.
cmake --version
gcc --version
Windows
Bu öğreticiyi Windows'da tamamlamak için yerel Windows ortamınıza aşağıdaki yazılımı yükleyin:
- Visual Studio (Community, Professional veya Enterprise) - VisualStudio'yu yüklerkenC++ ile Masaüstü Geliştirme iş yükünü eklediğinizden emin olun.
- Git.
- CMake.
Kodu indirme
Bu öğreticide, Azure IoT Hub Cihazı C SDK'sını kopyalayıp derlemek için kullanabileceğiniz bir geliştirme ortamı hazırlamış olacaksınız.
Seçtiğiniz dizinde bir komut istemi açın. Aşağıdaki komutu yürüterek Azure IoT C SDK'larını ve Kitaplıkları GitHub deposunu bu konuma kopyalayın:
git clone https://github.com/Azure/azure-iot-sdk-c.git
cd azure-iot-sdk-c
git submodule update --init
Bu işlemin tamamlanmasının birkaç dakika sürmesini bekleyin.
Kodu gözden geçirme
Daha önce indirdiğiniz C için Microsoft Azure IoT SDK kopyasında azure-iot-sdk-c/iothub_client/samples/pnp/pnp_temperature_controller/pnp_temperature_controller.c ve azure-iot-sdk-c/iothub_client/samples/pnp/pnp_temperature_controller/pnp_thermostat_component.c dosyalarını bir metin düzenleyicisinde açın.
Örnek, birden çok bileşenli Sıcaklık Denetleyicisi Dijital İkiz Tanımlama Dili modelini uygular.
IoT Central'a bağlanmak için örneği çalıştırdığınızda, cihazı kaydetmek ve bir bağlantı dizesi oluşturmak için Cihaz Sağlama Hizmeti'ni (DPS) kullanır. Örnek, ihtiyaç duyduğu DPS bağlantı bilgilerini komut satırı ortamından alır.
pnp_temperature_controller.c'demain işlev ilk olarak şunu çağırırCreateDeviceClientAndAllocateComponents:
-
dtmi:com:example:Thermostat;1Model kimliğini ayarlayın. IoT Central, bu cihaz için cihaz şablonunu tanımlamak veya oluşturmak için model kimliğini kullanır. Daha fazla bilgi edinmek için bkz. Cihaz şablonuna cihaz atama. - Cihazı sağlamak ve kaydetmek için DPS'yi kullanın.
- Bir cihaz istemci tanıtıcısı oluşturun ve IoT Central uygulamanıza bağlanın.
- Sıcaklık denetleyicisi bileşenindeki komutlar için bir işleyici oluşturur.
- Sıcaklık denetleyicisi bileşeninde özellik güncelleştirmeleri için bir işleyici oluşturur.
- İki termostat bileşenini oluşturur.
Sonraki main işlev:
- Tüm bileşenler için bazı ilk özellik değerlerini raporlar.
- Tüm bileşenlerden telemetri göndermek için bir döngü başlatır.
İşlev main daha sonra düzenli aralıklarla telemetri göndermek için bir iş parçacığı başlatır.
int main(void)
{
    IOTHUB_DEVICE_CLIENT_LL_HANDLE deviceClient = NULL;

    g_pnpDeviceConfiguration.modelId = g_temperatureControllerModelId;
    g_pnpDeviceConfiguration.enableTracing = g_hubClientTraceEnabled;

    // First determine the IoT Hub / credentials / device to use.
    if (GetConnectionSettingsFromEnvironment(&g_pnpDeviceConfiguration) == false)
    {
        LogError("Cannot read required environment variable(s)");
    }
    // Creates the thermostat subcomponents defined by this model.  Since everything
    // is simulated, this setup stage just creates simulated objects in memory.
    else if (AllocateThermostatComponents() == false)
    {
        LogError("Failure allocating thermostat components");
    }
    // Create a handle to device client handle.  Note that this call may block
    // for extended periods of time when using DPS.
    else if ((deviceClient = CreateAndConfigureDeviceClientHandleForPnP()) == NULL)
    {
        LogError("Failure creating IoT Hub device client");
        PnP_ThermostatComponent_Destroy(g_thermostatHandle1);
        PnP_ThermostatComponent_Destroy(g_thermostatHandle2);
    }
    else
    {
        LogInfo("Successfully created device client.  Hit Control-C to exit program\n");

        int numberOfIterations = 0;

        // During startup, send what DTDLv2 calls "read-only properties" to indicate initial device state.
        PnP_TempControlComponent_ReportSerialNumber_Property(deviceClient);
        PnP_DeviceInfoComponent_Report_All_Properties(g_deviceInfoComponentName, deviceClient);
        PnP_TempControlComponent_Report_MaxTempSinceLastReboot_Property(g_thermostatHandle1, deviceClient);
        PnP_TempControlComponent_Report_MaxTempSinceLastReboot_Property(g_thermostatHandle2, deviceClient);

        while (true)
        {
            // Wake up periodically to poll.  Even if we do not plan on sending telemetry, we still need to poll periodically in order to process
            // incoming requests from the server and to do connection keep alives.
            if ((numberOfIterations % g_sendTelemetryPollInterval) == 0)
            {
                PnP_TempControlComponent_SendWorkingSet(deviceClient);
                PnP_ThermostatComponent_SendCurrentTemperature(g_thermostatHandle1, deviceClient);
                PnP_ThermostatComponent_SendCurrentTemperature(g_thermostatHandle2, deviceClient);
            }

            IoTHubDeviceClient_LL_DoWork(deviceClient);
            ThreadAPI_Sleep(g_sleepBetweenPollsMs);
            numberOfIterations++;
        }

        // The remainder of the code is used for cleaning up our allocated resources. It won't be executed in this
        // sample (because the loop above is infinite and is only broken out of by Control-C of the program), but
        // it is included for reference.

        // Free the memory allocated to track simulated thermostat.
        PnP_ThermostatComponent_Destroy(g_thermostatHandle1);
        PnP_ThermostatComponent_Destroy(g_thermostatHandle2);

        // Clean up the IoT Hub SDK handle.
        IoTHubDeviceClient_LL_Destroy(deviceClient);
        // Free all IoT Hub subsystem.
        IoTHub_Deinit();
    }

    return 0;
}
pnp_thermostat_component.c üzerinden, PnP_ThermostatComponent_SendCurrentTemperature işlevi cihazın bir bileşenden IoT Central'a sıcaklık telemetrisini nasıl gönderdiğini gösterir:
void PnP_ThermostatComponent_SendCurrentTemperature(PNP_THERMOSTAT_COMPONENT_HANDLE pnpThermostatComponentHandle, IOTHUB_DEVICE_CLIENT_LL_HANDLE deviceClient)
{
    PNP_THERMOSTAT_COMPONENT* pnpThermostatComponent = (PNP_THERMOSTAT_COMPONENT*)pnpThermostatComponentHandle;
    IOTHUB_MESSAGE_HANDLE messageHandle = NULL;
    IOTHUB_MESSAGE_RESULT messageResult;
    IOTHUB_CLIENT_RESULT iothubClientResult;

    char temperatureStringBuffer[CURRENT_TEMPERATURE_BUFFER_SIZE];

    // Create the telemetry message body to send.
    if (snprintf(temperatureStringBuffer, sizeof(temperatureStringBuffer), g_temperatureTelemetryBodyFormat, pnpThermostatComponent->currentTemperature) < 0)
    {
        LogError("snprintf of current temperature telemetry failed");
    }
    // Create the message handle and specify its metadata.
    else if ((messageHandle = IoTHubMessage_CreateFromString(temperatureStringBuffer)) == NULL)
    {
        LogError("IoTHubMessage_PnP_CreateFromString failed");
    }
    else if ((messageResult = IoTHubMessage_SetContentTypeSystemProperty(messageHandle, g_jsonContentType)) != IOTHUB_MESSAGE_OK)
    {
        LogError("IoTHubMessage_SetContentTypeSystemProperty failed, error=%d", messageResult);
    }
    else if ((messageResult = IoTHubMessage_SetContentEncodingSystemProperty(messageHandle, g_utf8EncodingType)) != IOTHUB_MESSAGE_OK)
    {
        LogError("IoTHubMessage_SetContentEncodingSystemProperty failed, error=%d", messageResult);
    }
    else if ((messageResult = IoTHubMessage_SetComponentName(messageHandle, pnpThermostatComponent->componentName)) != IOTHUB_MESSAGE_OK)
    {
        LogError("IoTHubMessage_SetContentEncodingSystemProperty failed, error=%d", messageResult);
    }
    // Send the telemetry message.
    else if ((iothubClientResult = IoTHubDeviceClient_LL_SendTelemetryAsync(deviceClient, messageHandle, NULL, NULL)) != IOTHUB_CLIENT_OK)
    {
        LogError("Unable to send telemetry message, error=%d", iothubClientResult);
    }

    IoTHubMessage_Destroy(messageHandle);
}
İşlevi içinde pnp_thermostat_component.c, PnP_TempControlComponent_Report_MaxTempSinceLastReboot_Property bileşeninden IoT Central'a bir maxTempSinceLastReboot özelliği güncellemesi gönderir.
void PnP_TempControlComponent_Report_MaxTempSinceLastReboot_Property(PNP_THERMOSTAT_COMPONENT_HANDLE pnpThermostatComponentHandle, IOTHUB_DEVICE_CLIENT_LL_HANDLE deviceClient)
{
    PNP_THERMOSTAT_COMPONENT* pnpThermostatComponent = (PNP_THERMOSTAT_COMPONENT*)pnpThermostatComponentHandle;
    char maximumTemperatureAsString[MAX_TEMPERATURE_SINCE_REBOOT_BUFFER_SIZE];
    IOTHUB_CLIENT_RESULT iothubClientResult;

    if (snprintf(maximumTemperatureAsString, sizeof(maximumTemperatureAsString), g_maxTempSinceLastRebootPropertyFormat, pnpThermostatComponent->maxTemperature) < 0)
    {
        LogError("Unable to create max temp since last reboot string for reporting result");
    }
    else
    {
        IOTHUB_CLIENT_PROPERTY_REPORTED maxTempProperty;
        maxTempProperty.structVersion = IOTHUB_CLIENT_PROPERTY_REPORTED_STRUCT_VERSION_1;
        maxTempProperty.name = g_maxTempSinceLastRebootPropertyName;
        maxTempProperty.value =  maximumTemperatureAsString;

        unsigned char* propertySerialized = NULL;
        size_t propertySerializedLength;

        // The first step of reporting properties is to serialize IOTHUB_CLIENT_PROPERTY_WRITABLE_RESPONSE into JSON for sending.
        if ((iothubClientResult = IoTHubClient_Properties_Serializer_CreateReported(&maxTempProperty, 1, pnpThermostatComponent->componentName, &propertySerialized, &propertySerializedLength)) != IOTHUB_CLIENT_OK)
        {
            LogError("Unable to serialize reported state, error=%d", iothubClientResult);
        }
        // The output of IoTHubClient_Properties_Serializer_CreateReported is sent to IoTHubDeviceClient_LL_SendPropertiesAsync to perform network I/O.
        else if ((iothubClientResult = IoTHubDeviceClient_LL_SendPropertiesAsync(deviceClient, propertySerialized, propertySerializedLength,  NULL, NULL)) != IOTHUB_CLIENT_OK)
        {
            LogError("Unable to send reported state, error=%d", iothubClientResult);
        }
        else
        {
            LogInfo("Sending %s property to IoTHub for component %s", g_maxTempSinceLastRebootPropertyName, pnpThermostatComponent->componentName);
        }
        IoTHubClient_Properties_Serializer_Destroy(propertySerialized);
    }
}
pnp_thermostat_component.c içinde PnP_ThermostatComponent_ProcessPropertyUpdate işlevi, IoT Central'dan yazılabilir özellik güncelleştirmelerini işler:
void PnP_ThermostatComponent_ProcessPropertyUpdate(PNP_THERMOSTAT_COMPONENT_HANDLE pnpThermostatComponentHandle, IOTHUB_DEVICE_CLIENT_LL_HANDLE deviceClient, const char* propertyName, const char* propertyValue, int version)
{
    PNP_THERMOSTAT_COMPONENT* pnpThermostatComponent = (PNP_THERMOSTAT_COMPONENT*)pnpThermostatComponentHandle;

    if (strcmp(propertyName, g_targetTemperaturePropertyName) != 0)
    {
        LogError("Property %s was requested to be changed but is not part of the thermostat interface definition", propertyName);
    }
    else
    {
        char* next;
        double targetTemperature = strtod(propertyValue, &next);
        if ((propertyValue == next) || (targetTemperature == HUGE_VAL) || (targetTemperature == (-1*HUGE_VAL)))
        {
            LogError("Property %s is not a valid number", propertyValue);
            SendTargetTemperatureResponse(pnpThermostatComponent, deviceClient, propertyValue, PNP_STATUS_BAD_FORMAT, version, g_temperaturePropertyResponseDescriptionNotInt);
        }
        else
        {
            LogInfo("Received targetTemperature %f for component %s", targetTemperature, pnpThermostatComponent->componentName);

            bool maxTempUpdated = false;
            UpdateTemperatureAndStatistics(pnpThermostatComponent, targetTemperature, &maxTempUpdated);

            // The device needs to let the service know that it has received the targetTemperature desired property.
            SendTargetTemperatureResponse(pnpThermostatComponent, deviceClient, propertyValue, PNP_STATUS_SUCCESS, version, NULL);

            if (maxTempUpdated)
            {
                // If the maximum temperature has been updated, we also report this as a property.
                PnP_TempControlComponent_Report_MaxTempSinceLastReboot_Property(pnpThermostatComponent, deviceClient);
            }
        }
    }
}
pnp_thermostat_component.c içinde PnP_ThermostatComponent_ProcessCommandişlevi IoT Central'dan çağrılan komutları işler:
void PnP_ThermostatComponent_ProcessCommand(PNP_THERMOSTAT_COMPONENT_HANDLE pnpThermostatComponentHandle, const char *pnpCommandName, JSON_Value* commandJsonValue, IOTHUB_CLIENT_COMMAND_RESPONSE* commandResponse)
{
    PNP_THERMOSTAT_COMPONENT* pnpThermostatComponent = (PNP_THERMOSTAT_COMPONENT*)pnpThermostatComponentHandle;
    const char* sinceStr;

    if (strcmp(pnpCommandName, g_getMaxMinReportCommandName) != 0)
    {
        LogError("Command %s is not supported on thermostat component", pnpCommandName);
        commandResponse->statusCode = PNP_STATUS_NOT_FOUND;
    }
    // See caveats section in ../readme.md; we don't actually respect this sinceStr to keep the sample simple,
    // but want to demonstrate how to parse out in any case.
    else if ((sinceStr = json_value_get_string(commandJsonValue)) == NULL)
    {
        LogError("Cannot retrieve JSON string for command");
        commandResponse->statusCode = PNP_STATUS_BAD_FORMAT;
    }
    else if (BuildMaxMinCommandResponse(pnpThermostatComponent, commandResponse) == false)
    {
        LogError("Unable to build response for component %s", pnpThermostatComponent->componentName);
        commandResponse->statusCode = PNP_STATUS_INTERNAL_ERROR;
    }
    else
    {
        LogInfo("Returning success from command request for component %s", pnpThermostatComponent->componentName);
        commandResponse->statusCode = PNP_STATUS_SUCCESS;
    }
}
Kodu oluşturma
Dahil edilen örnek kodu oluşturmak için cihaz SDK'sını kullanırsınız:
Cihaz SDK'sının kök klasöründe bir cmake alt dizini oluşturun ve bu klasöre gidin:
cd azure-iot-sdk-c
mkdir cmake
cd cmake
SDK'yi ve örnekleri oluşturmak için aşağıdaki komutları çalıştırın:
cmake -Duse_prov_client=ON -Dhsm_type_symm_key=ON -Drun_e2e_tests=OFF ..
cmake --build .
Bağlantı bilgilerini alma
Bu öğreticinin ilerleyen bölümlerinde örnek cihaz uygulamasını çalıştırdığınızda aşağıdaki yapılandırma değerlerine ihtiyacınız vardır:
- Kimlik kapsamı: IoT Central uygulamanızda İzinler > Cihaz bağlantı grupları'na gidin. Kimlik kapsamı değerini not edin.
- Grup birincil anahtarı: IoT Central uygulamanızda İzinler > Cihaz bağlantı grupları > SAS-IoT-Devices'a gidin. Paylaşılan erişim imzası Birincil anahtar değerini not edin.
Aldığınız grup birincil anahtarından bir cihaz anahtarı oluşturmak için Azure Cloud Shell'i kullanın:
az extension add --name azure-iot
az iot central device compute-device-key --device-id sample-device-01 --pk <the group primary key value>
Oluşturulan cihaz anahtarını not edin, bu öğreticinin ilerleyen bölümlerinde bu anahtarı kullanacaksınız.
Note
Bu örneği çalıştırmak için cihazı IoT Central uygulamanıza önceden kaydetmeniz gerekmez. Örnek, cihazları ilk kez bağlandığında otomatik olarak kaydetmek için IoT Central özelliğini kullanır.
Kodu çalıştır
Örnek uygulamayı çalıştırmak için bir komut satırı ortamı açın ve azure-iot-sdk-c\cmake klasörüne gidin.
Örneği yapılandırmak için ortam değişkenlerini ayarlayın. Aşağıdaki kod parçacığı, Windows komut isteminde ortam değişkenlerinin nasıl ayarlandığını gösterir.
Bash kabuğu kullanıyorsanız, set komutlarını export komutlarıyla değiştirin.
set IOTHUB_DEVICE_SECURITY_TYPE=DPS
set IOTHUB_DEVICE_DPS_ID_SCOPE=<The ID scope you made a note of previously>
set IOTHUB_DEVICE_DPS_DEVICE_ID=sample-device-01
set IOTHUB_DEVICE_DPS_DEVICE_KEY=<The generated device key you made a note of previously>
set IOTHUB_DEVICE_DPS_ENDPOINT=global.azure-devices-provisioning.net
Örneği çalıştırmak için:
# Bash
cd iothub_client/samples/pnp/pnp_temperature_controller/
./pnp_temperature_controller
REM Windows
cd iothub_client\samples\pnp\pnp_temperature_controller\Debug
.\pnp_temperature_controller.exe
Aşağıdaki çıkışta cihazın IoT Central'a kaydolması ve bağlanması gösterilmektedir. Örnek telemetri göndermeye başlar:
Info: Initiating DPS client to retrieve IoT Hub connection information
-> 09:43:27 CONNECT | VER: 4 | KEEPALIVE: 0 | FLAGS: 194 | USERNAME: 0ne0026656D/registrations/sample-device-01/api-version=2019-03-31&ClientVersion=1.6.0 | PWD: XXXX | CLEAN: 1
<- 09:43:28 CONNACK | SESSION_PRESENT: false | RETURN_CODE: 0x0
-> 09:43:29 SUBSCRIBE | PACKET_ID: 1 | TOPIC_NAME: $dps/registrations/res/# | QOS: 1
<- 09:43:30 SUBACK | PACKET_ID: 1 | RETURN_CODE: 1
-> 09:43:30 PUBLISH | IS_DUP: false | RETAIN: 0 | QOS: DELIVER_AT_MOST_ONCE | TOPIC_NAME: $dps/registrations/PUT/iotdps-register/?$rid=1 | PAYLOAD_LEN: 102
<- 09:43:31 PUBLISH | IS_DUP: false | RETAIN: 0 | QOS: DELIVER_AT_LEAST_ONCE | TOPIC_NAME: $dps/registrations/res/202/?$rid=1&retry-after=3 | PACKET_ID: 2 | PAYLOAD_LEN: 94
-> 09:43:31 PUBACK | PACKET_ID: 2
-> 09:43:33 PUBLISH | IS_DUP: false | RETAIN: 0 | QOS: DELIVER_AT_MOST_ONCE | TOPIC_NAME: $dps/registrations/GET/iotdps-get-operationstatus/?$rid=2&operationId=4.2f792ade0a5c3e68.baf0e879-d88a-4153-afef-71aff51fd847 | PAYLOAD_LEN: 102
<- 09:43:34 PUBLISH | IS_DUP: false | RETAIN: 0 | QOS: DELIVER_AT_LEAST_ONCE | TOPIC_NAME: $dps/registrations/res/202/?$rid=2&retry-after=3 | PACKET_ID: 2 | PAYLOAD_LEN: 173
-> 09:43:34 PUBACK | PACKET_ID: 2
-> 09:43:36 PUBLISH | IS_DUP: false | RETAIN: 0 | QOS: DELIVER_AT_MOST_ONCE | TOPIC_NAME: $dps/registrations/GET/iotdps-get-operationstatus/?$rid=3&operationId=4.2f792ade0a5c3e68.baf0e879-d88a-4153-afef-71aff51fd847 | PAYLOAD_LEN: 102
<- 09:43:37 PUBLISH | IS_DUP: false | RETAIN: 0 | QOS: DELIVER_AT_LEAST_ONCE | TOPIC_NAME: $dps/registrations/res/200/?$rid=3 | PACKET_ID: 2 | PAYLOAD_LEN: 478
-> 09:43:37 PUBACK | PACKET_ID: 2
Info: Provisioning callback indicates success.  iothubUri=iotc-60a....azure-devices.net, deviceId=sample-device-01
-> 09:43:37 DISCONNECT
Info: DPS successfully registered.  Continuing on to creation of IoTHub device client handle.
Info: Successfully created device client.  Hit Control-C to exit program

Info: Sending serialNumber property to IoTHub
Info: Sending device information property to IoTHub.  propertyName=swVersion, propertyValue="1.0.0.0"
Info: Sending device information property to IoTHub.  propertyName=manufacturer, propertyValue="Sample-Manufacturer"
Info: Sending device information property to IoTHub.  propertyName=model, propertyValue="sample-Model-123"
Info: Sending device information property to IoTHub.  propertyName=osName, propertyValue="sample-OperatingSystem-name"
Info: Sending device information property to IoTHub.  propertyName=processorArchitecture, propertyValue="Contoso-Arch-64bit"
Info: Sending device information property to IoTHub.  propertyName=processorManufacturer, propertyValue="Processor Manufacturer(TM)"
Info: Sending device information property to IoTHub.  propertyName=totalStorage, propertyValue=10000
Info: Sending device information property to IoTHub.  propertyName=totalMemory, propertyValue=200
Info: Sending maximumTemperatureSinceLastReboot property to IoTHub for component=thermostat1
Info: Sending maximumTemperatureSinceLastReboot property to IoTHub for component=thermostat2
-> 09:43:44 CONNECT | VER: 4 | KEEPALIVE: 240 | FLAGS: 192 | USERNAME: iotc-60a576a2-eec7-48e2-9306-9e7089a79995.azure-devices.net/sample-device-01/?api-version=2020-09-30&DeviceClientType=iothubclient%2f1.6.0%20(native%3b%20Linux%3b%20x86_64)&model-id=dtmi%3acom%3aexample%3aTemperatureController%3b1 | PWD: XXXX | CLEAN: 0
<- 09:43:44 CONNACK | SESSION_PRESENT: false | RETURN_CODE: 0x0
-> 09:43:44 SUBSCRIBE | PACKET_ID: 2 | TOPIC_NAME: $iothub/twin/res/# | QOS: 0 | TOPIC_NAME: $iothub/methods/POST/# | QOS: 0
-> 09:43:44 PUBLISH | IS_DUP: false | RETAIN: 0 | QOS: DELIVER_AT_LEAST_ONCE | TOPIC_NAME: devices/sample-device-01/messages/events/ | PACKET_ID: 3 | PAYLOAD_LEN: 19
-> 09:43:44 PUBLISH | IS_DUP: false | RETAIN: 0 | QOS: DELIVER_AT_LEAST_ONCE | TOPIC_NAME: devices/sample-device-01/messages/events/%24.sub=thermostat1 | PACKET_ID: 4 | PAYLOAD_LEN: 21
-> 09:43:44 PUBLISH | IS_DUP: false | RETAIN: 0 | QOS: DELIVER_AT_LEAST_ONCE | TOPIC_NAME: devices/sample-device-01/messages/events/%24.sub=thermostat2 | PACKET_ID: 5 | PAYLOAD_LEN: 21
Azure IoT Central uygulamanızda bir operatör olarak şunları yapabilirsiniz:
genel bakış sayfasında iki termostat bileşeni tarafından gönderilen telemetriyi görüntüleyin:
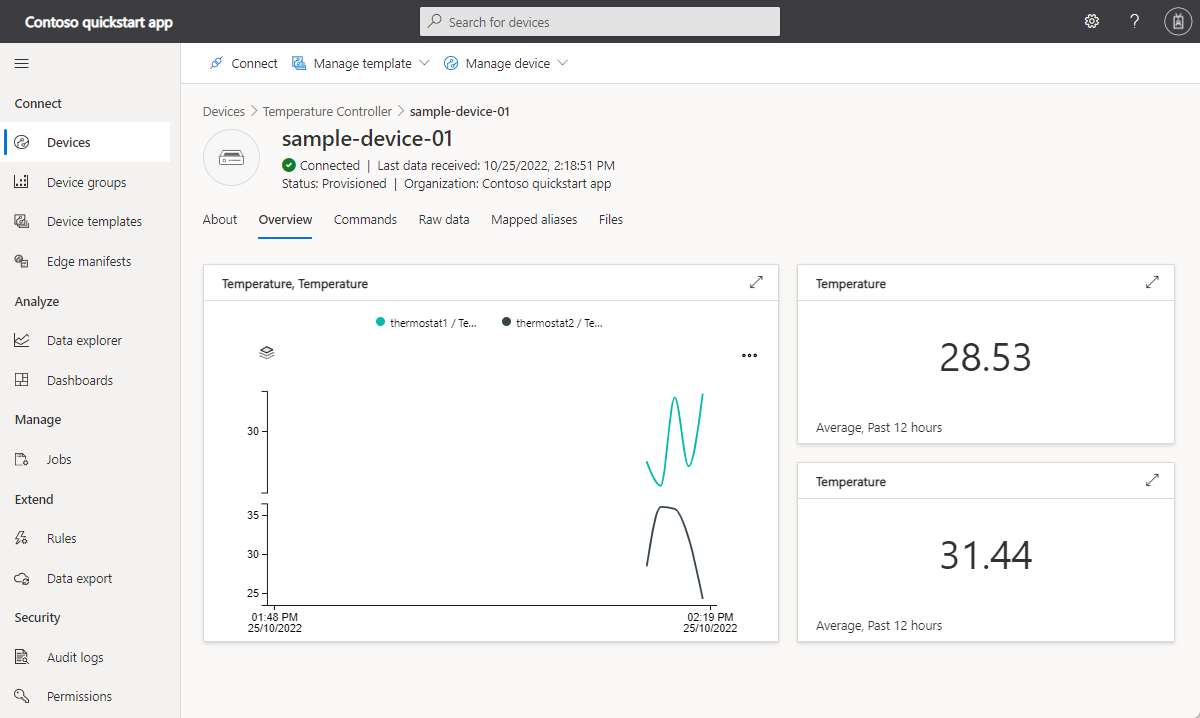
Hakkında sayfasında cihaz özelliklerini görüntüleyin. Bu sayfada cihaz bilgileri bileşeni ve iki termostat bileşeninden alınan özellikler gösterilir:


Cihaz şablonunu özelleştirme
Çözüm geliştiricisi olarak, sıcaklık denetleyicisi cihazı bağlandığında IoT Central'ın otomatik olarak oluşturduğu cihaz şablonunu özelleştirebilirsiniz.
Cihazla ilişkili müşteri adını depolamak üzere bir bulut özelliği eklemek için:
IoT Central uygulamanızda, Cihaz şablonları sayfasında Sıcaklık Denetleyicisi cihaz şablonuna gidin.
Sıcaklık Denetleyicisi modelinde +Yetenek ekle'yi seçin.
Müşteri adı olarak Görünen ad girin, Cloud özelliği olarak yetenek türü seçin, girdiyi genişletin ve String olarak Şema seçin. Ardından Kaydet'i seçin.
IoT Central uygulamanızda Get Max-Min raporu komutlarının nasıl görüntüleneceğini özelleştirmek için:
Cihaz şablonları sayfasında Sıcaklık Denetleyicisi cihaz şablonuna gidin.
getMaxMinReport (termostat1) için Get Max-Min report ifadesini termostat1 durum raporunu al ile değiştirin.
getMaxMinReport (thermostat2) için Get Max-Min report değeriniGet thermostat2 status report ile değiştirin.
Kaydetseçeneğini seçin.
Hedef Sıcaklık yazılabilir özelliklerinin IoT Central uygulamanızda nasıl görüntüleneceğini özelleştirmek için:
Cihaz şablonları sayfasında Sıcaklık Denetleyicisi cihaz şablonuna gidin.
targetTemperature (termostat1) için Hedef Sıcaklık değerini Hedef Sıcaklık (1) ile değiştirin.
targetTemperature (termostat2) için Hedef Sıcaklık değerini Hedef Sıcaklık (2) ile değiştirin.
Kaydetseçeneğini seçin.
Sıcaklık Denetleyicisi modelindeki termostat bileşenleri Hedef Sıcaklık yazılabilir özelliğini, cihaz şablonu ise Müşteri Adı bulut özelliğini içerir. Bir işlecin şu özellikleri düzenlemek için kullanabileceği bir görünüm oluşturun:
Görünümler'i ve ardından Düzenleme cihazı ve bulut verileri kutucuğunu seçin.
Form adı olarak Özellikler'i girin.
Hedef Sıcaklık (1), Hedef Sıcaklık (2) ve Müşteri Adı özelliklerini seçin. Ardından Bölüm ekle'yi seçin.
Değişikliklerinizi kaydedin.

Cihaz şablonunu yayımlama
Operatörün yaptığınız özelleştirmeleri görebilmesi ve kullanabilmesi için önce cihaz şablonunu yayımlamanız gerekir.
Thermostat cihaz şablonundan Yayımla'yı seçin. Bu cihaz şablonunu uygulama panelinde yayımla'yı seçin.
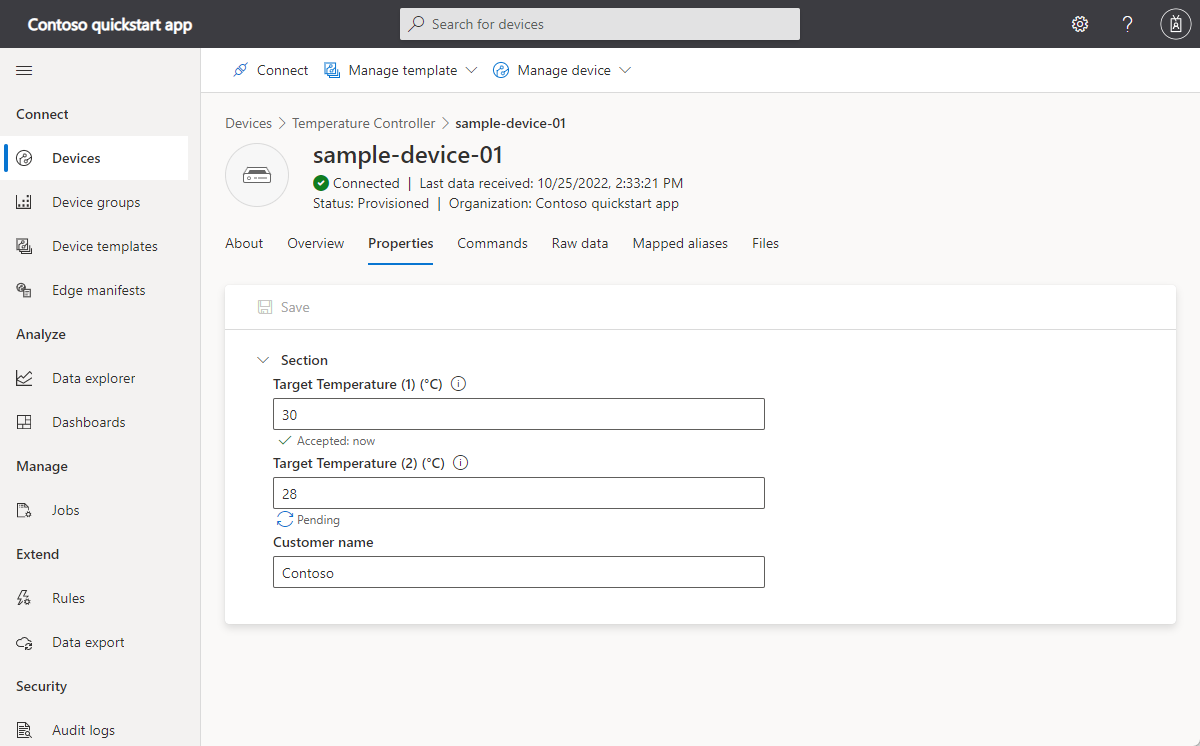
Operatör artık özellik değerlerini güncelleştirmek için Özellikler görünümünü kullanabilir ve cihaz komutları sayfasında Termostat1 durum raporunu al ve Termostat2 durumraporunu al adlı komutları çağırabilir:
Özellikler sayfasında yazılabilir özellik değerlerini güncelleştirin:
Komutlar sayfasından komutları çağırın. Durum raporu komutunu çalıştırırsanız, çalıştırmadan önce Since parametresi için bir tarih ve saat seçin:


Cihazın komutlara ve özellik güncelleştirmelerine nasıl yanıt verdiğini görebilirsiniz:
<- 09:49:03 PUBLISH | IS_DUP: false | RETAIN: 0 | QOS: DELIVER_AT_MOST_ONCE | TOPIC_NAME: $iothub/methods/POST/thermostat1*getMaxMinReport/?$rid=1 | PAYLOAD_LEN: 26
Info: Received PnP command for component=thermostat1, command=getMaxMinReport
Info: Returning success from command request for component=thermostat1
-> 09:49:03 PUBLISH | IS_DUP: false | RETAIN: 0 | QOS: DELIVER_AT_MOST_ONCE | TOPIC_NAME: $iothub/methods/res/200/?$rid=1 | PAYLOAD_LEN: 117

...

<- 09:50:04 PUBLISH | IS_DUP: false | RETAIN: 0 | QOS: DELIVER_AT_MOST_ONCE | TOPIC_NAME: $iothub/twin/PATCH/properties/desired/?$version=2 | PAYLOAD_LEN: 63
Info: Received targetTemperature=67.000000 for component=thermostat2
Info: Sending acknowledgement of property to IoTHub for component=thermostat2
Important
Bu makale, simetrik anahtar kimlik doğrulama olarak da adlandırılan paylaşılan erişim imzası kullanarak bir cihazı bağlama adımlarını içermektedir. Bu kimlik doğrulama yöntemi test ve değerlendirme için uygundur, ancak bir cihazı X.509 sertifikaları kullanarak doğrulamak daha güvenli bir yaklaşımdır. Daha fazla bilgi edinmek için bkz . IoT çözümleri > için en iyi güvenlik yöntemleri Bağlantı güvenliği.
Prerequisites
Bu makaledeki adımları tamamlamak için aşağıdaki kaynaklara ihtiyacınız vardır:
Etkin bir Azure aboneliği. Eğer bir Azure aboneliğiniz yoksa, başlamadan önce ücretsiz bir hesap oluşturun.
Özel uygulama şablonundan oluşturulan bir IoT Central uygulaması. Daha fazla bilgi edinmek için bkz. IoT Central uygulaması oluşturma ve Uygulamam hakkında nasıl bilgi alabilirim?.
Visual Studio (Community, Professional veya Enterprise) içeren bir geliştirme makinesi.
Örnek kodu içeren C# (.NET) GitHub deposu için Microsoft Azure IoT SDK'sının yerel bir kopyası. Deponun bir kopyasını indirmek için bu bağlantıyı kullanın: ZIP'i indirin. Ardından dosyanın sıkıştırmasını yerel makinenizde uygun bir konuma çözün.
Kodu gözden geçirme
Daha önce indirdiğiniz C# için Microsoft Azure IoT SDK deposunun kopyasında, Visual Studio'da azure-iot-sdk-csharp-main\azureiot.sln çözüm dosyasını açın. Çözüm Gezgini'ndePnpDeviceSamples > TemperatureController klasörünü genişletin ve bu örneğin kodunu görüntülemek için Program.cs ve TemperatureControllerSample.cs dosyalarını açın.
Örnek, birden çok bileşenli Sıcaklık Denetleyicisi Dijital İkiz Tanımlama Dili modelini uygular.
IoT Central'a bağlanmak için örneği çalıştırdığınızda, cihazı kaydetmek ve bir bağlantı dizesi oluşturmak için Cihaz Sağlama Hizmeti'ni (DPS) kullanır. Örnek, ortamdan ihtiyaç duyduğu DPS bağlantı bilgilerini alır.
Program.cs adresinde, Main'i aramak için SetupDeviceClientAsync methodunu çağırır:
- Cihazı DPS ile sağlarken model kimliğini
dtmi:com:example:TemperatureController;2kullanın. IoT Central, bu cihaz için cihaz şablonunu tanımlamak veya oluşturmak için model kimliğini kullanır. Daha fazla bilgi edinmek için bkz. Cihaz şablonuna cihaz atama. - IoT Central'a bağlanmak için bir DeviceClient örneği oluşturun.
private static async Task<DeviceClient> SetupDeviceClientAsync(Parameters parameters, CancellationToken cancellationToken)
{
  DeviceClient deviceClient;
  switch (parameters.DeviceSecurityType.ToLowerInvariant())
  {
    case "dps":
      DeviceRegistrationResult dpsRegistrationResult = await ProvisionDeviceAsync(parameters, cancellationToken);
      var authMethod = new DeviceAuthenticationWithRegistrySymmetricKey(dpsRegistrationResult.DeviceId, parameters.DeviceSymmetricKey);
      deviceClient = InitializeDeviceClient(dpsRegistrationResult.AssignedHub, authMethod);
      break;

    case "connectionstring":
      // ...

    default:
      // ...
  }
  return deviceClient;
}
Ardından ana yöntem bir TemperatureControllerSample örneği oluşturur ve IoT Central ile etkileşimleri işlemek için yöntemini çağırır PerformOperationsAsync .
TemperatureControllerSample.cs yöntemiPerformOperationsAsync:
- Varsayılan bileşende yeniden başlatma komutu için bir işleyici ayarlar.
- İki termostat bileşenindeki getMaxMinReport komutları için işleyicileri ayarlar.
- İki termostat bileşeninde hedef sıcaklık özellik güncelleştirmelerini almak için işleyicileri ayarlar.
- İlk cihaz bilgileri özellik güncelleştirmelerini gönderir.
- İki termostat bileşeninden düzenli aralıklarla sıcaklık telemetrisi gönderir.
- Çalışma kümesi telemetrisini varsayılan bileşenden düzenli aralıklarla gönderir.
- İki termostat bileşeninde yeni bir maksimum sıcaklığa ulaşılırsa son yeniden başlatmadan bu yana en yüksek sıcaklığı gönderir.
public async Task PerformOperationsAsync(CancellationToken cancellationToken)
{
  await _deviceClient.SetMethodHandlerAsync("reboot", HandleRebootCommandAsync, _deviceClient, cancellationToken);

  // For a component-level command, the command name is in the format "<component-name>*<command-name>".
  await _deviceClient.SetMethodHandlerAsync("thermostat1*getMaxMinReport", HandleMaxMinReportCommand, Thermostat1, cancellationToken);
  await _deviceClient.SetMethodHandlerAsync("thermostat2*getMaxMinReport", HandleMaxMinReportCommand, Thermostat2, cancellationToken);

  await _deviceClient.SetDesiredPropertyUpdateCallbackAsync(SetDesiredPropertyUpdateCallback, null, cancellationToken);
  _desiredPropertyUpdateCallbacks.Add(Thermostat1, TargetTemperatureUpdateCallbackAsync);
  _desiredPropertyUpdateCallbacks.Add(Thermostat2, TargetTemperatureUpdateCallbackAsync);

  await UpdateDeviceInformationAsync(cancellationToken);
  await SendDeviceSerialNumberAsync(cancellationToken);

  bool temperatureReset = true;
  _maxTemp[Thermostat1] = 0d;
  _maxTemp[Thermostat2] = 0d;

  while (!cancellationToken.IsCancellationRequested)
  {
    if (temperatureReset)
    {
      // Generate a random value between 5.0°C and 45.0°C for the current temperature reading for each "Thermostat" component.
      _temperature[Thermostat1] = Math.Round(s_random.NextDouble() * 40.0 + 5.0, 1);
      _temperature[Thermostat2] = Math.Round(s_random.NextDouble() * 40.0 + 5.0, 1);
    }

    await SendTemperatureAsync(Thermostat1, cancellationToken);
    await SendTemperatureAsync(Thermostat2, cancellationToken);
    await SendDeviceMemoryAsync(cancellationToken);

    temperatureReset = _temperature[Thermostat1] == 0 && _temperature[Thermostat2] == 0;
    await Task.Delay(5 * 1000);
  }
}
yöntemi, SendTemperatureAsync cihazın bir bileşenden IoT Central'a sıcaklık telemetrisini nasıl gönderdiğini gösterir. Bu SendTemperatureTelemetryAsync yöntemi, iletiyi oluşturmak için PnpConvention sınıfını kullanır.
private async Task SendTemperatureAsync(string componentName, CancellationToken cancellationToken)
{
  await SendTemperatureTelemetryAsync(componentName, cancellationToken);

  double maxTemp = _temperatureReadingsDateTimeOffset[componentName].Values.Max<double>();
  if (maxTemp > _maxTemp[componentName])
  {
    _maxTemp[componentName] = maxTemp;
    await UpdateMaxTemperatureSinceLastRebootAsync(componentName, cancellationToken);
  }
}

private async Task SendTemperatureTelemetryAsync(string componentName, CancellationToken cancellationToken)
{
  const string telemetryName = "temperature";
  double currentTemperature = _temperature[componentName];
  using Message msg = PnpConvention.CreateMessage(telemetryName, currentTemperature, componentName);

  await _deviceClient.SendEventAsync(msg, cancellationToken);

  if (_temperatureReadingsDateTimeOffset.ContainsKey(componentName))
  {
    _temperatureReadingsDateTimeOffset[componentName].TryAdd(DateTimeOffset.UtcNow, currentTemperature);
  }
  else
  {
    _temperatureReadingsDateTimeOffset.TryAdd(
      componentName,
      new Dictionary<DateTimeOffset, double>
      {
        { DateTimeOffset.UtcNow, currentTemperature },
      });
  }
}
UpdateMaxTemperatureSinceLastRebootAsync yöntemi bir maxTempSinceLastReboot özellik güncelleştirmesini IoT Central'a gönderir. Bu yöntem, düzeltme eki oluşturmak için PnpConvention sınıfını kullanır.
private async Task UpdateMaxTemperatureSinceLastRebootAsync(string componentName, CancellationToken cancellationToken)
{
  const string propertyName = "maxTempSinceLastReboot";
  double maxTemp = _maxTemp[componentName];
  TwinCollection reportedProperties = PnpConvention.CreateComponentPropertyPatch(componentName, propertyName, maxTemp);

  await _deviceClient.UpdateReportedPropertiesAsync(reportedProperties, cancellationToken);
}
TargetTemperatureUpdateCallbackAsync yöntemi, IoT Central'dan gelen yazılabilir hedef sıcaklık özelliği güncellemelerini işler. Bu yöntem, özellik güncelleştirme iletisini okumak ve yanıtı oluşturmak için sınıfını kullanır PnpConvention :
private async Task TargetTemperatureUpdateCallbackAsync(TwinCollection desiredProperties, object userContext)
{
  const string propertyName = "targetTemperature";
  string componentName = (string)userContext;

  bool targetTempUpdateReceived = PnpConvention.TryGetPropertyFromTwin(
    desiredProperties,
    propertyName,
    out double targetTemperature,
    componentName);
  if (!targetTempUpdateReceived)
  {
      return;
  }

  TwinCollection pendingReportedProperty = PnpConvention.CreateComponentWritablePropertyResponse(
      componentName,
      propertyName,
      targetTemperature,
      (int)StatusCode.InProgress,
      desiredProperties.Version);

  await _deviceClient.UpdateReportedPropertiesAsync(pendingReportedProperty);

  // Update Temperature in 2 steps
  double step = (targetTemperature - _temperature[componentName]) / 2d;
  for (int i = 1; i <= 2; i++)
  {
      _temperature[componentName] = Math.Round(_temperature[componentName] + step, 1);
      await Task.Delay(6 * 1000);
  }

  TwinCollection completedReportedProperty = PnpConvention.CreateComponentWritablePropertyResponse(
      componentName,
      propertyName,
      _temperature[componentName],
      (int)StatusCode.Completed,
      desiredProperties.Version,
      "Successfully updated target temperature");

  await _deviceClient.UpdateReportedPropertiesAsync(completedReportedProperty);
}
Bu yöntem, HandleMaxMinReportCommand IoT Central'dan çağrılan bileşenlerin komutlarını işler.
private Task<MethodResponse> HandleMaxMinReportCommand(MethodRequest request, object userContext)
{
    try
    {
        string componentName = (string)userContext;
        DateTime sinceInUtc = JsonConvert.DeserializeObject<DateTime>(request.DataAsJson);
        var sinceInDateTimeOffset = new DateTimeOffset(sinceInUtc);

        if (_temperatureReadingsDateTimeOffset.ContainsKey(componentName))
        {

            Dictionary<DateTimeOffset, double> allReadings = _temperatureReadingsDateTimeOffset[componentName];
            Dictionary<DateTimeOffset, double> filteredReadings = allReadings.Where(i => i.Key > sinceInDateTimeOffset)
                .ToDictionary(i => i.Key, i => i.Value);

            if (filteredReadings != null && filteredReadings.Any())
            {
                var report = new
                {
                    maxTemp = filteredReadings.Values.Max<double>(),
                    minTemp = filteredReadings.Values.Min<double>(),
                    avgTemp = filteredReadings.Values.Average(),
                    startTime = filteredReadings.Keys.Min(),
                    endTime = filteredReadings.Keys.Max(),
                };

                byte[] responsePayload = Encoding.UTF8.GetBytes(JsonConvert.SerializeObject(report));
                return Task.FromResult(new MethodResponse(responsePayload, (int)StatusCode.Completed));
            }

            return Task.FromResult(new MethodResponse((int)StatusCode.NotFound));
        }

        return Task.FromResult(new MethodResponse((int)StatusCode.NotFound));
    }
    catch (JsonReaderException ex)
    {
        // ...
    }
}
Bağlantı bilgilerini alma
Bu öğreticinin ilerleyen bölümlerinde örnek cihaz uygulamasını çalıştırdığınızda aşağıdaki yapılandırma değerlerine ihtiyacınız vardır:
- Kimlik kapsamı: IoT Central uygulamanızda İzinler > Cihaz bağlantı grupları'na gidin. Kimlik kapsamı değerini not edin.
- Grup birincil anahtarı: IoT Central uygulamanızda İzinler > Cihaz bağlantı grupları > SAS-IoT-Devices'a gidin. Paylaşılan erişim imzası Birincil anahtar değerini not edin.
Aldığınız grup birincil anahtarından bir cihaz anahtarı oluşturmak için Azure Cloud Shell'i kullanın:
az extension add --name azure-iot
az iot central device compute-device-key --device-id sample-device-01 --pk <the group primary key value>
Oluşturulan cihaz anahtarını not edin, bu öğreticinin ilerleyen bölümlerinde bu anahtarı kullanacaksınız.
Note
Bu örneği çalıştırmak için cihazı IoT Central uygulamanıza önceden kaydetmeniz gerekmez. Örnek, cihazları ilk kez bağlandığında otomatik olarak kaydetmek için IoT Central özelliğini kullanır.
Kodu çalıştır
Note
Kodu çalıştırmadan önce TemperatureController'ı başlangıç projesi olarak ayarlayın.
Visual Studio'da örnek uygulamayı çalıştırmak için:
Çözüm Gezgini'ndePnpDeviceSamples > TemperatureController proje dosyasını seçin.
Project > TemperatureController Özellikleri > Hata Ayıklama'ya gidin. Ardından projeye aşağıdaki ortam değişkenlerini ekleyin:
Name Value IOTHUB_DEVICE_SECURITY_TYPE DPS IOTHUB_DEVICE_DPS_ENDPOINT global.azure-devices-provisioning.net IOTHUB_DEVICE_DPS_ID_SCOPE Daha önce not aldığınız kimlik kapsamı değeri. IOTHUB_DEVICE_DPS_DEVICE_ID sample-device-01 IOTHUB_DEVICE_DPS_DEVICE_KEY Daha önce not aldığınız oluşturulan cihaz anahtarı değeri.
Artık Visual Studio'da örneği çalıştırabilir ve hatalarını ayıklayabilirsiniz.
Aşağıdaki çıkışta cihazın IoT Central'a kaydolması ve bağlanması gösterilmektedir. Örnek telemetri göndermeye başlar:
[03/31/2021 14:43:17]info: Microsoft.Azure.Devices.Client.Samples.TemperatureControllerSample[0]
      Press Control+C to quit the sample.
[03/31/2021 14:43:17]dbug: Microsoft.Azure.Devices.Client.Samples.TemperatureControllerSample[0]
      Set up the device client.
[03/31/2021 14:43:18]dbug: Microsoft.Azure.Devices.Client.Samples.TemperatureControllerSample[0]
      Initializing via DPS
[03/31/2021 14:43:27]dbug: Microsoft.Azure.Devices.Client.Samples.TemperatureControllerSample[0]
      Set handler for 'reboot' command.
[03/31/2021 14:43:27]dbug: Microsoft.Azure.Devices.Client.Samples.TemperatureControllerSample[0]
      Connection status change registered - status=Connected, reason=Connection_Ok.
[03/31/2021 14:43:28]dbug: Microsoft.Azure.Devices.Client.Samples.TemperatureControllerSample[0]
      Set handler for "getMaxMinReport" command.
[03/31/2021 14:43:28]dbug: Microsoft.Azure.Devices.Client.Samples.TemperatureControllerSample[0]
      Set handler to receive 'targetTemperature' updates.
[03/31/2021 14:43:28]dbug: Microsoft.Azure.Devices.Client.Samples.TemperatureControllerSample[0]
      Property: Update - component = 'deviceInformation', properties update is complete.
[03/31/2021 14:43:28]dbug: Microsoft.Azure.Devices.Client.Samples.TemperatureControllerSample[0]
      Property: Update - { "serialNumber": "SR-123456" } is complete.
[03/31/2021 14:43:29]dbug: Microsoft.Azure.Devices.Client.Samples.TemperatureControllerSample[0]
      Telemetry: Sent - component="thermostat1", { "temperature": 34.2 } in °C.
[03/31/2021 14:43:29]dbug: Microsoft.Azure.Devices.Client.Samples.TemperatureControllerSample[0]
      Property: Update - component="thermostat1", { "maxTempSinceLastReboot": 34.2 } in °C is complete.
[03/31/2021 14:43:29]dbug: Microsoft.Azure.Devices.Client.Samples.TemperatureControllerSample[0]
      Telemetry: Sent - component="thermostat2", { "temperature": 25.1 } in °C.
[03/31/2021 14:43:29]dbug: Microsoft.Azure.Devices.Client.Samples.TemperatureControllerSample[0]
      Property: Update - component="thermostat2", { "maxTempSinceLastReboot": 25.1 } in °C is complete.
[03/31/2021 14:43:29]dbug: Microsoft.Azure.Devices.Client.Samples.TemperatureControllerSample[0]
      Telemetry: Sent - {"workingSet":31412} in KB.
Azure IoT Central uygulamanızda bir operatör olarak şunları yapabilirsiniz:
genel bakış sayfasında iki termostat bileşeni tarafından gönderilen telemetriyi görüntüleyin:
Hakkında sayfasında cihaz özelliklerini görüntüleyin. Bu sayfada cihaz bilgileri bileşeni ve iki termostat bileşeninden alınan özellikler gösterilir:
Cihaz şablonunu özelleştirme
Çözüm geliştiricisi olarak, sıcaklık denetleyicisi cihazı bağlandığında IoT Central'ın otomatik olarak oluşturduğu cihaz şablonunu özelleştirebilirsiniz.
Cihazla ilişkili müşteri adını depolamak üzere bir bulut özelliği eklemek için:
IoT Central uygulamanızda, Cihaz şablonları sayfasında Sıcaklık Denetleyicisi cihaz şablonuna gidin.
Sıcaklık Denetleyicisi modelinde +Yetenek ekle'yi seçin.
Müşteri adı olarak Görünen ad girin, Cloud özelliği olarak yetenek türü seçin, girdiyi genişletin ve String olarak Şema seçin. Ardından Kaydet'i seçin.
IoT Central uygulamanızda Get Max-Min raporu komutlarının nasıl görüntüleneceğini özelleştirmek için:
Cihaz şablonları sayfasında Sıcaklık Denetleyicisi cihaz şablonuna gidin.
getMaxMinReport (termostat1) için Get Max-Min report ifadesini termostat1 durum raporunu al ile değiştirin.
getMaxMinReport (thermostat2) için Get Max-Min report değeriniGet thermostat2 status report ile değiştirin.
Kaydetseçeneğini seçin.
Hedef Sıcaklık yazılabilir özelliklerinin IoT Central uygulamanızda nasıl görüntüleneceğini özelleştirmek için:
Cihaz şablonları sayfasında Sıcaklık Denetleyicisi cihaz şablonuna gidin.
targetTemperature (termostat1) için Hedef Sıcaklık değerini Hedef Sıcaklık (1) ile değiştirin.
targetTemperature (termostat2) için Hedef Sıcaklık değerini Hedef Sıcaklık (2) ile değiştirin.
Kaydetseçeneğini seçin.
Sıcaklık Denetleyicisi modelindeki termostat bileşenleri Hedef Sıcaklık yazılabilir özelliğini, cihaz şablonu ise Müşteri Adı bulut özelliğini içerir. Bir işlecin şu özellikleri düzenlemek için kullanabileceği bir görünüm oluşturun:
Görünümler'i ve ardından Düzenleme cihazı ve bulut verileri kutucuğunu seçin.
Form adı olarak Özellikler'i girin.
Hedef Sıcaklık (1), Hedef Sıcaklık (2) ve Müşteri Adı özelliklerini seçin. Ardından Bölüm ekle'yi seçin.
Değişikliklerinizi kaydedin.
Cihaz şablonunu yayımlama
Operatörün yaptığınız özelleştirmeleri görebilmesi ve kullanabilmesi için önce cihaz şablonunu yayımlamanız gerekir.
Thermostat cihaz şablonundan Yayımla'yı seçin. Bu cihaz şablonunu uygulama panelinde yayımla'yı seçin.
Operatör artık özellik değerlerini güncelleştirmek için Özellikler görünümünü kullanabilir ve cihaz komutları sayfasında Termostat1 durum raporunu al ve Termostat2 durumraporunu al adlı komutları çağırabilir:
Özellikler sayfasında yazılabilir özellik değerlerini güncelleştirin:
Komutlar sayfasından komutları çağırın. Durum raporu komutunu çalıştırırsanız, çalıştırmadan önce Since parametresi için bir tarih ve saat seçin:
Cihazın komutlara ve özellik güncelleştirmelerine nasıl yanıt verdiğini görebilirsiniz:
[03/31/2021 14:47:00]dbug: Microsoft.Azure.Devices.Client.Samples.TemperatureControllerSample[0]
      Command: Received - component="thermostat2", generating max, min and avg temperature report since 31/03/2021 06:00:00.
[03/31/2021 14:47:00]dbug: Microsoft.Azure.Devices.Client.Samples.TemperatureControllerSample[0]
      Command: component="thermostat2", MaxMinReport since 31/03/2021 06:00:00: maxTemp=36.4, minTemp=36.4, avgTemp=36.4, startTime=31/03/2021 14:46:33, endTime=31/03/2021 14:46:55

...

[03/31/2021 14:46:36]dbug: Microsoft.Azure.Devices.Client.Samples.TemperatureControllerSample[0]
      Property: Received - component="thermostat1", { "targetTemperature": 67°C }.
[03/31/2021 14:46:36]dbug: Microsoft.Azure.Devices.Client.Samples.TemperatureControllerSample[0]
      Property: Update - component="thermostat1", {"targetTemperature": 67 } in °C is InProgress.
[03/31/2021 14:46:49]dbug: Microsoft.Azure.Devices.Client.Samples.TemperatureControllerSample[0]
      Property: Update - component="thermostat1", {"targetTemperature": 67 } in °C is Completed
[03/31/2021 14:46:49]dbug: Microsoft.Azure.Devices.Client.Samples.TemperatureControllerSample[0]
      Telemetry: Sent - component="thermostat1", { "temperature": 67 } in °C.
Important
Bu makale, simetrik anahtar kimlik doğrulama olarak da adlandırılan paylaşılan erişim imzası kullanarak bir cihazı bağlama adımlarını içermektedir. Bu kimlik doğrulama yöntemi test ve değerlendirme için uygundur, ancak bir cihazı X.509 sertifikaları kullanarak doğrulamak daha güvenli bir yaklaşımdır. Daha fazla bilgi edinmek için bkz . IoT çözümleri > için en iyi güvenlik yöntemleri Bağlantı güvenliği.
Prerequisites
Bu makaledeki adımları tamamlamak için aşağıdaki kaynaklara ihtiyacınız vardır:
Etkin bir Azure aboneliği. Eğer bir Azure aboneliğiniz yoksa, başlamadan önce ücretsiz bir hesap oluşturun.
Özel uygulama şablonundan oluşturulan bir IoT Central uygulaması. Daha fazla bilgi edinmek için bkz. IoT Central uygulaması oluşturma ve Uygulamam hakkında nasıl bilgi alabilirim?.
Java SE Development Kit 8 veya üzeri bir geliştirme makinesi. Daha fazla bilgi için bkz. JDK'yi yükleme.
Java için örnek kodu içeren Microsoft Azure IoT SDK'sının GitHub deposunun yerel bir kopyası. Deponun bir kopyasını indirmek için bu bağlantıyı kullanın: ZIP'i indirin. Ardından dosyanın sıkıştırmasını yerel makinenizde uygun bir konuma çözün.
Kodu gözden geçirme
Daha önce indirdiğiniz Java için Microsoft Azure IoT SDK'sının kopyasında azure-iot-sdk-java/iothub/device/iot-device-samples/pnp-device-sample/temperature-controller-device-sample/src/main/java/samples/com/microsoft/azure/sdk/iot/device/TemperatureController.java dosyasını bir metin düzenleyicisinde açın.
Örnek, birden çok bileşenli Sıcaklık Denetleyicisi Dijital İkiz Tanımlama Dili modelini uygular.
IoT Central'a bağlanmak için örneği çalıştırdığınızda, cihazı kaydetmek ve bir bağlantı dizesi oluşturmak için Cihaz Sağlama Hizmeti'ni (DPS) kullanır. Örnek, ihtiyaç duyduğu DPS bağlantı bilgilerini komut satırı ortamından alır.
main yöntemi:
- Model kimliğini ayarlamak için
initializeAndProvisionDevice'yi çağırın, cihazı sağlamak ve kaydetmek için DPS'yi kullanın,dtmi:com:example:TemperatureController;2örneği oluşturun ve IoT Central uygulamanıza bağlanın. IoT Central, bu cihaz için cihaz şablonunu tanımlamak veya oluşturmak için model kimliğini kullanır. Daha fazla bilgi edinmek için bkz. Cihaz şablonuna cihaz atama. - Komut işleyicileri
getMaxMinReportverebootkomutları için oluşturur. - Yazılabilir
targetTemperatureözellikler için özellik güncelleştirme işleyicileri oluşturur. - Cihaz Bilgileri arabirimindeki özellikler ve Cihaz Belleği ve Seri Numarası özellikleri için ilk değerleri gönderir.
- İki termostattan sıcaklık telemetrisi göndermek ve
maxTempSinceLastRebootözelliğini beş saniyede bir güncelleştirmek için bir iş parçacığı başlatır.
public static void main(String[] args) throws Exception {

  // ...

  switch (deviceSecurityType.toLowerCase())
  {
    case "dps":
    {
      if (validateArgsForDpsFlow())
      {
        initializeAndProvisionDevice();
        break;
      }
      throw new IllegalArgumentException("Required environment variables are not set for DPS flow, please recheck your environment.");
    }
    case "connectionstring":
    {
      // ...
    }
    default:
    {
      // ...
    }
  }

  deviceClient.subscribeToMethods(new MethodCallback(), null);

  deviceClient.subscribeToDesiredPropertiesAsync(
  {
  (twin, context) ->
      TwinCollection desiredProperties = twin.getDesiredProperties();
      for (String desiredPropertyKey : desiredProperties.keySet())
      {
          TargetTemperatureUpdateCallback.onPropertyChanged(new Property(desiredPropertyKey, desiredProperties.get(desiredPropertyKey)), null);
      }
  },
  null,
  (exception, context) ->
  {
      if (exception == null)
      {
          log.info("Successfully subscribed to desired properties. Getting initial state");
          deviceClient.getTwinAsync(
              (twin, getTwinException, getTwinContext) ->
              {
                  log.info("Initial twin state received");
                  log.info(twin.toString());
              },
              null);
      }
      else
      {
          log.info("Failed to subscribe to desired properties. Error code {}", exception.getStatusCode());
          System.exit(-1);
      }
  },
  null);

  updateDeviceInformation();
  sendDeviceMemory();
  sendDeviceSerialNumber();

  final AtomicBoolean temperatureReset = new AtomicBoolean(true);
  maxTemperature.put(THERMOSTAT_1, 0.0d);
  maxTemperature.put(THERMOSTAT_2, 0.0d);

  new Thread(new Runnable() {
    @SneakyThrows({InterruptedException.class, IOException.class})
    @Override
    public void run() {
      while (true) {
        if (temperatureReset.get()) {
          // Generate a random value between 5.0°C and 45.0°C for the current temperature reading for each "Thermostat" component.
          temperature.put(THERMOSTAT_1, BigDecimal.valueOf(random.nextDouble() * 40 + 5).setScale(1, RoundingMode.HALF_UP).doubleValue());
          temperature.put(THERMOSTAT_2, BigDecimal.valueOf(random.nextDouble() * 40 + 5).setScale(1, RoundingMode.HALF_UP).doubleValue());
        }

        sendTemperatureReading(THERMOSTAT_1);
        sendTemperatureReading(THERMOSTAT_2);

        temperatureReset.set(temperature.get(THERMOSTAT_1) == 0 && temperature.get(THERMOSTAT_2) == 0);
        Thread.sleep(5 * 1000);
      }
    }
  }).start();
}
yöntemi, initializeAndProvisionDevice cihazın IoT Central'a kaydolmak ve bağlanmak için DPS'yi nasıl kullandığını gösterir. Yük, IoT Central'ın cihaz şablonuna cihaz atamak için kullandığı model kimliğini içerir:
private static void initializeAndProvisionDevice() throws Exception {
  SecurityProviderSymmetricKey securityClientSymmetricKey = new SecurityProviderSymmetricKey(deviceSymmetricKey.getBytes(), registrationId);
  ProvisioningDeviceClient provisioningDeviceClient;
  ProvisioningStatus provisioningStatus = new ProvisioningStatus();

  provisioningDeviceClient = ProvisioningDeviceClient.create(globalEndpoint, scopeId, provisioningProtocol, securityClientSymmetricKey);

  AdditionalData additionalData = new AdditionalData();
  additionalData.setProvisioningPayload(com.microsoft.azure.sdk.iot.provisioning.device.plugandplay.PnpHelper.createDpsPayload(MODEL_ID));

  ProvisioningDeviceClientRegistrationResult registrationResult = provisioningDeviceClient.registerDeviceSync(additionalData);

    ClientOptions options = ClientOptions.builder().modelId(MODEL_ID).build();
    if (registrationResult.getProvisioningDeviceClientStatus() == ProvisioningDeviceClientStatus.PROVISIONING_DEVICE_STATUS_ASSIGNED) {
        System.out.println("IotHUb Uri : " + registrationResult.getIothubUri());
        System.out.println("Device ID : " + registrationResult.getDeviceId());
        String iotHubUri = registrationResult.getIothubUri();
        String deviceId = registrationResult.getDeviceId();
        log.debug("Opening the device client.");
        deviceClient = new DeviceClient(iotHubUri, deviceId, securityClientSymmetricKey, IotHubClientProtocol.MQTT, options);
        deviceClient.open(true);
    }
}
yöntemi, sendTemperatureTelemetry cihazın bir bileşenden IoT Central'a sıcaklık telemetrisini nasıl gönderdiğini gösterir. Bu yöntem, PnpConvention iletiyi oluşturmak için sınıfını kullanır:
  private static void sendTemperatureTelemetry(String componentName) {
    String telemetryName = "temperature";
    double currentTemperature = temperature.get(componentName);

    Message message = PnpConvention.createIotHubMessageUtf8(telemetryName, currentTemperature, componentName);
    deviceClient.sendEventAsync(message, new MessageIotHubEventCallback(), message);

    // Add the current temperature entry to the list of temperature readings.
    Map<Date, Double> currentReadings;
    if (temperatureReadings.containsKey(componentName)) {
      currentReadings = temperatureReadings.get(componentName);
    } else {
      currentReadings = new HashMap<>();
    }
    currentReadings.put(new Date(), currentTemperature);
    temperatureReadings.put(componentName, currentReadings);
  }
updateMaxTemperatureSinceLastReboot yöntemi, bir bileşenden IoT Central'a özellik güncellemesi gönderir. Bu yöntem, düzeltme eki oluşturmak için PnpConvention sınıfını kullanır.
private static void updateMaxTemperatureSinceLastReboot(String componentName) throws IOException {
  String propertyName = "maxTempSinceLastReboot";
  double maxTemp = maxTemperature.get(componentName);

  TwinCollection reportedProperty = PnpConvention.createComponentPropertyPatch(propertyName, maxTemp, componentName);
  deviceClient.updateReportedPropertiesAsync(reportedProperty, sendReportedPropertiesResponseCallback, null);
  log.debug("Property: Update - {\"{}\": {}°C} is {}.", propertyName, maxTemp, StatusCode.COMPLETED);
}
Sınıf, IoT Central'dan bir bileşene yazılabilir özellik güncelleştirmelerini işlemek için TargetTemperatureUpdateCallback yöntemini içerir. Bu yöntem, yanıt oluşturmak için sınıfını kullanır PnpConvention :
private static class TargetTemperatureUpdateCallback
{
    final static String propertyName = "targetTemperature";
    @SneakyThrows(InterruptedException.class)
    public static void onPropertyChanged(Property property, Object context) {
        String componentName = (String) context;
        if (property.getKey().equalsIgnoreCase(componentName)) {
            double targetTemperature = (double) ((TwinCollection) property.getValue()).get(propertyName);
            log.debug("Property: Received - component=\"{}\", {\"{}\": {}°C}.", componentName, propertyName, targetTemperature);
            TwinCollection pendingPropertyPatch = PnpConvention.createComponentWritablePropertyResponse(
                    propertyName,
                    targetTemperature,
                    componentName,
                    StatusCode.IN_PROGRESS.value,
                    property.getVersion().longValue(),
                    null);
            deviceClient.updateReportedPropertiesAsync(pendingPropertyPatch, sendReportedPropertiesResponseCallback, null);
            log.debug("Property: Update - component=\"{}\", {\"{}\": {}°C} is {}", componentName, propertyName, targetTemperature, StatusCode.IN_PROGRESS);
            // Update temperature in 2 steps
            double step = (targetTemperature - temperature.get(componentName)) / 2;
            for (int i = 1; i <=2; i++) {
                temperature.put(componentName, BigDecimal.valueOf(temperature.get(componentName) + step).setScale(1, RoundingMode.HALF_UP).doubleValue());
                Thread.sleep(5 * 1000);
            }
            TwinCollection completedPropertyPatch = PnpConvention.createComponentWritablePropertyResponse(
                    propertyName,
                    temperature.get(componentName),
                    componentName,
                    StatusCode.COMPLETED.value,
                    property.getVersion().longValue(),
                    "Successfully updated target temperature.");
            deviceClient.updateReportedPropertiesAsync(completedPropertyPatch, sendReportedPropertiesResponseCallback, null);
            log.debug("Property: Update - {\"{}\": {}°C} is {}", propertyName, temperature.get(componentName), StatusCode.COMPLETED);
        } else {
            log.debug("Property: Received an unrecognized property update from service.");
        }
    }
}
MethodCallback sınıfı, IoT Central'dan çağrılan bileşen komutlarını işlemek için onMethodInvoked yöntemini içerir.
private static class MethodCallback implements com.microsoft.azure.sdk.iot.device.twin.MethodCallback
{
    final String reboot = "reboot";
    final String getMaxMinReport1 = "thermostat1*getMaxMinReport";
    final String getMaxMinReport2 = "thermostat2*getMaxMinReport";
    @SneakyThrows(InterruptedException.class)
    @Override
    public DirectMethodResponse onMethodInvoked(String methodName, DirectMethodPayload methodData, Object context) {
        String jsonRequest = methodData.getPayload(String.class);
        switch (methodName) {
            case reboot:
                int delay = getCommandRequestValue(jsonRequest, Integer.class);
                log.debug("Command: Received - Rebooting thermostat (resetting temperature reading to 0°C after {} seconds).", delay);
                Thread.sleep(delay * 1000L);
                temperature.put(THERMOSTAT_1, 0.0d);
                temperature.put(THERMOSTAT_2, 0.0d);
                maxTemperature.put(THERMOSTAT_1, 0.0d);
                maxTemperature.put(THERMOSTAT_2, 0.0d);
                temperatureReadings.clear();
                return new DirectMethodResponse(StatusCode.COMPLETED.value, null);
            case getMaxMinReport1:
            case getMaxMinReport2:
                String[] words = methodName.split("\\*");
                String componentName = words[0];
                if (temperatureReadings.containsKey(componentName)) {
                    Date since = getCommandRequestValue(jsonRequest, Date.class);
                    log.debug("Command: Received - component=\"{}\", generating min, max, avg temperature report since {}", componentName, since);
                    Map<Date, Double> allReadings = temperatureReadings.get(componentName);
                    Map<Date, Double> filteredReadings = allReadings.entrySet().stream()
                            .filter(map -> map.getKey().after(since))
                            .collect(Collectors.toMap(Entry::getKey, Entry::getValue));
                    if (!filteredReadings.isEmpty()) {
                        SimpleDateFormat sdf = new SimpleDateFormat("yyyy-MM-dd'T'HH:mm:ss'Z'");
                        double maxTemp = Collections.max(filteredReadings.values());
                        double minTemp = Collections.min(filteredReadings.values());
                        double avgTemp = filteredReadings.values().stream().mapToDouble(Double::doubleValue).average().orElse(Double.NaN);
                        String startTime =  sdf.format(Collections.min(filteredReadings.keySet()));
                        String endTime =  sdf.format(Collections.max(filteredReadings.keySet()));
                        String responsePayload = String.format(
                                "{\"maxTemp\": %.1f, \"minTemp\": %.1f, \"avgTemp\": %.1f, \"startTime\": \"%s\", \"endTime\": \"%s\"}",
                                maxTemp,
                                minTemp,
                                avgTemp,
                                startTime,
                                endTime);
                        log.debug("Command: MaxMinReport since {}: \"maxTemp\": {}°C, \"minTemp\": {}°C, \"avgTemp\": {}°C, \"startTime\": {}, \"endTime\": {}",
                                since,
                                maxTemp,
                                minTemp,
                                avgTemp,
                                startTime,
                                endTime);
                        return new DirectMethodResponse(StatusCode.COMPLETED.value, responsePayload);
                    }
                    log.debug("Command: component=\"{}\", no relevant readings found since {}, cannot generate any report.", componentName, since);
                    return new DirectMethodResponse(StatusCode.NOT_FOUND.value, null);
                }
                log.debug("Command: component=\"{}\", no temperature readings sent yet, cannot generate any report.", componentName);
                return new DirectMethodResponse(StatusCode.NOT_FOUND.value, null);
            default:
                log.debug("Command: command=\"{}\" is not implemented, no action taken.", methodName);
                return new DirectMethodResponse(StatusCode.NOT_FOUND.value, null);
        }
    }
}
Bağlantı bilgilerini alma
Bu öğreticinin ilerleyen bölümlerinde örnek cihaz uygulamasını çalıştırdığınızda aşağıdaki yapılandırma değerlerine ihtiyacınız vardır:
- Kimlik kapsamı: IoT Central uygulamanızda İzinler > Cihaz bağlantı grupları'na gidin. Kimlik kapsamı değerini not edin.
- Grup birincil anahtarı: IoT Central uygulamanızda İzinler > Cihaz bağlantı grupları > SAS-IoT-Devices'a gidin. Paylaşılan erişim imzası Birincil anahtar değerini not edin.
Aldığınız grup birincil anahtarından bir cihaz anahtarı oluşturmak için Azure Cloud Shell'i kullanın:
az extension add --name azure-iot
az iot central device compute-device-key --device-id sample-device-01 --pk <the group primary key value>
Oluşturulan cihaz anahtarını not edin, bu öğreticinin ilerleyen bölümlerinde bu anahtarı kullanacaksınız.
Note
Bu örneği çalıştırmak için cihazı IoT Central uygulamanıza önceden kaydetmeniz gerekmez. Örnek, cihazları ilk kez bağlandığında otomatik olarak kaydetmek için IoT Central özelliğini kullanır.
Windows'da, indirdiğiniz Java deposu için Azure IoT SDK'sının kök klasörüne gidin.
Örnek uygulamayı derlemek için aşağıdaki komutu çalıştırın:
mvn install -T 2C -DskipTests
Kodu çalıştır
Örnek uygulamayı çalıştırmak için bir komut satırı ortamı açın ve TemperatureController.java örnek dosyasını içeren src klasörünü içeren azure-iot-sdk-java/iothub/device/iot-device-samples/pnp-device-sample/temperature-controller-device-sample klasörüne gidin.
Örneği yapılandırmak için ortam değişkenlerini ayarlayın. Aşağıdaki kod parçacığı, Windows komut isteminde ortam değişkenlerinin nasıl ayarlandığını gösterir.
Bash kabuğu kullanıyorsanız, set komutlarını export komutlarıyla değiştirin.
set IOTHUB_DEVICE_SECURITY_TYPE=DPS
set IOTHUB_DEVICE_DPS_ID_SCOPE=<The ID scope you made a note of previously>
set IOTHUB_DEVICE_DPS_DEVICE_ID=sample-device-01
set IOTHUB_DEVICE_DPS_DEVICE_KEY=<The generated device key you made a note of previously>
set IOTHUB_DEVICE_DPS_ENDPOINT=global.azure-devices-provisioning.net
Örneği çalıştırın:
mvn exec:java -Dexec.mainClass="samples.com.microsoft.azure.sdk.iot.device.TemperatureController"
Aşağıdaki çıkışta cihazın IoT Central'a kaydolması ve bağlanması gösterilmektedir. Örnek telemetri göndermeye başlar:
2021-03-30 15:33:25.138 DEBUG TemperatureController:123 - Initialize the device client.
Waiting for Provisioning Service to register
Waiting for Provisioning Service to register
IotHUb Uri : iotc-60a.....azure-devices.net
Device ID : sample-device-01
2021-03-30 15:33:38.294 DEBUG TemperatureController:247 - Opening the device client.
2021-03-30 15:33:38.307 INFO  ExponentialBackoffWithJitter:98 - NOTE: A new instance of ExponentialBackoffWithJitter has been created with the following properties. Retry Count: 2147483647, Min Backoff Interval: 100, Max Backoff Interval: 10000, Max Time Between Retries: 100, Fast Retry Enabled: true
2021-03-30 15:33:38.321 INFO  ExponentialBackoffWithJitter:98 - NOTE: A new instance of ExponentialBackoffWithJitter has been created with the following properties. Retry Count: 2147483647, Min Backoff Interval: 100, Max Backoff Interval: 10000, Max Time Between Retries: 100, Fast Retry Enabled: true
2021-03-30 15:33:38.427 DEBUG MqttIotHubConnection:274 - Opening MQTT connection...
2021-03-30 15:33:38.427 DEBUG Mqtt:123 - Sending MQTT CONNECT packet...
2021-03-30 15:33:44.628 DEBUG Mqtt:126 - Sent MQTT CONNECT packet was acknowledged
2021-03-30 15:33:44.630 DEBUG Mqtt:256 - Sending MQTT SUBSCRIBE packet for topic devices/sample-device-01/messages/devicebound/#
2021-03-30 15:33:44.731 DEBUG Mqtt:261 - Sent MQTT SUBSCRIBE packet for topic devices/sample-device-01/messages/devicebound/# was acknowledged
2021-03-30 15:33:44.733 DEBUG MqttIotHubConnection:279 - MQTT connection opened successfully
2021-03-30 15:33:44.733 DEBUG IotHubTransport:302 - The connection to the IoT Hub has been established
2021-03-30 15:33:44.734 INFO  IotHubTransport:1429 - Updating transport status to new status CONNECTED with reason CONNECTION_OK
2021-03-30 15:33:44.735 DEBUG IotHubTransport:1439 - Invoking connection status callbacks with new status details
2021-03-30 15:33:44.739 DEBUG IotHubTransport:394 - Client connection opened successfully
2021-03-30 15:33:44.740 INFO  DeviceClient:438 - Device client opened successfully
2021-03-30 15:33:44.740 DEBUG TemperatureController:152 - Set handler for "reboot" command.
2021-03-30 15:33:44.742 DEBUG TemperatureController:153 - Set handler for "getMaxMinReport" command.
2021-03-30 15:33:44.774 INFO  IotHubTransport:489 - Message was queued to be sent later ( Message details: Correlation Id [aaaa0000-bb11-2222-33cc-444444dddddd] Message Id [bbbb1111-cc22-3333-44dd-555555eeeeee] Device Operation Type [DEVICE_OPERATION_METHOD_SUBSCRIBE_REQUEST] )
2021-03-30 15:33:44.774 DEBUG TemperatureController:156 - Set handler to receive "targetTemperature" updates.
2021-03-30 15:33:44.775 INFO  IotHubTransport:1344 - Sending message ( Message details: Correlation Id [aaaa0000-bb11-2222-33cc-444444dddddd] Message Id [bbbb1111-cc22-3333-44dd-555555eeeeee] Device Operation Type [DEVICE_OPERATION_METHOD_SUBSCRIBE_REQUEST] )
2021-03-30 15:33:44.779 DEBUG Mqtt:256 - Sending MQTT SUBSCRIBE packet for topic $iothub/methods/POST/#
2021-03-30 15:33:44.793 INFO  IotHubTransport:489 - Message was queued to be sent later ( Message details: Correlation Id [cccc2222-dd33-4444-55ee-666666ffffff] Message Id [dddd3333-ee44-5555-66ff-777777aaaaaa] Device Operation Type [DEVICE_OPERATION_TWIN_SUBSCRIBE_DESIRED_PROPERTIES_REQUEST] )
2021-03-30 15:33:44.794 INFO  IotHubTransport:489 - Message was queued to be sent later ( Message details: Correlation Id [eeee4444-ff55-6666-77aa-888888bbbbbb] Message Id [ffff5555-aa66-7777-88bb-999999cccccc] Request Id [0] Device Operation Type [DEVICE_OPERATION_TWIN_GET_REQUEST] )
2021-03-30 15:33:44.819 INFO  IotHubTransport:489 - Message was queued to be sent later ( Message details: Correlation Id [aaaa6666-bb77-8888-99cc-000000dddddd] Message Id [aaaa0000-bb11-2222-33cc-444444dddddd] Device Operation Type [DEVICE_OPERATION_TWIN_SUBSCRIBE_DESIRED_PROPERTIES_REQUEST] )
2021-03-30 15:33:44.881 DEBUG Mqtt:261 - Sent MQTT SUBSCRIBE packet for topic $iothub/methods/POST/# was acknowledged
2021-03-30 15:33:44.882 INFO  IotHubTransport:1344 - Sending message ( Message details: Correlation Id [cccc2222-dd33-4444-55ee-666666ffffff] Message Id [dddd3333-ee44-5555-66ff-777777aaaaaa] Device Operation Type [DEVICE_OPERATION_TWIN_SUBSCRIBE_DESIRED_PROPERTIES_REQUEST] )
2021-03-30 15:33:44.882 DEBUG Mqtt:256 - Sending MQTT SUBSCRIBE packet for topic $iothub/twin/res/#
2021-03-30 15:33:44.893 INFO  IotHubTransport:489 - Message was queued to be sent later ( Message details: Correlation Id [bbbb1111-cc22-3333-44dd-555555eeeeee] Message Id [cccc2222-dd33-4444-55ee-666666ffffff] Request Id [1] Device Operation Type [DEVICE_OPERATION_TWIN_UPDATE_REPORTED_PROPERTIES_REQUEST] )
2021-03-30 15:33:44.904 DEBUG TemperatureController:423 - Property: Update - component = "deviceInformation" is COMPLETED.
2021-03-30 15:33:44.915 INFO  IotHubTransport:489 - Message was queued to be sent later ( Message details: Correlation Id [dddd3333-ee44-5555-66ff-777777aaaaaa] Message Id [eeee4444-ff55-6666-77aa-888888bbbbbb] )
2021-03-30 15:33:44.915 DEBUG TemperatureController:434 - Telemetry: Sent - {"workingSet": 1024.0KiB }
2021-03-30 15:33:44.915 INFO  IotHubTransport:489 - Message was queued to be sent later ( Message details: Correlation Id [ffff5555-aa66-7777-88bb-999999cccccc] Message Id [aaaa6666-bb77-8888-99cc-000000dddddd] Request Id [2] Device Operation Type [DEVICE_OPERATION_TWIN_UPDATE_REPORTED_PROPERTIES_REQUEST] )
2021-03-30 15:33:44.916 DEBUG TemperatureController:442 - Property: Update - {"serialNumber": SR-123456} is COMPLETED
2021-03-30 15:33:44.927 INFO  IotHubTransport:489 - Message was queued to be sent later ( Message details: Correlation Id [aaaa0000-bb11-2222-33cc-444444dddddd] Message Id [bbbb1111-cc22-3333-44dd-555555eeeeee] )
2021-03-30 15:33:44.927 DEBUG TemperatureController:461 - Telemetry: Sent - {"temperature": 5.8°C} with message Id bbbb1111-cc22-3333-44dd-555555eeeeee.
Azure IoT Central uygulamanızda bir operatör olarak şunları yapabilirsiniz:
genel bakış sayfasında iki termostat bileşeni tarafından gönderilen telemetriyi görüntüleyin:
Hakkında sayfasında cihaz özelliklerini görüntüleyin. Bu sayfada cihaz bilgileri bileşeni ve iki termostat bileşeninden alınan özellikler gösterilir:
Cihaz şablonunu özelleştirme
Çözüm geliştiricisi olarak, sıcaklık denetleyicisi cihazı bağlandığında IoT Central'ın otomatik olarak oluşturduğu cihaz şablonunu özelleştirebilirsiniz.
Cihazla ilişkili müşteri adını depolamak üzere bir bulut özelliği eklemek için:
IoT Central uygulamanızda, Cihaz şablonları sayfasında Sıcaklık Denetleyicisi cihaz şablonuna gidin.
Sıcaklık Denetleyicisi modelinde +Yetenek ekle'yi seçin.
Müşteri adı olarak Görünen ad girin, Cloud özelliği olarak yetenek türü seçin, girdiyi genişletin ve String olarak Şema seçin. Ardından Kaydet'i seçin.
IoT Central uygulamanızda Get Max-Min raporu komutlarının nasıl görüntüleneceğini özelleştirmek için:
Cihaz şablonları sayfasında Sıcaklık Denetleyicisi cihaz şablonuna gidin.
getMaxMinReport (termostat1) için Get Max-Min report ifadesini termostat1 durum raporunu al ile değiştirin.
getMaxMinReport (thermostat2) için Get Max-Min report değeriniGet thermostat2 status report ile değiştirin.
Kaydetseçeneğini seçin.
Hedef Sıcaklık yazılabilir özelliklerinin IoT Central uygulamanızda nasıl görüntüleneceğini özelleştirmek için:
Cihaz şablonları sayfasında Sıcaklık Denetleyicisi cihaz şablonuna gidin.
targetTemperature (termostat1) için Hedef Sıcaklık değerini Hedef Sıcaklık (1) ile değiştirin.
targetTemperature (termostat2) için Hedef Sıcaklık değerini Hedef Sıcaklık (2) ile değiştirin.
Kaydetseçeneğini seçin.
Sıcaklık Denetleyicisi modelindeki termostat bileşenleri Hedef Sıcaklık yazılabilir özelliğini, cihaz şablonu ise Müşteri Adı bulut özelliğini içerir. Bir işlecin şu özellikleri düzenlemek için kullanabileceği bir görünüm oluşturun:
Görünümler'i ve ardından Düzenleme cihazı ve bulut verileri kutucuğunu seçin.
Form adı olarak Özellikler'i girin.
Hedef Sıcaklık (1), Hedef Sıcaklık (2) ve Müşteri Adı özelliklerini seçin. Ardından Bölüm ekle'yi seçin.
Değişikliklerinizi kaydedin.
Cihaz şablonunu yayımlama
Operatörün yaptığınız özelleştirmeleri görebilmesi ve kullanabilmesi için önce cihaz şablonunu yayımlamanız gerekir.
Thermostat cihaz şablonundan Yayımla'yı seçin. Bu cihaz şablonunu uygulama panelinde yayımla'yı seçin.
Operatör artık özellik değerlerini güncelleştirmek için Özellikler görünümünü kullanabilir ve cihaz komutları sayfasında Termostat1 durum raporunu al ve Termostat2 durumraporunu al adlı komutları çağırabilir:
Özellikler sayfasında yazılabilir özellik değerlerini güncelleştirin:
Komutlar sayfasından komutları çağırın. Durum raporu komutunu çalıştırırsanız, çalıştırmadan önce Since parametresi için bir tarih ve saat seçin:
Cihazın komutlara ve özellik güncelleştirmelerine nasıl yanıt verdiğini görebilirsiniz:
2021-03-30 15:43:57.133 DEBUG TemperatureController:309 - Command: Received - component="thermostat1", generating min, max, avg temperature report since Tue Mar 30 06:00:00 BST 2021
2021-03-30 15:43:57.153 DEBUG TemperatureController:332 - Command: MaxMinReport since Tue Mar 30 06:00:00 BST 2021: "maxTemp": 35.6°C, "minTemp": 35.6°C, "avgTemp": 35.6°C, "startTime": 2021-03-30T15:43:41Z, "endTime": 2021-03-30T15:43:56Z
2021-03-30 15:43:57.394 DEBUG TemperatureController:502 - Command - Response from IoT Hub: command name=null, status=OK_EMPTY


...

2021-03-30 15:48:47.808 DEBUG TemperatureController:372 - Property: Received - component="thermostat2", {"targetTemperature": 67.0°C}.
2021-03-30 15:48:47.837 DEBUG TemperatureController:382 - Property: Update - component="thermostat2", {"targetTemperature": 67.0°C} is IN_PROGRESS
Important
Bu makale, simetrik anahtar kimlik doğrulama olarak da adlandırılan paylaşılan erişim imzası kullanarak bir cihazı bağlama adımlarını içermektedir. Bu kimlik doğrulama yöntemi test ve değerlendirme için uygundur, ancak bir cihazı X.509 sertifikaları kullanarak doğrulamak daha güvenli bir yaklaşımdır. Daha fazla bilgi edinmek için bkz . IoT çözümleri > için en iyi güvenlik yöntemleri Bağlantı güvenliği.
Prerequisites
Bu makaledeki adımları tamamlamak için aşağıdaki kaynaklara ihtiyacınız vardır:
Etkin bir Azure aboneliği. Eğer bir Azure aboneliğiniz yoksa, başlamadan önce ücretsiz bir hesap oluşturun.
Özel uygulama şablonundan oluşturulan bir IoT Central uygulaması. Daha fazla bilgi edinmek için bkz. IoT Central uygulaması oluşturma ve Uygulamam hakkında nasıl bilgi alabilirim?.
Node.js sürüm 6 veya üzeri yüklü bir geliştirme makinesi. Sürümünüzü denetlemek için komut satırında komutunu çalıştırabilirsiniz
node --version. Öğreticideki yönergeler, Windows komut isteminde `node` komutunu çalıştırdığınızı varsayar. Ancak, Node.js diğer birçok işletim sisteminde kullanabilirsiniz.Örnek kodu içeren Microsoft Azure IoT SDK'sının Node.js GitHub deposunun yerel bir kopyası. Deponun bir kopyasını indirmek için bu bağlantıyı kullanın: ZIP'i indirin. Ardından dosyanın sıkıştırmasını yerel makinenizde uygun bir konuma çözün.
Kodu gözden geçirme
Daha önce indirdiğiniz Node.js için Microsoft Azure IoT SDK'sının kopyasında azure-iot-sdk-node/device/samples/javascript/pnp_temperature_controller.js dosyasını bir metin düzenleyicisinde açın.
Örnek, birden çok bileşenli Sıcaklık Denetleyicisi Dijital İkiz Tanımlama Dili modelini uygular.
IoT Central'a bağlanmak için örneği çalıştırdığınızda, cihazı kaydetmek ve bir bağlantı dizesi oluşturmak için Cihaz Sağlama Hizmeti'ni (DPS) kullanır. Örnek, ihtiyaç duyduğu DPS bağlantı bilgilerini komut satırı ortamından alır.
main yöntemi:
- Bir
clientnesne oluşturur ve bağlantıyı açmadan önce model kimliğini ayarlardtmi:com:example:TemperatureController;2. IoT Central, bu cihaz için cihaz şablonunu tanımlamak veya oluşturmak için model kimliğini kullanır. Daha fazla bilgi edinmek için bkz. Cihaz şablonuna cihaz atama. - Üç komut için komut işleyicileri oluşturur.
- Her termostat bileşeni için her 5 saniyede bir sıcaklık telemetrisi göndermek için bir döngü başlatır.
- Çalışma kümesi boyutu telemetrisini her 6 saniyede bir göndermek üzere varsayılan bileşen için bir döngü başlatır.
-
maxTempSinceLastRebootHer termostat bileşeni için özelliğini gönderir. - Cihaz bilgileri özelliklerini gönderir.
- Üç bileşen için yazılabilir özellik işleyicileri oluşturur.
async function main() {
  // ...

  // fromConnectionString must specify a transport, coming from any transport package.
  const client = Client.fromConnectionString(deviceConnectionString, Protocol);
  console.log('Connecting using connection string: ' + deviceConnectionString);
  let resultTwin;

  try {
    // Add the modelId here
    await client.setOptions(modelIdObject);
    await client.open();
    console.log('Enabling the commands on the client');
    client.onDeviceMethod(commandNameGetMaxMinReport1, commandHandler);
    client.onDeviceMethod(commandNameGetMaxMinReport2, commandHandler);
    client.onDeviceMethod(commandNameReboot, commandHandler);

    // Send Telemetry after some interval
    let index1 = 0;
    let index2 = 0;
    let index3 = 0;
    intervalToken1 = setInterval(() => {
      const data = JSON.stringify(thermostat1.updateSensor().getCurrentTemperatureObject());
      sendTelemetry(client, data, index1, thermostat1ComponentName).catch((err) => console.log('error ', err.toString()));
      index1 += 1;
    }, 5000);

    intervalToken2 = setInterval(() => {
      const data = JSON.stringify(thermostat2.updateSensor().getCurrentTemperatureObject());
      sendTelemetry(client, data, index2, thermostat2ComponentName).catch((err) => console.log('error ', err.toString()));
      index2 += 1;
    }, 5500);


    intervalToken3 = setInterval(() => {
      const data = JSON.stringify({ workingset: 1 + (Math.random() * 90) });
      sendTelemetry(client, data, index3, null).catch((err) => console.log('error ', err.toString()));
      index3 += 1;
    }, 6000);

    // attach a standard input exit listener
    exitListener(client);

    try {
      resultTwin = await client.getTwin();
      // Only report readable properties
      const patchRoot = helperCreateReportedPropertiesPatch({ serialNumber: serialNumber }, null);
      const patchThermostat1Info = helperCreateReportedPropertiesPatch({
        maxTempSinceLastReboot: thermostat1.getMaxTemperatureValue(),
      }, thermostat1ComponentName);

      const patchThermostat2Info = helperCreateReportedPropertiesPatch({
        maxTempSinceLastReboot: thermostat2.getMaxTemperatureValue(),
      }, thermostat2ComponentName);

      const patchDeviceInfo = helperCreateReportedPropertiesPatch({
        manufacturer: 'Contoso Device Corporation',
        model: 'Contoso 47-turbo',
        swVersion: '10.89',
        osName: 'Contoso_OS',
        processorArchitecture: 'Contoso_x86',
        processorManufacturer: 'Contoso Industries',
        totalStorage: 65000,
        totalMemory: 640,
      }, deviceInfoComponentName);

      // the below things can only happen once the twin is there
      updateComponentReportedProperties(resultTwin, patchRoot, null);
      updateComponentReportedProperties(resultTwin, patchThermostat1Info, thermostat1ComponentName);
      updateComponentReportedProperties(resultTwin, patchThermostat2Info, thermostat2ComponentName);
      updateComponentReportedProperties(resultTwin, patchDeviceInfo, deviceInfoComponentName);
      desiredPropertyPatchListener(resultTwin, [thermostat1ComponentName, thermostat2ComponentName, deviceInfoComponentName]);
    } catch (err) {
      console.error('could not retrieve twin or report twin properties\n' + err.toString());
    }
  } catch (err) {
    console.error('could not connect Plug and Play client or could not attach interval function for telemetry\n' + err.toString());
  }
}
işlevi, provisionDevice cihazın IoT Central'a kaydolmak ve bağlanmak için DPS'yi nasıl kullandığını gösterir. Yük, IoT Central'ın cihaz şablonuna cihaz atamak için kullandığı model kimliğini içerir:
async function provisionDevice(payload) {
  var provSecurityClient = new SymmetricKeySecurityClient(registrationId, symmetricKey);
  var provisioningClient = ProvisioningDeviceClient.create(provisioningHost, idScope, new ProvProtocol(), provSecurityClient);

  if (payload) {
    provisioningClient.setProvisioningPayload(payload);
  }

  try {
    let result = await provisioningClient.register();
    deviceConnectionString = 'HostName=' + result.assignedHub + ';DeviceId=' + result.deviceId + ';SharedAccessKey=' + symmetricKey;
    console.log('registration succeeded');
    console.log('assigned hub=' + result.assignedHub);
    console.log('deviceId=' + result.deviceId);
    console.log('payload=' + JSON.stringify(result.payload));
  } catch (err) {
    console.error("error registering device: " + err.toString());
  }
}
işlevi, sendTelemetry cihazın ioT Central'a sıcaklık telemetrisini nasıl gönderdiğini gösterir. Bileşenlerden gelen telemetri için, bileşen adını taşıyan $.sub adlı bir özellik ekler.
async function sendTelemetry(deviceClient, data, index, componentName) {
  if componentName) {
    console.log('Sending telemetry message %d from component: %s ', index, componentName);
  } else {
    console.log('Sending telemetry message %d from root interface', index);
  }
  const msg = new Message(data);
  if (componentName) {
    msg.properties.add(messageSubjectProperty, componentName);
  }
  msg.contentType = 'application/json';
  msg.contentEncoding = 'utf-8';
  await deviceClient.sendEvent(msg);
}
Özellik güncelleme iletileri oluşturmak için main yöntemi, helperCreateReportedPropertiesPatch adlı bir yardımcı yöntem kullanır. Bu yöntem, özelliğini gönderen bileşeni belirtmek için isteğe bağlı bir parametre alır:
const helperCreateReportedPropertiesPatch = (propertiesToReport, componentName) => {
  let patch;
  if (!!(componentName)) {
    patch = { };
    propertiesToReport.__t = 'c';
    patch[componentName] = propertiesToReport;
  } else {
    patch = { };
    patch = propertiesToReport;
  }
  if (!!(componentName)) {
    console.log('The following properties will be updated for component: ' + componentName);
  } else {
    console.log('The following properties will be updated for root interface.');
  }
  console.log(patch);
  return patch;
};
yöntemi, main IoT Central'dan yazılabilir özelliklere yapılan güncelleştirmeleri işlemek için aşağıdaki yöntemi kullanır. Yöntemin yanıtı sürüm ve durum koduyla nasıl oluşturduğuna dikkat edin.
const desiredPropertyPatchListener = (deviceTwin, componentNames) => {
  deviceTwin.on('properties.desired', (delta) => {
    console.log('Received an update for device with value: ' + JSON.stringify(delta));
    Object.entries(delta).forEach(([key, values]) => {
      const version = delta.$version;
      if (!!(componentNames) && componentNames.includes(key)) { // then it is a component we are expecting
        const componentName = key;
        const patchForComponents = { [componentName]: {} };
        Object.entries(values).forEach(([propertyName, propertyValue]) => {
          if (propertyName !== '__t' && propertyName !== '$version') {
            console.log('Will update property: ' + propertyName + ' to value: ' + propertyValue + ' of component: ' + componentName);
            const propertyContent = { value: propertyValue };
            propertyContent.ac = 200;
            propertyContent.ad = 'Successfully executed patch';
            propertyContent.av = version;
            patchForComponents[componentName][propertyName] = propertyContent;
          }
        });
        updateComponentReportedProperties(deviceTwin, patchForComponents, componentName);
      }
      else if  (key !== '$version') { // individual property for root
        const patchForRoot = { };
        console.log('Will update property: ' + key + ' to value: ' + values + ' for root');
        const propertyContent = { value: values };
        propertyContent.ac = 200;
        propertyContent.ad = 'Successfully executed patch';
        propertyContent.av = version;
        patchForRoot[key] = propertyContent;
        updateComponentReportedProperties(deviceTwin, patchForRoot, null);
      }
    });
  });
};
yöntemi, main IoT Central komutlarını işlemek için aşağıdaki yöntemleri kullanır:
const commandHandler = async (request, response) => {
  helperLogCommandRequest(request);
  switch (request.methodName) {
  case commandNameGetMaxMinReport1: {
    await sendCommandResponse(request, response, 200, thermostat1.getMaxMinReportObject());
    break;
  }
  case commandNameGetMaxMinReport2: {
    await sendCommandResponse(request, response, 200, thermostat2.getMaxMinReportObject());
    break;
  }
  case commandNameReboot: {
    await sendCommandResponse(request, response, 200, 'reboot response');
    break;
  }
  default:
    await sendCommandResponse(request, response, 404, 'unknown method');
    break;
  }
};

const sendCommandResponse = async (request, response, status, payload) => {
  try {
    await response.send(status, payload);
    console.log('Response to method: ' + request.methodName + ' sent successfully.' );
  } catch (err) {
    console.error('An error occurred when sending a method response:\n' + err.toString());
  }
};
Bağlantı bilgilerini alma
Bu öğreticinin ilerleyen bölümlerinde örnek cihaz uygulamasını çalıştırdığınızda aşağıdaki yapılandırma değerlerine ihtiyacınız vardır:
- Kimlik kapsamı: IoT Central uygulamanızda İzinler > Cihaz bağlantı grupları'na gidin. Kimlik kapsamı değerini not edin.
- Grup birincil anahtarı: IoT Central uygulamanızda İzinler > Cihaz bağlantı grupları > SAS-IoT-Devices'a gidin. Paylaşılan erişim imzası Birincil anahtar değerini not edin.
Aldığınız grup birincil anahtarından bir cihaz anahtarı oluşturmak için Azure Cloud Shell'i kullanın:
az extension add --name azure-iot
az iot central device compute-device-key --device-id sample-device-01 --pk <the group primary key value>
Oluşturulan cihaz anahtarını not edin, bu öğreticinin ilerleyen bölümlerinde bu anahtarı kullanacaksınız.
Note
Bu örneği çalıştırmak için cihazı IoT Central uygulamanıza önceden kaydetmeniz gerekmez. Örnek, cihazları ilk kez bağlandığında otomatik olarak kaydetmek için IoT Central özelliğini kullanır.
Kodu çalıştır
Örnek uygulamayı çalıştırmak için bir komut satırı ortamı açın ve pnp_temperature_controller.jsörnek dosyasını içeren azure-iot-sdk-node/device/samples/javascript klasörüne gidin.
Örneği yapılandırmak için ortam değişkenlerini ayarlayın. Aşağıdaki kod parçacığı, Windows komut isteminde ortam değişkenlerinin nasıl ayarlandığını gösterir.
Bash kabuğu kullanıyorsanız, set komutlarını export komutlarıyla değiştirin.
set IOTHUB_DEVICE_SECURITY_TYPE=DPS
set IOTHUB_DEVICE_DPS_ID_SCOPE=<The ID scope you made a note of previously>
set IOTHUB_DEVICE_DPS_DEVICE_ID=sample-device-01
set IOTHUB_DEVICE_DPS_DEVICE_KEY=<The generated device key you made a note of previously>
set IOTHUB_DEVICE_DPS_ENDPOINT=global.azure-devices-provisioning.net
Gerekli paketleri yükleyin:
npm install
Örneği çalıştırın:
node pnp_temperature_controller.js
Aşağıdaki çıkışta cihazın IoT Central'a kaydolması ve bağlanması gösterilmektedir. Ardından örnek, telemetri göndermeye maxTempSinceLastReboot başlamadan önce iki termostat bileşeninden özelliğini gönderir:
registration succeeded
assigned hub=iotc-....azure-devices.net
deviceId=sample-device-01
payload=undefined
Connecting using connection string: HostName=iotc-....azure-devices.net;DeviceId=sample-device-01;SharedAccessKey=qdv...IpAo=
Enabling the commands on the client
Please enter q or Q to exit sample.
The following properties will be updated for root interface.
{ serialNumber: 'alwinexlepaho8329' }
The following properties will be updated for component: thermostat1
{ thermostat1: { maxTempSinceLastReboot: 1.5902294191855972, __t: 'c' } }
The following properties will be updated for component: thermostat2
{ thermostat2: { maxTempSinceLastReboot: 16.181771928614545, __t: 'c' } }
The following properties will be updated for component: deviceInformation
{ deviceInformation:
   { manufacturer: 'Contoso Device Corporation',
     model: 'Contoso 47-turbo',
     swVersion: '10.89',
     osName: 'Contoso_OS',
     processorArchitecture: 'Contoso_x86',
     processorManufacturer: 'Contoso Industries',
     totalStorage: 65000,
     totalMemory: 640,
     __t: 'c' } }
executed sample
Received an update for device with value: {"$version":1}
Properties have been reported for component: thermostat1
Properties have been reported for component: thermostat2
Properties have been reported for component: deviceInformation
Properties have been reported for root interface.
Sending telemetry message 0 from component: thermostat1
Sending telemetry message 0 from component: thermostat2
Sending telemetry message 0 from root interface
Azure IoT Central uygulamanızda bir operatör olarak şunları yapabilirsiniz:
genel bakış sayfasında iki termostat bileşeni tarafından gönderilen telemetriyi görüntüleyin:
Hakkında sayfasında cihaz özelliklerini görüntüleyin. Bu sayfada cihaz bilgileri bileşeni ve iki termostat bileşeninden alınan özellikler gösterilir:
Cihaz şablonunu özelleştirme
Çözüm geliştiricisi olarak, sıcaklık denetleyicisi cihazı bağlandığında IoT Central'ın otomatik olarak oluşturduğu cihaz şablonunu özelleştirebilirsiniz.
Cihazla ilişkili müşteri adını depolamak üzere bir bulut özelliği eklemek için:
IoT Central uygulamanızda, Cihaz şablonları sayfasında Sıcaklık Denetleyicisi cihaz şablonuna gidin.
Sıcaklık Denetleyicisi modelinde +Yetenek ekle'yi seçin.
Müşteri adı olarak Görünen ad girin, Cloud özelliği olarak yetenek türü seçin, girdiyi genişletin ve String olarak Şema seçin. Ardından Kaydet'i seçin.
IoT Central uygulamanızda Get Max-Min raporu komutlarının nasıl görüntüleneceğini özelleştirmek için:
Cihaz şablonları sayfasında Sıcaklık Denetleyicisi cihaz şablonuna gidin.
getMaxMinReport (termostat1) için Get Max-Min report ifadesini termostat1 durum raporunu al ile değiştirin.
getMaxMinReport (thermostat2) için Get Max-Min report değeriniGet thermostat2 status report ile değiştirin.
Kaydetseçeneğini seçin.
Hedef Sıcaklık yazılabilir özelliklerinin IoT Central uygulamanızda nasıl görüntüleneceğini özelleştirmek için:
Cihaz şablonları sayfasında Sıcaklık Denetleyicisi cihaz şablonuna gidin.
targetTemperature (termostat1) için Hedef Sıcaklık değerini Hedef Sıcaklık (1) ile değiştirin.
targetTemperature (termostat2) için Hedef Sıcaklık değerini Hedef Sıcaklık (2) ile değiştirin.
Kaydetseçeneğini seçin.
Sıcaklık Denetleyicisi modelindeki termostat bileşenleri Hedef Sıcaklık yazılabilir özelliğini, cihaz şablonu ise Müşteri Adı bulut özelliğini içerir. Bir işlecin şu özellikleri düzenlemek için kullanabileceği bir görünüm oluşturun:
Görünümler'i ve ardından Düzenleme cihazı ve bulut verileri kutucuğunu seçin.
Form adı olarak Özellikler'i girin.
Hedef Sıcaklık (1), Hedef Sıcaklık (2) ve Müşteri Adı özelliklerini seçin. Ardından Bölüm ekle'yi seçin.
Değişikliklerinizi kaydedin.
Cihaz şablonunu yayımlama
Operatörün yaptığınız özelleştirmeleri görebilmesi ve kullanabilmesi için önce cihaz şablonunu yayımlamanız gerekir.
Thermostat cihaz şablonundan Yayımla'yı seçin. Bu cihaz şablonunu uygulama panelinde yayımla'yı seçin.
Operatör artık özellik değerlerini güncelleştirmek için Özellikler görünümünü kullanabilir ve cihaz komutları sayfasında Termostat1 durum raporunu al ve Termostat2 durumraporunu al adlı komutları çağırabilir:
Özellikler sayfasında yazılabilir özellik değerlerini güncelleştirin:
Komutlar sayfasından komutları çağırın. Durum raporu komutunu çalıştırırsanız, çalıştırmadan önce Since parametresi için bir tarih ve saat seçin:
Cihazın komutlara ve özellik güncelleştirmelerine nasıl yanıt verdiğini görebilirsiniz.
getMaxMinReport komut bileşenindedirthermostat2, reboot komut varsayılan bileşendedir.
targetTemperature bileşeni için thermostat2 yazılabilir özelliği ayarlandı.
Received command request for command name: thermostat2*getMaxMinReport
The command request payload is:
2021-03-26T06:00:00.000Z
Response to method: thermostat2*getMaxMinReport sent successfully.

...

Received command request for command name: reboot
The command request payload is:
10
Response to method: reboot sent successfully.

...

Received an update for device with value: {"thermostat2":{"targetTemperature":76,"__t":"c"},"$version":2}
Will update property: targetTemperature to value: 76 of component: thermostat2
Properties have been reported for component: thermostat2
Important
Bu makale, simetrik anahtar kimlik doğrulama olarak da adlandırılan paylaşılan erişim imzası kullanarak bir cihazı bağlama adımlarını içermektedir. Bu kimlik doğrulama yöntemi test ve değerlendirme için uygundur, ancak bir cihazı X.509 sertifikaları kullanarak doğrulamak daha güvenli bir yaklaşımdır. Daha fazla bilgi edinmek için bkz . IoT çözümleri > için en iyi güvenlik yöntemleri Bağlantı güvenliği.
Prerequisites
Bu makaledeki adımları tamamlamak için aşağıdaki kaynaklara ihtiyacınız vardır:
Etkin bir Azure aboneliği. Eğer bir Azure aboneliğiniz yoksa, başlamadan önce ücretsiz bir hesap oluşturun.
Özel uygulama şablonundan oluşturulan bir IoT Central uygulaması. Daha fazla bilgi edinmek için bkz. IoT Central uygulaması oluşturma ve Uygulamam hakkında nasıl bilgi alabilirim?.
Python yüklü bir geliştirme makinesi. Geçerli Python sürümü gereksinimleri için Azure IoT Python SDK'sını denetleyin. Sürümünüzü denetlemek için komut satırında komutunu çalıştırabilirsiniz
python --version. Python, çok çeşitli işletim sistemleri için kullanılabilir. Bu öğreticideki yönergelerde, Windows komut isteminde python komutunu çalıştırdığınız varsayılır.Örnek kodu içeren Python GitHub deposu için Microsoft Azure IoT SDK'sının yerel bir kopyası. Deponun bir kopyasını indirmek için bu bağlantıyı kullanın: ZIP'i indirin. Ardından dosyanın sıkıştırmasını yerel makinenizde uygun bir konuma çözün.
Kodu gözden geçirme
Daha önce indirdiğiniz Python için Microsoft Azure IoT SDK kopyasında azure-iot-sdk-python/samples/pnp/temp_controller_with_thermostats.py dosyasını bir metin düzenleyicisinde açın.
Örnek, birden çok bileşenli Sıcaklık Denetleyicisi Dijital İkiz Tanımlama Dili modelini uygular.
IoT Central'a bağlanmak için örneği çalıştırdığınızda, cihazı kaydetmek ve bir bağlantı dizesi oluşturmak için Cihaz Sağlama Hizmeti'ni (DPS) kullanır. Örnek, ihtiyaç duyduğu DPS bağlantı bilgilerini komut satırı ortamından alır.
İşlev main :
- Cihazı sağlamak için DPS kullanır. Sağlama bilgileri model kimlik numarasını içerir. IoT Central, bu cihaz için cihaz şablonunu tanımlamak veya oluşturmak için model kimliğini kullanır. Daha fazla bilgi edinmek için bkz. Cihaz şablonuna cihaz atama.
- Bir
Device_clientnesne oluşturur ve bağlantıyı açmadan önce model kimliğini ayarlardtmi:com:example:TemperatureController;2. - IoT Central'a ilk özellik değerlerini gönderir. Düzeltme eklerini oluşturmak için
pnp_helperöğesini kullanır. -
getMaxMinReportverebootkomutları için dinleyiciler oluşturur. Her termostat bileşeninin kendigetMaxMinReportkomutu vardır. - Yazılabilir özellik güncelleştirmelerini dinlemek için özellik dinleyicisi oluşturur.
- 8 saniyede bir, iki termostat bileşeninden sıcaklık telemetrisi ve varsayılan bileşenden çalışma seti telemetrisi göndermek için bir döngü başlatır.
async def main():
    switch = os.getenv("IOTHUB_DEVICE_SECURITY_TYPE")
    if switch == "DPS":
        provisioning_host = (
            os.getenv("IOTHUB_DEVICE_DPS_ENDPOINT")
            if os.getenv("IOTHUB_DEVICE_DPS_ENDPOINT")
            else "global.azure-devices-provisioning.net"
        )
        id_scope = os.getenv("IOTHUB_DEVICE_DPS_ID_SCOPE")
        registration_id = os.getenv("IOTHUB_DEVICE_DPS_DEVICE_ID")
        symmetric_key = os.getenv("IOTHUB_DEVICE_DPS_DEVICE_KEY")

        registration_result = await provision_device(
            provisioning_host, id_scope, registration_id, symmetric_key, model_id
        )

        if registration_result.status == "assigned":
            print("Device was assigned")
            print(registration_result.registration_state.assigned_hub)
            print(registration_result.registration_state.device_id)
            device_client = IoTHubDeviceClient.create_from_symmetric_key(
                symmetric_key=symmetric_key,
                hostname=registration_result.registration_state.assigned_hub,
                device_id=registration_result.registration_state.device_id,
                product_info=model_id,
            )
        else:
            raise RuntimeError(
                "Could not provision device. Aborting Plug and Play device connection."
            )

    elif switch == "connectionString":
        # ...

    # Connect the client.
    await device_client.connect()

    ################################################
    # Update readable properties from various components

    properties_root = pnp_helper.create_reported_properties(serialNumber=serial_number)
    properties_thermostat1 = pnp_helper.create_reported_properties(
        thermostat_1_component_name, maxTempSinceLastReboot=98.34
    )
    properties_thermostat2 = pnp_helper.create_reported_properties(
        thermostat_2_component_name, maxTempSinceLastReboot=48.92
    )
    properties_device_info = pnp_helper.create_reported_properties(
        device_information_component_name,
        swVersion="5.5",
        manufacturer="Contoso Device Corporation",
        model="Contoso 4762B-turbo",
        osName="Mac Os",
        processorArchitecture="x86-64",
        processorManufacturer="Intel",
        totalStorage=1024,
        totalMemory=32,
    )

    property_updates = asyncio.gather(
        device_client.patch_twin_reported_properties(properties_root),
        device_client.patch_twin_reported_properties(properties_thermostat1),
        device_client.patch_twin_reported_properties(properties_thermostat2),
        device_client.patch_twin_reported_properties(properties_device_info),
    )

    ################################################
    # Get all the listeners running
    print("Listening for command requests and property updates")

    global THERMOSTAT_1
    global THERMOSTAT_2
    THERMOSTAT_1 = Thermostat(thermostat_1_component_name, 10)
    THERMOSTAT_2 = Thermostat(thermostat_2_component_name, 10)

    listeners = asyncio.gather(
        execute_command_listener(
            device_client, method_name="reboot", user_command_handler=reboot_handler
        ),
        execute_command_listener(
            device_client,
            thermostat_1_component_name,
            method_name="getMaxMinReport",
            user_command_handler=max_min_handler,
            create_user_response_handler=create_max_min_report_response,
        ),
        execute_command_listener(
            device_client,
            thermostat_2_component_name,
            method_name="getMaxMinReport",
            user_command_handler=max_min_handler,
            create_user_response_handler=create_max_min_report_response,
        ),
        execute_property_listener(device_client),
    )

    ################################################
    # Function to send telemetry every 8 seconds

    async def send_telemetry():
        print("Sending telemetry from various components")

        while True:
            curr_temp_ext = random.randrange(10, 50)
            THERMOSTAT_1.record(curr_temp_ext)

            temperature_msg1 = {"temperature": curr_temp_ext}
            await send_telemetry_from_temp_controller(
                device_client, temperature_msg1, thermostat_1_component_name
            )

            curr_temp_int = random.randrange(10, 50)  # Current temperature in Celsius
            THERMOSTAT_2.record(curr_temp_int)

            temperature_msg2 = {"temperature": curr_temp_int}

            await send_telemetry_from_temp_controller(
                device_client, temperature_msg2, thermostat_2_component_name
            )

            workingset_msg3 = {"workingSet": random.randrange(1, 100)}
            await send_telemetry_from_temp_controller(device_client, workingset_msg3)

    send_telemetry_task = asyncio.ensure_future(send_telemetry())

    # ...
İşlev, provision_device cihazı hazırlamak ve IoT Central'a kaydetmek için DPS'i kullanır. Fonksiyon, IoT Central'ın cihaz şablonuna cihaz atamak için kullandığı cihaz modeli kimliğini provizyon yükünde içerir:
async def provision_device(provisioning_host, id_scope, registration_id, symmetric_key, model_id):
    provisioning_device_client = ProvisioningDeviceClient.create_from_symmetric_key(
        provisioning_host=provisioning_host,
        registration_id=registration_id,
        id_scope=id_scope,
        symmetric_key=symmetric_key,
    )

    provisioning_device_client.provisioning_payload = {"modelId": model_id}
    return await provisioning_device_client.register()
İşlev execute_command_listener komut isteklerini işler, cihaz termostat bileşenleri için max_min_handler komutunu aldığında getMaxMinReport işlevini ve reboot_handler komutunu aldığında reboot işlevini çalıştırır. Yanıtı oluşturmak için modülünü kullanır pnp_helper :
async def execute_command_listener(
    device_client,
    component_name=None,
    method_name=None,
    user_command_handler=None,
    create_user_response_handler=None,
):
    while True:
        if component_name and method_name:
            command_name = component_name + "*" + method_name
        elif method_name:
            command_name = method_name
        else:
            command_name = None

        command_request = await device_client.receive_method_request(command_name)
        print("Command request received with payload")
        values = command_request.payload
        print(values)

        if user_command_handler:
            await user_command_handler(values)
        else:
            print("No handler provided to execute")

        (response_status, response_payload) = pnp_helper.create_response_payload_with_status(
            command_request, method_name, create_user_response=create_user_response_handler
        )

        command_response = MethodResponse.create_from_method_request(
            command_request, response_status, response_payload
        )

        try:
            await device_client.send_method_response(command_response)
        except Exception:
            print("responding to the {command} command failed".format(command=method_name))
, async def execute_property_listener termostat bileşenleri gibi targetTemperature yazılabilir özellik güncelleştirmelerini işler ve JSON yanıtını oluşturur. Yanıtı oluşturmak için modülünü kullanır pnp_helper :
async def execute_property_listener(device_client):
    while True:
        patch = await device_client.receive_twin_desired_properties_patch()  # blocking call
        print(patch)
        properties_dict = pnp_helper.create_reported_properties_from_desired(patch)

        await device_client.patch_twin_reported_properties(properties_dict)
send_telemetry_from_temp_controller işlevi termostat bileşenlerinden ioT Central'a telemetri iletilerini gönderir. Mesajları oluşturmak için pnp_helper modülünü kullanır.
async def send_telemetry_from_temp_controller(device_client, telemetry_msg, component_name=None):
    msg = pnp_helper.create_telemetry(telemetry_msg, component_name)
    await device_client.send_message(msg)
    print("Sent message")
    print(msg)
    await asyncio.sleep(5)
Bağlantı bilgilerini alma
Bu öğreticinin ilerleyen bölümlerinde örnek cihaz uygulamasını çalıştırdığınızda aşağıdaki yapılandırma değerlerine ihtiyacınız vardır:
- Kimlik kapsamı: IoT Central uygulamanızda İzinler > Cihaz bağlantı grupları'na gidin. Kimlik kapsamı değerini not edin.
- Grup birincil anahtarı: IoT Central uygulamanızda İzinler > Cihaz bağlantı grupları > SAS-IoT-Devices'a gidin. Paylaşılan erişim imzası Birincil anahtar değerini not edin.
Aldığınız grup birincil anahtarından bir cihaz anahtarı oluşturmak için Azure Cloud Shell'i kullanın:
az extension add --name azure-iot
az iot central device compute-device-key --device-id sample-device-01 --pk <the group primary key value>
Oluşturulan cihaz anahtarını not edin, bu öğreticinin ilerleyen bölümlerinde bu anahtarı kullanacaksınız.
Note
Bu örneği çalıştırmak için cihazı IoT Central uygulamanıza önceden kaydetmeniz gerekmez. Örnek, cihazları ilk kez bağlandığında otomatik olarak kaydetmek için IoT Central özelliğini kullanır.
Kodu çalıştır
Örnek uygulamayı çalıştırmak için bir komut satırı ortamı açın ve temp_controller_with_thermostats.py örnek dosyasını içeren azure-iot-sdk-python-2/samples/pnp klasörüne gidin.
Örneği yapılandırmak için ortam değişkenlerini ayarlayın. Aşağıdaki kod parçacığı, Windows komut isteminde ortam değişkenlerinin nasıl ayarlandığını gösterir.
Bash kabuğu kullanıyorsanız, set komutlarını export komutlarıyla değiştirin.
set IOTHUB_DEVICE_SECURITY_TYPE=DPS
set IOTHUB_DEVICE_DPS_ID_SCOPE=<The ID scope you made a note of previously>
set IOTHUB_DEVICE_DPS_DEVICE_ID=sample-device-01
set IOTHUB_DEVICE_DPS_DEVICE_KEY=<The generated device key you made a note of previously>
set IOTHUB_DEVICE_DPS_ENDPOINT=global.azure-devices-provisioning.net
Gerekli paketleri yükleyin:
pip install azure-iot-device
Örneği çalıştırın:
python temp_controller_with_thermostats.py
Aşağıdaki çıkışta cihazın IoT Central'a kaydolması ve bağlanması gösterilmektedir. Örnek, telemetri göndermeye başlamadan önce iki termostat bileşeninin maxTempSinceLastReboot özelliklerini gönderir.
Device was assigned
iotc-60a.....azure-devices.net
sample-device-01
Updating pnp properties for root interface
{'serialNumber': 'alohomora'}
Updating pnp properties for thermostat1
{'thermostat1': {'maxTempSinceLastReboot': 98.34, '__t': 'c'}}
Updating pnp properties for thermostat2
{'thermostat2': {'maxTempSinceLastReboot': 48.92, '__t': 'c'}}
Updating pnp properties for deviceInformation
{'deviceInformation': {'swVersion': '5.5', 'manufacturer': 'Contoso Device Corporation', 'model': 'Contoso 4762B-turbo', 'osName': 'Mac Os', 'processorArchitecture': 'x86-64', 'processorManufacturer': 'Intel', 'totalStorage': 1024, 'totalMemory': 32, '__t': 'c'}}
Listening for command requests and property updates
Press Q to quit
Sending telemetry from various components
Sent message
{"temperature": 27}
Sent message
{"temperature": 17}
Sent message
{"workingSet": 13}
Azure IoT Central uygulamanızda bir operatör olarak şunları yapabilirsiniz:
genel bakış sayfasında iki termostat bileşeni tarafından gönderilen telemetriyi görüntüleyin:
Hakkında sayfasında cihaz özelliklerini görüntüleyin. Bu sayfada cihaz bilgileri bileşeni ve iki termostat bileşeninden alınan özellikler gösterilir:
Cihaz şablonunu özelleştirme
Çözüm geliştiricisi olarak, sıcaklık denetleyicisi cihazı bağlandığında IoT Central'ın otomatik olarak oluşturduğu cihaz şablonunu özelleştirebilirsiniz.
Cihazla ilişkili müşteri adını depolamak üzere bir bulut özelliği eklemek için:
IoT Central uygulamanızda, Cihaz şablonları sayfasında Sıcaklık Denetleyicisi cihaz şablonuna gidin.
Sıcaklık Denetleyicisi modelinde +Yetenek ekle'yi seçin.
Müşteri adı olarak Görünen ad girin, Cloud özelliği olarak yetenek türü seçin, girdiyi genişletin ve String olarak Şema seçin. Ardından Kaydet'i seçin.
IoT Central uygulamanızda Get Max-Min raporu komutlarının nasıl görüntüleneceğini özelleştirmek için:
Cihaz şablonları sayfasında Sıcaklık Denetleyicisi cihaz şablonuna gidin.
getMaxMinReport (termostat1) için Get Max-Min report ifadesini termostat1 durum raporunu al ile değiştirin.
getMaxMinReport (thermostat2) için Get Max-Min report değeriniGet thermostat2 status report ile değiştirin.
Kaydetseçeneğini seçin.
Hedef Sıcaklık yazılabilir özelliklerinin IoT Central uygulamanızda nasıl görüntüleneceğini özelleştirmek için:
Cihaz şablonları sayfasında Sıcaklık Denetleyicisi cihaz şablonuna gidin.
targetTemperature (termostat1) için Hedef Sıcaklık değerini Hedef Sıcaklık (1) ile değiştirin.
targetTemperature (termostat2) için Hedef Sıcaklık değerini Hedef Sıcaklık (2) ile değiştirin.
Kaydetseçeneğini seçin.
Sıcaklık Denetleyicisi modelindeki termostat bileşenleri Hedef Sıcaklık yazılabilir özelliğini, cihaz şablonu ise Müşteri Adı bulut özelliğini içerir. Bir işlecin şu özellikleri düzenlemek için kullanabileceği bir görünüm oluşturun:
Görünümler'i ve ardından Düzenleme cihazı ve bulut verileri kutucuğunu seçin.
Form adı olarak Özellikler'i girin.
Hedef Sıcaklık (1), Hedef Sıcaklık (2) ve Müşteri Adı özelliklerini seçin. Ardından Bölüm ekle'yi seçin.
Değişikliklerinizi kaydedin.
Cihaz şablonunu yayımlama
Operatörün yaptığınız özelleştirmeleri görebilmesi ve kullanabilmesi için önce cihaz şablonunu yayımlamanız gerekir.
Thermostat cihaz şablonundan Yayımla'yı seçin. Bu cihaz şablonunu uygulama panelinde yayımla'yı seçin.
Operatör artık özellik değerlerini güncelleştirmek için Özellikler görünümünü kullanabilir ve cihaz komutları sayfasında Termostat1 durum raporunu al ve Termostat2 durumraporunu al adlı komutları çağırabilir:
Özellikler sayfasında yazılabilir özellik değerlerini güncelleştirin:
Komutlar sayfasından komutları çağırın. Durum raporu komutunu çalıştırırsanız, çalıştırmadan önce Since parametresi için bir tarih ve saat seçin:
Cihazın komutlara ve özellik güncelleştirmelerine nasıl yanıt verdiğini görebilirsiniz:
{'thermostat1': {'targetTemperature': 67, '__t': 'c'}, '$version': 2}
the data in the desired properties patch was: {'thermostat1': {'targetTemperature': 67, '__t': 'c'}, '$version': 2}
Values received are :-
{'targetTemperature': 67, '__t': 'c'}
Sent message

...

Command request received with payload
2021-03-31T05:00:00.000Z
Will return the max, min and average temperature from the specified time 2021-03-31T05:00:00.000Z to the current time
Done generating
{"avgTemp": 4.0, "endTime": "2021-03-31T12:29:48.322427", "maxTemp": 18, "minTemp": null, "startTime": "2021-03-31T12:28:28.322381"}
Ham verileri görüntüleme
Cihazınızın IoT Central'a gönderdiği ham verileri incelemek için Ham veri görünümünü kullanabilirsiniz:

Bu görünümde, görüntülenecek sütunları seçebilir ve görüntülenecek bir zaman aralığı ayarlayabilirsiniz. Modellenmemiş veri sütunu, cihaz şablonundaki hiçbir özellik veya telemetri tanımıyla eşleşmeyen cihaz verilerini gösterir.
Kaynakları temizle
Daha fazla IoT Central hızlı başlangıcını veya öğreticisini tamamlamayı planlamıyorsanız IoT Central uygulamanızı silebilirsiniz:
- IoT Central uygulamanızda Uygulama > Yönetimi'ne gidin.
- Sil'i seçin ve eyleminizi onaylayın.
Sonraki Adımlar
IoT Central öğreticileri kümesine devam etmek ve IoT Central çözümü oluşturma hakkında daha fazla bilgi edinmek isterseniz bkz: