ŞUNLAR IÇIN GEÇERLIDIR:  Python SDK'sı azure-ai-ml v2 (geçerli)
Bu makalede, Azure Machine Learning'de otomatik makine öğrenmesinden (AutoML) oluşturulan görüntü işleme modelleriyle ilgili tahminlerde bulunmak için Açık Sinir Ağı Değişimi'ni (ONNX) kullanmayı öğreneceksiniz.
Tahminler için ONNX kullanmak için şunları yapmanız gerekir:
- AutoML eğitim çalıştırmasından ONNX model dosyalarını indirin.
- ONNX modelinin girişlerini ve çıkışlarını anlama.
- Giriş görüntüleri için gerekli biçimde olması için verilerinizi önceden işleyin.
- Python için ONNX Çalışma Zamanı ile çıkarım yapın.
- Nesne algılama ve örnek segmentasyon görevleri için tahminleri görselleştirin.
ONNX , makine öğrenmesi ve derin öğrenme modelleri için açık bir standarttır. Popüler yapay zeka çerçevelerinde model içeri ve dışarı aktarma (birlikte çalışabilirlik) sağlar. Diğer ayrıntılar için ONNX GitHub projesini keşfedin.
ONNX Çalışma Zamanı , platformlar arası çıkarımları destekleyen açık kaynaklı bir projedir. ONNX Çalışma Zamanı, programlama dilleri (Python, C++, C#, C, Java ve JavaScript dahil) genelinde API'ler sağlar. Giriş görüntülerinde çıkarım yapmak için bu API'leri kullanabilirsiniz. ONNX biçimine aktarılmış olan modeli aldıktan sonra, bu API'leri projenizin ihtiyaç duyduğu herhangi bir programlama dilinde kullanabilirsiniz.
Bu kılavuzda, popüler görüntü işleme görevleri için görüntülerle ilgili tahminlerde bulunmak üzere ONNX Çalışma Zamanı için Python API'lerini kullanmayı öğreneceksiniz. Bu ONNX dışarı aktarılan modelleri farklı dillerde kullanabilirsiniz.
Önkoşullar
Desteklenen görüntü görevlerinden herhangi biri için AutoML tarafından eğitilen bir görüntü işleme modeli alın: sınıflandırma, nesne algılama veya örnek segmentasyonu.
Görüntü işleme görevleri için AutoML desteği hakkında daha fazla bilgi edinin.
onnxruntime paketini yükleyin. Bu makaledeki yöntemler 1.3.0 ile 1.8.0 sürümleriyle test edilmiştir.
ONNX model dosyalarını indirme
Azure Machine Learning stüdyosu kullanıcı arabirimini veya Azure Machine Learning Python SDK'sını kullanarak AutoML çalıştırmalarından ONNX model dosyalarını indirebilirsiniz. Deneme adı ve üst çalıştırma kimliği ile SDK aracılığıyla indirmenizi öneririz.
Azure Machine Learning Studio
Azure Machine Learning stüdyosu, eğitim not defterinde oluşturulan denemenin köprüsüni kullanarak veya Varlıklar altındaki Denemeler sekmesinde deneme adını seçerek denemenize gidin. Ardından en iyi alt çalıştırmayı seçin.
En iyi alt çalıştırmada Outputs+logs> gidin.
Aşağıdaki dosyaları el ile indirmek için İndir düğmesini kullanın:
-
labels.json: Eğitim veri kümesindeki tüm sınıfları veya etiketleri içeren dosya.
-
model.onnx: ONNX biçimindeki model.
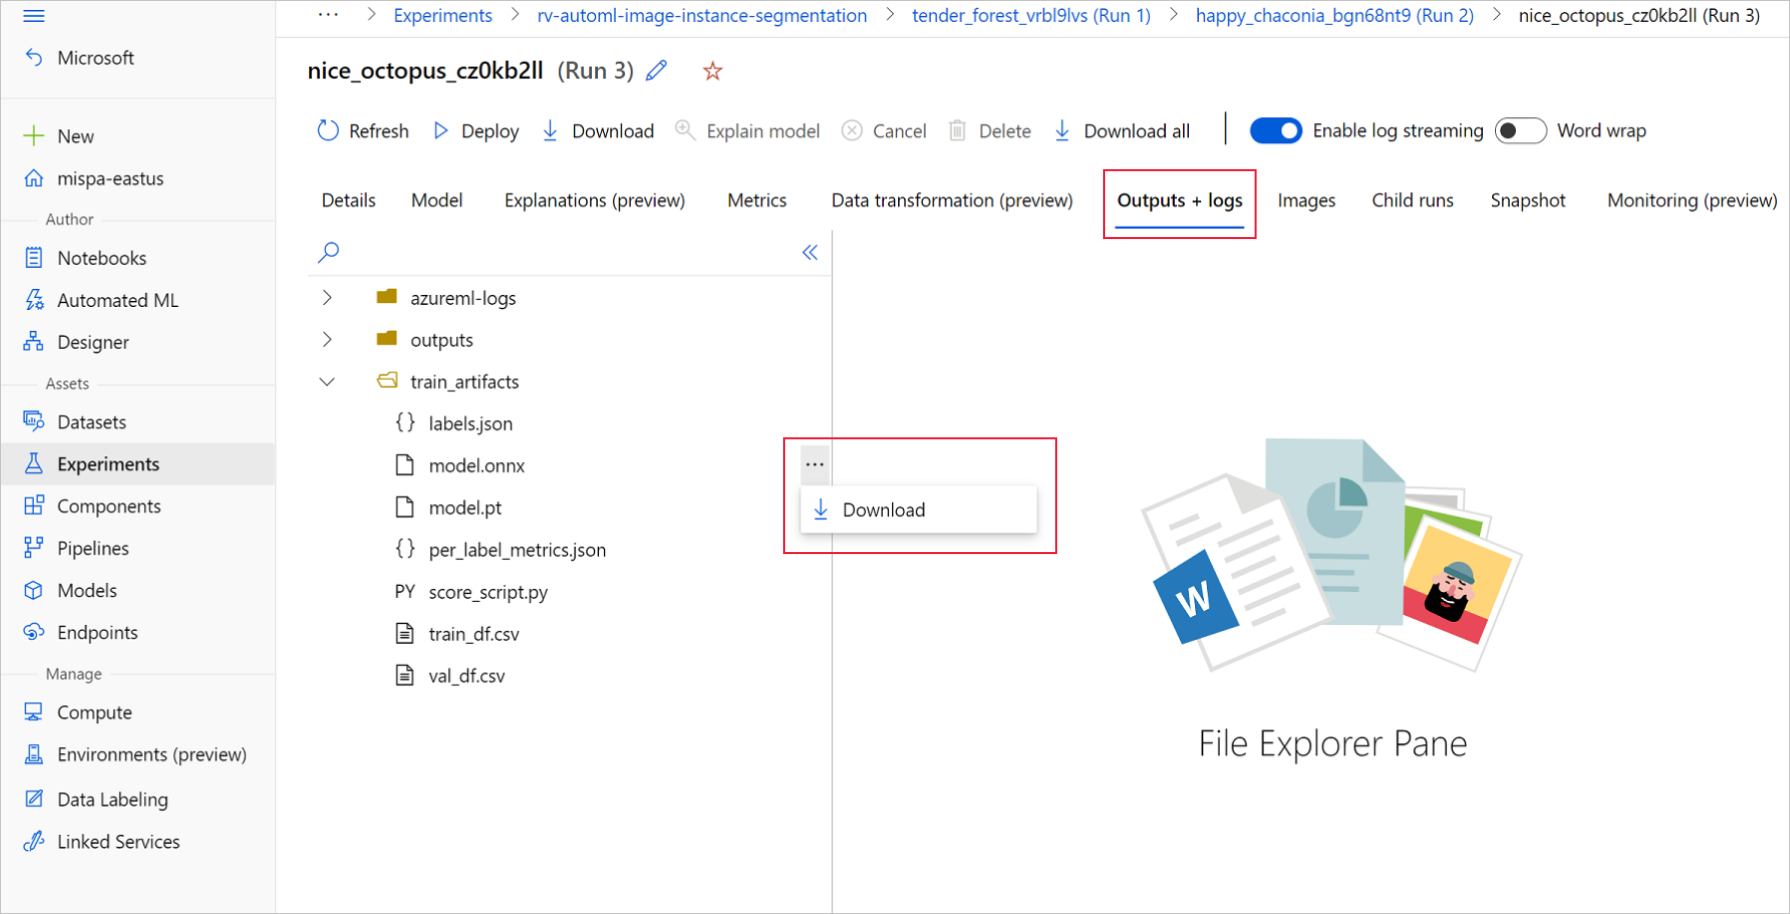
İndirilen model dosyalarını bir dizine kaydedin. Bu makaledeki örnekte ./automl_models dizini kullanılır.
Azure Machine Learning Python SDK'sı
SDK ile deneme adı ve üst çalıştırma kimliğiyle en iyi alt çalıştırmayı (birincil ölçüme göre) seçebilirsiniz. Ardından labels.json ve model.onnx dosyalarını indirebilirsiniz.
Aşağıdaki kod, ilgili birincil ölçüme göre en iyi alt çalıştırmayı döndürür.
from azure.identity import DefaultAzureCredential
from azure.ai.ml import MLClient
mlflow_client = MlflowClient()

credential = DefaultAzureCredential()
ml_client = None
try:
    ml_client = MLClient.from_config(credential)
except Exception as ex:
    print(ex)
    # Enter details of your Azure Machine Learning workspace
    subscription_id = ''
    resource_group = ''
    workspace_name = ''
    ml_client = MLClient(credential, subscription_id, resource_group, workspace_name)
import mlflow
from mlflow.tracking.client import MlflowClient

# Obtain the tracking URL from MLClient
MLFLOW_TRACKING_URI = ml_client.workspaces.get(
    name=ml_client.workspace_name
).mlflow_tracking_uri

mlflow.set_tracking_uri(MLFLOW_TRACKING_URI)

# Specify the job name
job_name = ''

# Get the parent run
mlflow_parent_run = mlflow_client.get_run(job_name)
best_child_run_id = mlflow_parent_run.data.tags['automl_best_child_run_id']
# get the best child run
best_run = mlflow_client.get_run(best_child_run_id)
Eğitim veri kümesindeki tüm sınıfları ve etiketleri içeren labels.json dosyasını indirin.
local_dir = './automl_models'
if not os.path.exists(local_dir):
    os.mkdir(local_dir)

labels_file = mlflow_client.download_artifacts(
    best_run.info.run_id, 'train_artifacts/labels.json', local_dir
)
model.onnx dosyasını indirin.
onnx_model_path = mlflow_client.download_artifacts(
    best_run.info.run_id, 'train_artifacts/model.onnx', local_dir
)
ONNX modelleri kullanılarak Nesne Algılama ve Örnek Segmentasyonu için toplu çıkarım olması durumunda, toplu puanlama için model oluşturma bölümüne bakın.
Toplu puanlama için model oluşturma
Varsayılan olarak, Görüntüler için AutoML sınıflandırma için toplu puanlama işlemini destekler. Ancak nesne algılama ve örnek segmentasyonu ONNX modelleri toplu çıkarım desteği sunmaz. Nesne algılama ve örnek segmentasyonu için toplu çıkarım durumunda, gerekli toplu iş boyutu için bir ONNX modeli oluşturmak üzere aşağıdaki yordamı kullanın. Belirli bir toplu iş boyutu için oluşturulan modeller diğer toplu iş boyutları için çalışmaz.
Conda ortam dosyasını indirin ve komut işiyle kullanılacak bir ortam nesnesi oluşturun.
#  Download conda file and define the environment

conda_file = mlflow_client.download_artifacts(
    best_run.info.run_id, "outputs/conda_env_v_1_0_0.yml", local_dir
)
from azure.ai.ml.entities import Environment
env = Environment(
    name="automl-images-env-onnx",
    description="environment for automl images ONNX batch model generation",
    image="mcr.microsoft.com/azureml/openmpi4.1.0-cuda11.1-cudnn8-ubuntu18.04",
    conda_file=conda_file,
)
Betiği göndermek için aşağıdaki modele özgü bağımsız değişkenleri kullanın. Bağımsız değişkenler hakkında daha fazla ayrıntı için modele özgü hiper parametrelere ve desteklenen nesne algılama modeli adları için desteklenen model mimarisi bölümüne bakın.
Toplu puanlama modelini oluşturmak için gereken bağımsız değişken değerlerini almak için AutoML eğitim çalıştırmalarının outputs klasöründe oluşturulan puanlama betiklerine bakın. En iyi alt çalıştırma için puanlama dosyasının içindeki model ayarları değişkeninde bulunan hiper parametre değerlerini kullanın.
Çok sınıflı görüntü sınıflandırması için, en iyi alt çalıştırma için oluşturulan ONNX modeli varsayılan olarak toplu puanlama desteği sunar. Bu nedenle, bu görev türü için modele özgü bağımsız değişkenler gerekmez ve Etiketleri ve ONNX model dosyalarını yükleme bölümüne atlayabilirsiniz.
Çok etiketli görüntü sınıflandırması için en iyi alt çalıştırma için oluşturulan ONNX modeli varsayılan olarak toplu puanlama desteği sunar. Bu nedenle, bu görev türü için modele özgü bağımsız değişkenler gerekmez ve Etiketleri ve ONNX model dosyalarını yükleme bölümüne atlayabilirsiniz.
inputs = {'model_name': 'fasterrcnn_resnet34_fpn',  # enter the faster rcnn or retinanet model name
         'batch_size': 8,  # enter the batch size of your choice
         'height_onnx': 600,  # enter the height of input to ONNX model
         'width_onnx': 800,  # enter the width of input to ONNX model
         'job_name': job_name,
         'task_type': 'image-object-detection',
         'min_size': 600,  # minimum size of the image to be rescaled before feeding it to the backbone
         'max_size': 1333,  # maximum size of the image to be rescaled before feeding it to the backbone
         'box_score_thresh': 0.3,  # threshold to return proposals with a classification score > box_score_thresh
         'box_nms_thresh': 0.5,  # NMS threshold for the prediction head
         'box_detections_per_img': 100   # maximum number of detections per image, for all classes
         }
inputs = {'model_name': 'yolov5',  # enter the yolo model name
          'batch_size': 8,  # enter the batch size of your choice
          'height_onnx': 640,  # enter the height of input to ONNX model
          'width_onnx': 640,  # enter the width of input to ONNX model
          'job_name': job_name,
          'task_type': 'image-object-detection',
          'img_size': 640,  # image size for inference
          'model_size': 'small',  # size of the yolo model
          'box_score_thresh': 0.1,  # threshold to return proposals with a classification score > box_score_thresh
          'box_iou_thresh': 0.5
        }
inputs = {'model_name': 'maskrcnn_resnet50_fpn',  # enter the maskrcnn model name
         'batch_size': 8,  # enter the batch size of your choice
         'height_onnx': 600,  # enter the height of input to ONNX model
         'width_onnx': 800,  # enter the width of input to ONNX model
         'job_name': job_name,
         'task_type': 'image-instance-segmentation',
         'min_size': 600,  # minimum size of the image to be rescaled before feeding it to the backbone
         'max_size': 1333,  # maximum size of the image to be rescaled before feeding it to the backbone
         'box_score_thresh': 0.3,  # threshold to return proposals with a classification score > box_score_thresh
         'box_nms_thresh': 0.5,  # NMS threshold for the prediction head
         'box_detections_per_img': 100  # maximum number of detections per image, for all classes
         }
Betiği göndermek için dosyayı indirin ve geçerli dizinde tutun ONNX_batch_model_generator_automl_for_images.py . Aşağıdaki komut işini kullanarak azureml-examples GitHub deposundaONNX_batch_model_generator_automl_for_images.pybetiği göndererek belirli bir toplu iş boyutuna sahip bir ONNX modeli oluşturun. Aşağıdaki kodda eğitilen model ortamı, ONNX modelini oluşturmak ve outputs dizinine kaydetmek üzere bu betiği göndermek için kullanılır.
Çok sınıflı görüntü sınıflandırması için, en iyi alt çalıştırma için oluşturulan ONNX modeli varsayılan olarak toplu puanlama desteği sunar. Bu nedenle, bu görev türü için modele özgü bağımsız değişkenler gerekmez ve Etiketleri ve ONNX model dosyalarını yükleme bölümüne atlayabilirsiniz.
Çok etiketli görüntü sınıflandırması için en iyi alt çalıştırma için oluşturulan ONNX modeli varsayılan olarak toplu puanlama desteği sunar. Bu nedenle, bu görev türü için modele özgü bağımsız değişkenler gerekmez ve Etiketleri ve ONNX model dosyalarını yükleme bölümüne atlayabilirsiniz.
from azure.ai.ml import command

job = command(
    code="./onnx_generator_files",  # local path where the code is stored
    command="python ONNX_batch_model_generator_automl_for_images.py --model_name ${{inputs.model_name}} --batch_size ${{inputs.batch_size}} --height_onnx ${{inputs.height_onnx}} --width_onnx ${{inputs.width_onnx}} --job_name ${{inputs.job_name}} --task_type ${{inputs.task_type}} --min_size ${{inputs.min_size}} --max_size ${{inputs.max_size}} --box_score_thresh ${{inputs.box_score_thresh}} --box_nms_thresh ${{inputs.box_nms_thresh}} --box_detections_per_img ${{inputs.box_detections_per_img}}",
    inputs=inputs,
    environment=env,
    compute=compute_name,
    display_name="ONNX-batch-model-generation-rcnn",
    description="Use the PyTorch to generate ONNX batch scoring model.",
)
returned_job = ml_client.create_or_update(job)
ml_client.jobs.stream(returned_job.name)
from azure.ai.ml import command

job = command(
    code="./onnx_generator_files",  # local path where the code is stored
    command="python ONNX_batch_model_generator_automl_for_images.py --model_name ${{inputs.model_name}} --batch_size ${{inputs.batch_size}} --height_onnx ${{inputs.height_onnx}} --width_onnx ${{inputs.width_onnx}} --job_name ${{inputs.job_name}} --task_type ${{inputs.task_type}} --img_size ${{inputs.img_size}} --model_size ${{inputs.model_size}} --box_score_thresh ${{inputs.box_score_thresh}} --box_iou_thresh ${{inputs.box_iou_thresh}}",
    inputs=inputs,
    environment=env,
    compute=compute_name,
    display_name="ONNX-batch-model-generation",
    description="Use the PyTorch to generate ONNX batch scoring model.",
)
returned_job = ml_client.create_or_update(job)
ml_client.jobs.stream(returned_job.name)
from azure.ai.ml import command

job = command(
    code="./onnx_generator_files",  # local path where the code is stored
    command="python ONNX_batch_model_generator_automl_for_images.py --model_name ${{inputs.model_name}} --batch_size ${{inputs.batch_size}} --height_onnx ${{inputs.height_onnx}} --width_onnx ${{inputs.width_onnx}} --job_name ${{inputs.job_name}} --task_type ${{inputs.task_type}} --min_size ${{inputs.min_size}} --max_size ${{inputs.max_size}} --box_score_thresh ${{inputs.box_score_thresh}} --box_nms_thresh ${{inputs.box_nms_thresh}} --box_detections_per_img ${{inputs.box_detections_per_img}}",
    inputs=inputs,
    environment=env,
    compute=compute_name,
    display_name="ONNX-batch-model-generation-maskrcnn",
    description="Use the PyTorch to generate ONNX batch scoring model.",
)
returned_job = ml_client.create_or_update(job)
ml_client.jobs.stream(returned_job.name)
Toplu iş modeli oluşturulduktan sonra, kullanıcı arabirimi aracılığıyla outputs+logs> el ile indirin veya aşağıdaki yöntemi kullanın:
batch_size = 8  # use the batch size used to generate the model
returned_job_run = mlflow_client.get_run(returned_job.name)

# Download run's artifacts/outputs
onnx_model_path = mlflow_client.download_artifacts(
    returned_job_run.info.run_id, 'outputs/model_'+str(batch_size)+'.onnx', local_dir
)
Model indirme adımından sonra, model.onnx dosyasını kullanarak çıkarım yapmak için ONNX Çalışma Zamanı Python paketini kullanırsınız. Tanıtım amacıyla, bu makalede her görüntü işleme görevi için görüntü veri kümelerini hazırlama başlığı altında yer alan veri kümeleri kullanılır.
ONNX model çıkarımı göstermek için ilgili veri kümeleriyle tüm görüntü işleme görevleri için modelleri eğittik.
Etiketleri ve ONNX model dosyalarını yükleme
Aşağıdaki kod parçacığı, sınıf adlarının sıralandığı labels.json yükler. Yani, ONNX modeli bir etiket kimliğini 2 olarak tahmin ederse, labels.json dosyasındaki üçüncü dizinde verilen etiket adına karşılık gelir.
import json
import onnxruntime

labels_file = "automl_models/labels.json"
with open(labels_file) as f:
    classes = json.load(f)
print(classes)
try:
    session = onnxruntime.InferenceSession(onnx_model_path)
    print("ONNX model loaded...")
except Exception as e:
    print("Error loading ONNX file: ", str(e))
Modele sahip olduğunuzda, modele ve göreve özgü bazı ayrıntıları bilmeniz önemlidir. Bu ayrıntılar arasında giriş sayısı ve çıkış sayısı, görüntüyü ön işleme için beklenen giriş şekli veya biçimi ve modele özgü veya göreve özgü çıkışları bilmeniz için çıkış şekli yer alır.
sess_input = session.get_inputs()
sess_output = session.get_outputs()
print(f"No. of inputs : {len(sess_input)}, No. of outputs : {len(sess_output)}")

for idx, input_ in enumerate(range(len(sess_input))):
    input_name = sess_input[input_].name
    input_shape = sess_input[input_].shape
    input_type = sess_input[input_].type
    print(f"{idx} Input name : { input_name }, Input shape : {input_shape}, \
    Input type  : {input_type}")

for idx, output in enumerate(range(len(sess_output))):
    output_name = sess_output[output].name
    output_shape = sess_output[output].shape
    output_type = sess_output[output].type
    print(f" {idx} Output name : {output_name}, Output shape : {output_shape}, \
    Output type  : {output_type}")
Her ONNX modelinin önceden tanımlanmış bir giriş ve çıkış biçimleri kümesi vardır.
Bu örnek, ONNX modeli çıkarımını açıklamak için 134 görüntü ve 4 sınıf/etiket içeren buzdolabıObjects veri kümesinde eğitilen modeli uygular. Görüntü sınıflandırma görevini eğitma hakkında daha fazla bilgi için çok sınıflı görüntü sınıflandırma not defterine bakın.
Giriş, önceden işlenmiş bir görüntüdür.
| Giriş adı |
Giriş şekli |
Giriş türü |
Açıklama |
| giriş1 |
(batch_size, num_channels, height, width) |
ndarray(float) |
Giriş, toplu iş boyutu 1 olan (1, 3, 224, 224) , yüksekliği ve genişliği 224 olan önceden işlenmiş bir görüntüdür. Bu sayılar, eğitim örneğinde için crop_size kullanılan değerlere karşılık gelir. |
Çıkış, tüm sınıflar/etiketler için bir logit dizisidir.
| Çıkış adı |
Çıkış şekli |
Çıkış türü |
Açıklama |
| çıkış1 |
(batch_size, num_classes) |
ndarray(float) |
Model logit'leri (olmadan softmax) döndürür. Örneğin, toplu iş boyutu 1 ve 4 sınıfları için döndürür (1, 4). |
Bu örnekte, ONNX modeli çıkarımını açıklamak için 128 görüntü ve 4 sınıf/etiket içeren çok etiketli buzdolabıObjects veri kümesinde eğitilen model kullanılır. Çok etiketli görüntü sınıflandırması için model eğitimi hakkında daha fazla bilgi için çok etiketli görüntü sınıflandırma not defterine bakın.
Giriş, önceden işlenmiş bir görüntüdür.
| Giriş adı |
Giriş şekli |
Giriş türü |
Açıklama |
| giriş1 |
(batch_size, num_channels, height, width) |
ndarray(float) |
Giriş, toplu iş boyutu 1 olan (1, 3, 224, 224) , yüksekliği ve genişliği 224 olan önceden işlenmiş bir görüntüdür. Bu sayılar, eğitim örneğinde için crop_size kullanılan değerlere karşılık gelir. |
Çıkış, tüm sınıflar/etiketler için bir logit dizisidir.
| Çıkış adı |
Çıkış şekli |
Çıkış türü |
Açıklama |
| çıkış1 |
(batch_size, num_classes) |
ndarray(float) |
Model logit'leri (olmadan sigmoid) döndürür. Örneğin, toplu iş boyutu 1 ve 4 sınıfları için döndürür (1, 4). |
Bu nesne algılama örneği, ONNX modeli çıkarımını açıklamak için 128 görüntü ve 4 sınıf/etiket içeren buzdolabıNesne algılama veri kümesinde eğitilen modeli kullanır. Bu örnek, çıkarım adımlarını göstermek için Daha Hızlı R-CNN modellerini eğitmektedir. Nesne algılama modellerini eğitma hakkında daha fazla bilgi için bkz . Nesne algılama not defteri.
Giriş, önceden işlenmiş bir görüntüdür.
| Giriş adı |
Giriş şekli |
Giriş türü |
Açıklama |
| Giriş |
(batch_size, num_channels, height, width) |
ndarray(float) |
Giriş, toplu iş boyutu 1, (1, 3, 600, 800) yüksekliği 600 ve genişliği 800 olan önceden işlenmiş bir görüntüdür. |
Çıkış, ve tahminlerinin output_names bir tanımlama grubudur.
output_names Burada ve predictions her birinin uzunluğu 3*batch_size olan listelerdir. Daha Hızlı R-CNN çıkış sırası kutular, etiketler ve puanlarken RetinaNet çıkışları kutular, puanlar, etiketlerdir.
| Çıkış adı |
Çıkış şekli |
Çıkış türü |
Açıklama |
output_names |
(3*batch_size) |
Anahtar listesi |
2 toplu iş boyutu için output_names['boxes_0', 'labels_0', 'scores_0', 'boxes_1', 'labels_1', 'scores_1'] |
predictions |
(3*batch_size) |
Ndarray(float) listesi |
2 toplu iş boyutu için şeklini predictions[(n1_boxes, 4), (n1_boxes), (n1_boxes), (n2_boxes, 4), (n2_boxes), (n2_boxes)]alır. Burada, her dizindeki değerler içindeki output_namesaynı dizine karşılık gelir. |
Aşağıdaki tabloda, resim toplu işlerindeki her örnek için döndürülen kutular, etiketler ve puanlar açıklanmaktadır.
| Veri Akışı Adı |
Şekil |
Türü |
Açıklama |
| Kutular |
(n_boxes, 4), her kutunun x_min, y_min, x_max, y_max |
ndarray(float) |
Model, sol üst ve sağ alt koordinatlarına sahip n kutu döndürür. |
| Etiketler |
(n_boxes) |
ndarray(float) |
Her kutudaki bir nesnenin etiket veya sınıf kimliği. |
| Notalar |
(n_boxes) |
ndarray(float) |
Her kutudaki bir nesnenin güvenilirlik puanı. |
Bu nesne algılama örneği, ONNX modeli çıkarımını açıklamak için 128 görüntü ve 4 sınıf/etiket içeren buzdolabıNesne algılama veri kümesinde eğitilen modeli kullanır. Bu örnek, ÇıKARıM adımlarını göstermek için YOLO modellerini eğitmektedir. Nesne algılama modellerini eğitma hakkında daha fazla bilgi için bkz . Nesne algılama not defteri.
Giriş, toplu iş boyutu 1 olan (1, 3, 640, 640) , yüksekliği ve genişliği 640 olan önceden işlenmiş bir görüntüdür. Bu sayılar eğitim örneğinde kullanılan değerlere karşılık gelir.
| Giriş adı |
Giriş şekli |
Giriş türü |
Açıklama |
| Giriş |
(batch_size, num_channels, height, width) |
ndarray(float) |
Giriş, toplu (1, 3, 640, 640) iş boyutu 1, yüksekliği 640 ve genişliği 640 olan önceden işlenmiş bir görüntüdür. |
ONNX modeli tahminleri birden çok çıkış içerir. İlk çıkış, algılamalar için en yüksek olmayan gizlemeyi gerçekleştirmek için gereklidir. Kullanım kolaylığı için otomatik ML, NMS postprocessing adımından sonra çıkış biçimini görüntüler. NMS'nin ardından gelen çıkış, toplu işlemdeki her bir örneğin kutu, etiket ve puan listesidir.
| Çıkış adı |
Çıkış şekli |
Çıkış türü |
Açıklama |
| Çıktı |
(batch_size) |
Ndarray(float) listesi |
Model, toplu iş içindeki her örnek için kutu algılamalarını döndürür |
Listedeki her hücre, her kutuda bulunan şekli (n_boxes, 6)olan bir örneğin kutu x_min, y_min, x_max, y_max, confidence_score, class_idalgılamalarını gösterir.
Bu örnek segmentasyonu örneği için, ONNX modeli çıkarımını açıklamak için 128 görüntü ve 4 sınıf/etiket içeren fridgeObjects veri kümesinde eğitilen R-CNN Maskeleme modelini kullanırsınız. Örnek segmentasyon modelinin eğitimi hakkında daha fazla bilgi için örnek segmentasyonu not defterine bakın.
Önemli
Örnek segmentasyon görevleri için yalnızca Maske R-CNN desteklenir. Giriş ve çıkış biçimleri yalnızca Maske R-CNN'sini temel alır.
Giriş, önceden işlenmiş bir görüntüdür. Maske R-CNN için ONNX modeli, farklı şekillerdeki görüntülerle çalışmak üzere dışarı aktarılmıştır. Daha iyi performans için bunları eğitim görüntüsü boyutlarıyla tutarlı sabit bir boyuta yeniden boyutlandırmanızı öneririz.
| Giriş adı |
Giriş şekli |
Giriş türü |
Açıklama |
| Giriş |
(batch_size, num_channels, height, width) |
ndarray(float) |
Giriş, (1, 3, input_image_height, input_image_width) toplu iş boyutu 1 olan, giriş görüntüsüne benzer yükseklik ve genişlik içeren önceden işlenmiş bir görüntüdür. |
Çıkış, ve tahminlerinin output_names bir tanımlama grubudur.
output_names Burada ve predictions her birinin uzunluğu 4*batch_size olan listelerdir.
| Çıkış adı |
Çıkış şekli |
Çıkış türü |
Açıklama |
output_names |
(4*batch_size) |
Anahtar listesi |
2 toplu iş boyutu için output_names['boxes_0', 'labels_0', 'scores_0', 'masks_0', 'boxes_1', 'labels_1', 'scores_1', 'masks_1'] |
predictions |
(4*batch_size) |
Ndarray(float) listesi |
2 toplu iş boyutu için şeklini predictions[(n1_boxes, 4), (n1_boxes), (n1_boxes), (n1_boxes, 1, height_onnx, width_onnx), (n2_boxes, 4), (n2_boxes), (n2_boxes), (n2_boxes, 1, height_onnx, width_onnx)]alır. Burada, her dizindeki değerler içindeki output_namesaynı dizine karşılık gelir. |
| Veri Akışı Adı |
Şekil |
Türü |
Açıklama |
| Kutular |
(n_boxes, 4), her kutunun x_min, y_min, x_max, y_max |
ndarray(float) |
Model, sol üst ve sağ alt koordinatlarına sahip n kutu döndürür. |
| Etiketler |
(n_boxes) |
ndarray(float) |
Her kutudaki bir nesnenin etiket veya sınıf kimliği. |
| Notalar |
(n_boxes) |
ndarray(float) |
Her kutudaki bir nesnenin güvenilirlik puanı. |
| Maske |
(n_boxes, 1, height_onnx, width_onnx) |
ndarray(float) |
Bir giriş görüntüsünün şekil yüksekliği ve genişliği ile algılanan nesnelerin maskeleri (çokgenler). |
Ön
ONNX modeli çıkarımı için aşağıdaki ön işleme adımlarını gerçekleştirin:
- Görüntüyü RGB'ye dönüştürün.
- Eğitim sırasında doğrulama veri kümesinin dönüşümünde kullanılan değerlere karşılık gelen ve
valid_resize_size değerlerinin görüntüsünü valid_resize_size yeniden boyutlandırın. için valid_resize_size varsayılan değer 256'dır.
- Ortala resmi ve
height_onnx_crop_sizeolarak width_onnx_crop_size kırpın. Varsayılan değer olan 224'e valid_crop_size karşılık gelir.
-
HxWxC değerini CxHxW olarak değiştirin.
- Float türüne dönüştürün.
- ImageNet'ler
mean = [0.485, 0.456, 0.406] ve std = [0.229, 0.224, 0.225]ile normalleştirme.
Hiper parametrelervalid_resize_sizevalid_crop_size eğitim sırasında farklı değerler seçtiyseniz bu değerler kullanılmalıdır.
ONNX modeli için gereken giriş şeklini alın.
batch, channel, height_onnx_crop_size, width_onnx_crop_size = session.get_inputs()[0].shape
batch, channel, height_onnx_crop_size, width_onnx_crop_size
PyTorch olmadan
import glob
import numpy as np
from PIL import Image

def preprocess(image, resize_size, crop_size_onnx):
    """Perform pre-processing on raw input image

    :param image: raw input image
    :type image: PIL image
    :param resize_size: value to resize the image
    :type image: Int
    :param crop_size_onnx: expected height of an input image in onnx model
    :type crop_size_onnx: Int
    :return: pre-processed image in numpy format
    :rtype: ndarray 1xCxHxW
    """

    image = image.convert('RGB')
    # resize
    image = image.resize((resize_size, resize_size))
    #  center  crop
    left = (resize_size - crop_size_onnx)/2
    top = (resize_size - crop_size_onnx)/2
    right = (resize_size + crop_size_onnx)/2
    bottom = (resize_size + crop_size_onnx)/2
    image = image.crop((left, top, right, bottom))

    np_image = np.array(image)
    # HWC -> CHW
    np_image = np_image.transpose(2, 0, 1) # CxHxW
    # normalize the image
    mean_vec = np.array([0.485, 0.456, 0.406])
    std_vec = np.array([0.229, 0.224, 0.225])
    norm_img_data = np.zeros(np_image.shape).astype('float32')
    for i in range(np_image.shape[0]):
        norm_img_data[i,:,:] = (np_image[i,:,:]/255 - mean_vec[i])/std_vec[i]

    np_image = np.expand_dims(norm_img_data, axis=0) # 1xCxHxW
    return np_image

# following code loads only batch_size number of images for demonstrating ONNX inference
# make sure that the data directory has at least batch_size number of images

test_images_path = "automl_models_multi_cls/test_images_dir/*" # replace with path to images
# Select batch size needed
batch_size = 8
# you can modify resize_size based on your trained model
resize_size = 256
# height and width will be the same for classification
crop_size_onnx = height_onnx_crop_size

image_files = glob.glob(test_images_path)
img_processed_list = []
for i in range(batch_size):
    img = Image.open(image_files[i])
    img_processed_list.append(preprocess(img, resize_size, crop_size_onnx))

if len(img_processed_list) > 1:
    img_data = np.concatenate(img_processed_list)
elif len(img_processed_list) == 1:
    img_data = img_processed_list[0]
else:
    img_data = None

assert batch_size == img_data.shape[0]
PyTorch ile
import glob
import torch
import numpy as np
from PIL import Image
from torchvision import transforms

def _make_3d_tensor(x) -> torch.Tensor:
    """This function is for images that have less channels.

    :param x: input tensor
    :type x: torch.Tensor
    :return: return a tensor with the correct number of channels
    :rtype: torch.Tensor
    """
    return x if x.shape[0] == 3 else x.expand((3, x.shape[1], x.shape[2]))

def preprocess(image, resize_size, crop_size_onnx):
    transform = transforms.Compose([
        transforms.Resize(resize_size),
        transforms.CenterCrop(crop_size_onnx),
        transforms.ToTensor(),
        transforms.Lambda(_make_3d_tensor),
        transforms.Normalize([0.485, 0.456, 0.406], [0.229, 0.224, 0.225])])

    img_data = transform(image)
    img_data = img_data.numpy()
    img_data = np.expand_dims(img_data, axis=0)
    return img_data

# following code loads only batch_size number of images for demonstrating ONNX inference
# make sure that the data directory has at least batch_size number of images

test_images_path = "automl_models_multi_cls/test_images_dir/*"  # replace with path to images
# Select batch size needed
batch_size = 8
# you can modify resize_size based on your trained model
resize_size = 256
# height and width will be the same for classification
crop_size_onnx = height_onnx_crop_size

image_files = glob.glob(test_images_path)
img_processed_list = []
for i in range(batch_size):
    img = Image.open(image_files[i])
    img_processed_list.append(preprocess(img, resize_size, crop_size_onnx))

if len(img_processed_list) > 1:
    img_data = np.concatenate(img_processed_list)
elif len(img_processed_list) == 1:
    img_data = img_processed_list[0]
else:
    img_data = None

assert batch_size == img_data.shape[0]
ONNX modeli çıkarımı için aşağıdaki ön işleme adımlarını gerçekleştirin. Bu adımlar çok sınıflı görüntü sınıflandırması için aynıdır.
- Görüntüyü RGB'ye dönüştürün.
- Eğitim sırasında doğrulama veri kümesinin dönüşümünde kullanılan değerlere karşılık gelen ve
valid_resize_size değerlerinin görüntüsünü valid_resize_size yeniden boyutlandırın. için valid_resize_size varsayılan değer 256'dır.
- Ortala resmi ve
height_onnx_crop_sizeolarak width_onnx_crop_size kırpın. Bu, varsayılan değer olan 224'e valid_crop_size karşılık gelir.
-
HxWxC değerini CxHxW olarak değiştirin.
- Float türüne dönüştürün.
- ImageNet'ler
mean = [0.485, 0.456, 0.406] ve std = [0.229, 0.224, 0.225]ile normalleştirme.
Hiper parametrelervalid_resize_sizevalid_crop_size eğitim sırasında farklı değerler seçtiyseniz bu değerler kullanılmalıdır.
ONNX modeli için gereken giriş şeklini alın.
batch, channel, height_onnx_crop_size, width_onnx_crop_size = session.get_inputs()[0].shape
batch, channel, height_onnx_crop_size, width_onnx_crop_size
PyTorch olmadan
import glob
import numpy as np
from PIL import Image

def preprocess(image, resize_size, crop_size_onnx):
    """Perform pre-processing on raw input image

    :param image: raw input image
    :type image: PIL image
    :param resize_size: value to resize the image
    :type image: Int
    :param crop_size_onnx: expected height of an input image in onnx model
    :type crop_size_onnx: Int
    :return: pre-processed image in numpy format
    :rtype: ndarray 1xCxHxW
    """

    image = image.convert('RGB')
    # resize
    image = image.resize((resize_size, resize_size))
    # center  crop
    left = (resize_size - crop_size_onnx)/2
    top = (resize_size - crop_size_onnx)/2
    right = (resize_size + crop_size_onnx)/2
    bottom = (resize_size + crop_size_onnx)/2
    image = image.crop((left, top, right, bottom))

    np_image = np.array(image)
    # HWC -> CHW
    np_image = np_image.transpose(2, 0, 1) # CxHxW

    # normalize the image
    mean_vec = np.array([0.485, 0.456, 0.406])
    std_vec = np.array([0.229, 0.224, 0.225])
    norm_img_data = np.zeros(np_image.shape).astype('float32')
    for i in range(np_image.shape[0]):
        norm_img_data[i,:,:] = (np_image[i,:,:] / 255 - mean_vec[i]) / std_vec[i]
    np_image = np.expand_dims(norm_img_data, axis=0) # 1xCxHxW
    return np_image

# following code loads only batch_size number of images for demonstrating ONNX inference
# make sure that the data directory has at least batch_size number of images

test_images_path = "automl_models_multi_label/test_images_dir/*" # replace with path to images
# Select batch size needed
batch_size = 8
# you can modify resize_size based on your trained model
resize_size = 256
# height and width will be the same for classification
crop_size_onnx = height_onnx_crop_size

image_files = glob.glob(test_images_path)
img_processed_list = []
for i in range(batch_size):
    img = Image.open(image_files[i])
    img_processed_list.append(preprocess(img, resize_size, crop_size_onnx))

if len(img_processed_list) > 1:
    img_data = np.concatenate(img_processed_list)
elif len(img_processed_list) == 1:
    img_data = img_processed_list[0]
else:
    img_data = None

assert batch_size == img_data.shape[0]
PyTorch ile
import glob
import torch
import numpy as np
from PIL import Image
from torchvision import transforms

def _make_3d_tensor(x) -> torch.Tensor:
    """This function is for images that have less channels.

    :param x: input tensor
    :type x: torch.Tensor
    :return: return a tensor with the correct number of channels
    :rtype: torch.Tensor
    """
    return x if x.shape[0] == 3 else x.expand((3, x.shape[1], x.shape[2]))

def preprocess(image, resize_size, crop_size_onnx):
    """Perform pre-processing on raw input image

    :param image: raw input image
    :type image: PIL image
    :param resize_size: value to resize the image
    :type image: Int
    :param crop_size_onnx: expected height of an input image in onnx model
    :type crop_size_onnx: Int
    :return: pre-processed image in numpy format
    :rtype: ndarray 1xCxHxW
    """
    transform = transforms.Compose([
        transforms.Resize(resize_size),
        transforms.CenterCrop(crop_size_onnx),
        transforms.ToTensor(),
        transforms.Lambda(_make_3d_tensor),
        transforms.Normalize([0.485, 0.456, 0.406], [0.229, 0.224, 0.225])])

    img_data = transform(image)
    img_data = img_data.numpy()
    img_data = np.expand_dims(img_data, axis=0)

    return img_data

# following code loads only batch_size number of images for demonstrating ONNX inference
# make sure that the data directory has at least batch_size number of images

test_images_path = "automl_models_multi_label/test_images_dir/*"  # replace with path to images
# Select batch size needed
batch_size = 8
# you can modify resize_size based on your trained model
resize_size = 256
# height and width will be the same for classification
crop_size_onnx = height_onnx_crop_size

image_files = glob.glob(test_images_path)
img_processed_list = []
for i in range(batch_size):
    img = Image.open(image_files[i])
    img_processed_list.append(preprocess(img, resize_size, crop_size_onnx))

if len(img_processed_list) > 1:
    img_data = np.concatenate(img_processed_list)
elif len(img_processed_list) == 1:
    img_data = img_processed_list[0]
else:
    img_data = None

assert batch_size == img_data.shape[0]
Daha Hızlı R-CNN mimarisiyle nesne algılama için, görüntü kırpma dışında görüntü sınıflandırmasıyla aynı ön işleme adımlarını izleyin. Görüntüyü yükseklik 600 ve genişlik 800ile yeniden boyutlandırabilirsiniz. Aşağıdaki kodla beklenen giriş yüksekliğini ve genişliğini alabilirsiniz.
batch, channel, height_onnx, width_onnx = session.get_inputs()[0].shape
batch, channel, height_onnx, width_onnx
Ardından, ön işleme adımlarını gerçekleştirin.
import glob
import numpy as np
from PIL import Image

def preprocess(image, height_onnx, width_onnx):
    """Perform pre-processing on raw input image

    :param image: raw input image
    :type image: PIL image
    :param height_onnx: expected height of an input image in onnx model
    :type height_onnx: Int
    :param width_onnx: expected width of an input image in onnx model
    :type width_onnx: Int
    :return: pre-processed image in numpy format
    :rtype: ndarray 1xCxHxW
    """

    image = image.convert('RGB')
    image = image.resize((width_onnx, height_onnx))
    np_image = np.array(image)
    # HWC -> CHW
    np_image = np_image.transpose(2, 0, 1) # CxHxW
    # normalize the image
    mean_vec = np.array([0.485, 0.456, 0.406])
    std_vec = np.array([0.229, 0.224, 0.225])
    norm_img_data = np.zeros(np_image.shape).astype('float32')
    for i in range(np_image.shape[0]):
        norm_img_data[i,:,:] = (np_image[i,:,:] / 255 - mean_vec[i]) / std_vec[i]
    np_image = np.expand_dims(norm_img_data, axis=0) # 1xCxHxW
    return np_image

# following code loads only batch_size number of images for demonstrating ONNX inference
# make sure that the data directory has at least batch_size number of images

test_images_path = "automl_models_od/test_images_dir/*" # replace with path to images
image_files = glob.glob(test_images_path)
img_processed_list = []
for i in range(batch_size):
    img = Image.open(image_files[i])
    img_processed_list.append(preprocess(img, height_onnx, width_onnx))

if len(img_processed_list) > 1:
    img_data = np.concatenate(img_processed_list)
elif len(img_processed_list) == 1:
    img_data = img_processed_list[0]
else:
    img_data = None

assert batch_size == img_data.shape[0]
YOLO mimarisiyle nesne algılama için, görüntü kırpma dışında görüntü sınıflandırmasıyla aynı ön işleme adımlarını izleyin. Görüntüyü yükseklik 600 ve genişlik 800ile yeniden boyutlandırabilir ve aşağıdaki kodla beklenen giriş yüksekliğini ve genişliğini alabilirsiniz.
batch, channel, height_onnx, width_onnx = session.get_inputs()[0].shape
batch, channel, height_onnx, width_onnx
YOLO için gerekli ön işleme için bkz . yolo_onnx_preprocessing_utils.py.
import glob
import numpy as np
from yolo_onnx_preprocessing_utils import preprocess

# use height and width based on the generated model
test_images_path = "automl_models_od_yolo/test_images_dir/*" # replace with path to images
image_files = glob.glob(test_images_path)
img_processed_list = []
pad_list = []
for i in range(batch_size):
    img_processed, pad = preprocess(image_files[i])
    img_processed_list.append(img_processed)
    pad_list.append(pad)

if len(img_processed_list) > 1:
    img_data = np.concatenate(img_processed_list)
elif len(img_processed_list) == 1:
    img_data = img_processed_list[0]
else:
    img_data = None

assert batch_size == img_data.shape[0]
Önemli
Örnek segmentasyon görevleri için yalnızca Maske R-CNN desteklenir. Ön işleme adımları yalnızca Maske R-CNN'sini temel alır.
ONNX modeli çıkarımı için aşağıdaki ön işleme adımlarını gerçekleştirin:
- Görüntüyü RGB'ye dönüştürün.
- Resmi yeniden boyutlandırın.
-
HxWxC değerini CxHxW olarak değiştirin.
- Float türüne dönüştürün.
- ImageNet'ler
mean = [0.485, 0.456, 0.406] ve std = [0.229, 0.224, 0.225]ile normalleştirme.
ve içinresize_height, R-CNN Maskeleme için ve resize_widthmin_sizemax_size sınırlanmış olarak eğitim sırasında kullandığınız değerleri de kullanabilirsiniz.
import glob
import numpy as np
from PIL import Image

def preprocess(image, resize_height, resize_width):
    """Perform pre-processing on raw input image

    :param image: raw input image
    :type image: PIL image
    :param resize_height: resize height of an input image
    :type resize_height: Int
    :param resize_width: resize width of an input image
    :type resize_width: Int
    :return: pre-processed image in numpy format
    :rtype: ndarray of shape 1xCxHxW
    """

    image = image.convert('RGB')
    image = image.resize((resize_width, resize_height))
    np_image = np.array(image)
    # HWC -> CHW
    np_image = np_image.transpose(2, 0, 1)  # CxHxW
    # normalize the image
    mean_vec = np.array([0.485, 0.456, 0.406])
    std_vec = np.array([0.229, 0.224, 0.225])
    norm_img_data = np.zeros(np_image.shape).astype('float32')
    for i in range(np_image.shape[0]):
        norm_img_data[i,:,:] = (np_image[i,:,:]/255 - mean_vec[i])/std_vec[i]
    np_image = np.expand_dims(norm_img_data, axis=0)  # 1xCxHxW
    return np_image

# following code loads only batch_size number of images for demonstrating ONNX inference
# make sure that the data directory has at least batch_size number of images
# use height and width based on the trained model
# use height and width based on the generated model
test_images_path = "automl_models_is/test_images_dir/*" # replace with path to images
image_files = glob.glob(test_images_path)
img_processed_list = []
for i in range(batch_size):
    img = Image.open(image_files[i])
    img_processed_list.append(preprocess(img, height_onnx, width_onnx))

if len(img_processed_list) > 1:
    img_data = np.concatenate(img_processed_list)
elif len(img_processed_list) == 1:
    img_data = img_processed_list[0]
else:
    img_data = None

assert batch_size == img_data.shape[0]
ONNX Çalışma Zamanı ile çıkarım
ONNX Çalışma Zamanı ile çıkarım, her görüntü işleme görevi için farklılık gösterir.
def get_predictions_from_ONNX(onnx_session, img_data):
    """Perform predictions with ONNX runtime

    :param onnx_session: onnx model session
    :type onnx_session: class InferenceSession
    :param img_data: pre-processed numpy image
    :type img_data: ndarray with shape 1xCxHxW
    :return: scores with shapes
            (1, No. of classes in training dataset)
    :rtype: numpy array
    """

    sess_input = onnx_session.get_inputs()
    sess_output = onnx_session.get_outputs()
    print(f"No. of inputs : {len(sess_input)}, No. of outputs : {len(sess_output)}")
    # predict with ONNX Runtime
    output_names = [ output.name for output in sess_output]
    scores = onnx_session.run(output_names=output_names,\
                                               input_feed={sess_input[0].name: img_data})

    return scores[0]

scores = get_predictions_from_ONNX(session, img_data)
def get_predictions_from_ONNX(onnx_session,img_data):
    """Perform predictions with ONNX runtime

    :param onnx_session: onnx model session
    :type onnx_session: class InferenceSession
    :param img_data: pre-processed numpy image
    :type img_data: ndarray with shape 1xCxHxW
    :return: scores with shapes
            (1, No. of classes in training dataset)
    :rtype: numpy array
    """

    sess_input = onnx_session.get_inputs()
    sess_output = onnx_session.get_outputs()
    print(f"No. of inputs : {len(sess_input)}, No. of outputs : {len(sess_output)}")
    # predict with ONNX Runtime
    output_names = [ output.name for output in sess_output]
    scores = onnx_session.run(output_names=output_names,\
                                               input_feed={sess_input[0].name: img_data})

    return scores[0]

scores = get_predictions_from_ONNX(session, img_data)
def get_predictions_from_ONNX(onnx_session, img_data):
    """perform predictions with ONNX runtime

    :param onnx_session: onnx model session
    :type onnx_session: class InferenceSession
    :param img_data: pre-processed numpy image
    :type img_data: ndarray with shape 1xCxHxW
    :return: boxes, labels , scores
            (No. of boxes, 4) (No. of boxes,) (No. of boxes,)
    :rtype: tuple
    """

    sess_input = onnx_session.get_inputs()
    sess_output = onnx_session.get_outputs()

    # predict with ONNX Runtime
    output_names = [output.name for output in sess_output]
    predictions = onnx_session.run(output_names=output_names,\
                                               input_feed={sess_input[0].name: img_data})

    return output_names, predictions

output_names, predictions = get_predictions_from_ONNX(session, img_data)
def get_predictions_from_ONNX(onnx_session,img_data):
    """perform predictions with ONNX Runtime

    :param onnx_session: onnx model session
    :type onnx_session: class InferenceSession
    :param img_data: pre-processed numpy image
    :type img_data: ndarray with shape 1xCxHxW
    :return: boxes, labels , scores
    :rtype: list
    """
    sess_input = onnx_session.get_inputs()
    sess_output = onnx_session.get_outputs()
    # predict with ONNX Runtime
    output_names = [ output.name for output in sess_output]
    pred = onnx_session.run(output_names=output_names,\
                                               input_feed={sess_input[0].name: img_data})
    return pred[0]

result = get_predictions_from_ONNX(session, img_data)
Örnek segmentasyon modeli kutuları, etiketleri, puanları ve maskeleri tahmin eder. ONNX, ilgili sınırlayıcı kutular ve sınıf güvenilirlik puanıyla birlikte örnek başına tahmin edilen bir maske çıkışı oluşturur. Gerekirse ikili maskeden çokgene dönüştürmeniz gerekebilir.
def get_predictions_from_ONNX(onnx_session, img_data):
    """Perform predictions with ONNX runtime

    :param onnx_session: onnx model session
    :type onnx_session: class InferenceSession
    :param img_data: pre-processed numpy image
    :type img_data: ndarray with shape 1xCxHxW
    :return: boxes, labels , scores , masks with shapes
            (No. of instances, 4) (No. of instances,) (No. of instances,)
            (No. of instances, 1, HEIGHT, WIDTH))
    :rtype: tuple
    """

    sess_input = onnx_session.get_inputs()
    sess_output = onnx_session.get_outputs()
    # predict with ONNX Runtime
    output_names = [ output.name for output in sess_output]
    predictions = onnx_session.run(output_names=output_names,\
                                               input_feed={sess_input[0].name: img_data})
    return output_names, predictions

output_names, predictions = get_predictions_from_ONNX(session, img_data)
İşlem sonrası
Her sınıf için sınıflandırma güvenilirlik puanlarını (olasılıklar) almak için tahmin edilen değerlere uygulayın softmax() . Daha sonra tahmin, en yüksek olasılığı olan sınıf olacaktır.
PyTorch olmadan
def softmax(x):
    e_x = np.exp(x - np.max(x, axis=1, keepdims=True))
    return e_x / np.sum(e_x, axis=1, keepdims=True)

conf_scores = softmax(scores)
class_preds = np.argmax(conf_scores, axis=1)
print("predicted classes:", ([(class_idx, classes[class_idx]) for class_idx in class_preds]))
PyTorch ile
conf_scores = torch.nn.functional.softmax(torch.from_numpy(scores), dim=1)
class_preds = torch.argmax(conf_scores, dim=1)
print("predicted classes:", ([(class_idx.item(), classes[class_idx]) for class_idx in class_preds]))
Bu adım, çok sınıflı sınıflandırmadan farklıdır. Çok etiketli görüntü sınıflandırmasına ilişkin güvenilirlik puanlarını almak için logit'lere (ONNX çıkışı) uygulamanız sigmoid gerekir.
PyTorch olmadan
def sigmoid(x):
    return 1 / (1 + np.exp(-x))

# we apply a threshold of 0.5 on confidence scores
score_threshold = 0.5
conf_scores = sigmoid(scores)
image_wise_preds = np.where(conf_scores > score_threshold)
for image_idx, class_idx in zip(image_wise_preds[0], image_wise_preds[1]):
    print('image: {}, class_index: {}, class_name: {}'.format(image_files[image_idx], class_idx, classes[class_idx]))
PyTorch ile
# we apply a threshold of 0.5 on confidence scores
score_threshold = 0.5
conf_scores = torch.sigmoid(torch.from_numpy(scores))
image_wise_preds = torch.where(conf_scores > score_threshold)
for image_idx, class_idx in zip(image_wise_preds[0], image_wise_preds[1]):
    print('image: {}, class_index: {}, class_name: {}'.format(image_files[image_idx], class_idx, classes[class_idx]))
Çok sınıflı ve çok etiketli sınıflandırma için, AutoML'de desteklenen tüm model mimarileri için daha önce bahsedilen adımların aynısını izleyebilirsiniz.
Nesne algılama için tahminler , ölçeğinde height_onnxotomatik olarak kullanılır width_onnx. Tahmin edilen kutu koordinatlarını özgün boyutlara dönüştürmek için aşağıdaki hesaplamaları uygulayabilirsiniz.
- Xmin * original_width/width_onnx
- Ymin * original_height/height_onnx
- Xmax * orijinal_genişlik/genişlik_onnx
- Ymax * original_height/height_onnx
Bir diğer seçenek de kutu boyutlarını [0, 1] aralığında olacak şekilde ölçeklendirmek için aşağıdaki kodu kullanmaktır. Bunu yapmak, kutu koordinatlarının özgün görüntü boyutlarındaki kutuları almak için ilgili koordinatlarla (tahminleri görselleştirme bölümünde açıklandığı gibi) özgün görüntüler yüksekliği ve genişliğiyle çarpılmasını sağlar.
def _get_box_dims(image_shape, box):
    box_keys = ['topX', 'topY', 'bottomX', 'bottomY']
    height, width = image_shape[0], image_shape[1]

    box_dims = dict(zip(box_keys, [coordinate.item() for coordinate in box]))

    box_dims['topX'] = box_dims['topX'] * 1.0 / width
    box_dims['bottomX'] = box_dims['bottomX'] * 1.0 / width
    box_dims['topY'] = box_dims['topY'] * 1.0 / height
    box_dims['bottomY'] = box_dims['bottomY'] * 1.0 / height

    return box_dims

def _get_prediction(boxes, labels, scores, image_shape, classes):
    bounding_boxes = []
    for box, label_index, score in zip(boxes, labels, scores):
        box_dims = _get_box_dims(image_shape, box)

        box_record = {'box': box_dims,
                      'label': classes[label_index],
                      'score': score.item()}

        bounding_boxes.append(box_record)

    return bounding_boxes

# Filter the results with threshold.
# Please replace the threshold for your test scenario.
score_threshold = 0.8
filtered_boxes_batch = []
for batch_sample in range(0, batch_size*3, 3):
    # in case of retinanet change the order of boxes, labels, scores to boxes, scores, labels
    # confirm the same from order of boxes, labels, scores output_names
    boxes, labels, scores = predictions[batch_sample], predictions[batch_sample + 1], predictions[batch_sample + 2]
    bounding_boxes = _get_prediction(boxes, labels, scores, (height_onnx, width_onnx), classes)
    filtered_bounding_boxes = [box for box in bounding_boxes if box['score'] >= score_threshold]
    filtered_boxes_batch.append(filtered_bounding_boxes)
Aşağıdaki kod kutular, etiketler ve puanlar oluşturur. Bu sınırlayıcı kutu ayrıntılarını kullanarak Daha Hızlı R-CNN modeli için gerçekleştirdiğiniz işlem sonrası adımların aynısını gerçekleştirin.
from yolo_onnx_preprocessing_utils import non_max_suppression, _convert_to_rcnn_output

result_final = non_max_suppression(
    torch.from_numpy(result),
    conf_thres=0.1,
    iou_thres=0.5)

def _get_box_dims(image_shape, box):
    box_keys = ['topX', 'topY', 'bottomX', 'bottomY']
    height, width = image_shape[0], image_shape[1]

    box_dims = dict(zip(box_keys, [coordinate.item() for coordinate in box]))

    box_dims['topX'] = box_dims['topX'] * 1.0 / width
    box_dims['bottomX'] = box_dims['bottomX'] * 1.0 / width
    box_dims['topY'] = box_dims['topY'] * 1.0 / height
    box_dims['bottomY'] = box_dims['bottomY'] * 1.0 / height

    return box_dims

def _get_prediction(label, image_shape, classes):

    boxes = np.array(label["boxes"])
    labels = np.array(label["labels"])
    labels = [label[0] for label in labels]
    scores = np.array(label["scores"])
    scores = [score[0] for score in scores]

    bounding_boxes = []
    for box, label_index, score in zip(boxes, labels, scores):
        box_dims = _get_box_dims(image_shape, box)

        box_record = {'box': box_dims,
                      'label': classes[label_index],
                      'score': score.item()}

        bounding_boxes.append(box_record)

    return bounding_boxes

bounding_boxes_batch = []
for result_i, pad in zip(result_final, pad_list):
    label, image_shape = _convert_to_rcnn_output(result_i, height_onnx, width_onnx, pad)
    bounding_boxes_batch.append(_get_prediction(label, image_shape, classes))
print(json.dumps(bounding_boxes_batch, indent=1))
Daha Hızlı R-CNN için belirtilen adımları kullanabilir (R-CNN Maskeleme durumunda her örnekte dört öğe kutusu, etiket, puan, maske bulunur) veya örnek segmentasyonu için tahminleri görselleştirme bölümüne bakabilirsiniz.
Tahminleri görselleştirme
Giriş görüntüsünü etiketlerle görselleştirin.
import matplotlib.image as mpimg
import matplotlib.pyplot as plt
%matplotlib inline

sample_image_index = 0 # change this for an image of interest from image_files list
IMAGE_SIZE = (18, 12)
plt.figure(figsize=IMAGE_SIZE)
img_np = mpimg.imread(image_files[sample_image_index])

img = Image.fromarray(img_np.astype('uint8'), 'RGB')
x, y = img.size

fig,ax = plt.subplots(1, figsize=(15, 15))
# Display the image
ax.imshow(img_np)

label = class_preds[sample_image_index]
if torch.is_tensor(label):
    label = label.item()

conf_score = conf_scores[sample_image_index]
if torch.is_tensor(conf_score):
    conf_score = np.max(conf_score.tolist())
else:
    conf_score = np.max(conf_score)

display_text = '{} ({})'.format(label, round(conf_score, 3))
print(display_text)

color = 'red'
plt.text(30, 30, display_text, color=color, fontsize=30)

plt.show()
Giriş görüntüsünü etiketlerle görselleştirin.
import matplotlib.image as mpimg
import matplotlib.pyplot as plt
%matplotlib inline

sample_image_index = 0 # change this for an image of interest from image_files list
IMAGE_SIZE = (18, 12)
plt.figure(figsize=IMAGE_SIZE)
img_np = mpimg.imread(image_files[sample_image_index])
img = Image.fromarray(img_np.astype('uint8'), 'RGB')
x, y = img.size

fig,ax = plt.subplots(1, figsize=(15, 15))
# Display the image
ax.imshow(img_np)
# we apply a threshold of 0.5 on confidence scores
score_threshold = 0.5
label_offset_x = 30
label_offset_y = 30
if torch.is_tensor(conf_scores):
    sample_image_scores = conf_scores[sample_image_index].tolist()
else:
    sample_image_scores = conf_scores[sample_image_index]

for index, score in enumerate(sample_image_scores):
    if score > score_threshold:
        label = classes[index]
        display_text = '{} ({})'.format(label, round(score, 3))
        print(display_text)

        color = 'red'
        plt.text(label_offset_x, label_offset_y, display_text, color=color, fontsize=30)
        label_offset_y += 30

plt.show()
Giriş görüntüsünü kutular ve etiketlerle görselleştirin.
import matplotlib.image as mpimg
import matplotlib.patches as patches
import matplotlib.pyplot as plt
%matplotlib inline

img_np = mpimg.imread(image_files[1])  # replace with desired image index
image_boxes = filtered_boxes_batch[1]  # replace with desired image index

IMAGE_SIZE = (18, 12)
plt.figure(figsize=IMAGE_SIZE)
img = Image.fromarray(img_np.astype('uint8'), 'RGB')
x, y = img.size
print(img.size)

fig,ax = plt.subplots(1)
# Display the image
ax.imshow(img_np)

# Draw box and label for each detection
for detect in image_boxes:
    label = detect['label']
    box = detect['box']
    ymin, xmin, ymax, xmax =  box['topY'], box['topX'], box['bottomY'], box['bottomX']
    topleft_x, topleft_y = x * xmin, y * ymin
    width, height = x * (xmax - xmin), y * (ymax - ymin)
    print('{}: {}, {}, {}, {}'.format(detect['label'], topleft_x, topleft_y, width, height))
    rect = patches.Rectangle((topleft_x, topleft_y), width, height,
                             linewidth=1, edgecolor='green', facecolor='none')

    ax.add_patch(rect)
    color = 'green'
    plt.text(topleft_x, topleft_y, label, color=color)

plt.show()
Giriş görüntüsünü kutular ve etiketlerle görselleştirin.
import matplotlib.image as mpimg
import matplotlib.patches as patches
import matplotlib.pyplot as plt
%matplotlib inline

img_np = mpimg.imread(image_files[1])  # replace with desired image index
image_boxes = bounding_boxes_batch[1]  # replace with desired image index

IMAGE_SIZE = (18, 12)
plt.figure(figsize=IMAGE_SIZE)
img = Image.fromarray(img_np.astype('uint8'), 'RGB')
x, y = img.size
print(img.size)

fig,ax = plt.subplots(1)
# Display the image
ax.imshow(img_np)

# Draw box and label for each detection
for detect in image_boxes:
    label = detect['label']
    box = detect['box']
    ymin, xmin, ymax, xmax =  box['topY'], box['topX'], box['bottomY'], box['bottomX']
    topleft_x, topleft_y = x * xmin, y * ymin
    width, height = x * (xmax - xmin), y * (ymax - ymin)
    print('{}: {}, {}, {}, {}'.format(detect['label'], topleft_x, topleft_y, width, height))
    rect = patches.Rectangle((topleft_x, topleft_y), width, height,
                             linewidth=1, edgecolor='green', facecolor='none')

    ax.add_patch(rect)
    color = 'green'
    plt.text(topleft_x, topleft_y, label, color=color)

plt.show()
Örnek giriş görüntüsünü maskeler ve etiketlerle görselleştirin.
import matplotlib.patches as patches
import matplotlib.pyplot as plt
%matplotlib inline

def display_detections(image, boxes, labels, scores, masks, resize_height,
                       resize_width, classes, score_threshold):
    """Visualize boxes and masks

    :param image: raw image
    :type image: PIL image
    :param boxes: box with shape (No. of instances, 4)
    :type boxes: ndarray
    :param labels: classes with shape (No. of instances,)
    :type labels: ndarray
    :param scores: scores with shape (No. of instances,)
    :type scores: ndarray
    :param masks: masks with shape (No. of instances, 1, HEIGHT, WIDTH)
    :type masks:  ndarray
    :param resize_height: expected height of an input image in onnx model
    :type resize_height: Int
    :param resize_width: expected width of an input image in onnx model
    :type resize_width: Int
    :param classes: classes with shape (No. of classes)
    :type classes:  list
    :param score_threshold: threshold on scores in the range of 0-1
    :type score_threshold: float
    :return: None
    """

    _, ax = plt.subplots(1, figsize=(12,9))

    image = np.array(image)
    original_height = image.shape[0]
    original_width = image.shape[1]

    for mask, box, label, score in zip(masks, boxes, labels, scores):
        if score <= score_threshold:
            continue
        mask = mask[0, :, :, None]
        # resize boxes to original raw input size
        box = [box[0]*original_width/resize_width,
               box[1]*original_height/resize_height,
               box[2]*original_width/resize_width,
               box[3]*original_height/resize_height]

        mask = cv2.resize(mask, (image.shape[1], image.shape[0]), 0, 0, interpolation = cv2.INTER_NEAREST)
        # mask is a matrix with values in the range of [0,1]
        # higher values indicate presence of object and vice versa
        # select threshold or cut-off value to get objects present
        mask = mask > score_threshold
        image_masked = image.copy()
        image_masked[mask] = (0, 255, 255)
        alpha = 0.5  # alpha blending with range 0 to 1
        cv2.addWeighted(image_masked, alpha, image, 1 - alpha,0, image)
        rect = patches.Rectangle((box[0], box[1]), box[2] - box[0], box[3] - box[1],\
                                 linewidth=1, edgecolor='b', facecolor='none')
        ax.annotate(classes[label] + ':' + str(np.round(score, 2)), (box[0], box[1]),\
                    color='w', fontsize=12)
        ax.add_patch(rect)

    ax.imshow(image)
    plt.show()

score_threshold = 0.5
img = Image.open(image_files[1])  # replace with desired image index
image_boxes = filtered_boxes_batch[1]  # replace with desired image index
boxes, labels, scores, masks = predictions[4:8]  # replace with desired image index
display_detections(img, boxes.copy(), labels, scores, masks.copy(),
                   height_onnx, width_onnx, classes, score_threshold)
Sonraki adımlar